Decentraland Developer Tutorial: Build Your First Interactive Scene Using the SDK
Learn how to use the SDK to build a dynamic, interactive scene that responds to user-generated events

Most people use virtual worlds for what’s called “dollhousing”, or gathering a bunch of stuff that looks nice or says something about you, and then showing it off to other users. However, the Decentraland SDK has so much more to offer.
My name is Nicolas Earnshaw, and I take care of the Decentraland documentation, that means everything you can find in docs.decentraland.org. If you have any feedback on our docs, please make a pull request or create an issue on the docs GitHub repo!
In this article I want to teach you how to make a basic Decentraland scene interactive. I want to keep it very simple. We’re not going to create a fully-fledged game, just something that responds to user interaction in basic ways.
As you read along, you can check out the source code for the scene, or follow along and create your own scene from scratch. While all of the concepts I’ll cover apply to games, I want to showcase them in a less technically ambitious scene. I’ll leave that for future posts.
For today’s post, we’ll build something closer to interactive art than to a game; picture a virtual equivalent of the kind of installation you find in modern, trendy museums accompanied by confusing descriptions with the words “embodied” and “human condition”.
To deal with interactive scenes, there are two key concepts that we need to cover: events and the scene’s state.
Events represent things that happen. They are typically things that the user does, like click on an entity or walk around the scene.
The scene state is the current condition of the scene at any given time, represented as a set of variables that may change over time, usually in response to events.
Build your scene
If you’re building your own scene as you read, you should already have created your first scene, and have the default Hello World scene already built up.
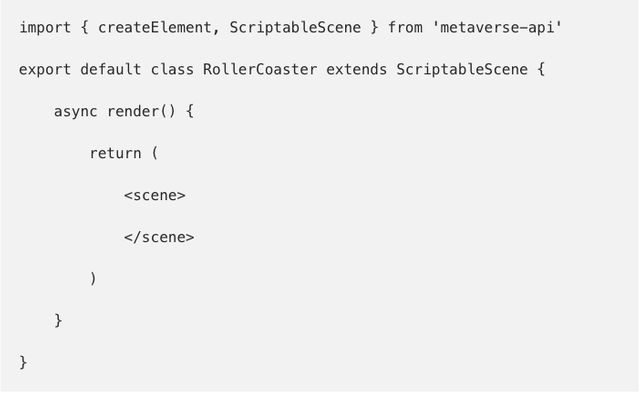
If you open the scene.tsx file, you’ll note that it contains a basic sample scene. Delete everything in it so that you’re left with the bare essentials:
Respond to clicks
Let’s start out with an easy use case: the user clicks somewhere, creating an event. The event triggers a function that changes the scene state, and the new scene state causes the scene to be rendered with visible differences.
I’m still not sure what I want to do with my sample scene, but I know I want to do something artistic. So, let’s start by building a pedestal to display some sort of virtual sculpture.
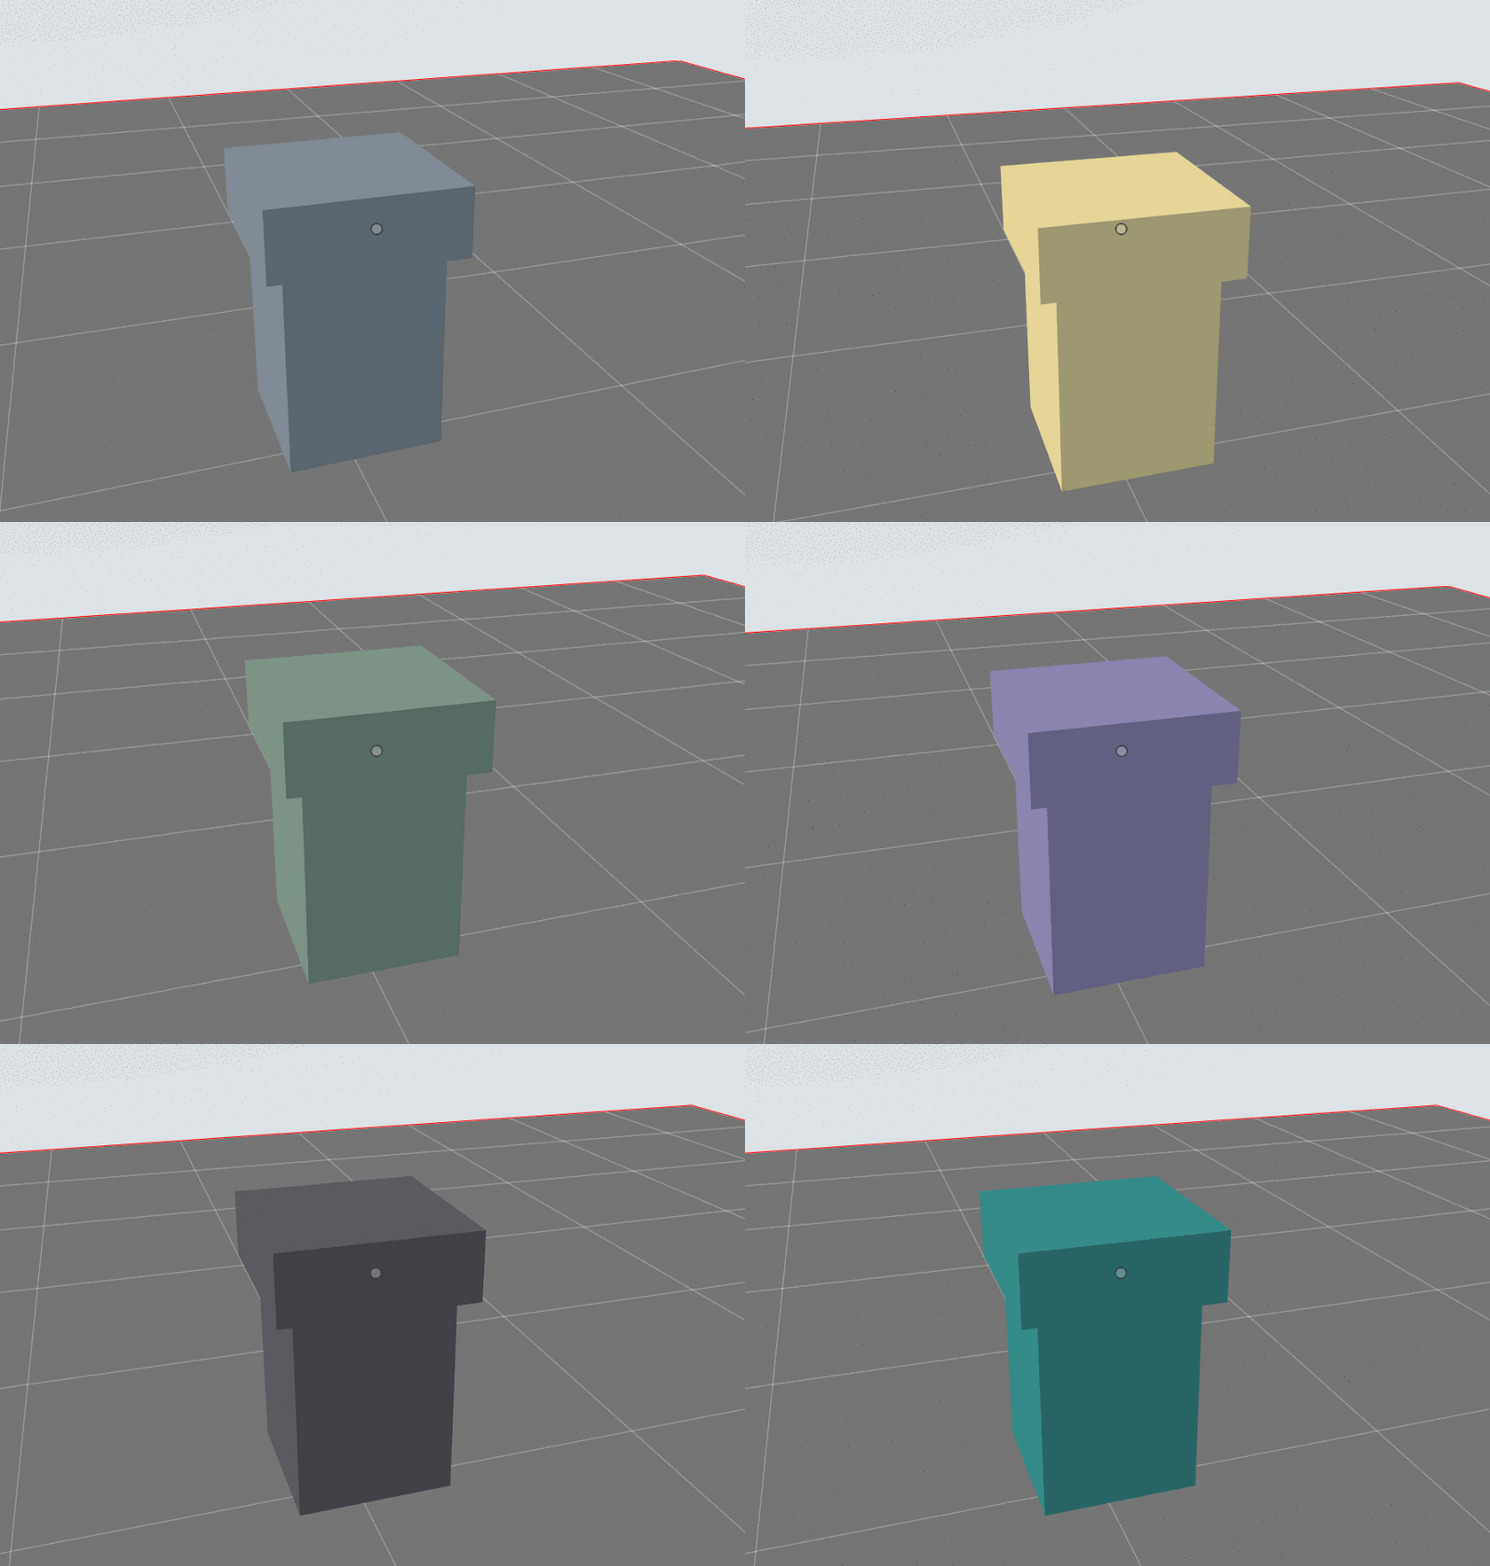
We want to make our art exhibit interactive, so let’s have the pedestal change color when the user clicks on it.
First, we need to take care of three things:
Define a scene state that includes a variable that represents the pedestal’s color and keeps track of its changes.
Place a pedestal entity in the scene, and set its color to reference the variable in the scene state.
Change the variable’s value in the scene state every time that the user clicks on the pedestal, randomly choosing from a list some predefined colors.
We’ll now define a scene state. So far, the only thing we need to keep track of in the scene is the color of the pedestal, so we’ll declare that as our only variable, giving it an initial color of grey (expressed as a hexadecimal value).

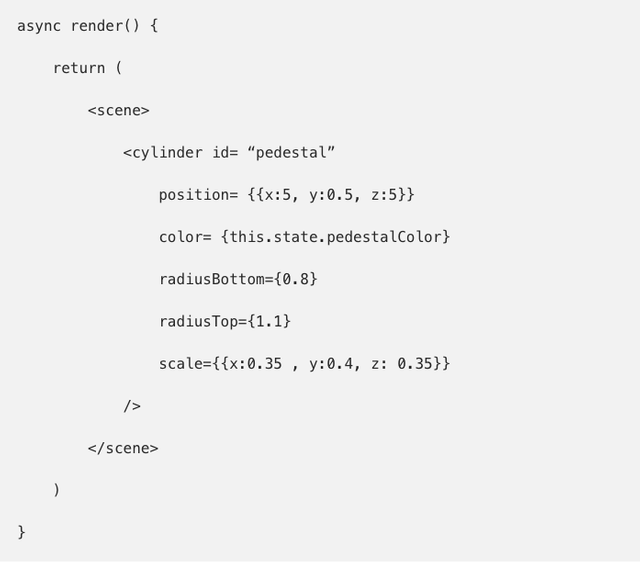
Nice going! So far, this variable still doesn’t manifest itself in our scene in any visible way. We’ll create our pedestal as a simple cylinder entity, and we’ll set the pedestal’s color to reference the pedestalColor variable we created in the scene’s state.
We’ll define an array of color values that we can randomly choose from in the .tsx file, but this will sit outside the definition of our custom scene class, that way it can be referenced from anywhere in the file.

Using this array, we can choose a color by referring to a position in the array, which will be very handy later on when we pick colors by generating a random number.
The final thing our sample needs is a way for the value of pedestalColor to change, otherwise the scene isn’t really interactive, is it? To do that, we initiate an eventSubscriber so that it carries out an asynchronous function whenever an event of type pedestal_click occurs.
Since we want this eventSubscriber to start listening for click events as soon as our scene is loaded, we initiate it as part of the sceneDidMount function; this function is called only once, when the scene is ready to be shown to the user.
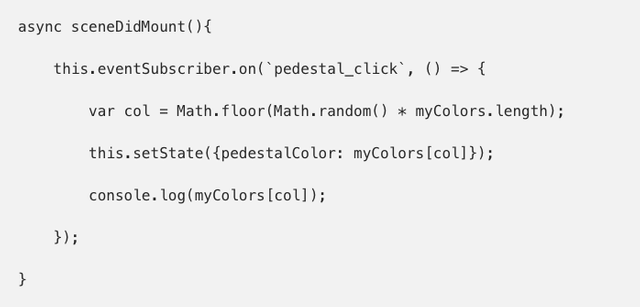
Since the id of the clicked entity is pedestal, the click event is named pedestal_clicked. We don’t need to define this event name anywhere, the SDK generates it automatically based on the entity id.
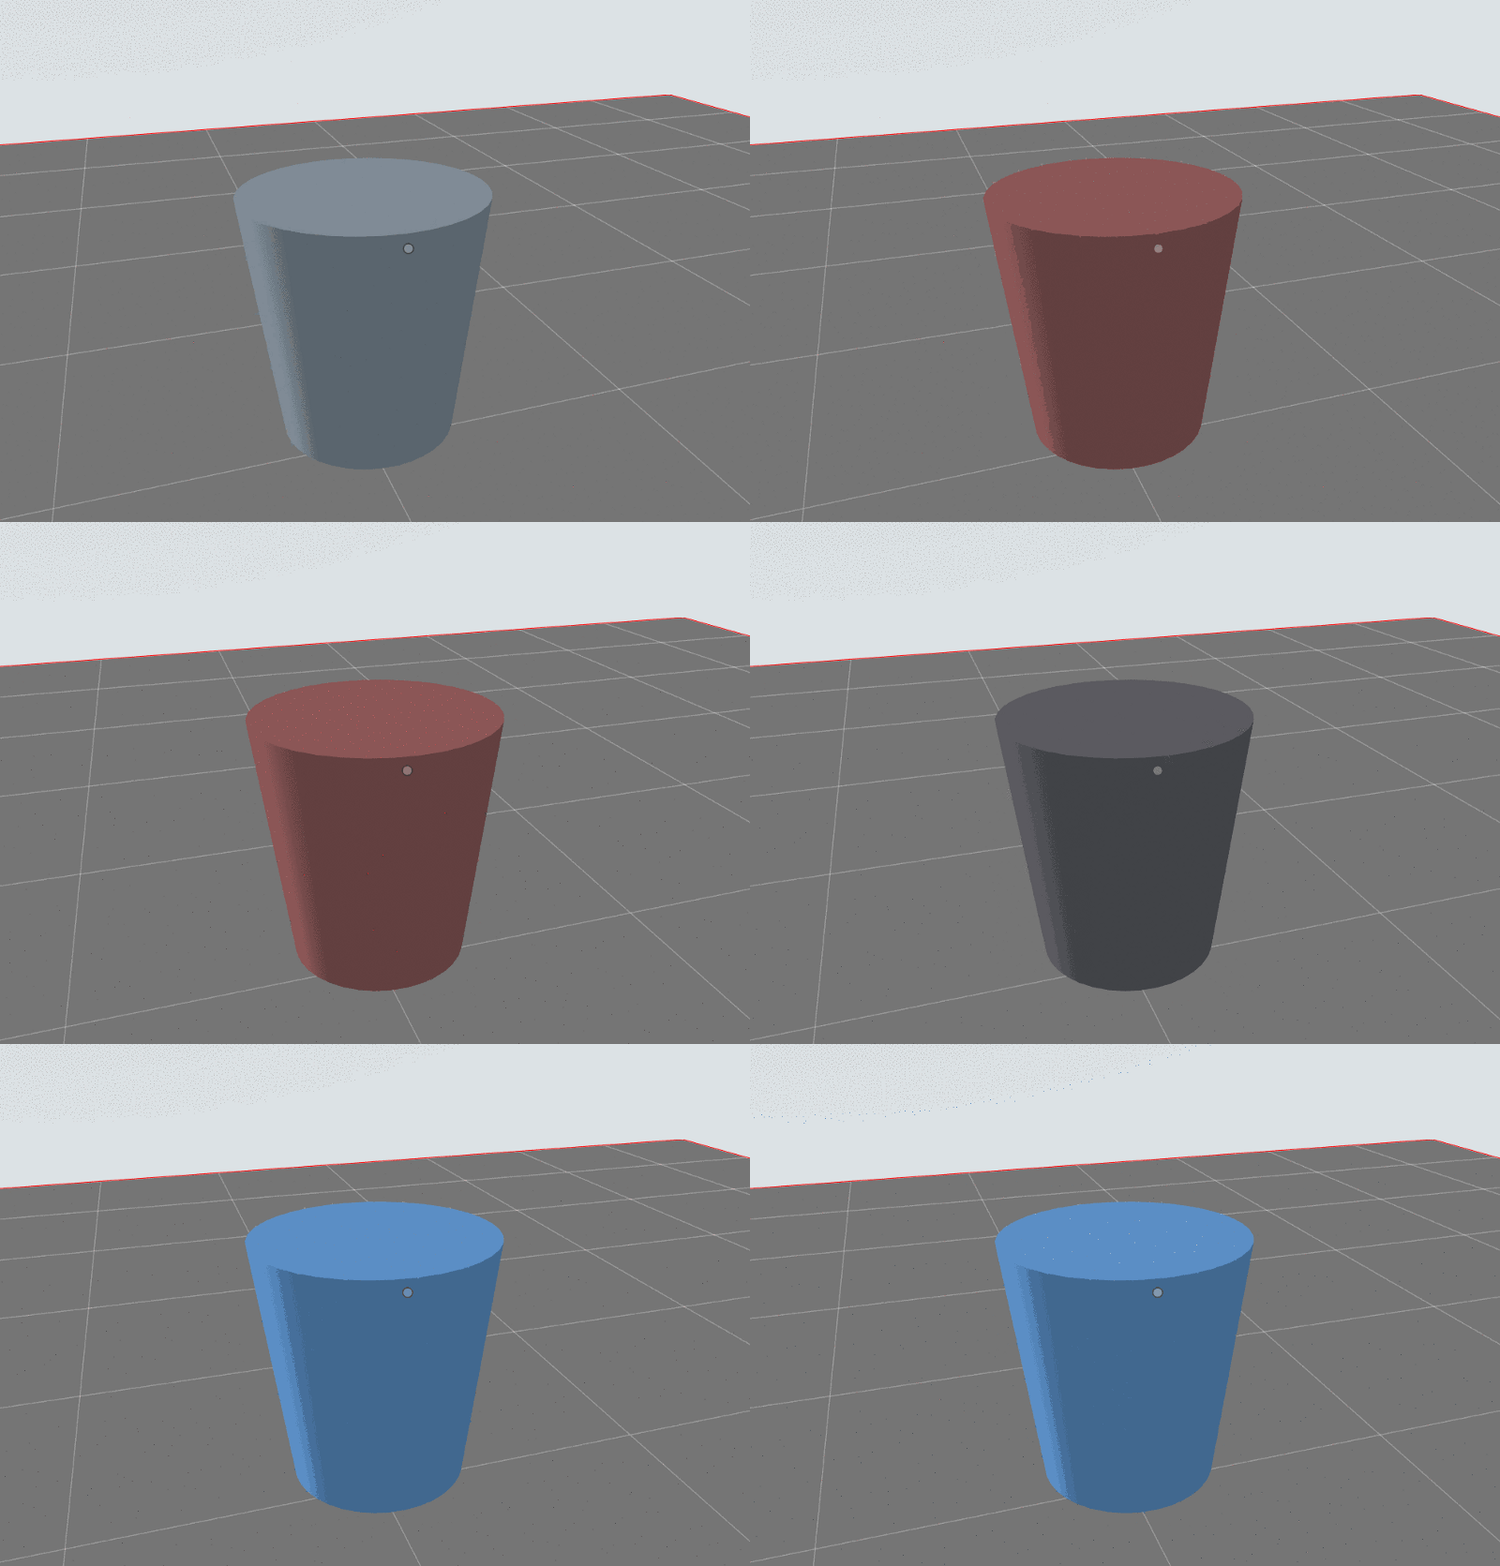
Now is a good time to run a preview of your scene.
Start your preview by running dcl preview in your terminal or command prompt. Every time you click on the pedestal, the pedestalColor variable changes. Each time something changes in the scene state, the scene is rendered again using the new values of the scene state.
We added a console.log(myColors[col]) statement to the function that changes the pedestal’s color. Logging messages is a good way to gain insight into your code in case it doesn’t behave as expected. This is especially handy when you’re dealing with things that are invisible, like the scene state or events.
To view the logged messages while running a preview of your scene, you need to look at your browser’s JavaScript console, which you can open in the developer settings of your browser. You should see the hexadecimal values of the colors printed out as they change.
Optional: build a fancier pedestal
The SDK lets us add several types of entities with basic shapes, what are commonly called primitives, but we can also define our own custom entity types. If we want our pedestal to be made up of a combination of several shapes but still behave as a single entity, we can define a custom “pedestal” type and add that instead.
To do this, create a new file called pedestal.tsx, preferably in a folder named /src in your scene. Then, add the following code, which defines a pedestal as two box entities in relative positions to a base entity. The code also defines an interface for our new type, this determines what parameters can be passed to the entity to customize it.
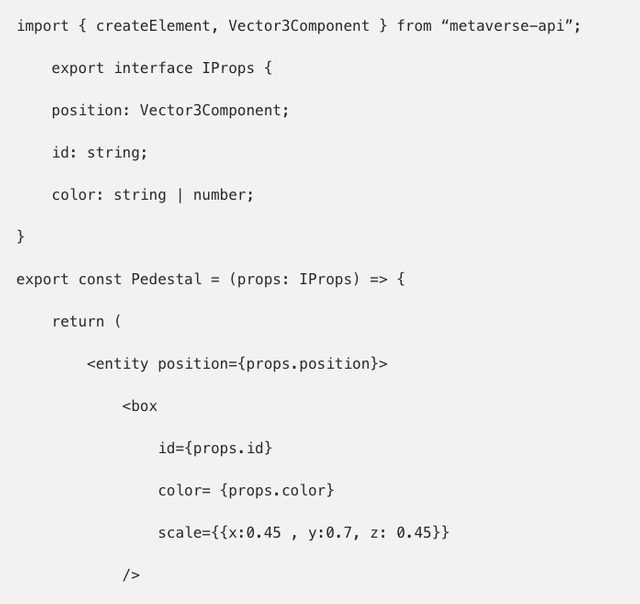
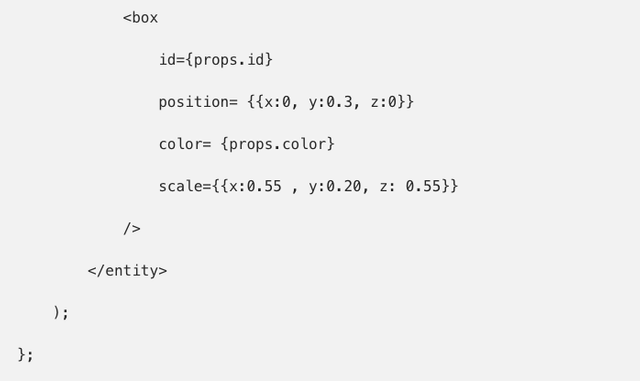
We need to add an invisible entity to wrap our two box entities, this is because type definitions need to generate a single root entity. We can’t have two loose box entities at root level, they have to be children of a single parent.
Also note that the way in which we set the color of the entities has changed. This is because we’re no longer writing in the scene.tsx file, so we can’t refer to the scene state directly. The expression this.state.pedestalColor is no longer valid because the word this no longer refers to the scene object, it refers to the instance of the pedestal entity.
To access information from pedestalColor in the scene state, we need to pass its value to a color property that belongs to the instance of the pedestal entity, then we use it to set the color of the boxes through the expression props.color. This might make more sense when you see how we add the pedestal entity to the scene.
Back in our main scene.tsx file, we need to import the Pedestal type from the file we just created, otherwise our scene won’t even know that it exists.

Instead of adding a cylinder as we did before, we now add an object of type Pedestal, and set values for the properties we defined in its interface.
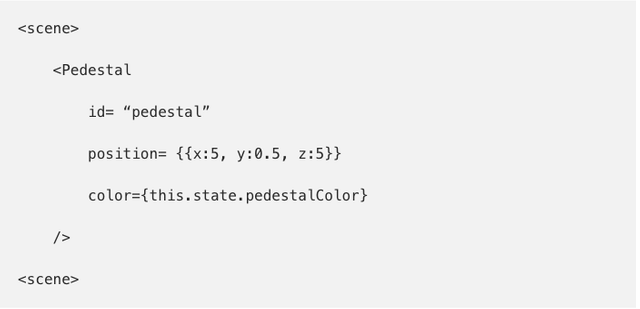
Note that you can only set parameters that you defined in the interface of your custom type, in this case: id, position, and color. If we want to make our pedestal type more adaptable, we could add more properties to the interface like rotation and scale. Also note that we’re passing the value of this.state.pedestalColor to the entity’s property color. This value is updated each time the scene state changes.
Add looping animations
Now it’s time to put something on that pedestal and have it slowly spin in circles so that we can better admire it. Google Poly is full of free models you can use. Many are available as .glTF files that you can import directly into a Decentraland scene. I found this adorable work of art and instantly fell in love with how …special it is (thanks Will Thompson for uploading it with a free licence!).

Most low-poly meshes that you download from Google Poly can be uploaded directly into a Decentraland scene, but with this one I ran into a problem: it had an extremely large number of vertices (over 12,000). Most of these vertices were not even visible, as it was all made from many overlapping spheres.
Since I really really wanted to use this model, I imported it into Blender and simplified its structure, without compromising its beauty. I used the BoolTool Blender add-on to remove all the internal faces of the model, then I used the decimate modifier to simplify its geometry. Finally, I exported the model back to a glTF file.
The code for getting this model to rotate in your scene is similar to what we used for clicking the pedestal:
Add a new variable to the scene’s state that represents the dog’s current rotation.
Place an entity in the scene for the dog model and set its rotation to reference that variable you just created.
Change the value of the variable at a regular interval.
Here’s the new scene state, including the variable that represents the dog’s rotation.

In the sceneDidMount function, the same place where we initiated the click event listener, we can initiate the rotation of the dog. We do this by adding a setInterval statement, this performs a function regularly at a given interval.
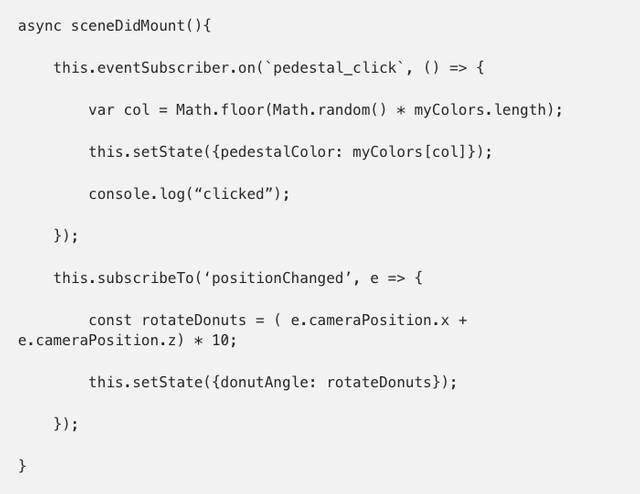
This function changes the dogAngle variable in the scene state every 100 milliseconds. It doesn’t matter if the value of dogAngle ends up rising well above 360, its values will keep being interpreted as a rotation.
Finally, we’ll add our precious dog to the render() function, positioned on top of the pedestal:
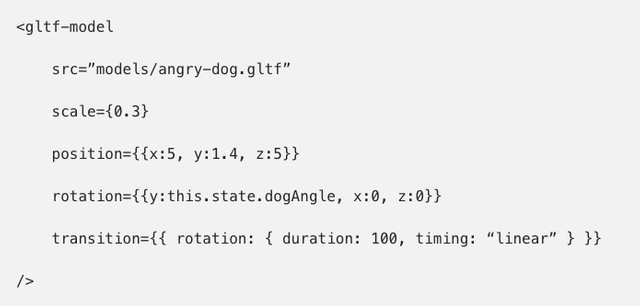
Note that the y axis of the rotation references the new variable we added to the scene state, we don’t care about rotating it along the x or z axis so those values are set to 0.
We also added a rotation transition to the entity, transitions make changes occur smoothly. If you comment out the line in the code where we add the transition, you’ll notice that the rotation works, but it looks jumpy. That’s because we’re updating the scene state at a rate which is different from the frames per second at which the scene is being rendered. A transition guarantees that the dog will rotate smoothly. Notice that the duration we set for the transition (100 milliseconds) matches the interval at which the rotation is being updated.
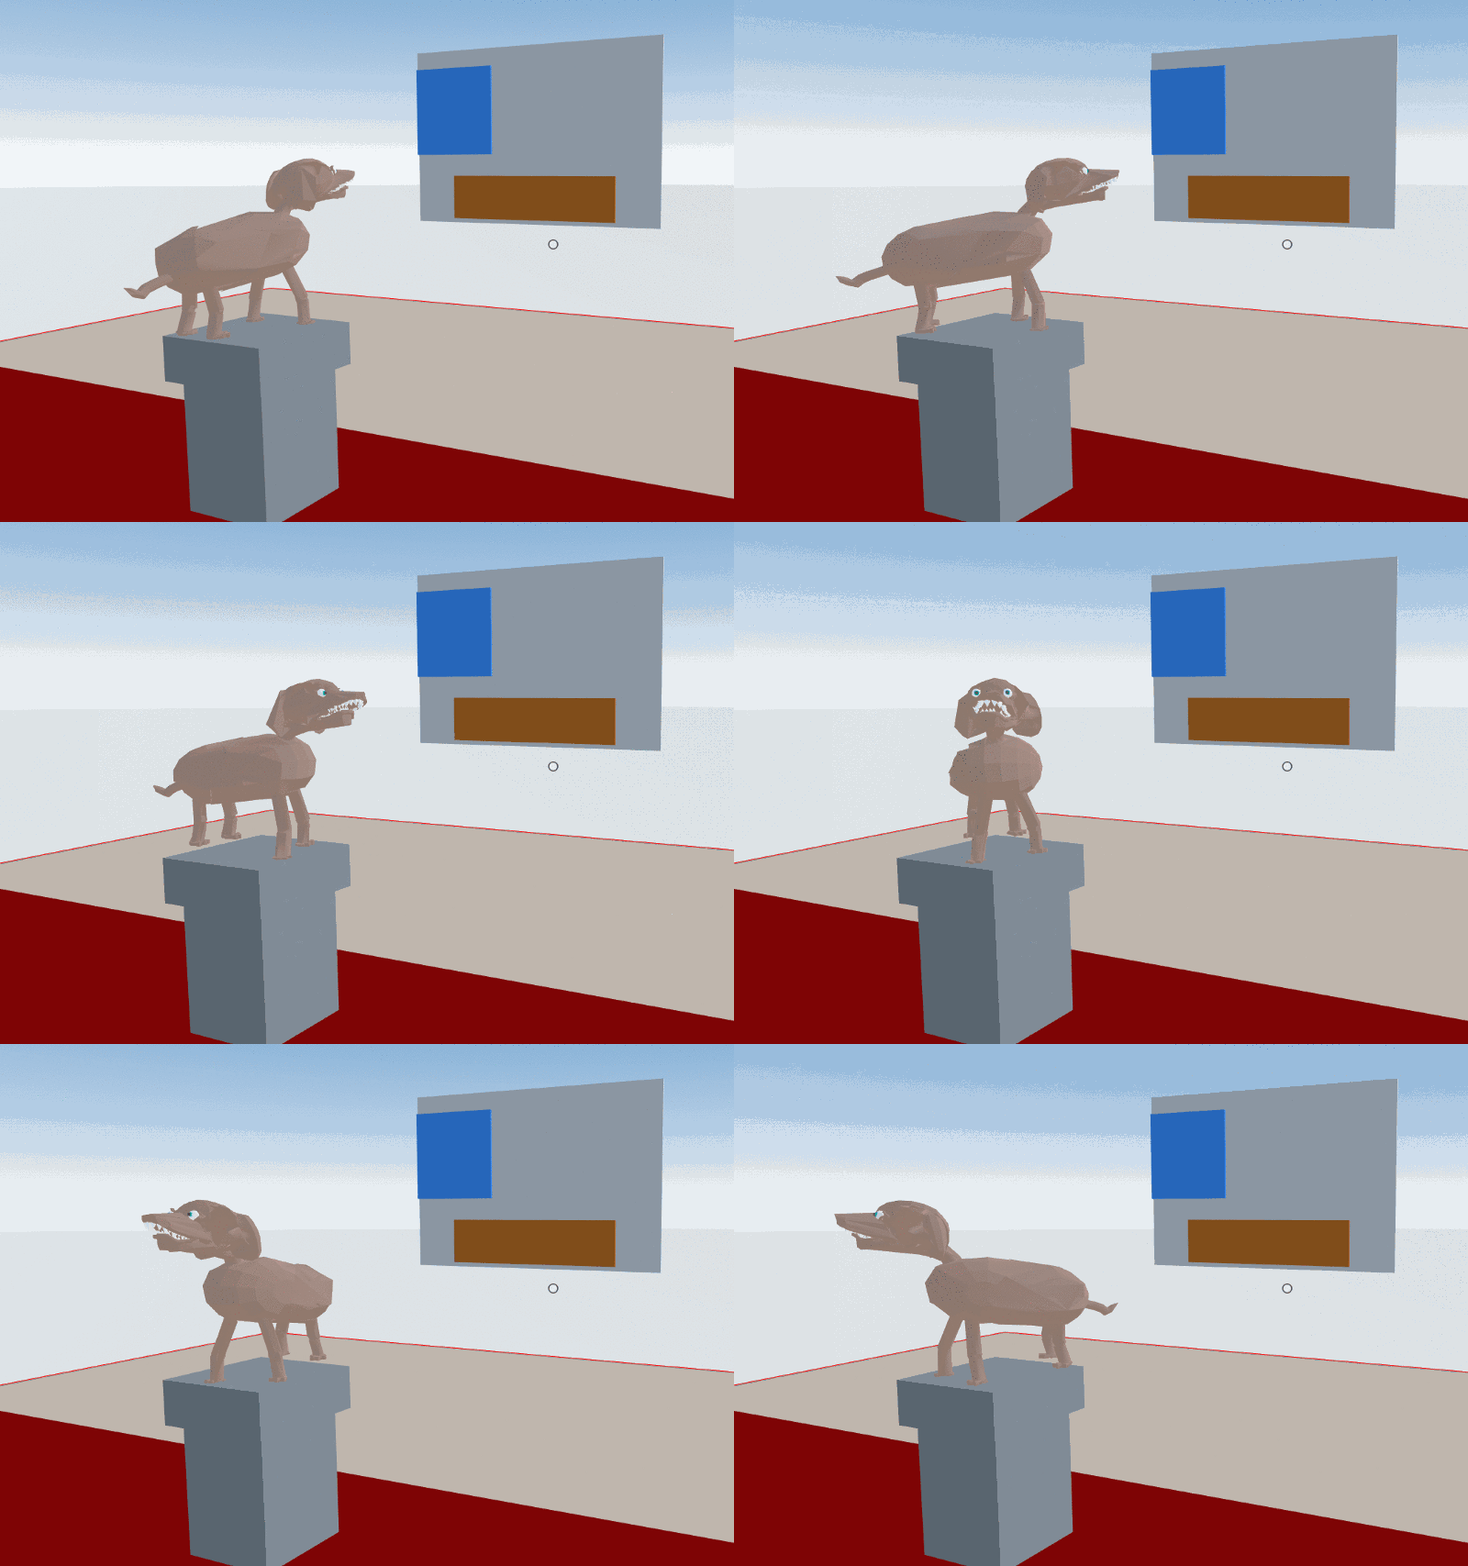
So there you have it, our dog is now turning smoothly for you to admire. I also added some details to the scene so that it looks a little more like a museum worthy of exhibiting this.
Track and respond to the user’s position
Clicks aren’t the only events that the user generates while navigating your scene. Every time the user moves or even turns to look around, a new event is generated. The positionChanged event contains all of the relevant information that is generated with it: the id of the user that moved and the coordinates of its new location. We can use this information to alter the scene state however we want.
Our scene is missing something a bit more outrageous, so we’ll now add an object that rotates based on the user’s position. I like how this interaction works, because it catches you off guard when you realize that your walking is causing the rotation, and that the direction of the rotation depends on the direction in which you walk.
Using Blender, I created a 3D model of a giant flying donut spiral. Why? It’s art, it can mean a lot of things to different people, and it’s easier to make you do the thinking.
The model was fairly easy to create, I just added a torus mesh (which is naturally shaped like a donut) and used the array modifier to multiply it into a bunch of cloned shapes. I then exported them all as a single glTF file. If you want to use the donut spiral model for your projects, you can copy it from the scene repo.
The steps to add this to our scene should start to feel familiar:
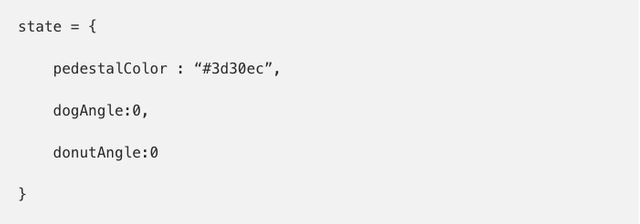
Add a new variable to the scene state to represent the spiral’s current rotation:
Add a gltf-model entity and set its rotation to match our newly created variable:
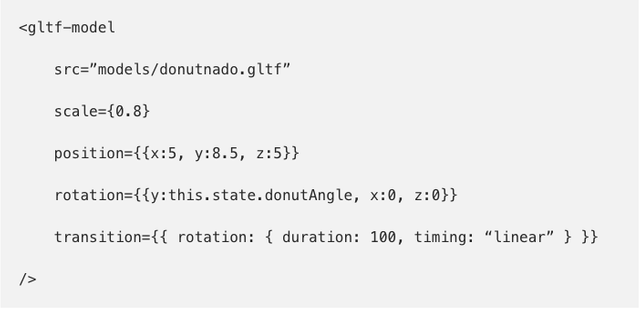
Note that we also set a transition on the rotation, this will make it rotate smoothly.
Add a subscribeTo method that runs an asynchronous function each time a positionChanged event occurs. Initiate this in the sceneDidMount function as we did before, in this way it will start monitoring the user’s position as soon as the scene is loaded.

The subscribeTo method is similar to the eventSubscriber method we used for clicking the pedestal, but by using subscribeTo you can also access information that arrives with the event object. Here we’re setting the donutAngle variable to an addition of the x and z coordinates of the user’s position.
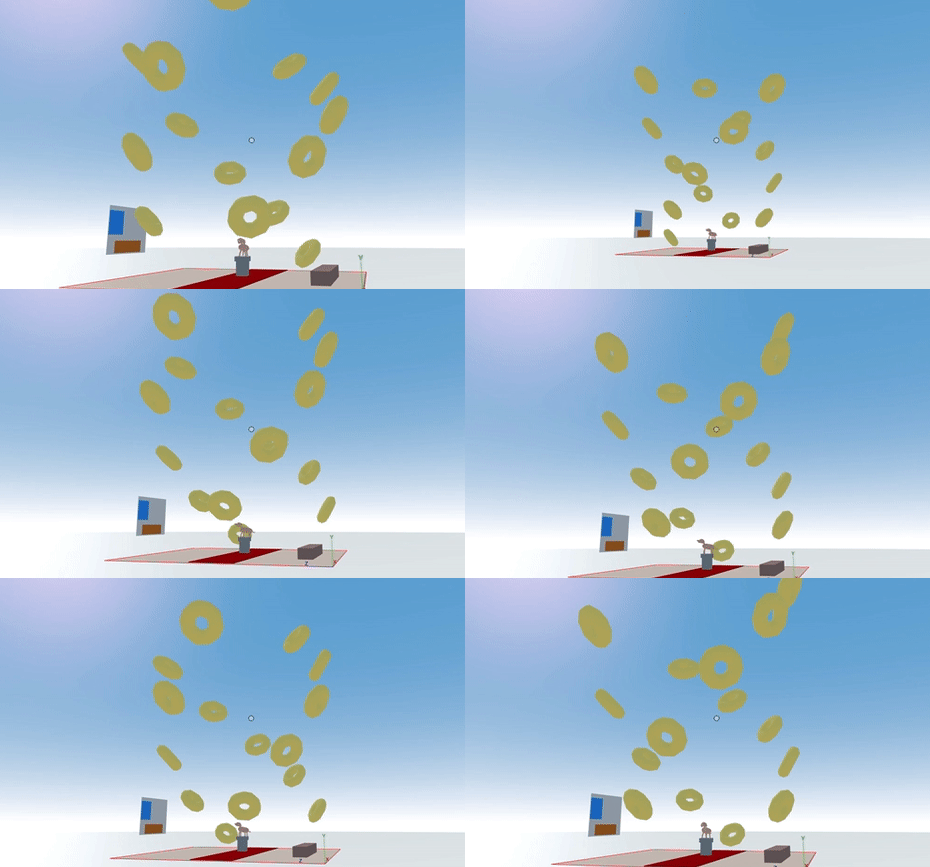
When moving to the right or forward, the donuts turn left, when moving to the left or backwards, the donuts turn right, and when staying still, the donuts stay still as well. This is all very disconcerting, I love it.
There’s a downside to how our spiral behaves: if you move diagonally, the X coordinate rises while the Z coordinate drops causing both coordinates add up to zero which keeps the donuts still. There are ways you could change the code to prevent that from happening, but to keep things simple, let’s assume that we’re ok with how it works.
SDK Best Practices: tip of the day
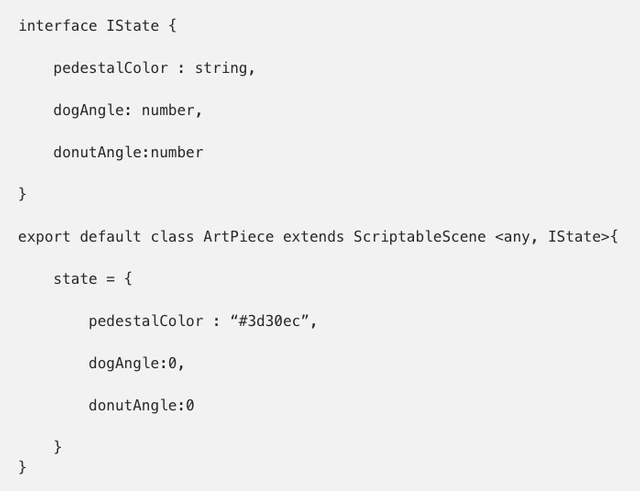
Your scene state can contain as many different variables as you want, but the state object containing these variables can be defined as a type of its own. This ensures that the state object always has the right variables and that they all have valid values for their corresponding types.
First, create a state interface, then pass the type of this interface as the second property of your custom scene class, which sets the type for the state object. If you’re working with an advanced code editor like Visual Studio Code or Atom, defining a state interface helps your editor provide type validation and smart auto-completes, which can save you from a lot of headaches.
Final thoughts
Interactive art is often not about the aesthetic value of the thing you’re seeing itself, but rather about the mapping between your actions and how the piece responds, and how that makes you feel. As for this piece, it probably just makes you feel dizzy. Nevertheless, do consider that there are clever ways in which the mapping between a user’s actions and the changes in the scene’s state can be used to make you feel, for example, empowered or powerless in different ways, and imagine how that can be used to convey artistic meaning.
So that’s all for today. I hope this tutorial inspires you to create more interactive scenes. Whether you’re aspiring to create some kind of interactive art, a game, or just something you think looks and feels nice, what you do with the SDK is totally up to you!
Join the conversation on
Discord
Twitter
Reddit
Telegram
Get started with the SDK!
This is an official Decentraland account.
Our original published article can be found on our medium blog here - https://blog.decentraland.org/build-your-first-interactive-scene-using-the-sdk-5d6895ac78f0