Dare to Learn with me! Step by step tutorial, Necklace or Choker made under the Soutache technique with my personal touch Part 1

Hello, it is an honor to bring you today the step by step of this magnificent necklace or choker that is very original and elegant, I will try as far as possible to explain it in a simple and detailed way so that it is practical and detailed, easy to understand, to the who know me know that this is my passion and I do it with love and patience with the desire to inspire them and thus ignite their creative flame to create their own pieces ...
The Soutache technique has existed for a long time, especially in the world of fashion. From military uniforms to high fashion creations, the soutache creates an incredible texture. Recently it has caused a stir in the world of jewelry with the renewed interest in the embroidered embellishments between pearls and different jewels, The Soutache is a flat braid with a slot in the center, made of two rows of strings wrapped in rayon. It is added to the designs stacked in layers: the edges of the braid are visible in the design and often I personally sew them using silicon liquid

Materials:
Soutache thread or rayon braid (The name varies according to your country). Color of your choice
3 Apply round plane 2.5 cm each
Piece of thick fabric or leather for the base 13 cm high - 20 cm wide
4 Ring or ring Bijoux
Brooch or lock
20 cm thin chain
42 pellets of 0.2 mm
1 5 mm strass stone
2 Attachments or suitcase for jewelry
Liquid silicon
Fine tip pliers
Scissors.
Rule.
Lighter
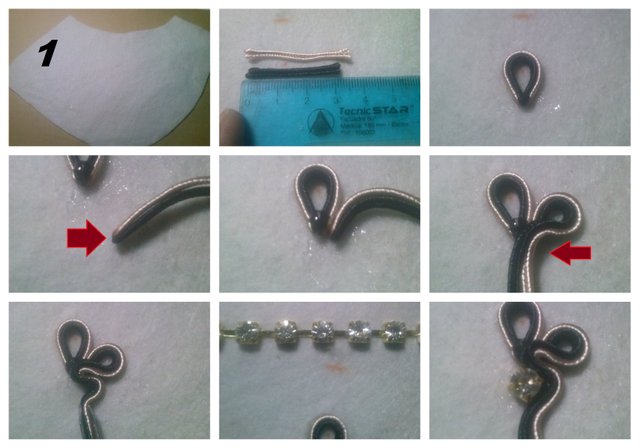
STEP 1: Cut a piece of leather or thick fabric for the base of the collar 13 cm high - 20 cm wide. We will cut two threads one of 3 cm and the next 3.5 cm burns the ends and paste them as I show in image 3 on the basis of leather or fabric, 2 x 32 cm dimension each, burns the ends together we must stick them just to side of the ones that we just paste we will make a circle and we will stick again in the tip of the previous circle as I show you in the images now we put more liquid silicon in the leather and we stick the thread upwards about 0.5 mm making a semi circle, we cut a large strass stone about 0.5 mm thick and we will stick it right in the middle of the semi circle that we just formed with a little liquid silicon although we can replace it with a pearl or round stone in this space.

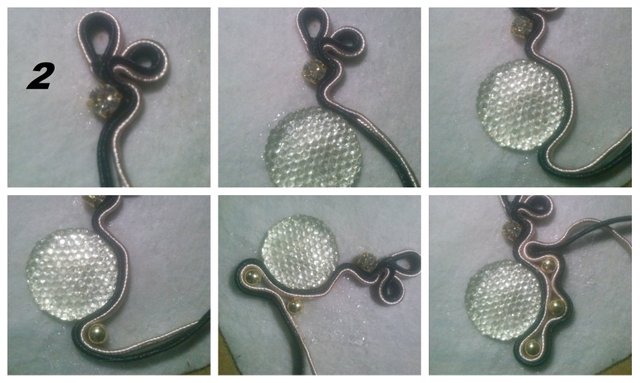
STEP 2: In this stage we are going to stick the big round wall about 0.5 mm away from the strass that you hit previously, carefully place liquid silicon around the wall and we will stick the thread little by little until the middle of it, turn the thread up and stick the first balin pearl or stone of your preference you will stick about 1 cm of yarn and you will place the second balin or pearl of your choice to reach the top will stick the yarn in the center between the strass and the applique then it will protrude approximately 1 cm
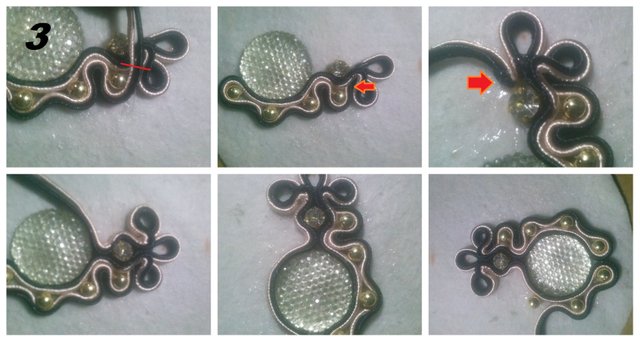
STEP 3: In this stage we will stick another balin and with the remaining thread we will cover it and cut the rest you marked it with a red line where it is more advisable to cut the ends and burn them down so that they are not visible that gives a better finish to our piece. Now we are going to do the same thing on the opposite side we must cut 2 threads of 32 cm long each one will burn the joined ends we must stick them right next to those that we just hit and so on we will carry out in this stage the 3 previous steps little by little taking care the details and helping us with the tweezers so as not to mess up the threads or anything.
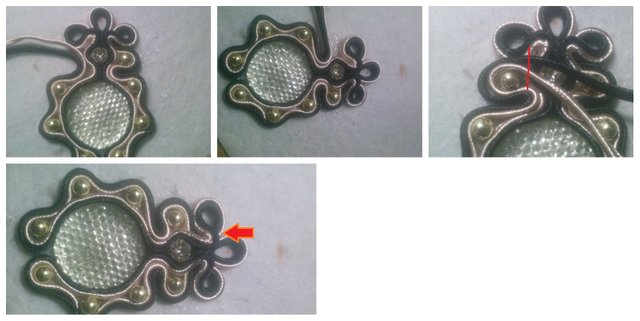
STEP 4: At this point we will put a balin with a little liquid silicon and the remaining thread will be passed around to cover it and the rest will be cut in the image and marked with a red line so that you can have an idea of where we should cut the tips will be burned with the help of a lighter and we will introduce it below the threads the next step begins just where the red arrow is located in this last image.


You make that jewerly by your own..that's incredible, you most creative person..
Succes is always for you
Thanks, if done by hand. I love it is my passion.
Congratulations! This post has been upvoted from the communal account, @minnowsupport, by Marleyn from the Minnow Support Project. It's a witness project run by aggroed, ausbitbank, teamsteem, someguy123, neoxian, followbtcnews, and netuoso. The goal is to help Steemit grow by supporting Minnows. Please find us at the Peace, Abundance, and Liberty Network (PALnet) Discord Channel. It's a completely public and open space to all members of the Steemit community who voluntarily choose to be there.
If you would like to delegate to the Minnow Support Project you can do so by clicking on the following links: 50SP, 100SP, 250SP, 500SP, 1000SP, 5000SP.
Be sure to leave at least 50SP undelegated on your account.
Dare to learn, exactly 😊 OMGosh really @marleyn, your patience is out of this world!!!