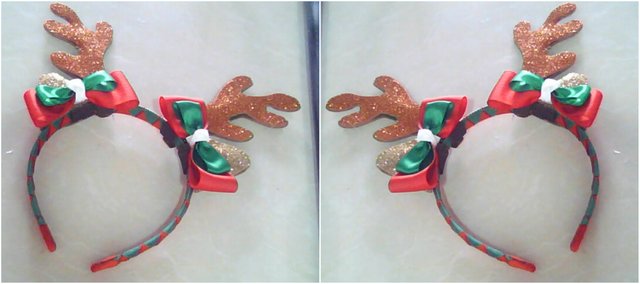
Reindeer Belt or Headband !!! Spectacular for this Christmas.
Hello, First of all Merry Christmas, It is an honor for me to have this window open to share with each of the people who read me here, Many know me others are reading me for the first time, to my more than my job is my passion is to give that uncertain touch to life that color is missing, is to vary and help others to vary with me. Learning, growing and the best thing is that we do it together ... The Universe works in mysterious ways and for several reasons I moved away from this beautiful blog that I created with love, desire, encouragement, so that others can learn, Today I return with new ideas, new thoughts, new moods. As I wrote earlier I thank the Universe for this new day at work. I really believe that in this life we are all teachers, in some cases we have to be the students, and in others the teachers of someone else, always what we resist persists in our life, in life we will have many obstacles, people who do not like us but We are there to teach something, just as sometimes people will arrive who will be like a beautiful and warm light that will enlighten our lives and guide us along the path that we must go, locate yourself in whatever you want, and with what you have learned fight and continue Go ahead.
Now if ... We start !!!
If you have a question, do not hesitate to write to me, I will be happy to help you.

MATERIALS
Height stick
Silicone Bar
Silicone gun
2 Strips of Red Razo Tape 4 cm wide * 20 cm long each
2 Strips of Green Ribbon 2.5 cm wide * 10 cm wide each
Lighter
Scissors
Needle
Paper and pencil for the template
Foami the color of your choice for ears and Astas !!
Love, Encouragement and Patience ... Step by Step we will learn!
.
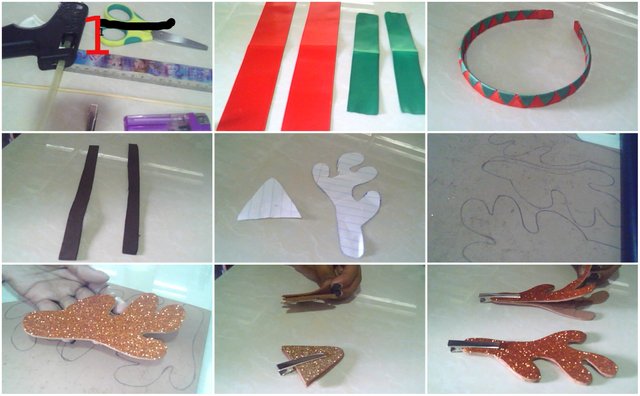
STEP 1: We have the materials specified above ready, we make the templates of the Antlers and the ears on a paper, cut them out and draw them on the back of the foami you choose, I use two colors in frosty foami. then cut 4 for each piece, you must verify that the 4 parts were the same.

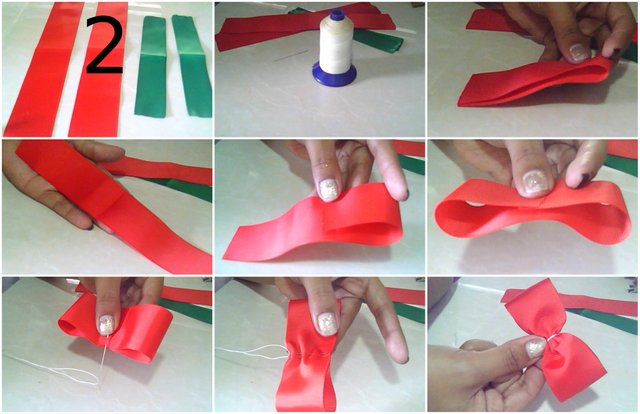
STEP 2: In this stage we will make the ties, Cut two strips 4 centimeters wide by 20 centimeters long each red or color of your choice, follow the steps as you see in the image fold the tape in half, make a little pressure in the center so that the center is marked, open it again and this time we will bend each tip to the center where we make the mark, and proceed to sew just by the medium, you must tighten the thread well and with it roll it by the tape so that it exerts pressure tie well and cut.
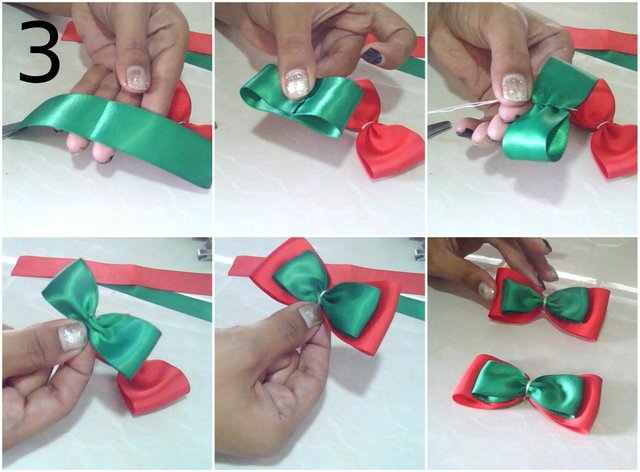
STEP 3: This time we will use the green ribbon its measurements are 2.5 centimeters wide by 10 centimeters long, we must perform the same process that was done in the previous step to finish carefully sew up the red ribbon and it will be as shown in the final image.

STEP 4: To finalize the loop I use a ribbon of loop color of approximately 12 centimeters, we will cut it into two ribbons of 6 centimeters each we must make a simple tie and with the help of the Silicone gun we glue it little by little to the back exerting a little pressure and so we will have our ties.
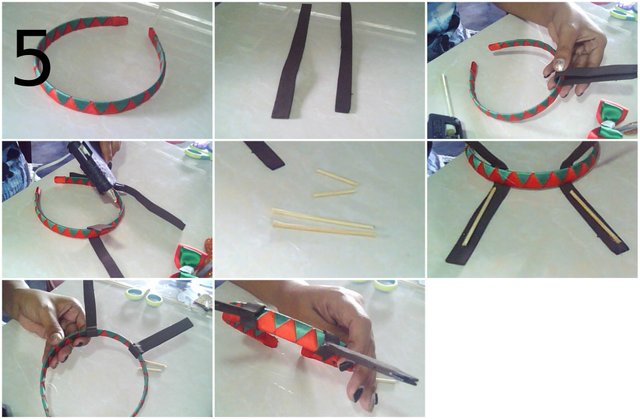
STEP 5: For this part I have an already lined headband, which you can watch the video to do it HERE
Now let's cut 2 pieces of long foami 1 centimeter wide by 15 centimeters long, mark the center and paste them, I counted 9 red triangles and paste the first foami, then do the same on the other side and glue the other foami with a little hot silicone, we will cut the stick of height in 2 each 6 centimeters, and 2 more than 3 centimeters each. Place hot silicon on the foami, place the tall stick that you already cut and close the foami again so that the newly stuck stick is hidden, you can look at the images.
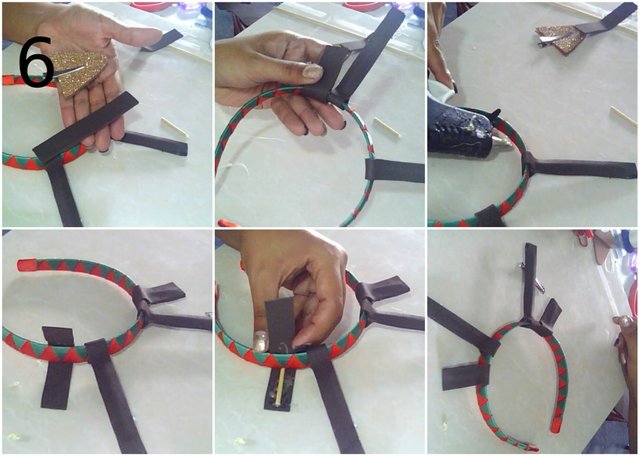
STEP 6: In this step we will perform the same procedure as in the previous step, taking care of the details for a better finish of our piece. Look at the images for a better understanding.
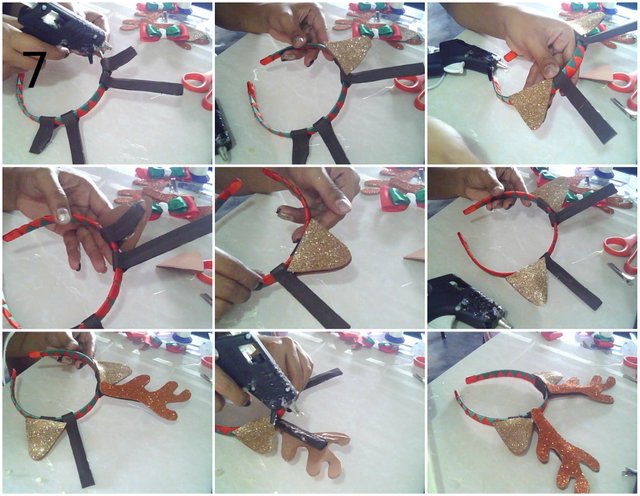
STEP 7: When you finish hitting the foami that goes in the bottom you will realize that this will work as a support, now we will place hot silicon in the parts that we have just placed for Paste the ears and the Antlers, both forward and back, We must do it carefully, taking into account the details, always looking for a better finish for our piece. With love everything is better.
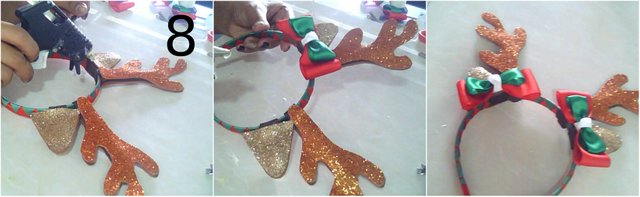


It looks amazing!!!!Well done mama :)
@tipu curate
Upvoted 👌 (Mana: 0/30 - need recharge?)
thank you very much ☺️
You have been curated on behalf of Inner Blocks: a community encouraging first hand content, with each individual living their best life, and being responsible for their own well being. #innerblocks Check it out at @innerblocks for the latest information and community updates, or to show your support via delegation.
Hi, @marleyn!
You just got a 0.13% upvote from SteemPlus!
To get higher upvotes, earn more SteemPlus Points (SPP). On your Steemit wallet, check your SPP balance and click on "How to earn SPP?" to find out all the ways to earn.
If you're not using SteemPlus yet, please check our last posts in here to see the many ways in which SteemPlus can improve your Steem experience on Steemit and Busy.