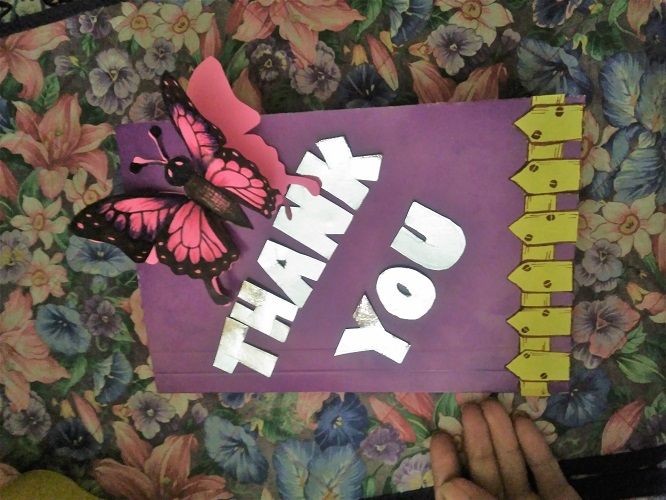
DIY Pop-up "Thank You" Greeting Card

This is my entry for @mermaidvampire's DIY Greeting Card Making Contest. I made this "Thank You" Card with Pop-up Flowers for my grandma.
How did I came up with this idea?
I remember the last time me and my grandma chatted on skype, she told me some "things" about when "her time comes". So, I told her, that "time" won't come any sooner. It should not, because she haven't visited here yet and we haven't spent
some "quality time" together yet. I promised her, whenever she comes home, I will bring her to a beautiful garden and we will spend quality time together. I know how she loves flowers, colorful flowers... she's a nature lover. She also loves butterflies.
Let me tell you a bit more about my grandma.. she works abroad as a janitress. Yes! She's a janitress and I am so proud of her. Can you imagine? she was the one who sent me and my sisters to school, yes, from pre-school until college! She's getting older and older but she doesn't want to retire.
I really admire her. She's the best person that I know. Just this January, she sent me a gift! She sent me a violet laptop! (the one that I am using right now). What more could I say? I know a card isn't enough to thank her for everything she've done to me and my family. But when I saw this contest about making a card for loved ones, she's the first person that comes to my mind. I want to make a "special" card for her. A card just like my laptop, colored violet. With the theme, "Garden" to remind her about the promised that I made.
Let me show you how I made this! Let's start!
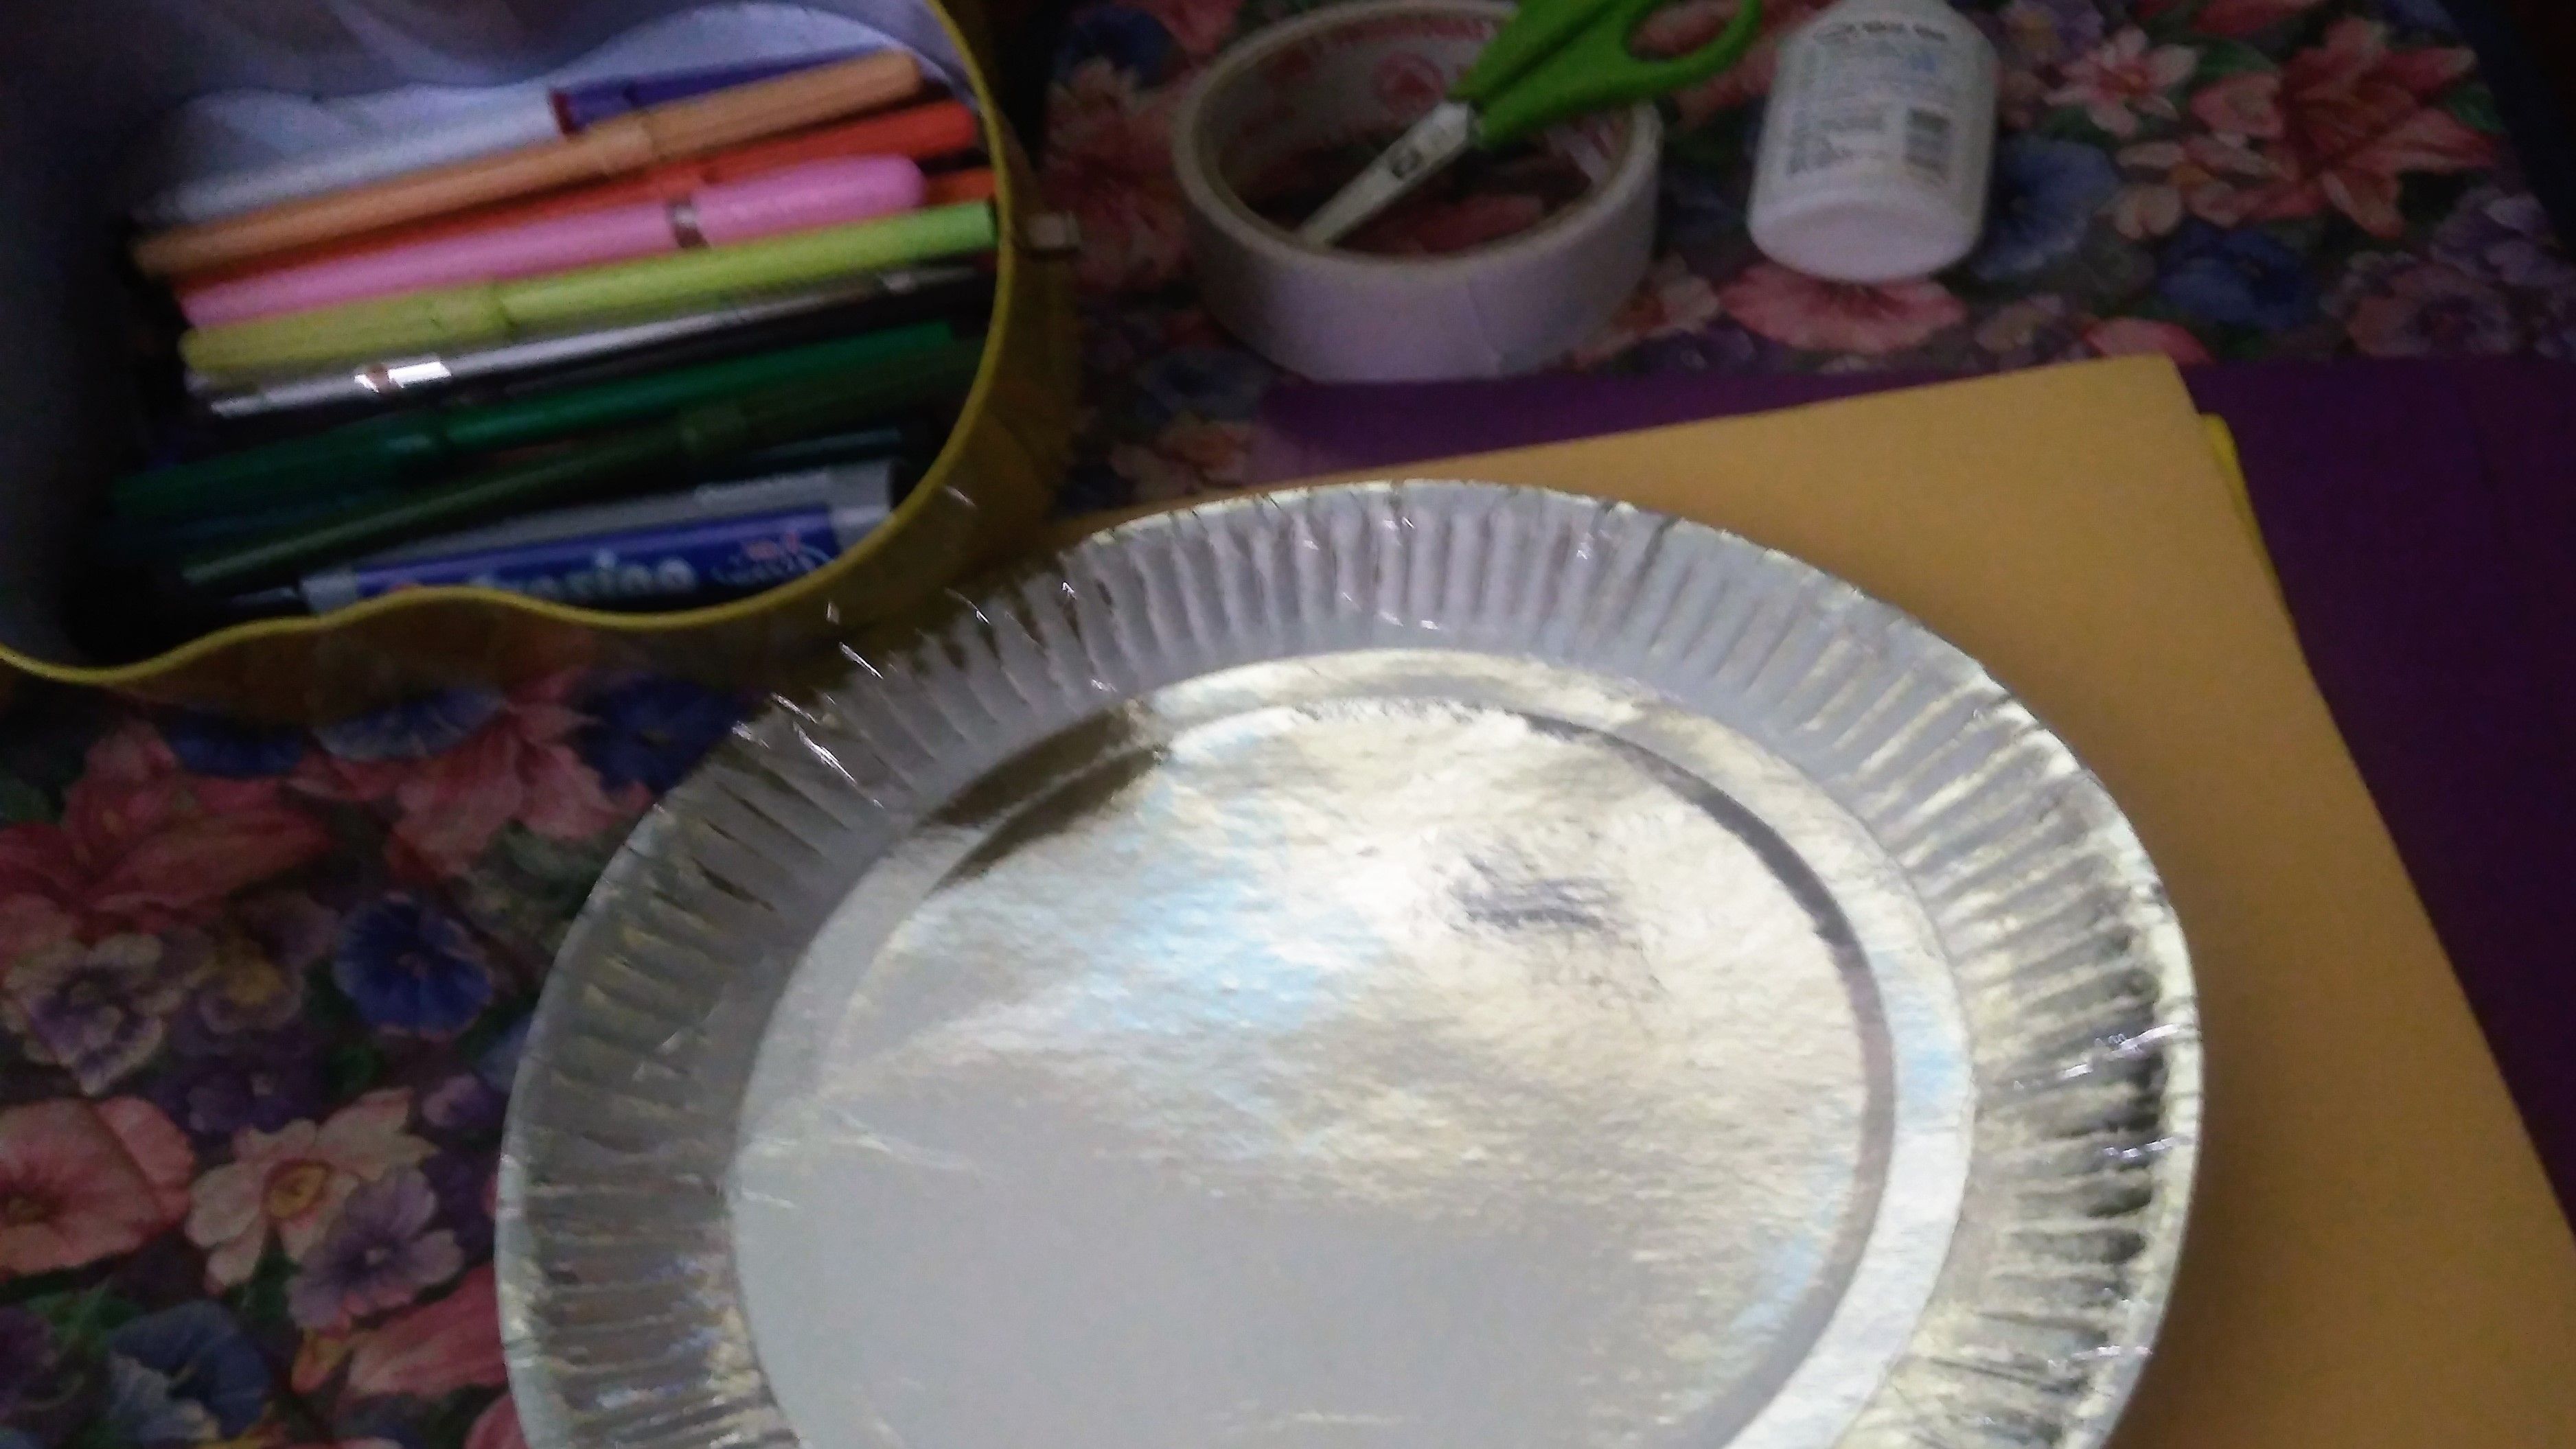
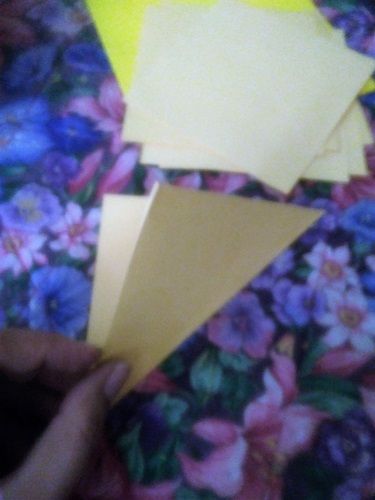
Here are the only art materials I found inside our house.
- Some left-over colored papers and a used violet folder. My daughter used this in their art subject.
- I also found a can with some colored pens, ballpen and markers inside (it is frommy sister)
- a white glue
- a pair of scissors
- double-side tape (my father use this on his work)
- a paper plate (we have plenty of it, we save for special occasions, none of us want to wash plenty plates)
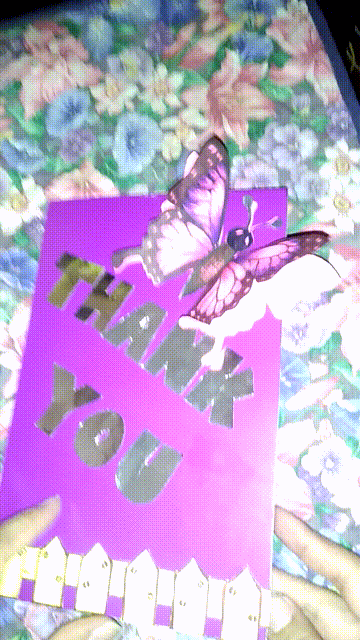
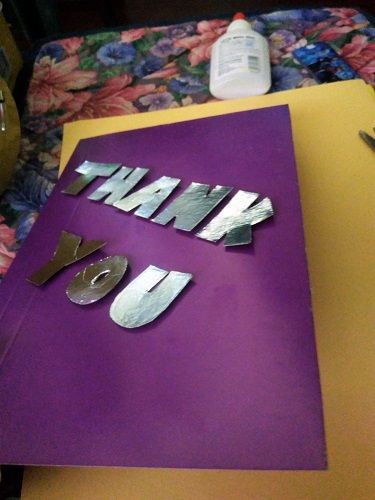
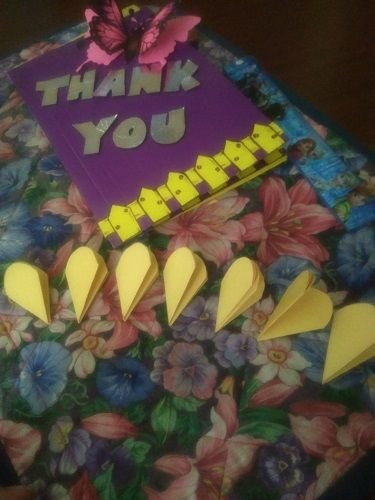
The Card Message: "Thank You!"
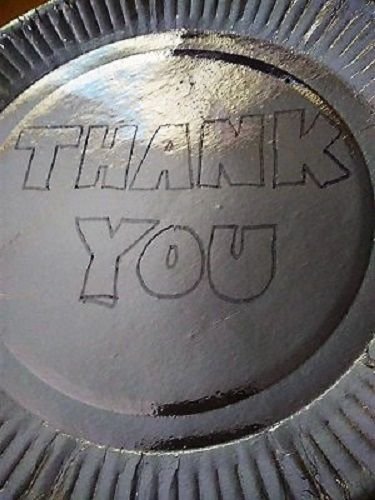
So I chose to use the paper plate because it is shiny like a mirror that reflects ourselves. It is silver, it represents 25 years anniversary... (25 years of my existence). Maybe when I sent this card to her tomorrow, she will receive it on or after my birthday. I wrote there the word "THANK YOU". Only two words but have a lot of meaning and emotions behind. These words are like magic words. It can make a heart happy or sometimes gives sadness but most of all, it shows "gratitude" or "appreciation". I want to thank her for always being there, supporting me and my mom since the day I was born.
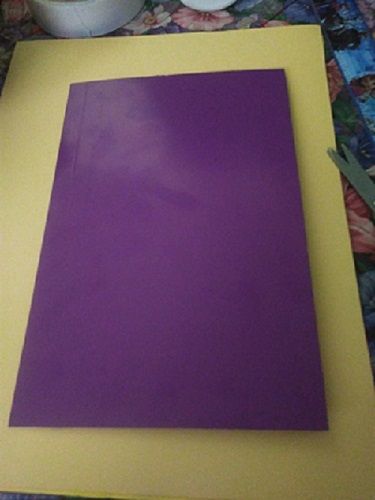
Then I cut this used violet folder, into 8.5" x 5.5" to be our card. When folded, it looks like my laptop. This is to show my appreciation of her gift. The violet laptop. It is very useful, I use it here to steem.. I also use this in my kids' projects and homework... and most of all, I earn money from this.
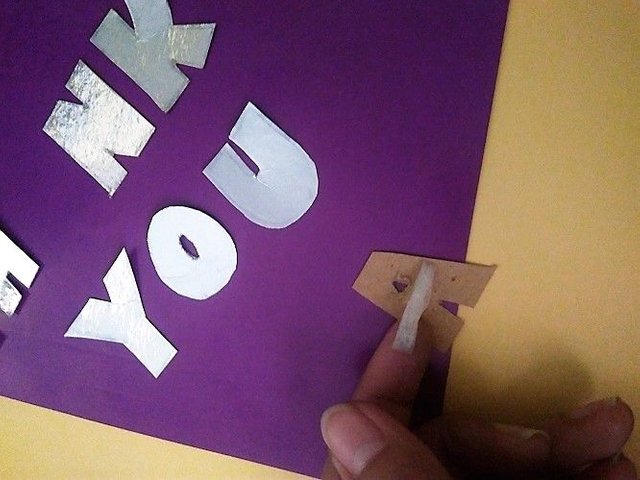
One by one, I cut out the letters I wrote on the paper plate. I cut a small double-sided tape and roll it. I stick one on the center of each letter.
This gives the letters an "embossed" or "floating effect".
The Butterfly!
I only have pink, yellow, violet and pale yellow papers here. So I chose "Pink" to be my butterfly. I folded it vertically into four.
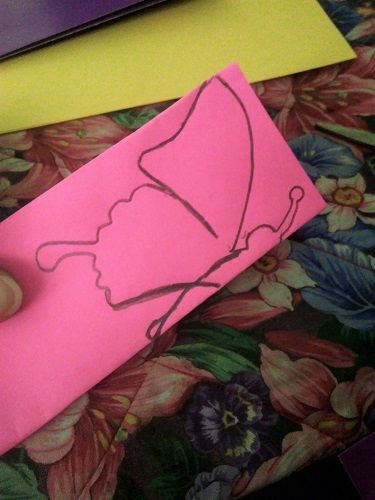
Then I draw a half butterfly there.

There you go! We have two same sized butterflies, with same sizes of wings in an instant.
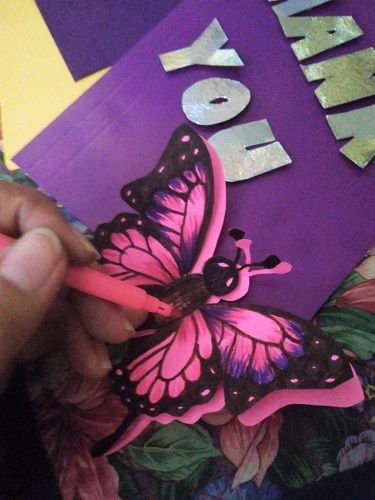
Let's color our butterfly!
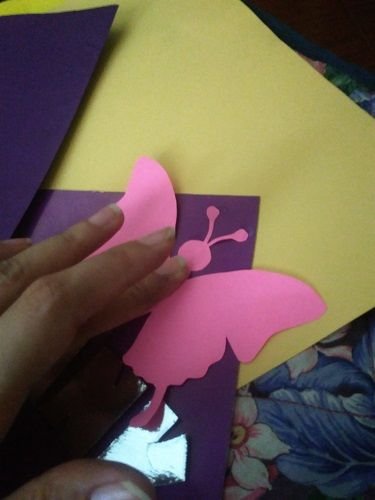
I left the other one uncolored and paste it there at the corner of the card.
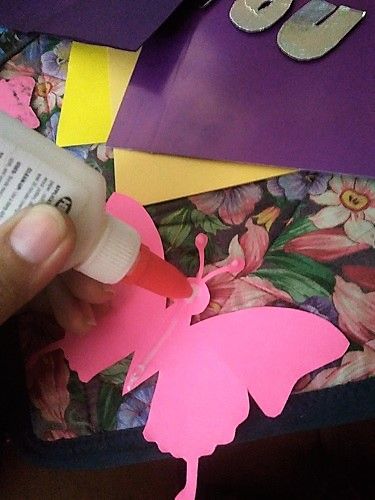
Just put some glue on the "body" of the colored butterfly and paste it on top of the uncolored butterfly.
That way it can have a realistic effect, like it can really fly.
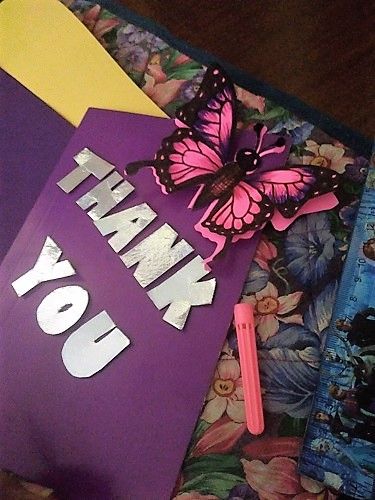
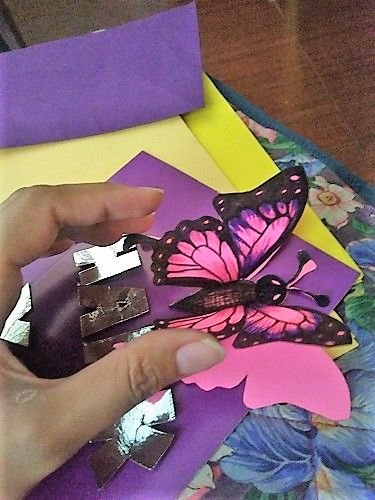
there you go! My purple/pink butterfly.
Let's make a fence!

Cut a yellow colored paper into 1 inch strips. Then fold it about an inch continuously. Then, I traced my fence design there and cut it.

Tada!! We have a long wooden fence!

Paste it at the bottom of our card. Let's add some more details by coloring the borders of the fence using a brown color pen.
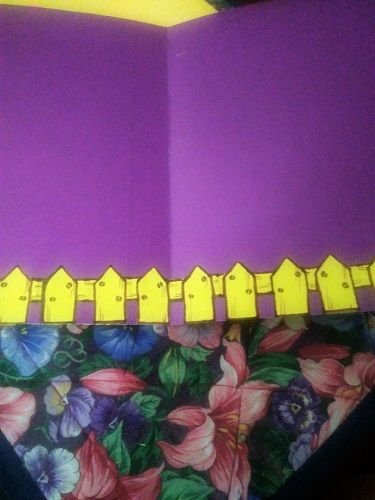
Do the same inside the card.
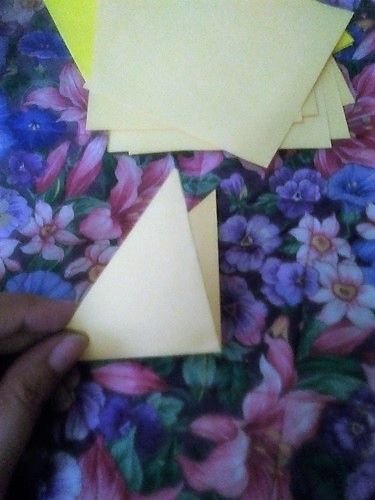
The Flowers!
Then fold it into half diagonally.
Then fold it again in half, making two corners meet each other.
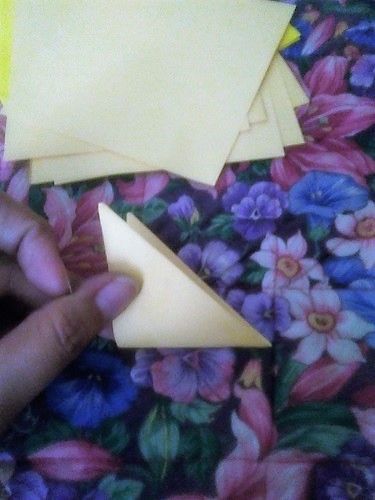
Fold it in half once more.
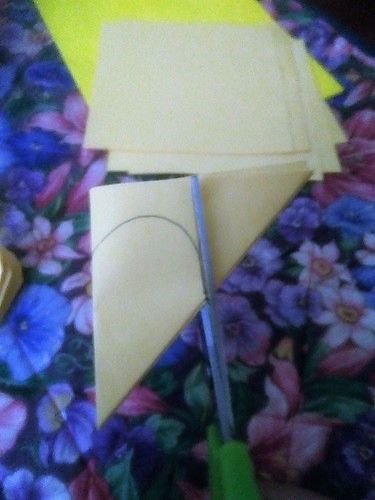
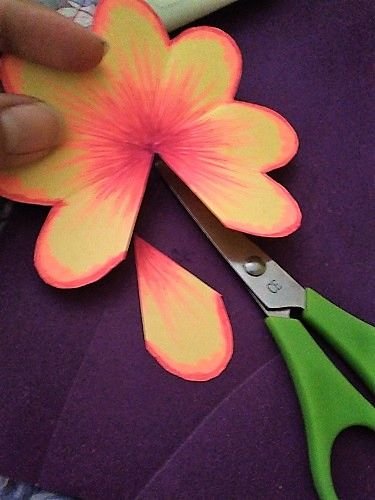
Then trace an arc and cut it.
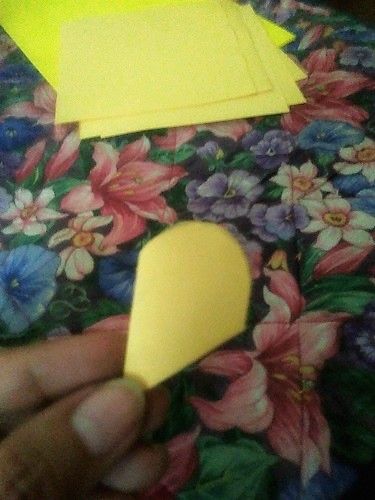
So, we now have a petal!
Do the same on the remaining 6 square papers... We now have 7 petals!

No, look! they are flowers!!

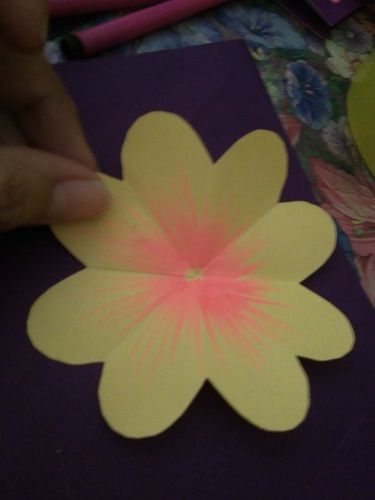
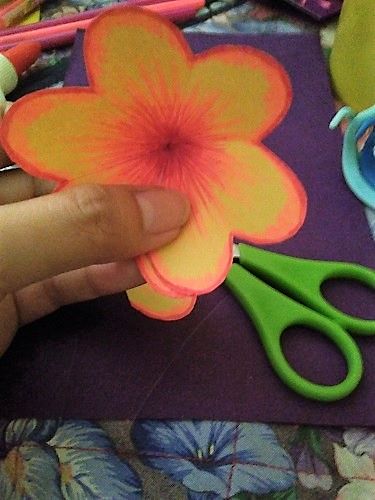
Continue making some "checks" while rotating the flower.
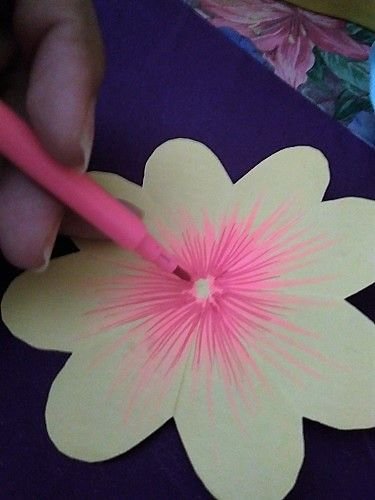
Next, do it again but this time use Pink colored pen.
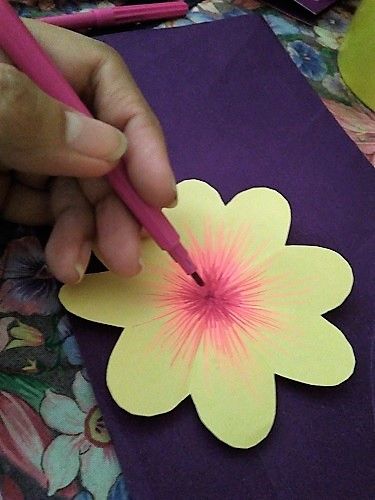
Then do it again, this time use Purple colored pen. Make the checks shorter this time.
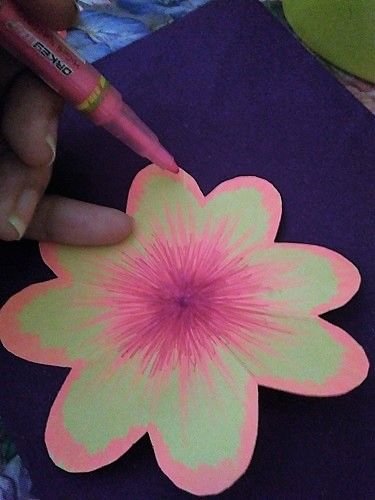
Color the edges of the petals using the Neon pink marker.
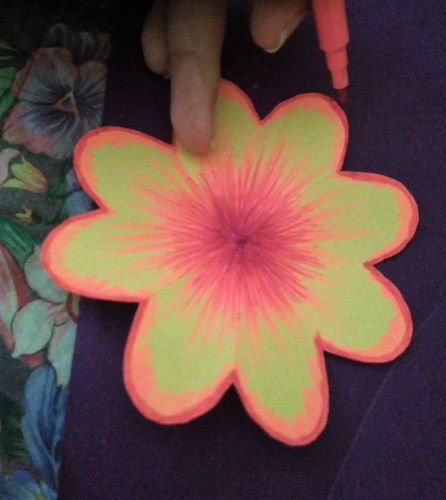
Outline the edges of the petals using the Pink colored pen.
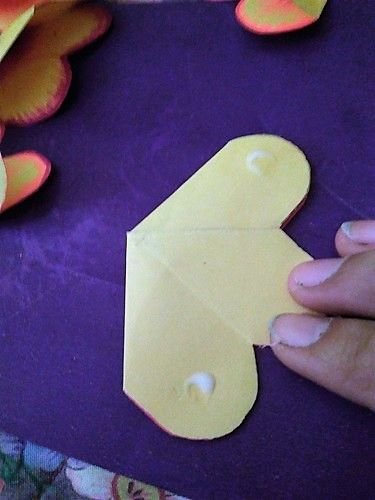
Cut out one petal. Then put a drop of glue on the adjacent one.
Overlap the separated petals.
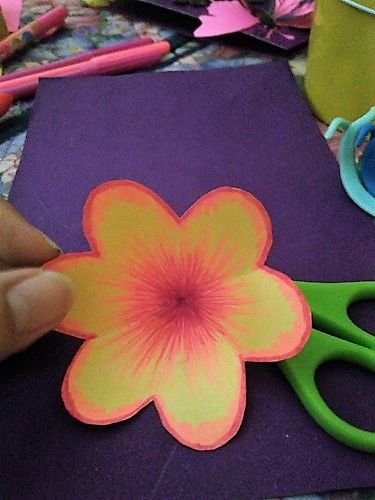
There! We now have a Flower!
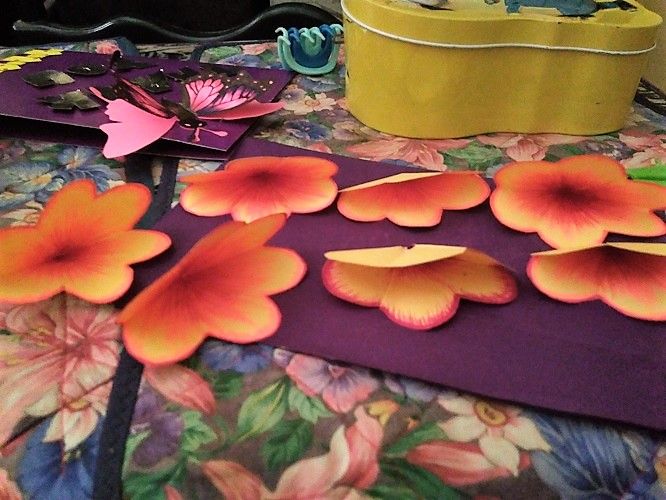
Do the same on the remaining 6 uncolored flowers.
Now let's stick the flowers all together to make a "blooming" bouquet of flowers effect. Put only a small drop of glue on each petal.
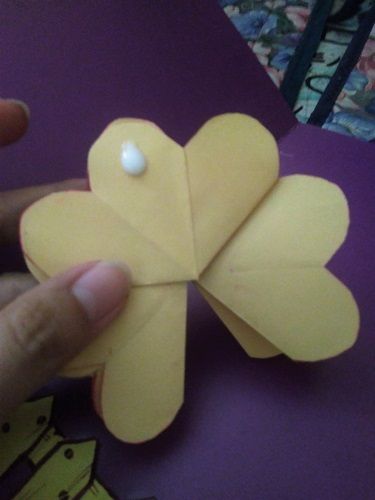
Then put a small drop of glue on the center.

Place it there inside the card, at the center part. Then put another drop on the other side.
Then close it! Wait for a few minutes to let the glue dry.
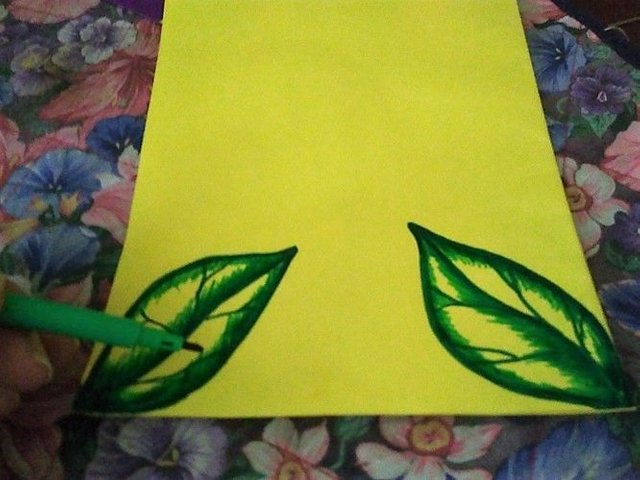
Oh no, I don't have a green colored paper! But it's okay, we can use the Yellow colored paper and color it using a green pen.
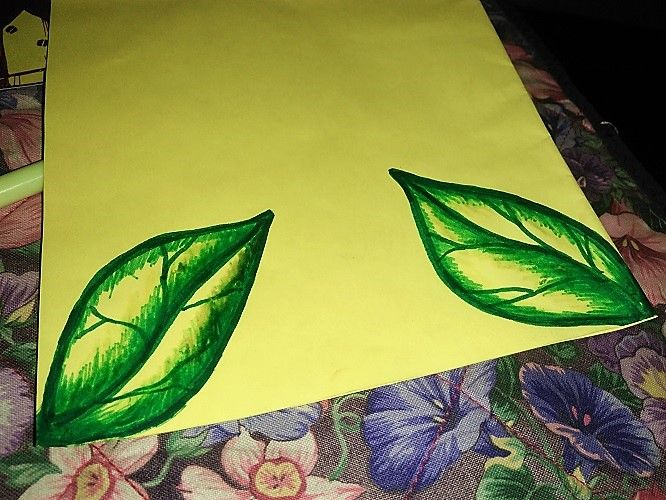
There, we now have yellow-greenish leaves! Cut it out.
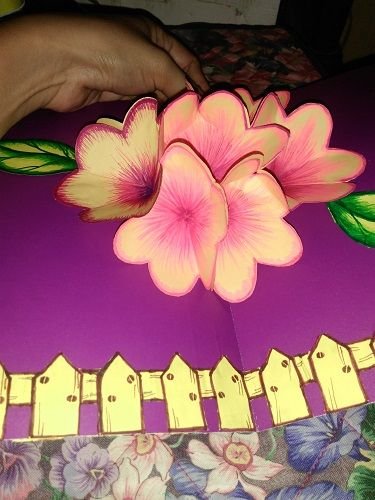
Let's open the card and paste the leaves on the corners!
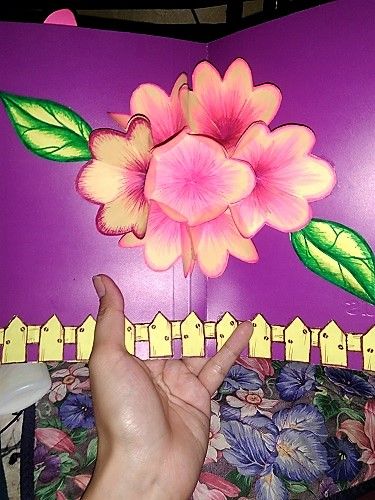
Tada!! We now have blooming flowers in a garden! Yipie!

I know it's been a long post... thanks for reading!!
I know my grandma will appreciate this. She doesn't like digital arts. Why create a card instead of sending her one online using "copy-paste"? It's because my grandma is an old-soul (yeah, she's really old). She appreciates hardwork more than anything. Hand-made. It's special. Just like her to me. <3
I will send this card to her by going to the post office soon!
The message behind the blooming flowers
Whenever you think or worry about, "your life is getting near to end", open this card and hear me say...
"Not yet mom, not yet. Please don't think about that. We haven't had a quality time together yet. I will tour you in the Philippines, remember? We will go to a beautiful garden with so many kinds of flowers, and butterflies... You like that, don't you? So, please. Continue to live."

Please support @surpassinggoogle as a witness by voting him at https://steemit.com/~witnesses and type in "steemgigs" at the first search box.
If you want to give him witness voting decisions on your behalf, visit https://steemit.com/~witnesses again and type in "surpassinggoogle" in the second box as a proxy.
Please like @teardrops on Facebook and Twitter:
https://www.facebook.com/teardropstokens/ •
• https://twitter.com/teardropstokens •

Congratulations! Your post has been selected as a daily Steemit truffle! It is listed on rank 9 of all contributions awarded today. You can find the TOP DAILY TRUFFLE PICKS HERE.
I upvoted your contribution because to my mind your post is at least 14 SBD worth and should receive 68 votes. It's now up to the lovely Steemit community to make this come true.
I am
TrufflePig, an Artificial Intelligence Bot that helps minnows and content curators using Machine Learning. If you are curious how I select content, you can find an explanation here!Have a nice day and sincerely yours,

TrufflePigWow this is so beautiful
thank you... 😊
I like it,, saya berharap kamu akan menang,, spirit,
😘
thank you @tuminaz 🙂
Wow...this is cool! Keep up po.
thank you idol...!
Beautiful piece of art, @maylyn09! Continue to inspire!
Cheers,
Jeanne
Thank you Sis Jeanne...! 🙂
Congratulations! This post has been upvoted from the communal account, @minnowsupport, by maylyn09 from the Minnow Support Project. It's a witness project run by aggroed, ausbitbank, teamsteem, theprophet0, someguy123, neoxian, followbtcnews, and netuoso. The goal is to help Steemit grow by supporting Minnows. Please find us at the Peace, Abundance, and Liberty Network (PALnet) Discord Channel. It's a completely public and open space to all members of the Steemit community who voluntarily choose to be there.
If you would like to delegate to the Minnow Support Project you can do so by clicking on the following links: 50SP, 100SP, 250SP, 500SP, 1000SP, 5000SP.
Be sure to leave at least 50SP undelegated on your account.
Wow 😮 this is perfect card,
Galing nyo po @maylyn09
hehe... salamat @sn0white! 🙂
ang galing naman !!! :-)
Hehe... Thank you po.. 😊😄
Galing nio kabayan @maylyn09
Salamat 😊
Cards are more meaningful if we put our own touch to it. Beautiful and pretty card you got there.
Thank you @leeart..
Yes, that's why cards are more special because it was made with Love