🎤 Audio Recording Basics: Let's Make it Easy! (Part II) 🎸
In part I, we discussed the sound sources and the recording room. Today, we will tackle noise reduction, microphones and an audio interface.
Here are some typical easy-to-resolve tracking/recording challenges you might bump into:
Noise and Hiss
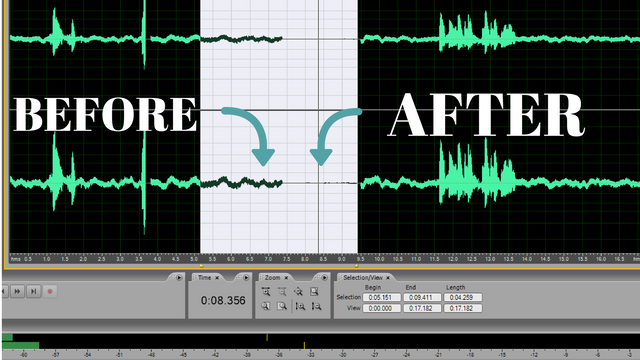
The biggest problem to address is noise from the AC and exhaust fan. After soundproofing the room, it's almost dead quiet and every noise source left inside became more noticeable. I also noticed that the room became a little warmer. Moist air accumulates in enclosed areas and they feel clammy even when the AC is on. Another problem with a common window-type AC is the compressor hum which is usually louder and more obtrusive than fan noise. It’s much harder to remove with noise reduction plugins since it includes mid-range sounds that may interfere with vocals and instruments. It’s like the sound is in the center and very prominent, so it’s hard to remove without affecting the clarity of the recorded sound when mixed with it during tracking/recording. There are lots of instructions you can see online on how to install soundproof ventilation ducts and air conditioning but they tend to be more expensive and complicated. So far, given the time and budget allotment, here’s what worked for us effectively:
Cover noise sources with sound-absorbent household items.

While acoustic blankets provide better sound protection, thick curtains attenuate a significant amount of noise coming from windows. You will immediately hear the difference after stuffing the area around the AC with thick cloth and towels as well. I also improvised a small air duct made from plywood and foam to redirect air and reduce noise. A sound panel wrapped with towels hung in front of the intake vent blocks most of the mid-range and high-frequency noise and what's left is a low-end rumble which is less-obtrusive and much easier to filter out (More of this in the audio editing part).
[Youtube Video: Towel test]
In this video from DIY Perks, you’ll see how effective towels are as the main soundproofing material for DIY sound panels.
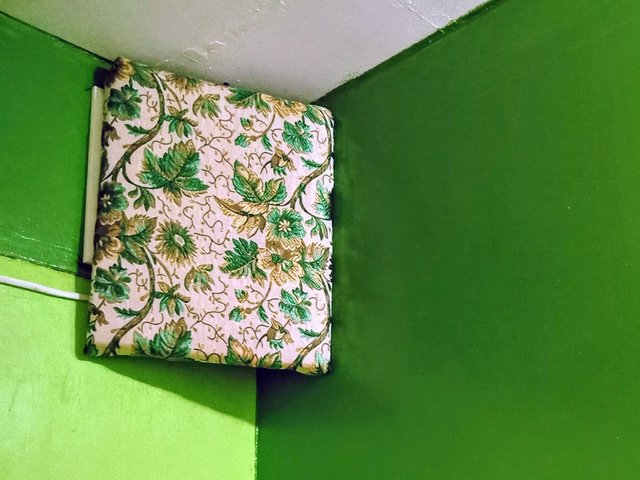
I also put one of those sound panels over the exhaust fan. I chose a rotary duct fan for the studio since it’s quieter, though it moves less air. It can generate a higher pressure than classic propeller types and its job is to suck the warm, stale air building up near the ceiling through a small opening. It gradually replaces air in the recording room without sucking out too much cooled air below so it doesn’t put a lot of extra load on the AC.
Microphones
[Note: Don’t use both foam windscreen and pop filter at the same time. Just choose one which is more practical and easier to handle. They're both effective in blocking plosives (air coming from the P, B and sometimes T sounds when speaking or singing) but the foam blocks more of the high-frequency sounds and may affect clarity.]
Dynamic Mics
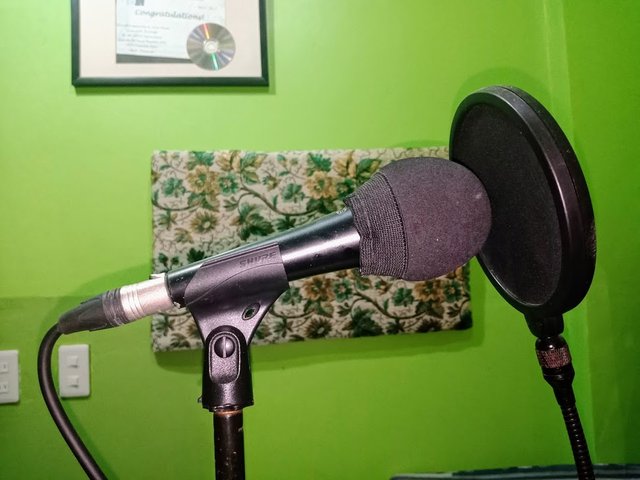
Without any room treatment and soundproofing, I recommend using dynamic mics. Most handheld stage microphones, like my Shure PG58 shown above, are dynamic mics. These mics have diaphragms that work essentially like reverse-speakers which generate electricity when sound hits them and vibrate, as opposed to vibrating when electricity passes through them (for speakers). They pick up less ambient noise compared to condenser mics but the tradeoff is, since they typically don't have a power source, they have low output. It makes them more susceptible to cable noise and less sensitive particularly at high-frequency ranges. They also suffer from the ‘bass proximity effect’ which means they sound boomy with lots of low-frequency response when placed very close to the sound source but they sound tinny when moved far back. The good thing is they tend to be more rugged and they typically operate without any power source. The vocalist has to move back away from it when singing loudly and move closer when singing quiet parts. It takes practice and changes in tonal quality can be challenging to edit.
Condenser Mics
Condenser Mics have capacitors (also called condensers) that change in capacitance as they vibrate. They require a power source so you’ll see lots of them powered via 48V Phantom power (which I will discuss later under audio interfaces), USB, or even batteries. Though more sensitive and transparent-sounding than dynamic mics, they tend to be more fragile. That's why it's recommended to use a shock mount (which also comes with the BM-800). It not only prevents bumps from damaging the mic but reduces handling noise as well while the stand is being moved or accidentally bumped.

The BM-800 condenser mic receives lots of good reviews even from my vocalists who record at home so I decided to get one instead of a USB condenser mic. This mic has a pretty good frequency response especially with the phantom power on.
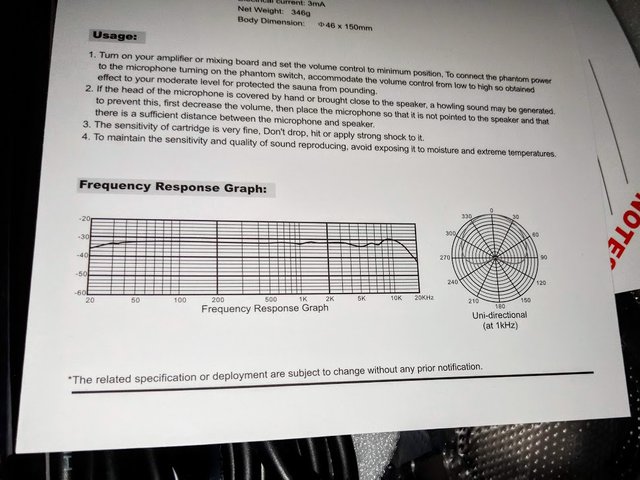
Like many other mics, it also has a cardioid (heart-shaped) pickup pattern which minimizes noise coming from behind it. It comes with a standard XLR-mini TRS cable. It works when directly plugged into a PC mic jack though you have to turn up the input gain to maximum or near maximum in order to get a satisfactory recording volume. The same is true for the USB mic I tried before though it sounded cleaner with much less line noise. On the other hand, with phantom power coming from the mixer or audio interface, you have plenty of power and volume to play with. Ambient sounds will be more of a concern than line noise. In fact, to avoid distortion or feedback that can damage equipment, you have to start at a very low volume and input gain and lower your speaker volume before turning on the phantom power. Make sure it's upright and the BM-800 logo faces the source. You also want to find an ideal angle where it doesn't pick up sound reflections from untreated walls or noise sources.
Cables and Routing
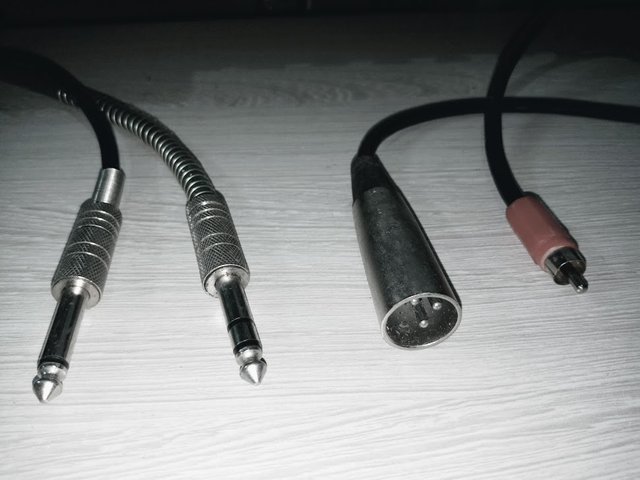
[TS, TRS, XLR, RCA cable connectors in order]
Low-Voltage Cables
Many types of professional audio gear require balanced connections (like TRS and XLR connectors with 3-wire cables) that cancel out noise from power lines or radio interference that may bleed into the signal. Although high-quality balanced cables are heavily shielded to protect the signal from radio interference, it’s still beneficial to keep them away from high-voltage power cables and outlets.
High-Voltage Cables
Nearly every piece of gear has to be plugged into a power source, like a 110/220-Volt outlet or USB port (which is also connected to a household outlet via the computer). 60Hz hum coming from 110/220V lines can bleed into audio or even USB cables so you want to keep them as far apart as you can. Another piece of equipment you might also need is a line filter/power stabilizer. Those are similar to voltage regulators and surge protectors but models specifically designed for audio equipment are more complex and expensive for a good reason. They not only keep the voltage stable but prevent line noise generated by other appliances from traveling through the power cables into your gear.
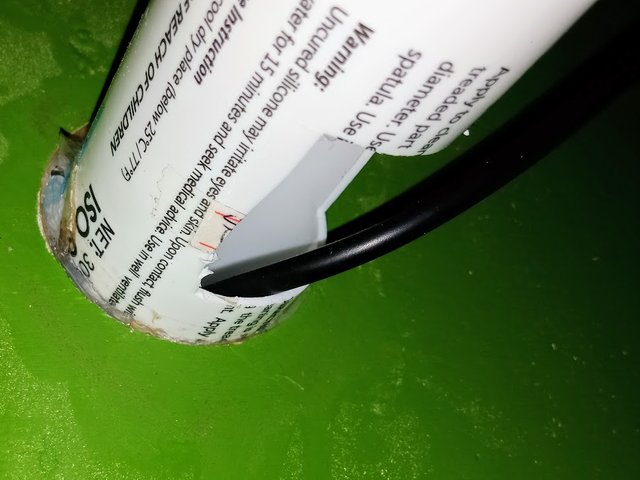
In the picture above, you see my main mic cable with its own hole through the drywall. I drilled a separate hole for the 220V power cable that powers the computer terminal (from the UPS in the control room), and the third hole for all USB and headset cables.
Audio Interface
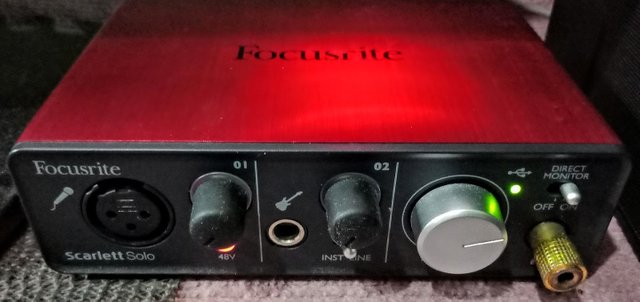
Consumer grade microphones like those built into headsets and many desktop microphones can be plugged in directly to the computer. The problem is they tend to produce low output or, when amplified via software, a lot of line noise (hiss and hum). This is a common issue especially when the plug gets oxidized over time and/or the jack loosens. USB interfaces provide a solution to this problem. This Focusrite Scarlett Solo provides reliable phantom power for my BM-800 mic, and a line-in or instrument jack which functions like a D.I. box.
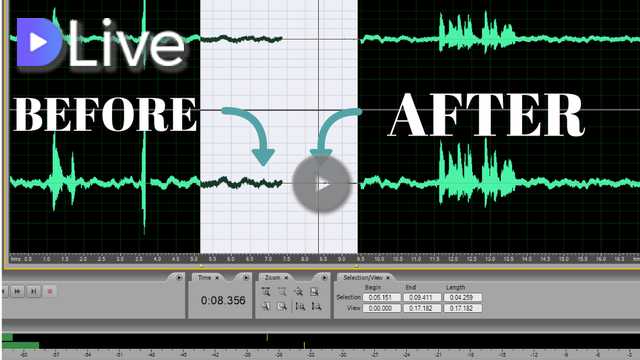
If you plan to record from a microphone directly plugged into your 1/8" PC mic jack, be sure to learn how to remove hiss and cable noise from your track. In this video, I demonstrate How I’d remove line noise from a vocal track using Adobe Audition.
My video is at DLive
In the next part of this series, I will show you how to edit and manage your vocal track and make it sit well with your music. Please stay tuned.
All images are my original work except any with the source cited.
Thanks for reading/viewing!
[Credits to the Author of Life]
Please consider casting your votes for the following witnesses: @curie, @surpassinggoogle, @steemgigs, @precise, @cloh76.witness, @ausbitbank, @teamsteem, @gmuxx, @hiroyamagishi, @elizahfhaye, @bayanihan, @papa-pepper, @steemph, @daveks, @jerrybanfield, @teardrops, @donkeypong, @davidpakman, @minnowsupport, @themarkymark, @blocktrades and @sndbox who have been adding invaluable contribution to the community.
To cast your votes, just go to
https://steemit.com/~witnesses


Please stay tuned for my favorite photos and the lessons I learned behind the scenes.
nice thinking @j-alhomestudio
to day its make easy to all...
Nice post
@j-alhomestudio! You've been featured on Scuzzy's Weekly Music Curation post on behalf of @msp-music.
Here's the link to the original post: https://steemit.com/music/@scuzzy/scuzzy-s-weekly-music-curation-06-22-18-or-msp-music-community-curation-initiative
Thanks!