[Week 4] Google IT Support Professional Certificate #26 | Course 4 System Administration and IT Infrastructure Services {Part 2}
.jpg)
This is part 2 for part 1 click here--------------- http://bit.ly/2BMZRwb
8.Managing Active Directory Users and Groups
As we mentioned in an earlier lesson, a common sysadmin task is managing the lifecycle of user accounts. User accounts are an important part of IT. They identify who you are and they used to control what kind of access you have to IT resources in your organization. Poorly managed user accounts can prevent people from doing what they need to do, which can waste time and get really frustrating. User accounts that have too much access or are no longer needed, create risk for the organization. All of this together means making sure that user accounts are created, maintained and eventually deleted is one of the most important tasks that assist administrator can have. So, let's dig in. Let's create a user account for Kristi using the Active Directory Administrative Center and put in the default user container. If we right click on "Users", right here and then click on "User", we get this dialogue to create a user. There's a whole bunch of stuff here. Do we really have to fill all of this in? Thankfully not. Only the fields that have the red asterisk next to them are required. Let's go ahead and enter a full name and account name for Kristi. The full name is a person's real name. But what's user SamAccountNameLog on. That's a very long way of saying username. The Security Account Manager or Sam is a database in windows that stores usernames and password. This is where, SAM account name comes from. So, let me go ahead and typing Kristi first. Then I want to type in her user account, we'll also name her Kristi.

You can see that the domain is going to be part of the accounts full name. Each user account has to have a unique username within the domain. We're just going to use Kristi first name here. Now, let's set a password for the new user account. We don't want to know Christi's password, so we're going to make sure the option "User must change password at the next log in" is checked and then choose a random password for her. Like so. All right. The AD administrative console that says, "Create user accounts one at a time," but eventually, we're going to need to create a whole bunch of counts at once. Imagine registration time at school or university when hundreds or thousands of new user accounts would need to be created in just a few days. You wouldn't want to do that by clicking through ADAC forms. If you know how to create a user account in the command line interface, then you can learn how to write a script that will run those commands for you over and over again. We're going to talk a lot more about scripting and automation in an upcoming lesson. For now, we just want to be able to see the commands that we'll need to do what ADAC does for us. It turns out that everything that you do in ADAC is actually done in PowerShell. Down at the bottom of the console is a windows PowerShell history pain that we can expand to see the commands that are being run by ADAC.
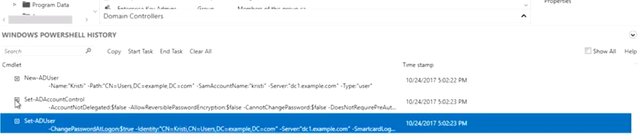
It looks like ADAC ran a few commands when we created Kristi user account. There's one other thing that I like to call out. When we need to describe the full path of an object in AD, we'll often use LDAP notation. You can see that in the parameters in this PowerShell history. Next, let's look at active directory groups. Remember our early discussion about groups used to grant permissions to roles. Let's create a group based in Kristi's role in this fictional org. Kristi, is a researcher in the active directory administrative center. Right click on the user's container and select "New Group". We're going to call this group researchers. So, let's enter that into the group name field. See the SAM account name field again. It fills automatically when the name as we type it. You can create a group with different full name and SAM account name. But it's usually not useful to do that. What is a good idea is to provide a description of the group. That way everyone understands what the groups for.
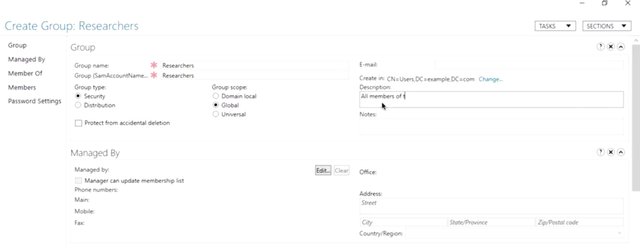
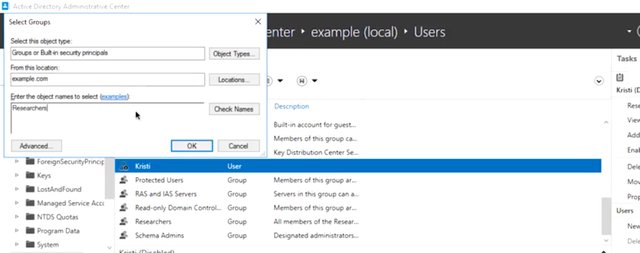
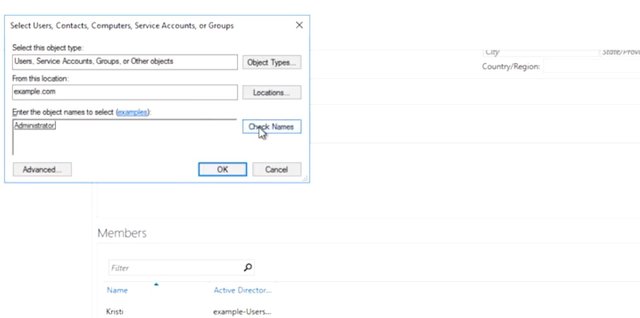
We can also add an initial set of users from the screen. But we're going to save that for the next step. For now, let's click Okay and the group will be created. The group now shows up in ADAC and the description is right there to remind us of what the groups used for. Excellent. Now, let's check ADAC's work and see how to do this in PowerShell. So, I'm going to go ahead and open PowerShell and paste my command. There it is. You can see all of the settings that we filled in fields for in the create group dialog in ADAC. But what are group category and group scope? If you look back at the new-group window, you'll see that there are two mandatory settings that we just left as default group type and group scope. So, what are they? There are two categories of group in active directory. The most common one and the only one that will deal with in this module is called a security group. Security groups can contain user accounts, computer accounts or other security groups. The default groups that we talked about before like domain users and domain admins are security groups that use to grant or deny access to IT resources. Let's say you create a human resource group, and then give that group access to a shared folder specifically for folks in human resources. The other type of group is called Distribution Group. A distribution group is only designed to group accounts and contacts for email communication. You can't use distribution groups for signing permission to resources. One reason you might use a distribution group and service security group, is to create an email list that included people from outside of your domain. What about group scope? Group scope has to do with the way that group definitions are replicated across domains. Keeping a lot of large groups synchronized in very large network is a complicated problem. So, active directory gives us different types of groups to manage that complexity. Most commonly groups scopes are used like this. Domain local, this is used to sign permission to a resource. An example of this would be to create a domain local group that has read access to a network shared code, Research Share Readers and another with write access code Research Share Writers. Global: this is used to group accounts into a role. Our example researchers group is a global group. You could have other role based groups like sales or management. Universal: this is used to group global roles in a forest. Domain local and global groups aren't replicated outside of the domain that they're defined in but, universal groups are. Now multi domain forest you might have a global research share readers group in each domain and or research shared readers universe group that contains each global group as members. Universal groups are replicated to all domains in a forest. The details of AD group's scope are a bit more complicated than we had time to get into. So, check out the supplemental reading if you want to know more. For now we'll stick to creating domain local resource groups and global role groups. With domain local resource groups and global role groups, you can create very easy to understand group memberships. They very clearly describe what kind of access each role is supposed to have to each resource. So, I can add managers to the Research Share Readers group and researchers to the Research Share Writers group. That's all very easy to understand. Now, if we add Kristie to our new researchers group, she can write to the research shared folder. It's not because her user account was given direct access to the files there, but because she's a researcher. All right, let's add user accounts to our new researchers group. We can do this from the user account or from the group. Let's start from Kristi's user account. In the active directory administrative center, right click on her account and select 'activegroups'. So, I want to do that right now. Now, in the "Enter the object names to select" field, type researchers. Let's do that right now. Then click "Okay".
That's it. What did ADAC do in the background. ADAC used PowerShella command that takes an active directory security principle like a user account or security group and add it to its group membership. I've included a link to more info about security principles in the next reading. Now, what if we want to make changes from the group instead? Let me add myself to the researchers group and see how that works. I'll right click on the research's group and then click on properties.
If I click on members, I can see that Kristi is a member of this group. Now, if I click on this add button off to the right, it will bring up a similar dialog window you saw before. Now, going to my account name and click okay, so I'm an administrator. Hit okay.
Just like we made changes from the group instead the user, so did ADAC and PowerShell. This time around, we used a PowerShell command to set or make changes to an existing AD group. We added my account to the researchers group. Now I'm not really a researcher in this org. So, let's go ahead and remove my account using ADAC.
This time of course, I use the remove button instead the add button and we're done. As you can see, the only thing that changed in the PowerShell command was a single parameter to remove instead of add a member. Most people in an organization, have more than one role. In our fictional company, researchers are part of the Research and Development Department. Some network resources will be shared with all of our R&D while some resources will only be made available to researchers. It makes sense for us to create a parent group for the R&D department. Let's create a global security group for this. So, what we're going to do is going to go ahead and right click "Users" like "New", "Group". Then go ahead and make more group named research and development. The description we're going to go ahead and write, "All of the members of the research and development group." Then we're going hit Okay. Now, our researchers are part of the R&D department, in addition to being researchers. So, instead of adding each research independently to the research and development group, we can add the researchers group as a member. If I type 'research' like this and hit okay, I get a list of all of the users and groups that start with research. Let's go ahead and select research and development to add the researchers group. What happened at the windows PowerShell history? Remember, user accounts in groups of both security principals. So, we use the same PowerShell command to change group membership here like we did before. So, we created a user and added them to some new groups. The next thing that you should know is how to assist the people they use support with password management. We'll go over that and more in the next lesson.

For more information on Group Scope check out the link here https://technet.microsoft.com/en-us/library/cc755692(v=ws.10).aspx
and for Security Principles click here. https://technet.microsoft.com/en-us/library/cc780957%28v=ws.10%29.aspx?f=255&MSPPError=-2147217396
9. Managing Active Directory User Passwords
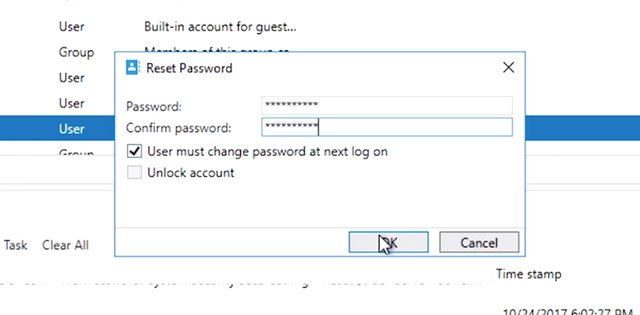
One of the key advantages of central authentication is that it simplifies the management of passwords. Did you know that up to 25 percent of people forget their password at least once a day? Helping users with password issues is a common task for an I.T support specialist. Once a user changes their password in active directory, that change is effective on every machine that they're permitted to log onto. With certain exceptions, AD doesn't store the user's password. Instead, it stores a one-way cryptographic hash of the password. You'll learn more about hashing in the I.T security course. In the meantime, the basic idea is that passwords can be easily turned into a hash, but hashes can't be easily turned back into passwords. You can't look up a user's password even if you wanted to. That's actually a really good thing. As a general rule, you should avoid ever knowing the password of another person's account. If there's more than one person who can authenticate using the same user name and password, then auditing becomes difficult or even impossible. To audit your infrastructure in this sense means to analyze who perform specific actions in your I.T infrastructure. In a security audit or troubleshooting scenario, it's important that only one person can authenticate with their account. So, keeping that in mind, how can you assist with the account passwords? The most common issue is that a person forgets the password. When this happens, if you have SysAdmin responsibilities, you may be authorized to reset their password for them. This should only be done when you're absolutely sure that the person requesting the password reset is allowed to do so. Many organizations will have policies and procedures that require the request to be made in person, or that the person otherwise prove that they are who they say they are. Once you know that the password reset is authorized, you've done the hard part. The rest is simple. So, let's imagine that Mateo reports that he can't sign into his account because he forgot his password. In the Active Directory administration center which I'll show you right here, we're going to right click on his user account. Lets find his user account first. And then right-click his account, and click reset password. The password that we enter here will be temporary because we we're going to make sure that user must change password at next log in is checked. So I'm going to go ahead and create a temporary password.
10. Joining an Active Directory Domain
If you have systems administrative responsibilities, you might be involved in joining machines to the Active Directory domain. Remember from our introduction to AD that computers can be joined or bound to Active Directory? Joining the computer to Active Directory means two things: that AD knows about the computer and has provisioned a computer account for it, and that computer knows about the Active Directory domain and authenticates with it. Over here, I'm logged in to a Windows computer that isn't joined to domain.
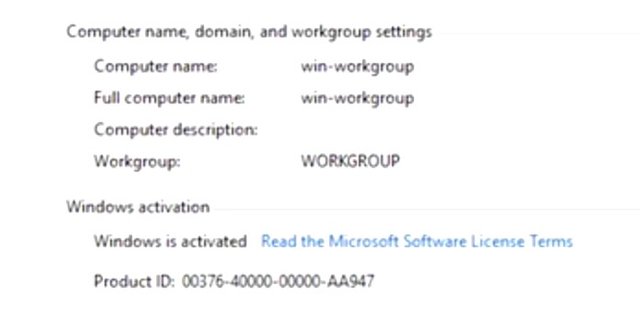
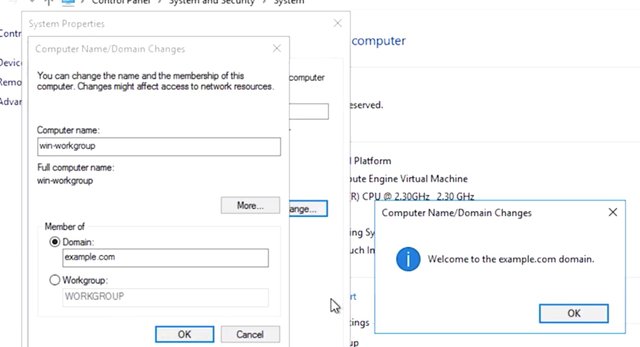
This is called a workgroup computer. The name comes from Windows workgroups which are a collection of standalone computers that work together. Windows workgroups aren't centrally administered so they become harder and harder to manage as the size of the network grows. We want central administration and authentication in our network. So let's join this computer to the domain. Let's look at the GUI for this first, then PowerShell. So we'll go ahead and click Computer, then System Properties. As you can see, this computer is under a workgroup. So what we need to do is we need to join this machine to the domain. To do that, I'm going to go ahead and click Change settings, click on Change. In the computer name and domain changes window, you can see the computer can either be a member of the domain or workgroup, but not both at the same time. So I'm going to go ahead and select the domain right here. And I'm going to go ahead and enter our domain name which is example.com. Now, when I click OK, this computer will reach out on the network to find the domain controller for my AD domain. Once it finds a DC, I'll be asked for a username and password to authorize the computer to be joined to the domain. So I put in my domain admin, username, and password. Which I am going to do right now. Voila, there you go. My machine is now joined to my domain.
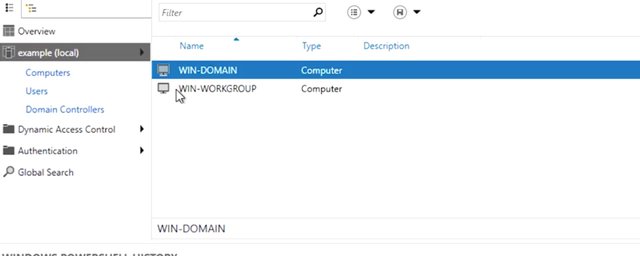
The Domain Controller creates a computer account in the domain for this computer, and this computer reconfigures itself to use AD authentication services. This will require a reboot, so let's jump over to the Active Directory administrative center to see what it looks like on that end. All right, so I'm at my Active Directory window and I'll go ahead and click Computers. All right, there it is. I can see my computer in the computer's container. Now, my new computer will use this Active Directory domain for authentication and I can use group policy to manage this machine.
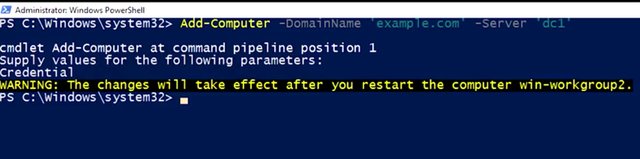
We can join computers to the domain from PowerShell, too. I've got this computer over here that also needs to be joined to the domain. So let's use the CLI this time. So I am going to go ahead and type in AD computer and domain name, example.com, and server, connect to dcl. That's nice and simple. Now, I'm prompted for my credentials again, which I'm going to enter.
And that's it. By default, this command won't automatically reboot the machine to complete the domain join. If I add the restart parameter, the command will take care of that, too. One final thing, over the years, there have been several versions of Active Directory.
We refer to these versions as functional levels, and Active Directory domain has a functional level that describes the features that it supports. If you're interested in seeing some of these changes to Active Directory over time, take a look at the next reading on AD functional levels. If you administer Active Directory, you'll need to know what your domain and forest functional levels are, and may some day need to upgrade your Active Directory forest or domains, or new features. So let's look at the properties on this domain. So this domain is at version 2016.
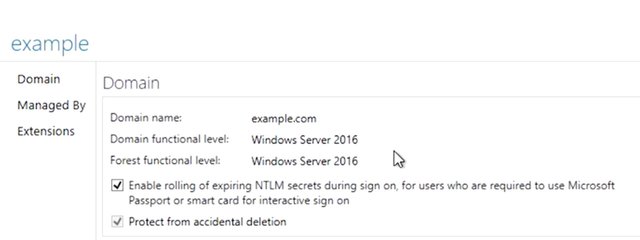
We can also find this from PowerShell like this. So type in Get-AdForest, and then Get-AdDomain. See the forest mode and domain mode properties? Now that you know what your domain's functional level is, you can find out what AD features it supports. Check out the supplemental reading for a whole lot of additional documentation and training materials if you want a deeper dive into AD administration.
11. What is Group Policy?
All right, now that we've joined all these computers to our domain, what are we going to do with them?
In this lesson, we're going to talk about how to use Active Directory group policy to configure computers and the domain itself. Like we mentioned before, directory services are databases that are used to store information about objects. The objects represent things in your network that you want to be able to reference or manage. One of these object types in AD is group policy object, or GPO.
What's a GPO? It's a set of policies and preferences that can be applied to a group of objects in the directory. GPOs contain settings for computers and user accounts. You may want different software preferences for the marketing team, the legal team, and the engineering team. Using group policy would help standardize the user preferences for each of these teams and help make it more manageable for you to configure. Using group policies you can create log in and log off Scrubs and apply them to users and computers. You can configure the event log telling the computer what events should be logged and where the logs should be sent. You can say how many times someone can enter the wrong password before their account is locked. You can install software that you want to be available, and block software that you don't want to run. You heard the boss, and this is just the beginning. You can create as many group policy objects as you want. But they don't do anything until they're linked to domain sites or OUs.
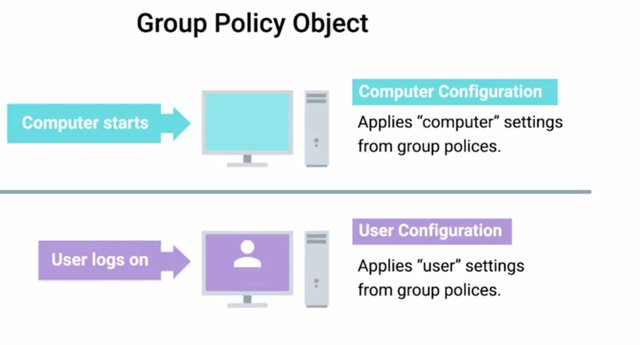
When you link a GPO, all of the computers or users under that domain, site, or OU will have that policy applied. You can use other tools like security filtering and WMI filters to make group policies apply more selectively. We'll get in to that a bit. A Group Policy Object can contain Computer Configuration, User Configuration, or both.
These are applied at different times. Computer Configuration is applied when the computer signs into the Active Directory domain. This will happen each time the computer boots into windows, unless it's disconnected from the network at the time it's booted up. User configuration is applied when a user account is logged onto the computer. In each case, once a GPO is in effect, it's checked and enforced every few minutes. Remember when I said that GPOs contain pauses and preferences? What's the difference? Policies are settings that are reapplied every few minutes, and aren't meant to be changed even by the local administrators.
By default, policies in the GPO will be reapplied on the machine every 90 minutes. This ensures that computers on the network don't drift from the configuration that systems administrators define for them. Group policy preferences, on the other hand, are settings that, in many cases, are meant to be a template for settings. System administrators will choose settings that should be the default on computers that apply the GPO. But someone using the computer can change the settings from what's defined in the policy, and that change won't be overwritten. How do domain-joined computers actually get their GPOs? When a domain-joined computer or user signs into the domain by contacting a domain controller, that domain controller gives the computer a list of group policies that it should apply. The computer then downloads those policies from a special folder called Sysvol, that's exported as a network share from every domain controller. This folder's replicated between all of the domain controllers and can also contain things like log in and log off scripts. Once the computer has downloaded it's GPOs, it applies them to the computer. We won't get into too much detail about the Sysvol folder, but I've included links to more information in the next reading. Lastly, many policies and preferences in GPOs are represented as values in the Windows Registry. The Windows Registry is a hierarchical database of settings that Windows, and many Windows applications, use for storing configuration data.
The GPO is applied by making changes to the registry. The Windows Operating System and Windows applications read the registry settings to determine what their behavior should be. You can read more about the Windows Registry in the supplemental reading. Group policy management is another huge topic. We'll only cover the basics of it in this course. Now that you understand a little bit about what group policy objects are, let's dig in and see how you use them to manage Active Directory and AD joined computers.
12. Group Policy Creation and Editing
The most important tool we'll use for creating and viewing group policy object is called the group policy management console or GPMC. You can find this in the tools menu of server manager or by running GPMC.MSE from the command line. You can see that the layer of GPMC is similar to other management tools that we've used in Active Directory.
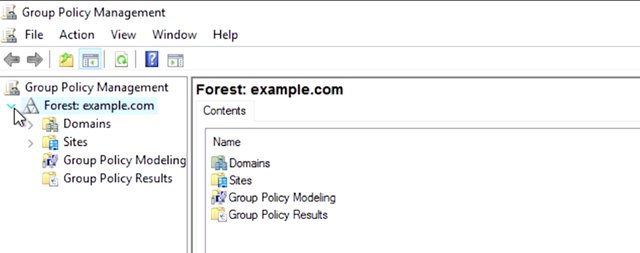
On the left, we see the structure of Active Directory. GPMC adds several containers to it's GUI. These aren't AD containers we all use. There are management interfaces that only show up in GPMC. The group policy objects container will hold all of the GPOs that are defined in the domain.
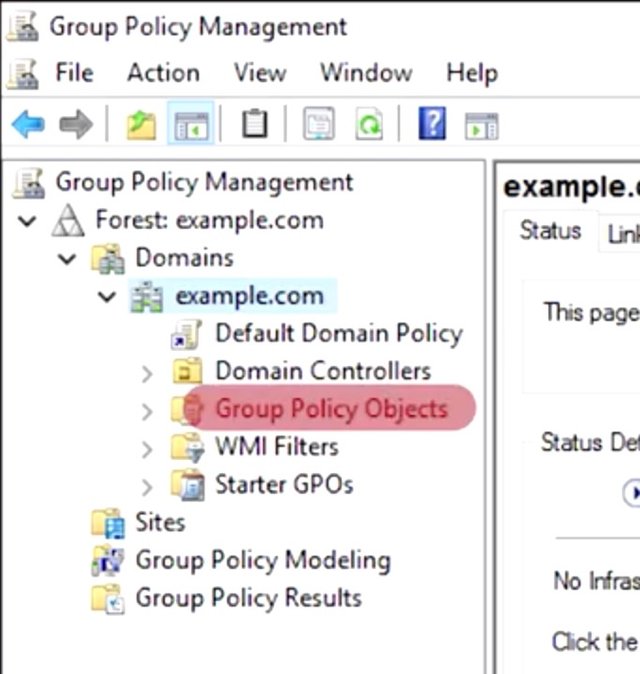
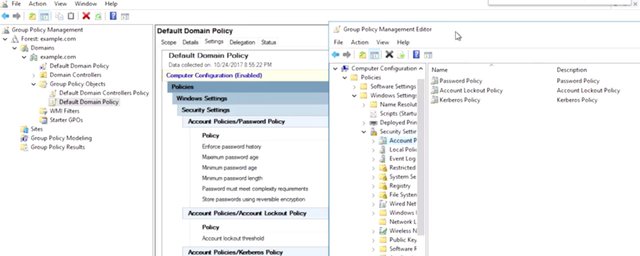
The WMI Filters container is used to define powerful targeting rules for your GPOs. These filters use properties of Windows Management Instrumentation or WMI objects to decide whether or not a GPO should apply to a specific computer. This is a more advanced topic, but if you want to dive a little deeper, check out the link in the supplemental reading. Group policy result is a troubleshooting tool that's used to figure out what group policies apply to computer and user in your network. You would use this tool to check on group policies that are already applied to a computer or user. On the flip side, group policy modeling is used to predict which group policies will apply to a computer or user in your network. You use this tool if you wanted to test a change to your GPOs or use or WMI Filters before making real changes in your Active Directory. We'll go into each of these in detail as the lesson goes on. You might have also noticed that there are a couple of things missing. Remember that the users and computer containers are not organizational units. Group policy objects can only be linked to domain, sites, and OUs. If computer and user objects are in the default containers they can only be targeted with GPOs that are linked to domains and sites. It's a good practice to organize your user and computer accounts in OUs so they can be targeted with a more specific group policies. Now, let's get started with group policy objects note in GPMC and take a quick look at a GPO that already exist. In a brand new Active Directory domain, they'll be two GPOs that are automatically created: the default domain controller policy and the default domain policy. The default domain policy is, as you might guess, a default GPO that is linked to the domain. It applies to all of the computers and users in the domain. The default domain control policy is linked to the domain control's OU and applies, you guessed it, to the domain controllers. What we're looking at here is a settings report for the default domain policy. This GPO is designed to enforce policy decisions that we want to make for the entire domain.
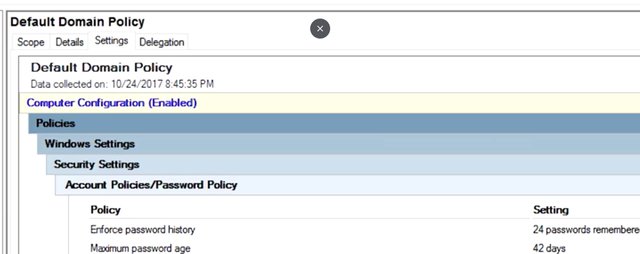
For example, the minimum password length policy prevents users from setting passwords that are too short. The audit account log on events policy says that the computer should create a Windows event for each successful and failed log on attempt. There are thousands of settings that can be controlled with GPO, so it can take some research to find the right setting to change in a group policy object to make a change that you want. Group policy has been around through several versions of Windows, and sometimes things aren't exactly where you'd expect to find them. Don't despair. There are lots of documentation online about group policies and where to find specific settings. Pro tip, something that you might find super useful are the group policy settings reference that Microsoft releases with each new version of Windows. This reference is a spreadsheet that details the GPO policies and preferences that are available and where to find them. Next, let's try changing one of the settings in our default domain policy. Before we get started, I'm going to make a backup of the GPO.
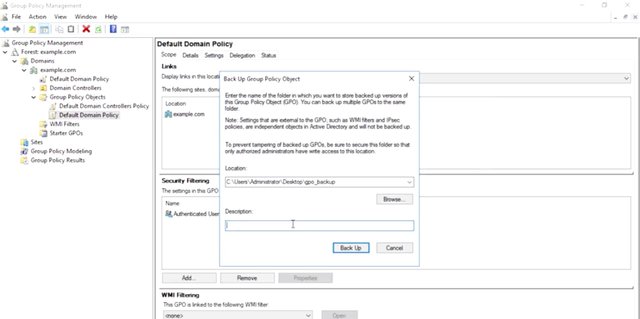
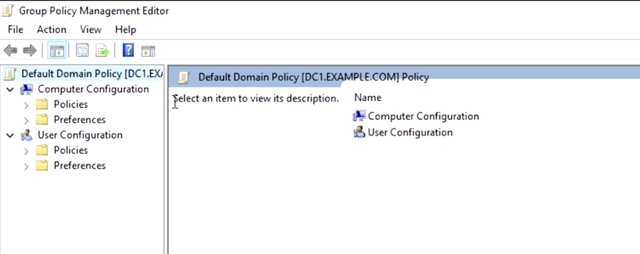
I'll right-click on the policy and choose backup. I've created GPO backup for my desktop, but in a real variant, we'd want to create a network for this lock down to only allow domain administrators to access it. I can add a description here too to help me remember why I made the backup. Then I complete the backup wizard and I'm done. Now, I know that if I make a mistake, I can restore the policy from backup. So I'll right-click on the policy again but this time, I'm choosing edit. This will open up the default domain policy into the group policy management editor. You can see over in the left-hand pane that the GPO is divided into two sections: computer configuration and user configuration.
Each of these is divided into policies and preferences. Inside this tree of policies and preferences, as every individual GPO setting that GPMC knows about, whether it's been configured or not, every GPO has accessed the same settings that every other GPO has access to. There aren't special GPOs. Even so, it's a good practice to make different GPOs that each address a specific category of need. For example, you might have a GPO that handles all of the settings for a specific group of users or one that handles security policies for the whole domain. With specific GPOs for specific solutions, you can link your GPOs to only the computer or users that need that policy. Since you're working with the entire universe of group policy in every GPO, it can be very difficult to tell from the editor what settings are actually configured in this GPO. Refer back to the settings report in the GPMC for that information. It looks different, but you might notice that the settings report is laid out in the same hierarchical fashion as the GPO editor. I can see that the account lockout threshold is configured to zero, invalid log on times. Let's take a look at that policy in the GPO editor. I'm going to use a settings report as a road map to finding that policy in the editor. So let me show you how. I'm going to go ahead and right-click, Default Domain Policy, hit edit. And I will have this to the side so I can look at our road map. So as you can see, computer configurations, so I click computer configuration, then click policies, click Windows settings, want to click security settings, and then account policies because we're interested in the lockout policy.
You can see that there are three policies under account lockout policy. The policy column tells us the name of the policy and the policy setting tells us the current configuration of the policy. If a policy is not defined, then this GPO won't make any changes to that setting on the computers that it's apply to. The policy name is pretty easy to understand, but I'm not sure that I understand all of the consequences of changing those values. If I double-click on any of these policies, it will open up the properties dialog for that policy. Oh, what's this? There's an explain tab here. Awesome. The explain tab will tell us what the policy configures. It may also tell us what to expect if the policy is not defined and what the default value of the policy is if it's enabled but not customized. So looking at the explanation of the account lockout threshold policy, I see that by having it set to zero, accounts will never be disabled for failed log-in attempts. That's not what I want in my domain,
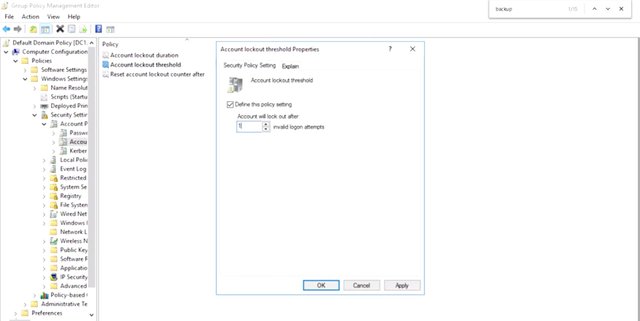
so I'm going to change this value. Oh, interesting. It looks like this policy has some dependencies on other policies. Okay. I'm going to accept these defaults, and now, I'll see that all three of these policies in the account lockout policy have been configured. So how do we save these changes? As soon as you hit apply or OK in a group policy management editor dialog, the changes made in the GPO immediately. Almost right away, computers can receive the update and start applying it. That might not be what you wanted. When you need to make changes to a production group policy, you should test them first. For example, I was playing around with the default domain policy which is linked to the whole domain. So I just immediately made it so all user accounts will be locked if they enter their password incorrectly once. Whoops. Where's the undo button? Guess what? There isn't one. Don't worry. This is why we made a backup before starting to work on this policy. Let's restore the policy from backup and undo this catastrophe waiting to happen. Back in the group policy management console, I'm going to right-click on default domain policy in the group policy objects and then select restore from backup. This wizard remembers the last place that I backed up a GPO, and it seems that's where I want to restore from. So intuitive. Now, it lists each of the GPO backups that are in the folder that we choose.
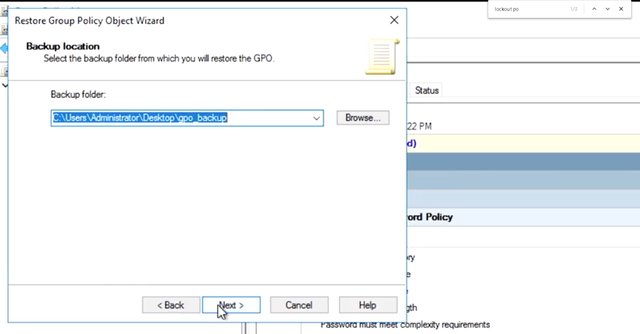
The name of the policy and the time that it was backed up are listed here, along with any descriptions that we provided when we did the backup. If I click on view settings, it would launch my web browser with the settings report of the backup. Cool, right? Okay. I need to get this policy restored so my users don't get locked out of their accounts. The summary dialog shows me what I'm about to do, so let's go there. This all looks right. So I'm going to click finish and make sure that my policy has been restored.
Perfect. My backup has been restored, and my mistake has been undone. As you've seen in this example, before making changes to a GPO, you should always back it up, but what's another way I could have prevented this mistake? That's right. I could have tested my changes. There are lots of ways to do this. I'll summarize some simple steps here and provide additional documentation in the supplemental reading. Some organizations will have established best practices for testing GPO changes in their environment. If that's the case, then you should follow those standards. You might need to follow a change management process too in order to notify others in the organization about the changes that you were about to make. What I'm going to show you is just one way of adding some safety to GPO changes. Let's say, I have a GPO code example policy. Good name, right? I want to make changes to example policy, but I want to test the changes first to make sure that I don't break production machines. First, I set up a testing OU that contains test machines or user accounts. If example policy is usually linked at example.com, finance, then computers, then I can create example.com, finance, computers, test, and put testing machines in the test OU. This lets the test machines keep all of the existing production GPOs but gives me a place to link a test GPO that'll overwrite production. Let me go and show you how I do that. So I click example, click new, click OU, and type in finance and click OK.
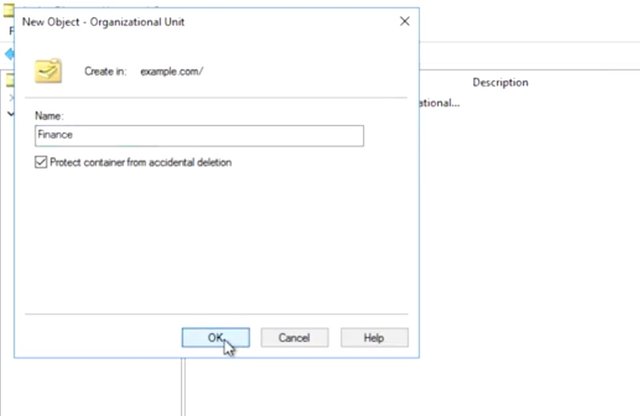
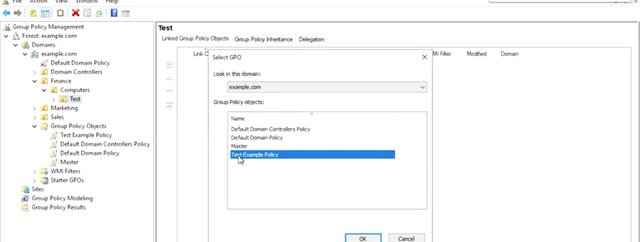
Thinker another OU from my computers, and then underneath that, I'm going to go ahead and make a test OU so I can test my GPO, hit OK. Next, I make a copy of the GPO that I want to change and call it something like test example policy. Let me show you how I do that. So this is one policy that I have. I'm going to hit copy, go to my group policy objects, hit paste. Now, it say, "Use the default permission for the GPOs," because we want to make a copy, of course, and hit OK. As you can see, its called 'copy of master'. I'm going to rename this to test example policy, enter. Now, I can make the changes that I want to test in test example policy and link it to my test OU, and let me show you how I linked that. I'm going to go into my OU finance, computers, and then test, right-click test. And now, it'll say, "Link an existing GPO," which is going to be my test example policy right here and then hit OK.
After I confirmed that my changes work the way that I expected, I can make a backup of the test policy then import the backup of test example policy to the production example policy. This makes some extra work for me since I'm a systems administrator, but I also benefit from added safety and peace of mind. By testing my changes on a copy of the GPO on test machines, I make it much harder to accidentally break production with machines. Your organization might be using advanced group policy management or AGPM, which is a set of add-on tools from Microsoft that give you some added provision control abilities in GPMC. If you do use AGPM in your organization, you should follow best practices for GPO version control using AGPM. I've included a link to those best practices in the next reading. We've edited the GPO and seen some ways to make editing GPO safe. Now, we need to know a bit more about how to understand all of the policies that are applied to a specific machine or user account. Next up, GPO inheritance and precedence. I'll see you there.
To Join this course click on the link below
.jpg)
Google IT Support Professional Certificate http://bit.ly/2JONxKk
LInks to previous weeks Courses.
[Week 3] Google IT Support Professional Certificate #24 | Course 4 System Administration and IT Infrastructure Services
http://bit.ly/2BRtOLu
[Week 2] Google IT Support Professional Certificate #23 | Course 4 System Administration and IT Infrastructure Services
http://bit.ly/2N25GqA
[Week 1] Google IT Support Professional Certificate #22 | Course 4 System Administration and IT Infrastructure Services
http://bit.ly/2PiJpX2
[Week 6] Google IT Support Professional Certificate #21 | Course 4 System Administration and IT Infrastructure Services
http://bit.ly/2MqF857
[Week 5] Google IT Support Professional Certificate #20 | Course 3 WEEK 5 Operating Systems and You: Becoming a Power User
http://bit.ly/2P8wVRQ
[Week 4] Google IT Support Professional Certificate #19 || Course 3 WEEK 4 Operating Systems and You: Becoming a Power User
http://bit.ly/2B6KE8E
[Week 3] Google IT Support Professional Certificate #17 || Course 3 WEEK 3 Operating Systems and You: Becoming a Power User{Part 1}
http://bit.ly/2AYxJ8Z
[Week 2] Google IT Support Professional Certificate #16 || Course 3 WEEK 2 Operating Systems and You: Becoming a Power User
http://bit.ly/2nhSKBA
[Week 1] Google IT Support Professional Certificate #15 || Course 3 WEEK 1 Operating Systems and You: Becoming a Power User {Part 2}
http://bit.ly/2naOweX
[Week 1] Google IT Support Professional Certificate #14 || Course 3 WEEK 1 Operating Systems and You: Becoming a Power User {Part 1}
http://bit.ly/2M4pn3C
Google IT Support Professional Certificate #0 | Why you should do this Course? | All details before you join this course.
http://bit.ly/2Oe2t8p
#steemiteducation #Computerscience #education #Growwithgoogle #ITskills #systemadministration #itprofessional
#googleitsupportprofessional
Atlast If you are interested in the IT field, this course, or want to learn Computer Science. If you want to know whats in this course, what skills I learned Follow me @hungryengine. I will guide you through every step of this course and share my knowledge from this course daily.
Support me on this journey and I will always provide you with some of the best career knowledge in Computer Science field.