手把手教你玩eos:卡牌游戏第三课——从区块链中读取状态
文章由EOS节点EOSWing(柚翼)首发于eoswing.io博客,内容将不定期更新,仅供学习交流之用。

0.引言
0.1教程概况
手把手教你玩eos系列教程,从最基础开始,一步一步教你学会用eos。比如发代币,开发DAPP等等。
本文是第九篇。本篇教程主要学习如何从区块链中获取数据。
0.2 学习内容
相关准备
代码编写
测试代码
0.3 机器环境
cpu: 1核
内存: 8G
操作系统:CentOS 7.4 64位
服务器所在地:香港
推荐将服务器放在网络较为优质的环境,比如香港。不然会有很多配置依赖下载上的问题。
1 相关准备
1.1 课程目标
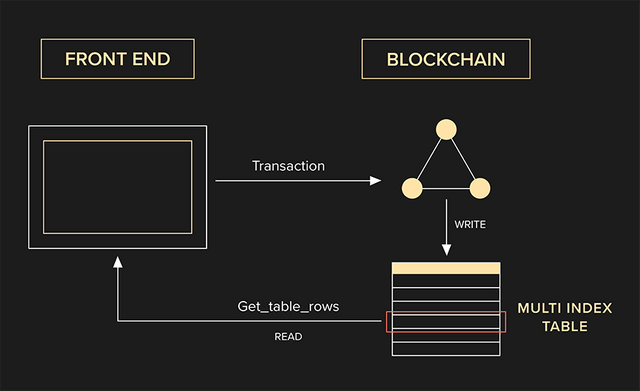
为了获取数据,我们使用RPC调用(get_table_rows)传入参数,这将强制它仅返回与包含在多索引表的一行中的当前播放器相关联的数据。然后,我们将在新的个人资料页面中显示前端的数据。
整个流程如下图所示:
1.2 准备工作
进入开发环境容器
docker exec -it eosdev /bin/bash
进入前端文件夹
cd /eos-work/frontend/src
2 代码编写
2.1 编写与区块链通信的代码
打开负责与后端区块链通信的ApiService.js
vi ./services/ApiService.js
在代码中添加getUserByName()和getCurrentUser()两个函数:
class ApiService {
//===添加getCurrentUser()函数===
static getCurrentUser() {
return new Promise((resolve, reject) => {
if (!localStorage.getItem("cardgame_account")) {
return reject();
}
takeAction("login", { username: localStorage.getItem("cardgame_account") })
.then(() => {
resolve(localStorage.getItem("cardgame_account"));
})
.catch(err => {
localStorage.removeItem("cardgame_account");
localStorage.removeItem("cardgame_key");
reject(err);
});
});
}
//===添加getUserByName()函数===
static async getUserByName(username) {
try {
const rpc = new Rpc.JsonRpc(process.env.REACT_APP_EOS_HTTP_ENDPOINT);
const result = await rpc.get_table_rows({
"json": true,
"code": process.env.REACT_APP_EOS_CONTRACT_NAME, // contract who owns the table
"scope": process.env.REACT_APP_EOS_CONTRACT_NAME, // scope of the table
"table": "users", // name of the table as specified by the contract abi
"limit": 1,
"lower_bound": username,
});
return result.rows[0];
} catch (err) {
console.error(err);
}
}
//======
}
2.2 编写显示玩家信息的组件
我们在Game下面创建PlayerProfile组件负责显示玩家信息
首先,下载图片素材到images文件夹
cd ./components/Game/components/PlayerProfile/
svn checkout https://github.com/EOSIO/eosio-card-game-repo/branches/lesson-3/frontend/src/components/Game/components/PlayerProfile/images
创建PlayerProfile.jsx
vi PlayerProfile.jsx
输入代码:
import React, { Component } from 'react';
import { Button } from 'components';
class PlayerProfile extends Component {
render() {
// Extract data and event functions from props
const { name, winCount, lostCount, onStartGame } = this.props;
// Display welcome message,
//         buttons for login / start game,
//         number of winning and losing
return (
  <div className="PlayerProfile">
    <div className="title">Elemental Battles - powered by EOSIO</div>
    <div className="welcome">
      <span>Welcome</span>
    </div>
    <div className="username">
      <span>{ name }</span>
    </div>
    <div className="record">
      <p>Your Current Record</p>
      <span>Win <span className="count">{ winCount }</span></span>
      <span> | </span>
      <span>Lost <span className="count">{ lostCount }</span></span>
    </div>
    <div className="buttons">
      <Button onClick={ onStartGame } className="green">START</Button>
    </div>
  </div>
)
}
}
export default PlayerProfile;
创建index.js
vi index.js
输入代码:
import './PlayerProfile.css';
import PlayerProfile from './PlayerProfile';
export default PlayerProfile;
2.3 添加调用逻辑代码
回到上级目录,创建组件的index.js
cd ..
vi index.js
输入代码:
import PlayerProfile from './PlayerProfile';
export {
PlayerProfile,
}
再回到Game目录下,在Game.jsx中增加代码块
cd ..
vi Game.jsx
修改代码如下:
// React core
import React, { Component } from 'react';
import { connect } from 'react-redux';
// Game subcomponents
import { PlayerProfile } from './components';
// Services and redux action
import { UserAction } from 'actions';
import { ApiService } from 'services';
class Game extends Component {
constructor(props) {
// Inherit constructor
super(props);
// Bind functions
this.loadUser = this.loadUser.bind(this);
// Call loadUser before mounting the app
this.loadUser();
}
// Get latest user object from blockchain
loadUser() {
// Extract setUser of UserAction and user.name of UserReducer from redux
const { setUser, user: { name } } = this.props;
// Send request the blockchain by calling the ApiService,
// Get the user object and store the win_count, lost_count and game_data object
return ApiService.getUserByName(name).then(user => {
setUser({
win_count: user.win_count,
lost_count: user.lost_count,
game: user.game_data,
});
});
}
render() {
// Extract data from user data of UserReducer from redux
const { user: { name, win_count, lost_count } } = this.props;
return (
  <section className="Game">
    <PlayerProfile
      name={ name }
      winCount={ win_count }
      lostCount={ lost_count }
    />
  </section>
)
}
}
// Map all state to component props (for redux to connect)
const mapStateToProps = state => state;
// Map the following action to props
const mapDispatchToProps = {
setUser: UserAction.setUser,
};
// Export a redux connected component
export default connect(mapStateToProps, mapDispatchToProps)(Game);
再到App文件夹下,修改App.jsx
cd ../App
vi App.jsx
此次修改如下,注意对比前后差别。
// React core
import React, { Component } from 'react';
import { connect } from 'react-redux';
// Components
import { Game, Login } from 'components';
// Services and redux action
import { UserAction } from 'actions';
import { ApiService } from 'services';
class App extends Component {
constructor(props) {
// Inherit constructor
super(props);
// Bind functions
this.getCurrentUser = this.getCurrentUser.bind(this);
// Call getCurrentUser before mounting the app
this.getCurrentUser();
}
getCurrentUser() {
// Extract setUser of UserAction from redux
const { setUser } = this.props;
// Send a request to API (blockchain) to get the current logged in user
return ApiService.getCurrentUser()
// If the server return a username
.then(username => {
// Save the username to redux store
// For structure, ref: ./frontend/src/reducers/UserReducer.js
setUser({ name: username });
})
// To ignore 401 console error
.catch(() => {});
}
render() {
// Extract data from state and props (user is from redux)
const { user: { name } } = this.props;
// If the username is set in redux, display the Game component
// If the username is NOT set in redux, display the Login component
return (
  <div className="App">
    { name && <Game /> }
    { !name && <Login /> }
  </div>
);
}
}
// Map all state to component props (for redux to connect)
const mapStateToProps = state => state;
// Map the following action to props
const mapDispatchToProps = {
setUser: UserAction.setUser,
};
// Export a redux connected component
export default connect(mapStateToProps, mapDispatchToProps)(App);
3 测试代码
cd /eos-work/frontend
npm start
因为这次会读取缓存信息。所以注意先清除下浏览器缓存,或者换一个浏览器。
如果没清除缓存的话,会自动跳到玩家信息页面。
在浏览器中输入网址查看:
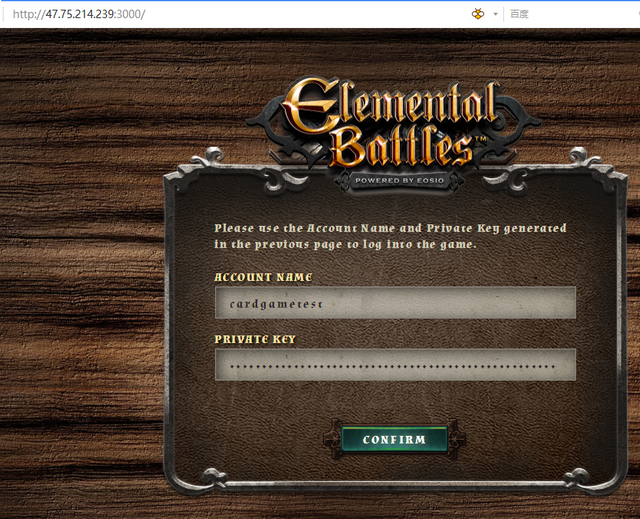
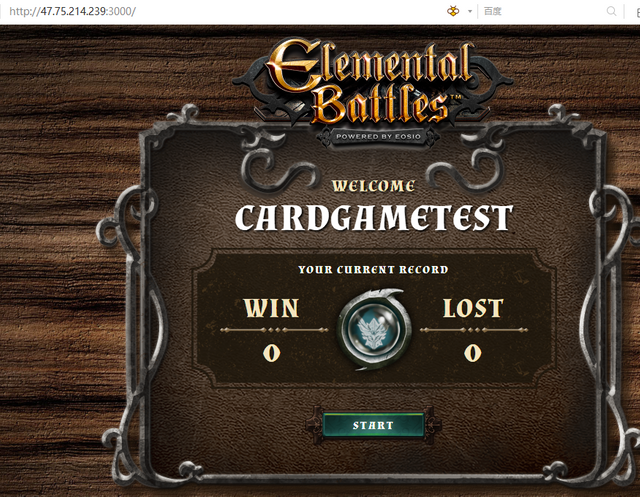
输入正确的账号名和私钥后,登录可以看到当前玩家信息。
由于我们还没有比赛,输赢的数据都是零。
4 后记
延伸阅读
在本文的学习中如果遇到问题,欢迎留言或者在如下链接寻找解决方案:
EOS官方游戏开发第三课: https://battles.eos.io/tutorial/lesson3/chapter1
如果觉得这一系列教程有点意思,请投票给柚翼节点(eoswingdotio)。您的投票是本教程持续更新的动力源泉,谢谢。