手把手教你玩eos:卡牌游戏第七课——完善游戏流程
文章由EOS节点EOSWing(柚翼)首发于eoswing.io博客,内容将不定期更新,仅供学习交流之用。
0.引言
0.1教程概况
手把手教你玩eos系列教程,从最基础开始,一步一步教你学会用eos。比如发代币,开发DAPP等等。
本文是第十三篇。本篇教程主要学习卡牌游戏的整个游戏流程代码编写。
0.2 学习内容
相关准备
智能合约代码编写和部署
编写前端代码
测试代码
0.3 机器环境
cpu: 1核
内存: 8G
操作系统:CentOS 7.4 64位
服务器所在地:香港
推荐将服务器放在网络较为优质的环境,比如香港。不然会有很多配置依赖下载上的问题。
1 相关准备
1.1 课程目标
在本课程中,我们将完善整个游戏流程,确保体验一个完整的游戏。同时,根据比赛结果,提示结束游戏并开始下一轮。
1.2 规则讲解
在每个回合结束时我们继续前进到下一轮,但在此之前,检查游戏状态以确定游戏是否已经完成是很重要的。
在以下情况,结束游戏:
AI HP达到零,则玩家赢得游戏;
玩家HP达到零,则玩家输掉游戏;
如果玩家和AI都用完卡片,那么:
玩家HP高于AI HP,则玩家赢得游戏;
AI HP比玩家HP更高,则AI赢得了比赛。
如果游戏尚未结束,则玩家可以选择前进到下一轮并玩另一张牌,或者认输并结束游戏。
1.3 准备工作
进入开发环境容器
docker exec -it eosdev /bin/bash
进入后端智能合约文件夹
cd /eos-work/contracts/cardgame
2 智能合约代码编写和部署
2.1 编写合约代码
打开cardgame.hpp文件:
vi cardgame.hpp
编辑代码,添加代码如下:
void resolve_selected_cards(game& game_data);
//在上面代码行后添加如下代码
//===下面为添加代码===
void update_game_status(user_info& user);
//======
//......
void startgame(account_name username);
//在上面代码行后添加如下代码
//===下面为添加代码===
void endgame(account_name username);
void nextround(account_name username);
打开gameplay.cpp文件:
vi gameplay.cpp
在所有代码行的最后面添加代码如下:
//在代码行的最后添加如下代码
// Check the current game board and update the game status accordingly
void cardgame::update_game_status(user_info& user) {
game& game_data = user.game_data;
if (game_data.life_ai <= 0) {
// Check the AI's HP
game_data.status = PLAYER_WON;
} else if (game_data.life_player <= 0) {
// Check the player's HP
game_data.status = PLAYER_LOST;
} else {
// Neither player has their HP reduced to 0
// Check whether the game has finished (i.e., no more cards in both hands)
const auto is_empty_slot = [&](const auto& id) { return card_dict.at(id).type == EMPTY; };
bool player_finished = std::all_of(game_data.hand_player.begin(), game_data.hand_player.end(), is_empty_slot);
bool ai_finished = std::all_of(game_data.hand_ai.begin(), game_data.hand_ai.end(), is_empty_slot);
// If one of them has run out of card, the other must have run out of card too
if (player_finished || ai_finished) {
if (game_data.life_player > game_data.life_ai) {
game_data.status = PLAYER_WON;
} else {
game_data.status = PLAYER_LOST;
}
}
}
// Update the lost/ win count accordingly
if (game_data.status == PLAYER_WON) {
user.win_count++;
} else if (game_data.status == PLAYER_LOST) {
user.lost_count++;
}
}
打开cardgame.cpp文件:
vi cardgame.cpp
编辑代码,在startgame函数后添加代码如下:
void cardgame::startgame(account_name username) {
// Ensure this action is authorized by the player
require_auth(username);
auto& user = _users.get(username, "User doesn't exist");
_users.modify(user, username, [&](auto& modified_user) {
// Create a new game
game game_data;
// Draw 4 cards each for the player and the AI
for (uint8_t i = 0; i < 4; i++) {
draw_one_card(game_data.deck_player, game_data.hand_player);
draw_one_card(game_data.deck_ai, game_data.hand_ai);
}
// Assign the newly created game to the player
modified_user.game_data = game_data;
});
}
//在上面代码行后添加如下代码
//===下面为添加代码===
void cardgame::endgame(account_name username) {
// Ensure this action is authorized by the player
require_auth(username);
// Get the user and reset the game
auto& user = _users.get(username, "User doesn't exist");
_users.modify(user, username, [&](auto& modified_user) {
modified_user.game_data = game();
});
}
void cardgame::nextround(account_name username) {
// Ensure this action is authorized by the player
require_auth(username);
auto& user = _users.get(username, "User doesn't exist");
// Verify game status
eosio_assert(user.game_data.status == ONGOING,
"nextround: This game has ended. Please start a new one.");
eosio_assert(user.game_data.selected_card_player != 0 && user.game_data.selected_card_ai != 0,
"nextround: Please play a card first.");
_users.modify(user, username, [&](auto& modified_user) {
game& game_data = modified_user.game_data;
// Reset selected card and damage dealt
game_data.selected_card_player = 0;
game_data.selected_card_ai = 0;
game_data.life_lost_player = 0;
game_data.life_lost_ai = 0;
// Draw card for the player and the AI
if (game_data.deck_player.size() > 0) draw_one_card(game_data.deck_player, game_data.hand_player);
if (game_data.deck_ai.size() > 0) draw_one_card(game_data.deck_ai, game_data.hand_ai);
});
}
//======
再在startgame函数体中添加一行代码:
resolve_selected_cards(game_data);
//在上面代码行后添加如下代码
//===下面为添加代码===
update_game_status(modified_user);
//======
最后,在末尾定义abi时,添加函数体:
//在最后一行添加nexttround 和 endgame 两个函数
EOSIO_ABI(cardgame, (login)(startgame)(playcard)(nextround)(endgame))
2.2 部署智能合约覆盖原合约
编译智能合约
编译wast文件
eosiocpp -o cardgame.wast cardgame.cpp
编译abi文件
eosiocpp -g cardgame.abi cardgame.cpp
解锁钱包
cleos wallet unlock -n gamewallet
部署智能合约
cleos -u https://api-kylin.eosasia.one set contract 123123gogogo /eos-work/contracts/cardgame -p 123123gogogo@active
至此,后端的合约重新部署完成。
3 编写前端代码
3.1 编辑Game.jsx
cd /eos-work/frontend/src/components/Game/
vi Game.jsx
更新代码如下:
//在rander()前添加handleNextRound和handleEndGame两个函数
handleNextRound() {
// Send a request to API (blockchain) to trigger next round
// And call loadUser again for react to render latest game status to UI
return ApiService.nextRound().then(()=>{
return this.loadUser();
});
}
handleEndGame() {
// Send a request to API (blockchain) to end the game
// And call loadUser again for react to render latest game status to UI
return ApiService.endGame().then(()=>{
return this.loadUser();
});
}
//在render()函数中添加两个函数体,
render() {
// Extract data from user data of UserReducer from redux
const { user: { name, win_count, lost_count, game } } = this.props;
// Flag to indicate if the game has started or not
// By checking if the deckCard of AI is still 17 (max card)
const isGameStarted = game && game.deck_ai.length !== 17;
// If game hasn't started, display PlayerProfile
// If game has started, display GameMat, Resolution, Info screen
return (
<section className="Game">
{ !isGameStarted ?
<PlayerProfile
name={ name }
winCount={ win_count }
lostCount={ lost_count }
onStartGame={ this.handleStartGame }
/>
:
3.2 编辑ApiService.js
cd /eos-work/frontend/src/services/
vi ApiService.js
添加代码如下:
static playCard(cardIdx) {
return takeAction("playcard", { username: localStorage.getItem("cardgame_account"), player_card_idx: cardIdx });
}
//在上面代码行后添加如下代码
//===下面为添加代码===
static nextRound() {
return takeAction("nextround", { username: localStorage.getItem("cardgame_account") });
}
static endGame() {
return takeAction("endgame", { username: localStorage.getItem("cardgame_account") });
}
//===
4 测试代码
cd /eos-work/frontend
npm start
在浏览器中输入网址测试。
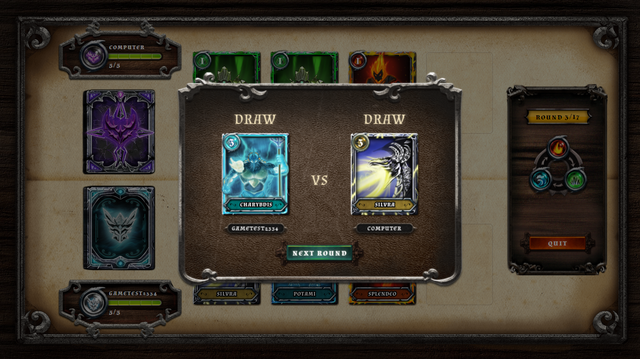
这次,还是保留了上节课程的账号缓存,所以输入网址后直接跳转到对战界面。
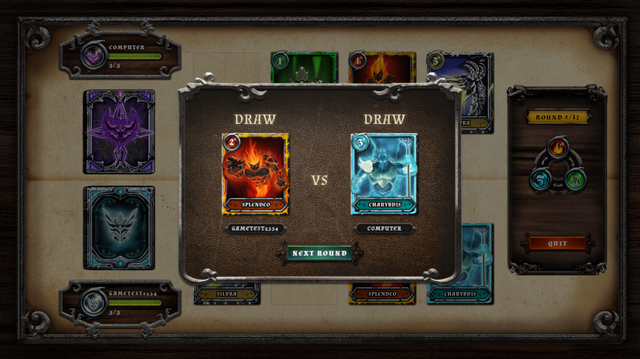
点击按钮进入游戏主界面:
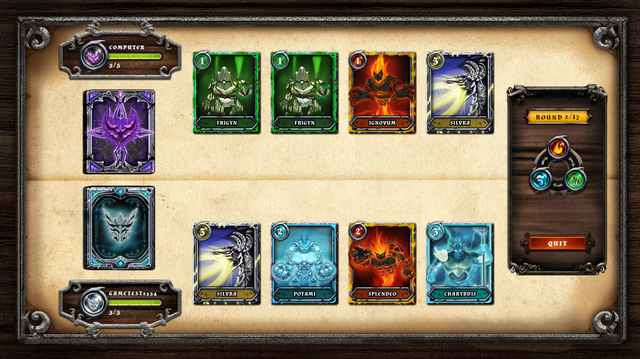
再次选择卡牌,进行对战:
5 后记
延伸阅读
在本文的学习中如果遇到问题,欢迎留言或者在如下链接寻找解决方案:
EOS官方游戏开发第五课: https://battles.eos.io/tutorial/lesson5/chapter1
如果觉得这一系列教程有点意思,请投票给柚翼节点(eoswingdotio)。您的投票是本教程持续更新的动力源泉,谢谢。