Steps and tips on how to grow potatoes at home
Hello friends, receive a greeting in the name of God, may the Lord bless you. In this opportunity I will present "The potatoes" that are a staple in the diet that in my country years ago was economical because there were high production and plantings, but now they have become an expensive food; so not all Venezuelans can buy it now. Being a supplement that can be consumed in different ways. in view of this we must learn to plant it in our homes in pots and you will have enough potatoes to feed the family and friends.
Planting potatoes in pots minimizes the amount of space you need and also reduces the risk of infestation by pests and diseases. What you will need most is a deep and heavy pot, since the potatoes grow underground and need a lot of space.
How to grow potatoes at home in pots?
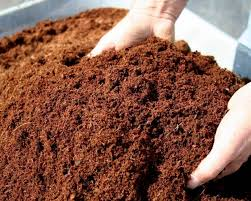
It is important to have land, fertilizer and a masseter of at least 10 liters.The bigger the better, the more potatoes you will have.
Make sure your pot has numerous drainage holes. Potato seeds will rot if they are in a land with too much water for an extended period of time, which is why drainage holes are necessary to prevent this from happening. If the pot or container you choose has no holes, drill two or three holes in the bottom with a drill.
Consider the use of an organic fertilizer, such as dried chicken manure, meat meal, fish meal or algae.
Type of Earth to use?
Potatoes or potatoes can develop from soils with Ph 4.6 up. What you should never do is lime the land where they will be planted. These prefer soils rich in potassium and phosphate. This plant likes well drained and moist soils.
It is highly recommended, the autumn before the crop, to incorporate manure or compost to the land where the potatoes or potatoes are going to be planted. 45 kg of manure or compost per 10 m ^ 2 is sufficient. This is done to supply the potassium and phosphate that they will need.
Where to get the seed?
Most of our fruits and vegetables start with a seed.
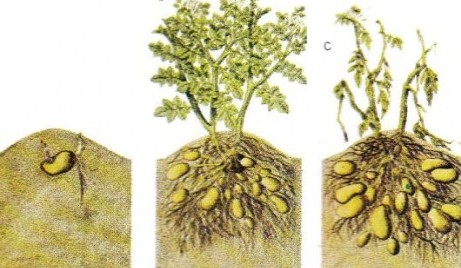
The potato can reproduce by seed or by tuber.
Producing a potato plant by seed takes longer and is more complicated than by tuber.
If we observe a potato, we will see the eyes or buds, from these the roots and stems are produced. That is to say that we must choose some potatoes and let them germinate and then sow.
Steps
1-Germination
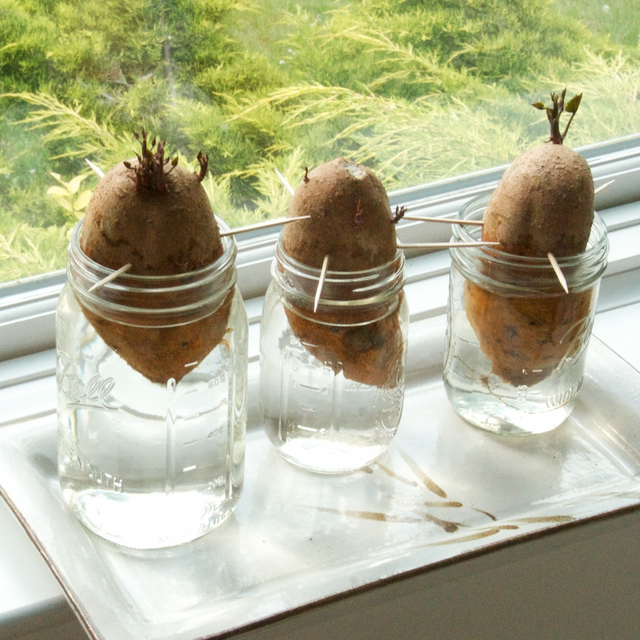
Leave the potato seeds in a cool, dark place. A cupboard or closet in the basement are very suitable places. Keep them in an egg carton or other container that holds them and check them every day to see if they already have eyes.
-Pass the potatoes to a lighted but fresh place when they have developed some eyes. Keep potatoes in this place, with most of the eyes facing up, until dark green shoots are formed.
-Remove the excess of eyes. The more eyes you have, the more potatoes you can grow; however, the more potatoes you grow from a tuber, the smaller these will be. Select the three strongest eyes and remove the rest by rubbing them with your finger or cut them with a sharp knife.
-Cut the potatoes in half. If you do not want to take your eyes off, cut the potatoes in half and treat each of them as if they were two different seeds. Each half should weigh between 42 and 56 grams (1.5 and 2 ounces) and should also have two or three eyes.
-Let the cut halves be entangled. The exposed portions will dry and form a kind of callus if you leave them in the air for a few days.
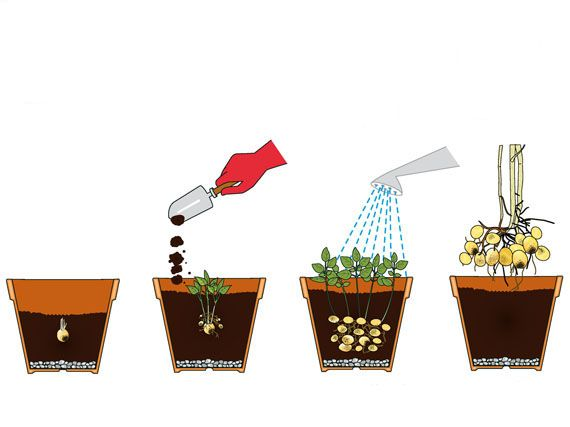
How to plant?
1-Cover the bottom of the pot with gravel or gravel. These materials help in the drainage process, by absorbing the water and preventing it from remaining in the pot for too long.
2-Fill the pot with between 10 and 15 centimeters (4 and 6 inches) of your culture medium. Gently flatten the earth with your hands to make sure it is solid and firm enough to hold the potatoes in place, so they will not sink when they gain weight.
3-Arrange the potatoes in the pot. Most eyes should be facing up. Separate the tubers evenly and do not overload the container. As a general guide, a 30 cm (12 inch) diameter pot should only contain about 3 potato seeds.
4-Cover the tubers with between 10 and 13 centimeters (4 and 5 inches) of earth. Use your hands to flatten firmly, but do not press hard enough to crush the potato seeds.
5-Water sparingly The soil should be moist to the touch, but not soggy.
How to maintain plants
1-Add more soil as the plant grows. Only the 2.5 cm (1 inch) of the upper part of the tuber should be visible. Keep adding soil until you reach the edge of the pot. Ideally, the earth will be between 46 and 61 cm (18 and 24 inches) deep.
2-Water potatoes frequently. The soil should be moist, but never soaked or completely dry. You can usually check it by burying the tip of a finger on the ground.
During the summer, you probably have to water the potatoes twice a day, especially if you live in an area with hot, dry weather.
3-During the colder months, most plants only require 2.5 cm (1 inch) of rain per week for their proper development, but if your area does not rain too much for extended periods of time, perhaps you have to water the potatoes manually. Place a rain gauge near the potato pots to determine if they are getting enough rainwater week by week.
4-Arrange the potatoes outdoors, in an area where they receive sun and partial shade. Potatoes need sunlight, but it hurts to be exposed to direct sunlight for a long time.
5-Check the pH of the soil with litmus paper or another pH test. You should do this at about the middle of the season, especially if the leaves look yellow or weak. The potatoes thrive on a soil with a pH of around 6.
Add more compost or fertilizer if you need to lower the pH.Add agricultural lime if you need to increase the pH.
6-Fertilize the potatoes every two weeks with a liquid fertilizer. Giving food to the potato plants will help you get a bigger and more abundant crop.
Avoid pests
In masetas grab less pests.
Many pests, such as the leafhopper (Empoasca fabae), can be removed by hand; others may require the use of an organic pesticide to prevent or kill them.
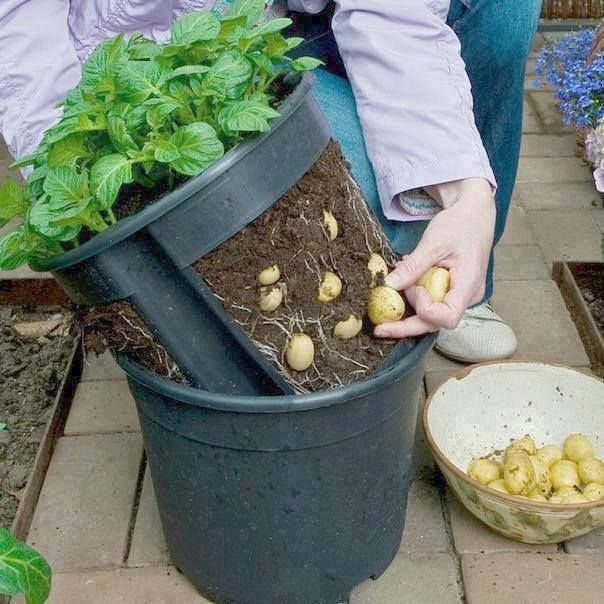
Stop watering two weeks before the final harvest. You will know that the rest of the potatoes are almost ready to be harvested by observing how much foliage has died. Once the leaves and stems are completely yellow, the potatoes will be ready to be harvested.
Start dead stems and leaves. Wear gloves to protect your hands. Remove all the potatoes that remain attached to the dead foliage and dig into the ground to find those that have been buried in the pot.
You can start harvesting potatoes or potatoes when you see that the flowers begin to appear until the moment you notice them wither and dry. Depending on the growing conditions and the variety of potatoes, they will need more or less time to grow. In general, the harvest is carried out in a period of 3 to 5 months after sowing.
I hope you like it and can plant potatoes in your home. Farms, feeding the world
Indeed we @farms find this post informative and educative, thanks for sharing
Resteem
(to be a part of this community; ensure to always use #farms and #steemchurch for agricultural related post)
You know....there was a movie called as Martian where that guy had grown potatoes in mars...