My first experience with Capillary Action Gardening
My first experience with Capillary Action Gardening – AKA wicking pots
I recently experimented with capillary action gardening. I heard about how productive and low maintenance these systems were. My friend at @barriault pointed out some of his uses of these systems. I decided to take some junk I had laying around and turn it into something useful. This was to be an effort to use zero cost stuff I had around. The goal was to expend as little as possible. I had no desire to buy new supplies to build a planting system when I can plant in the ground for free.
I have a plastic drum that was given to me by someone that had no idea what to do with it. It was originally used to ship a non-toxic substance. I took it and kept it thinking that I would find a use for it. I decided to turn it into a couple of capillary action pots. I drew up a simple plan.
I cut the drum into two round pots. I drew a crude “line” around the middle of the side and generally followed it with a saw. This produced two imperfect but totally useful drum ends.
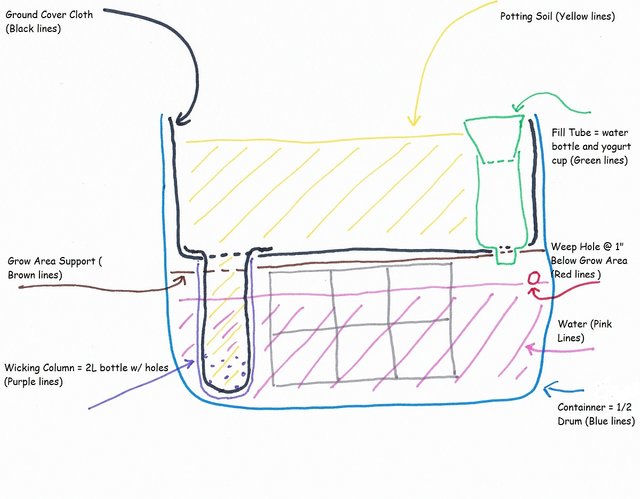
I needed to create a water basin as a source for the irrigation. I had a few old clay blocks lying around and they were just the right size. I could stack two of these and create a cavity that would allow for about 8” of potting soil above the water and about a 2” ridge above that.
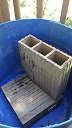
With the platform height established I needed to have a wicking column. I decided to use a “wicking sock” made from ground cover fabric. To ensure that sock would not come apart I placed it into a 2L plastic pop bottle that I cut off at the platform height. I put holes in the bottle to allow water to freely flow into it. The sock was filled with potting soil to create the capillary action / wicking column.

I also would need an overflow drain port from the water basin to release excess water. I drilled a small hole about 1” below the platform height.

Next I needed to establish a reliable floor over my water reservoir. I would need to be able to add 8” or so of potting soil for a grow bed and not have it fall into the water reservoir. This floor would have to allow for the top of the wicking column potting soil to be in complete contact with the potting soil of the growth bed. This floor would also need to have a port for filling the reservoir with water.

I just happened to have some scrap plastic lattice. I cut this into a circle that just fit the drum. I cut a circular hole that would allow the wicking sock to rise into the grow bed. I also cut a hole that would allow my feed tube to poke through to allow filling with water. I installed the lattice and covered it with ground cover cloth letting it cover the bottom and up the sides several inches. I then cut an X into the cloth over the wicking sock and the water fill hole. I pulled the wicking sock up through the lattice and ground cover cloth and slit it and folded it down flat on the grow bed floor.
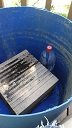
I needed a fill tube but I did not want to waste on new material. I decided to use an inverted 500ml water bottle. The spout of the bottle would poke through the lattice and the shoulder would seal the tube to the grow bed floor. The problem was that the bottle just a little shorter than I needed. However I looked around and found out that the cut off bottom of the water bottle would fit the bottom of a 8oz yogurt cup. I put holes in the bottom of the yogurt cup and set it into the open bottom of the water bottle. The taper of the yogurt cup sealed and held the yogurt cup perfectly. I had created a good no cost filling tube.
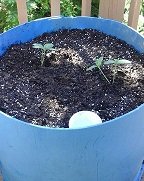
The unit was now ready. I filled it with good potting soil to a dept of about 8” to 9”. I filled the reservoir with water and placed 4 cucumber plants in each.
The result was amazing. I have never had any luck growing cucumbers. The plants always dried up and failed in the late summer due to lack of water. Growing in the ground required massive amounts of water and still failed. This method grew healthy high producing plants with very little maintenance at all. The water used was far less than in ground growing and took very little time. I am very happy with my results and I plan to continue pursuing this and other non-traditional gardening techniques.
Do you want me resteem your post to over 72,500 followers? Go here: https://steemit.com/@a-0-0
Can’t wait to see some photos of some stuff growing in these . . .
Congratulations @bobspgos! You received a personal award!
You can view your badges on your Steem Board and compare to others on the Steem Ranking
Do not miss the last post from @steemitboard:
Vote for @Steemitboard as a witness to get one more award and increased upvotes!