Making Terrariums | Photo Album and Tutorial!
Building your own terrarium is easy, with endless options for planting and decoration that fit any budget or aesthetic! Today, I thought I’d give it a whirl, and share a bit of my process with you.
Since moving into a new apartment a few months ago, I’ve been on a houseplant kick.
I’ve added a banana tree, four different ferns, two violets, a spider plant, a hanging cactus, a snake plant, and a few others to the jungle! Yes, I know I have a problem. ;)
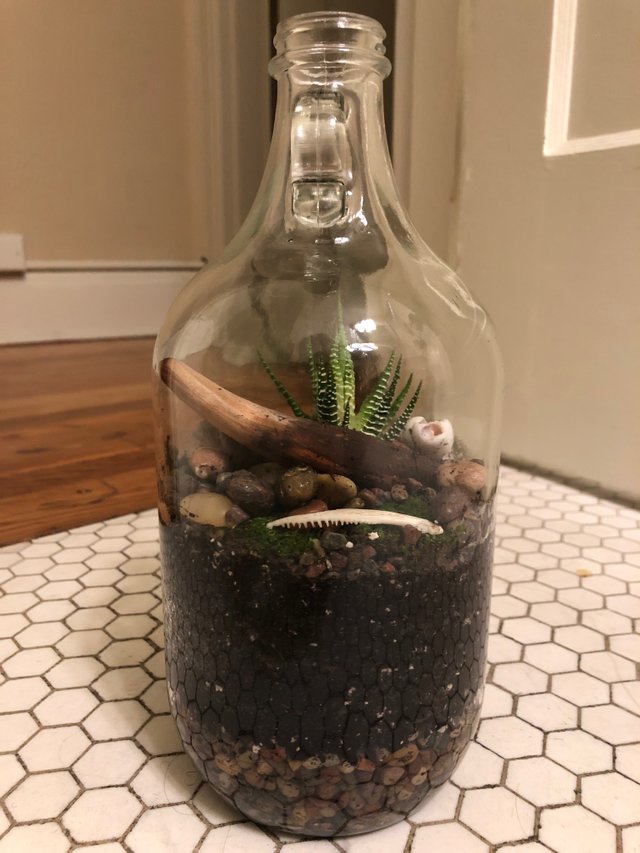
The new place is right off a main street in Seattle with a weekly farmers market. It’s also apple season here in the Pacific Northwest, so last week I purchased a beautiful gallon jug of cider in a glass bottle. Once we finished, I decided it was terrarium time.
Crafting a terrarium is easy, you’ll just need:
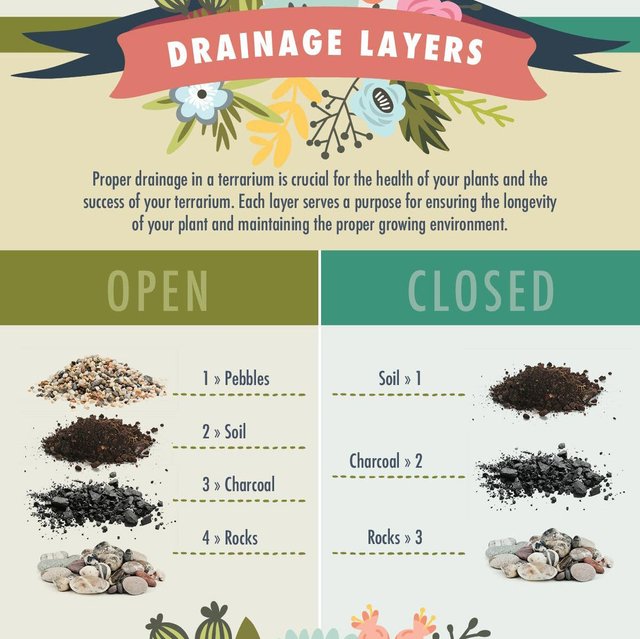
1) A glass container.
Some are open, some are closed. I think it’s best to think of creative objects made of glass to use for your terrarium. The best ones always seem to reuse or repurpose a neat piece.
2) Soil.
Pretty much any good potting soil will do. Bear in mind that your terrarium will hold moisture better than a regular flower pot, so the more aerated the soil the better. If you’re going with succulents or a tiny cactus, consider adding some sand to your soil!
3) Rocks
Rocks keep your terrarium aerated. You’ll want a thick layer of smallish stones on the bottom (at least 1.5 inches) and probably some on the top.
4) Activated Charcoal (optional)
A thin layer of charcoal between the pebbles and dirt can help ward off bacteria that cause mold. It also helps to make the layers look more aesthetically distinct. You don’t have to include it - especially if its tricky to find in your neighborhood. I didn’t use it in my terrarium today and I’ll let you know how that goes!
5) Plants
You can use anything your heart desires, but it’s best if they’re small enough that they don’t touch the sides of your terrarium. Since humidity will be high inside, you’ll do well with plants suited for the tropics. If you go with succulents, they’ll need much less water to be happy (and see that note on sandy soil up above).
6) Decor (optional)
Again, you can use anything your heart desires! When I go out exploring, I always pick up little stones and shells from local beaches. That’s what I chose to use today.
7) Moss (optional)
Add moss as a layer between dirt and pebbles for extra aeration, or use live moss as a way of topping your landscape. Living in the PNW, we have a LOT of moss everywhere. I went into an adjacent parking lot and snagged some that was growing around the curb to use today! Urban foraging. ;)
Here’s a great graphic that breaks those layers down for you. :)
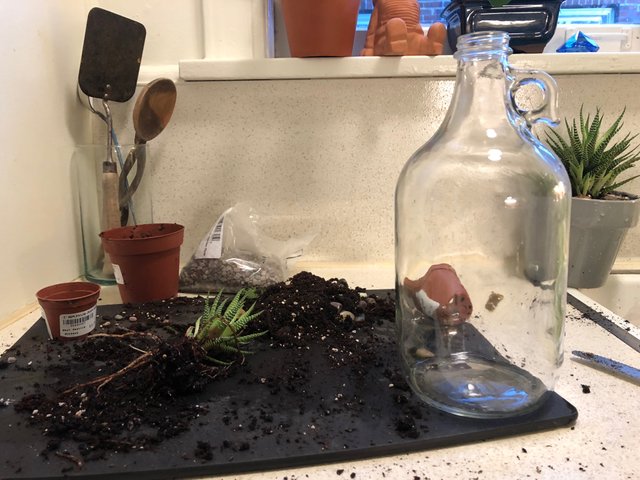
Today, I started with my cider jug, and a small piece of succulent from one of my houseplants.
Earlier this afternoon I went to the nursery and brought home a few tiny plants to use for this project, but it turns out I had overestimated the size of the jug and neither would work. So, I brainstormed another option and took this as an opportunity to break up one of my succulents that’s been sprouting a lot of babies recently.
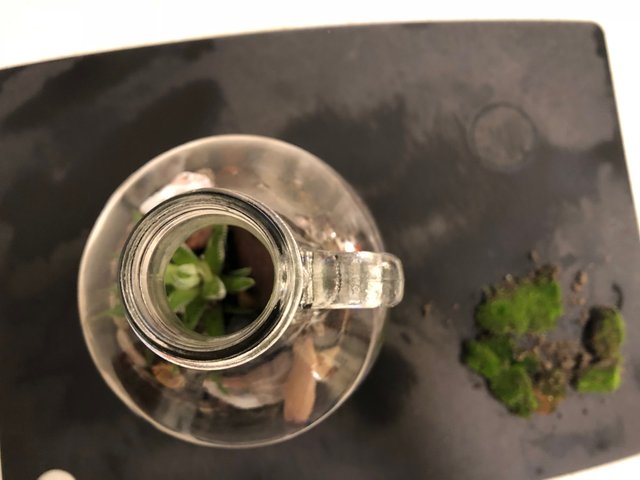
I’ll admit, I wasn’t the best at taking process pics here - that tiny opening on the cider jug was a bit tricky to navigate so I was pretty focused while I worked.
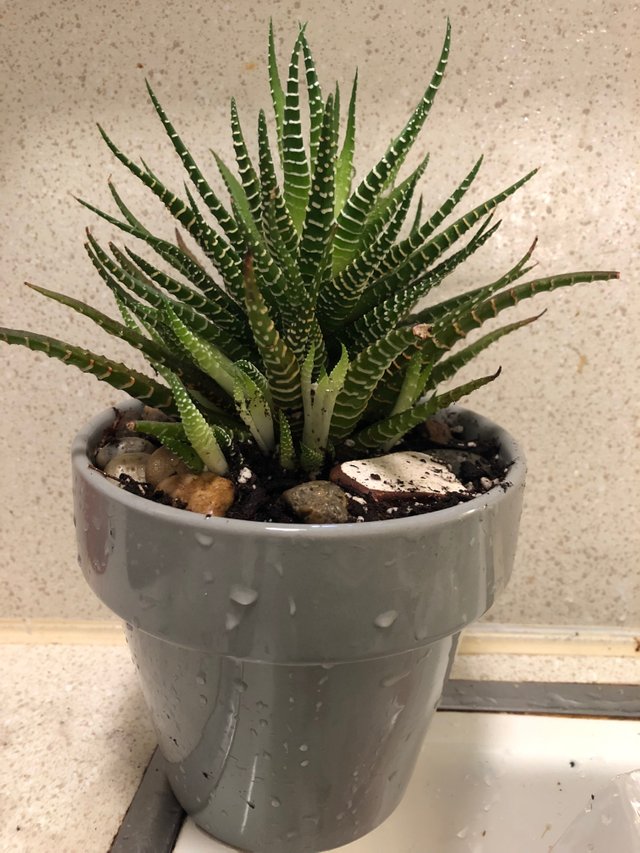
Here’s the houseplant pre-split.
As you can see, around the bottom there are loads of light green, baby sprouts taking off. I used one of these as the base plant for the terrarium. To separate this I turned out the pot, then massaged the root mass to loosen it up. I then firmly grabbed the base of the growth I was splitting and gently worked it away until I had a separate root mass.
Then I added gravel and soil, my plant, and more gravel around the top of the terrarium to begin to build the landscape.
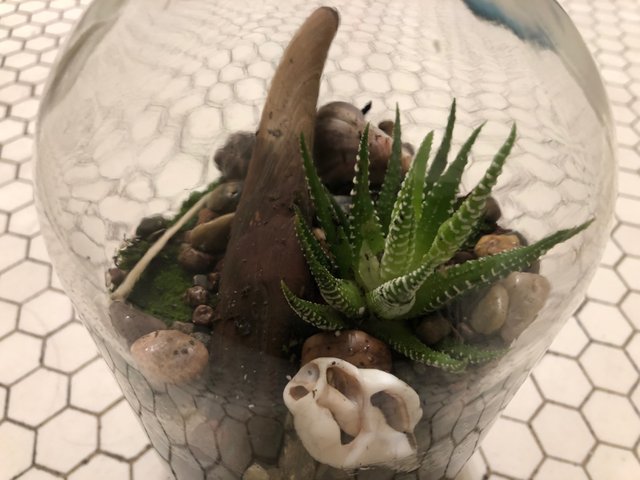
At this point, I dropped in little clumps of fresh moss and used the end of a long fondue fork to gently work them into the soil and in between the rocks. I also added some larger stones, a small piece of driftwood, shells, and the tiny jawbone of a fish I found on the beach.
I chose to add the moss as I built so that I could control where it “popped” in the landscape.
Here you can see that many features are already in place and that I’m using the moss as filler here and there throughout.
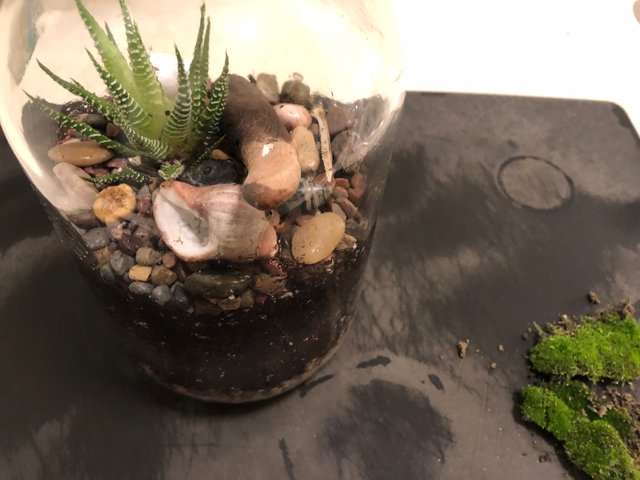
Completed ecosystem.
Once everything was in place I added water through the top, cleaning off the sides and checking to see if my drainage was working. The moss is just a little waterlogged in this pic.
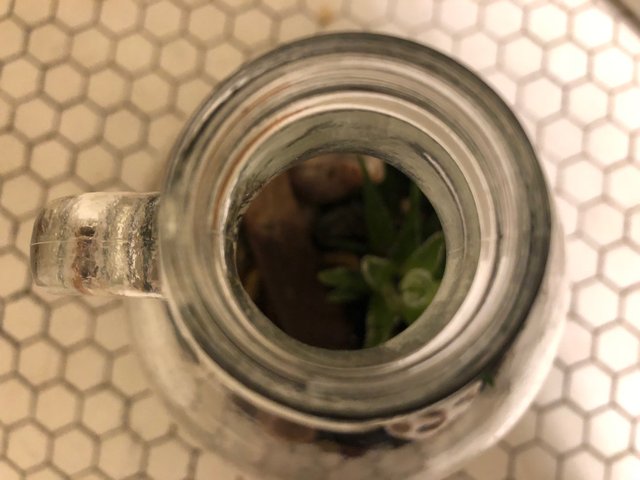
Looking in.
I’m pretty excited I managed to build this through this tiny opening on the jug! It was definitely a challenge a time or two, but I’m pleased with the end result.
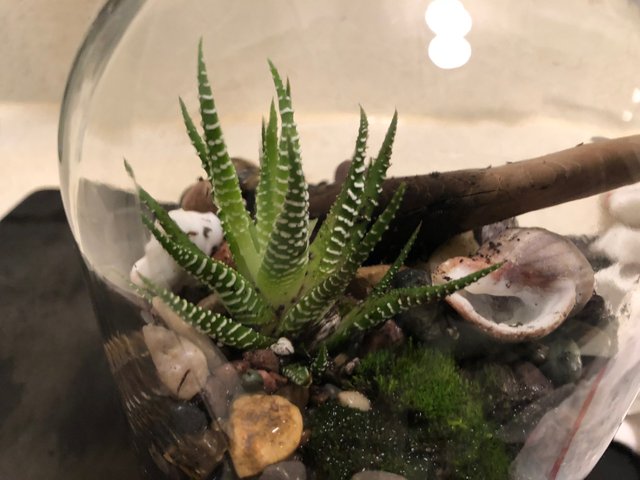
A few close-ups of the inside detail:
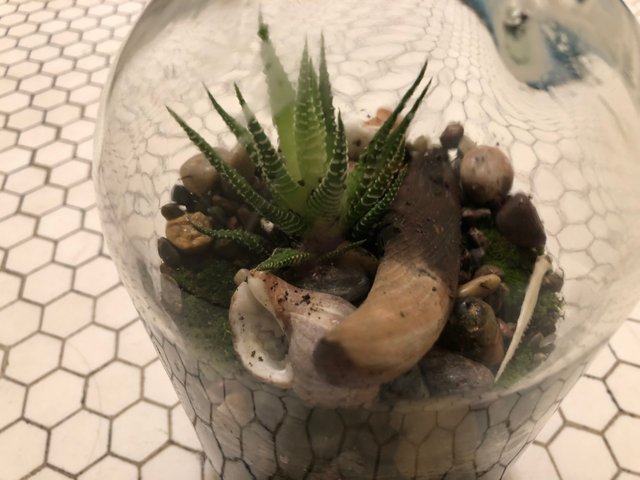
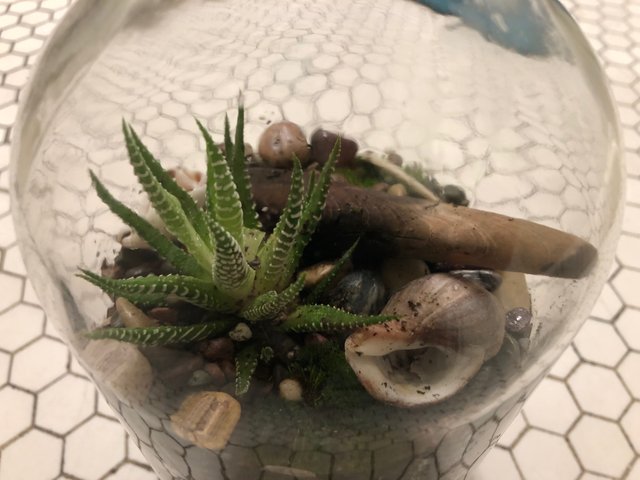
And here, the full piece with layers in view! The little bone in front is a jawbone from a fish I found on a beach - anyone know their fish and able to tell me what kind?!
For my first time making a terrarium, I’m pretty happy with how this turned out. Since I used a succulent, I’m planning on keeping it in a warm window and really making sure I don’t overwater. I’ll let you folks know how it goes!
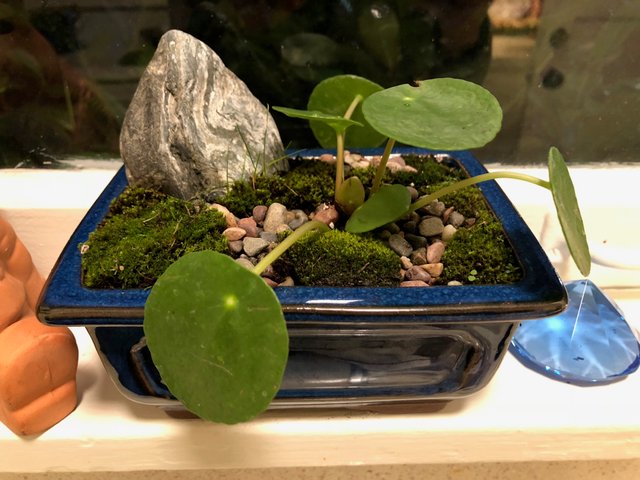
And finally - here’s a little something I made with one of the tiny plants I initially purchased!
Even though this Chinese Money Plant was too big for the terrarium, it made an adorable little landscape inside of this bonsai pot with a river rock from the Olympic Peninsula and more curb-moss. Luckily, I had this pot just sitting around so this was a nice little added bonus to this afternoon’s project.
And that’s all for now friends - hope you enjoyed - and I’d love to see the terrariums you’ve made! And, if you haven’t made one - would you give it a try?
Salty Dog | Entry to @Axeman’s Seascape Contest
Exploring Yellowstone National Park | Photo Album
Two for One | A QUIET PLACE Movie Review (entry for Steemitbloggers Contest) + Halloween Watchlist Results!
Exploring the Lewis & Clark Caverns in Montana | Photo Album
I Have a Long-Term Relationship with Marijuana
Quick Trip to Franklin Falls | WA State
Ultimate Halloween Watchlist Contest - 6sbd to giveaway
Exploring Crater Lake - one of the 7 Wonders of Oregon | Photo Album
Exploring Ruby Beach on the Olympic Peninsula | Photo Album
A Summer’s Worth of Adventures | Photo Album
Offering an Explanation
How I Got Here: a poem about existence


Join us @steemitbloggers
Animation By @zord189
BIG LOVE, Lily
We are SO proud to have you as a member of our
FANTABULOUS @steemitbloggers family!
uvoted and resteemed!
❤ MWAH!!! ❤
interested in joining the Steemit Bloggers Community?
Thanks for the love #steemitbloggers! :)
How neat! I have a few upcycled glass jars and such that would make great terrariums. I might have to give it a try, I've heard it's a thing you can do but I've never seen such a comprehensive tutorial before. Thank you so much for sharing!
You’re so welcome - it’s really really fun as a day project - and if you already have the containers laying around it’s well worth a shot!
Plants can really brighten up your mood! I love these terrariums and once made these are very low maintenance while still giving you that plant love in your home :-) Cool post!
Thanks so much @soyrosa! Once I had the jug in hand it seemed like the natural thing to do, haha. Appreciate you stopping by. :)
Hello it looks so nice thank you for this lovely tutorial
Thanks so much! And thank you for stopping by to support and comment. :)
So lovely, I'm growing a few types of succulents now, hopefully can do something fun with them soon.
Ooo, that sounds like a fun project! I love succulents - they’re one of my favorites!Thanks for stopping by!
My pleasure @lilyraabe!
Very interesting thanks for sharing
Hey thanks so much for stopping by to check it out! :)
How neat! Your finished terrarium looks quite professional. I'd never guess it's your first one!
Thanks so much, haha. Appreciate you stopping by to check it out. :)
I do not understand how you can create a beautiful garden in a bottle. How to shove a plant there?
Hahah, so it was a really small plant - that’s why I just broke off one of the babies from my houseplant (and also why the ones I bought at the store in 2.5” pots were too big). I think with an opening this small you’d need to either plant some seeds, or find a tiny plant baby from a larger plant like I did.
I used a funnel to add in the rocks and dirt. And a long fondue fork to poke around and move things. :)
Some creativity, free time and look, such beautiful things we can create :) Maybe I'll do one when finally stay longer in one place :D
Thanks for checking it out - certainly was a lovely way to while away a few hours. :)
OMG I didn't even know what they were called but I can totally see myself making one. Now to find the proper glass bottle*) very informative post:)
Thanks for checking it out! It’s totally fun, especially getting to find the little things you want to put inside. See you around. :)