Drawing like a pro - 88, Drawing a gate - one-point perspective
Hi friends!
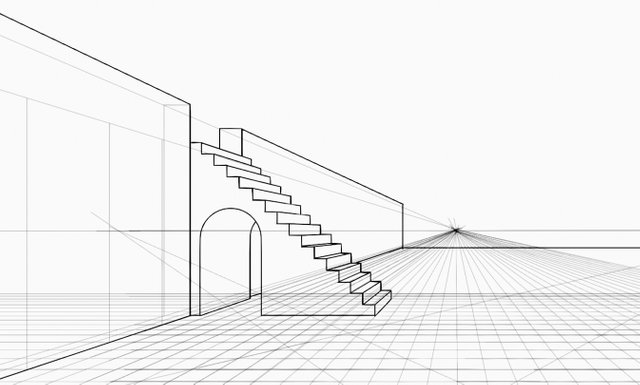
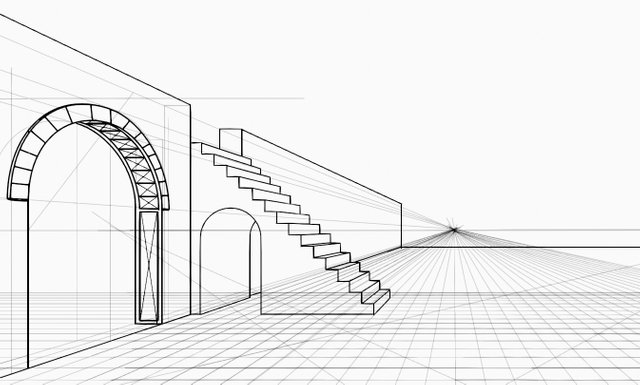
Starting by drawing the helplines to see the thickness of the wall and drawing the lines to define the dimensions of the gate that we will draw.
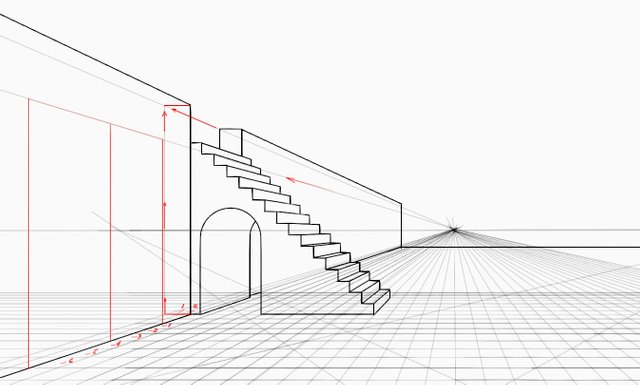
Here the measurements to determine the thickness of the wall and the dimensions of the gate are highlighted in red so that you can distinguish them more clearly.
There are two tiles for the wall and six tiles for the width of the door. The height was randomly defined.
To define the vertical center of the gate we counted three tiles, as is logic, in place to draw diagonal lines
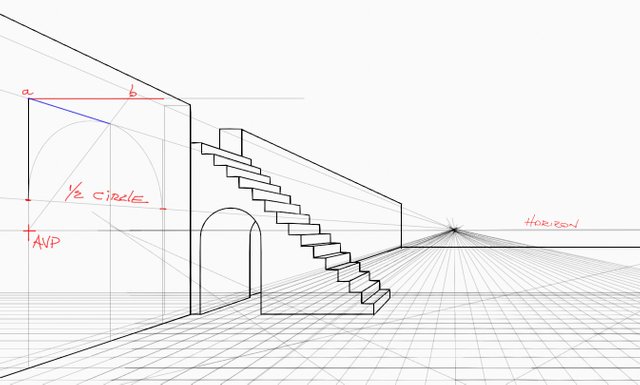
In order to draw the arch I drew a semicircle in perspective using the method seen to draw ellipses.
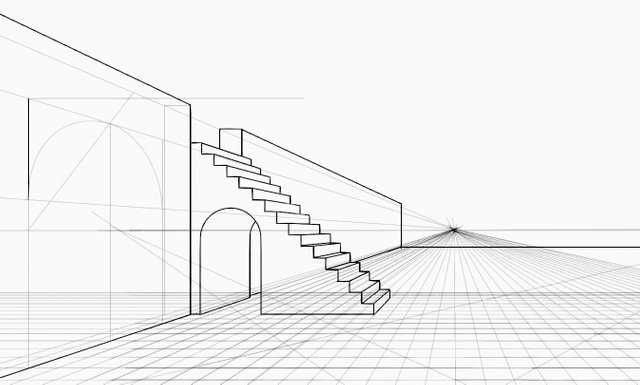
Here I show you in red the method to find the points to draw a semicircle.
The method is the same for drawing the cube, so we need to draw a square in perspective to draw the arch.
We must define an auxiliary vanishing point (AVP) on the horizon line under point "a", then we draw a diagonal line that passes through the center of the gate to cut at point "b" the horizontal help line that we must have drawn previously.
The segment "ab" obtained is the measure that we can transfer to the vertical position that passes through "a" to AVP.
Once we have drawn the arch of the gate we must do the same with the other edge of the wall.
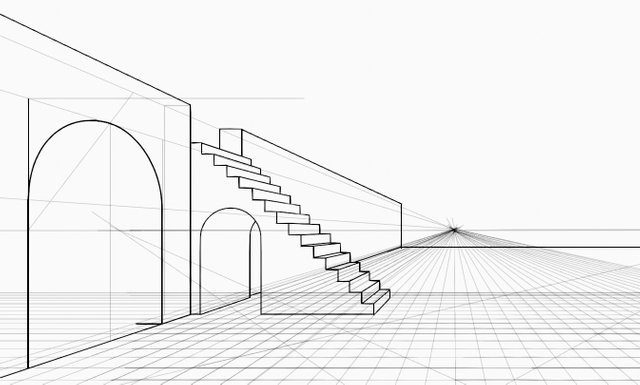
Here are all the helplines traced in the same way as we did previously.

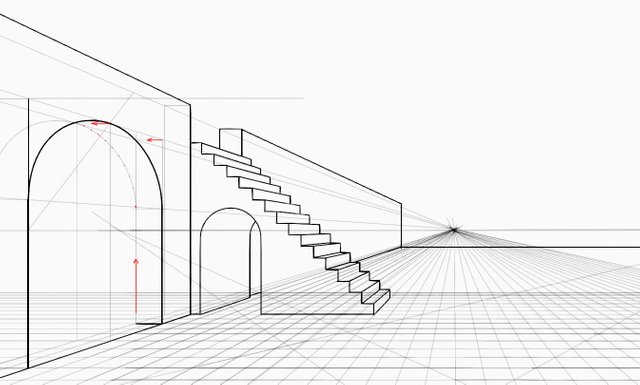
In red are the helplines to get the width of the wall to draw the other arc.
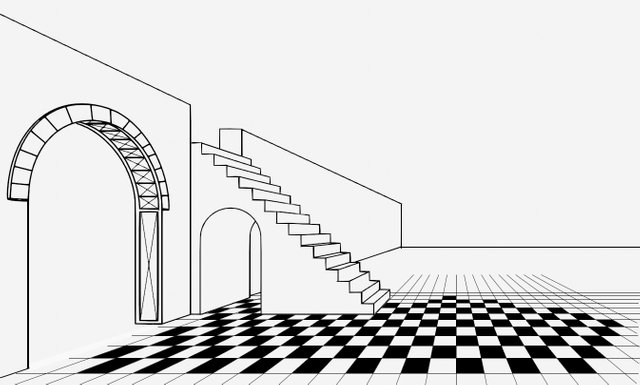
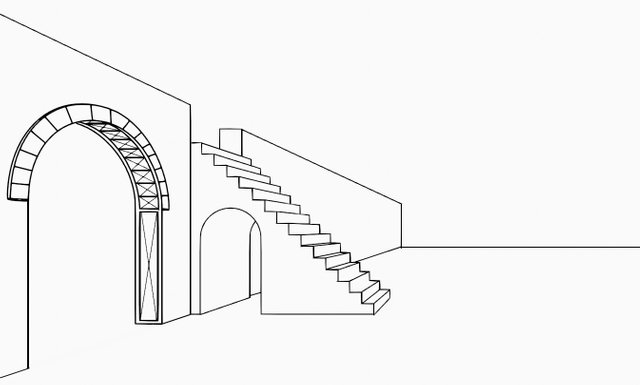
The gate is finished...
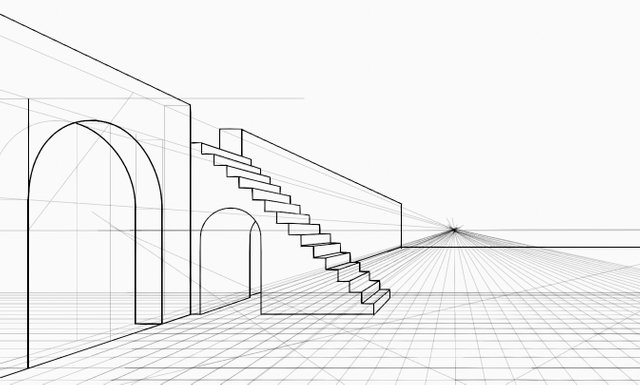
You can try to draw some ornaments if you want.
All helplines have been deleted.
Try to make a tiled floor if you want.
I wish you a very nice day and good exercise!
https://steemit.com/hive-185836/@fumansiu/color-and-light-orange-round-3
is his newest lesson.
Very interesting indeed!
Well, our friend @arcoiris is back with his magnificent watercolour lessons.
Check out this last post that contains very interesting and useful advice about watercolours https://steemit.com/hive-185836/@arcoiris/watercolor-school-or-or-practicing-with-secondary-colors-practicando-con-los-colores-secundarios.
Also, thanks to @xpilar for making these initiatives possible with their great support.
Here are the links to the previous related posts.
1 - 2 - 3 - 4 -
5 - 6 - 7 - 8 - 9 - 10 -
11 - 12 - 13 14 - 15 -
16 - 17 - 18 - 19 - 20 - 21 - 22 - 23 - 24 - 25 -
26 - 27 - 28 - 29 - 30 - 31 - 32 - 33 - 34 - 35 - 36 - 37 - 38 - 39 -
40 - 41 - 42 - 43 - 44 - 45 - 46 - 47 - 48 - 49 - 50 - 51-feedback - 52-Masterclass - 53-Homework Contest #6 - 54-Lesson - 55-Lesson - 56-Lesson - 57-Lesson - 58-feedback - 59-feddback - 60 Masterclass - 61-HW Contest #7 - 62-Lesson - 63-Lesson - 64-Lesson - 65-Lesson - Lesson-66 - 67-feedback - 68-feedback - 69-feedback - 70-Masterclass - 71-Homework Contest #8 - 72-Lesson - 73-Lesson - 74-Lesson - 75-Lesson - 76-Masterclass - 77-Homework - 78-Lesson - 79- Lesson - 80-lesson - 81-feedback - 82-lesson - 83-Masterclass - 84-HW contest - 85-feedback - 86-lesson - 87-lesson
Hai @jorgevandeperre
Voter is manually by the
WOX Community Local Aceh-Team
Hilsen Moderator
Community WORLD OF XPILAR
@sultan-aceh 🤝
Thank you very much!
And here is the next element.
Great, you can be an architect)
😄 Thank you!
I didn't get a chance to tell you before but I had been following your tutorial since your first lesson. I didn't have time to practice earlier but I'm doing it now. Drew the mortar last night. XD
Thoroughly enjoyed each lesson. Thank you so much for this.
Hi @event-horizon. I am very happy to know that you follow my publications about drawing. I hope to have the opportunity to see your drawings.
I have never seen better tutorials. I randomly drew the drawers and the mortar on a rough paper. Didn't mean to post. Otherwise, would have used my sketchbook. It has medium-coarse papers.
I can clearly see there are a lot of mistakes as I have no previous knowledge about perspective drawing and it was also my first attempt.
For example, I outlined the shadows too hard I think. They should look seamless. I should've kept the distance between 2nd and 3rd ball lesser than first two.
I have read upto lesson 24 I guess. Would you also be teaching how to use different paints in future?
Hi @event-horizon, all is very well done. At this stage, there are many things that you do not know yet, but it is a very good sign that you can see your mistakes. In the next lessons, you will find the answer to your problems with perspective.
It is good that you know that the shadows are not right, the next step is to draw again until they are fixed.
In the stage in which you find yourself, it is very important that you learn to know your materials and tools, how to use them and how to take care of your supports so as not to damage them.
I suggest you read the first lessons ( 2 - 3 - 4 - 5) where I talk about materials and tools and how to use and care for them.
For example, this should never happen (see marked in red below). To avoid these undesirable marks, the way you handle the pencils is very important.
See lesson 5 Holding the pencil to draw
Greetings!
I read all the lessons from the beginning. I got the different pencils but haven't been able to find the blender yet. I learned about the paper ruler.
Like I said, I just randomly drew these on the first paper I saw (the marks you see are of my son's writing practice at the back of paper).
I will re-draw everything on the paper you suggested. Probably get a new sketchbook for practice.
Great!
Tried some doodling on sketchbook too but wasn't comfortable there due to its texture...
Practice will help you find the best materials and tools for you and your drawing style.
As a rule, fine-grained paper with hard pencils is used to make fine and detailed drawings, which is also valid for small formats. With textured paper, use soft pencils and don't expect fine, detailed lines.
I suggest if you are not comfortable with the grain of your sketchbook you use bond paper, this is the common A4 or A3 paper for printing. This paper is a hot pressed fine grain very useful for drawing with HB and H pencils and for practising drawing delicate fine lines as you will when studying perspective.
Thank you for these suggestions. I will soon get back with better drawings. 😀
You're welcome! You gave me the idea to write a post I'm working on, maybe you'll find it interesting. This might be helpful in finding the right material and tools for you, or it might give you the will to try a wider variety of mediums.
Have a nice day!
Sounds great. Looking forward. 😀
Hi @event-horizon, it is so nice to see doing the drawing practices, you definitely will get better, I noticed on myself.
Hi @stef1, thank you dear. I feel more motivated now. Hope to acquire some basic drawing skills with these amazing tutorials.