Automated Rabbit Watering System
What is the first thing you think about when you think of a farm? Animals maybe? Fields, orchards, or gardens? Tractors? How about chores? Pretty sure that the word “chores” comes quickly to the mind of any farmer or homesteader out there, past or present. Chores, they consume our most valuable resource. Time. One of my goals (among many others) when entering farming at a small scale was to see how many of the processes I could automate. Some day I can sit back in the porch and sip some iced tea, maybe watch the chickens and ducks do their thing while the farm tends to itself. Haha, that will be the day, but you have to start somewhere right?
I have most of the parts to automate our chicken door, but more pressing for us now that the summer heat has hit, has been handling our rabbit water. How tedious it is to go to each cage several times a day to ensure the water level in the rabbit bottles is okay and to top off as needed. It is especially nasty when you get to the male rabbit cages. I haven’t found it yet, but I am pretty sure the water bottles must have a target on them, only visible to a rabbit eye. Soiled and slimy hands are a sure guarantee (I won’t elaborate). There has to be a better way.

Sure enough, there is! For under $60 in parts and less than 2 hours of assembly, we can now water up to 20 rabbit cages. For comparison, with $60, I could only purchase 3-4 decent new cage water bottles, and I would still have to manually fill them daily. Boo!
I started by saving an old drywall mud bucket and cover. One can never have enough buckets! I had stopped at the local fleet supply and picked up a stock tank float valve, typically used to regulate the water level in a stock tank for goats, horses, or cattle. I cutout the bucket lid so that I could fit the valve and float assembly in the bucket. I wanted to still be able to put the lid back on there to prevent nasties from getting in their water. I then ordered a 20 pack of rabbit water nipples and some plastic tubing online. I had some 1/2″ pex tubing and a valve laying around from house projects. With a water line already in the barn, I tapped into it with the pex T-fitting and put in a new valve to feed this new rabbit watering system I was going to setup. This valve would ensure I could isolate this system if I ever had problems with the rabbit watering system in the future.
The pex was then connected from the new valve to the float valve I attached to the bucket. I drilled a small hole in the bottom of the bucket and installed the plastic tubing through that hole. I then ran the tubing to each rabbit cage using the fittings provided in the rabbit nipple kit.
At each cage, I installed a nipple. A word of advice, ensure the plastic hosing is not accessible to the rabbits, they will try to bite through it. I learned that the hard way!
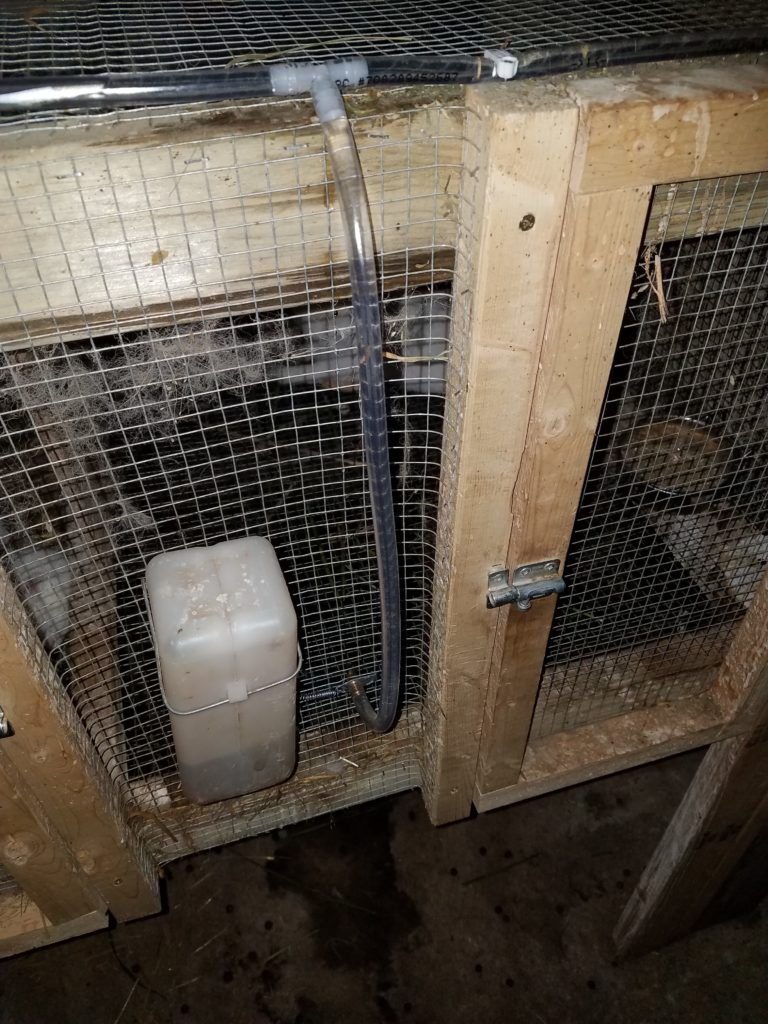
Wire staples worked well to hold the tubing in place. Finally, I suspended the bucket from the ceiling so gravity would feed water through the tubes to each rabbit.
Once everything was in place, I opened up the valve to the new system. The bucket immediately filled with water. When full, it stopped! I watched the water slowly fill up the lines and made sure to press each water feeder nipple to ensure that water would flow out and the remaining air would be released from the lines. After checking on it a few times through the day, I was satisfied. The water level maintained and the system did not appear to be leaking anywhere! Perfect! A simple, yet effective, low cost, low energy rabbit watering system! All in all, it took about one, maybe two, hours to complete. I’ll remove the water bottles once I know the rabbits have adjusted.

UPDATE (2017.06.27): After a couple weeks of use, the water system is still working great! We haven’t needed to water the rabbits manually at all since installation! I removed the water bottles about 2-3 days after setting the system up.
For a links to the parts I used, refer to my original blog post: http://mnhomesteader.com/blog/index.php/2017/06/12/automated-rabbit-watering-system/
-Jeremy (http://mnhomesteader.com)
How creative. Thanks for sharing
Yes! this is one of the chores that takes the longest for me a I have about 35 water bottles to fill daily. You have definitely inspired me. Great post.
Thank you for the kind words! Now, if only I could run it through the winter :( Some day!
well done love the creativity
Thank you!
Slick solution. Well done!
Thank you!
Very cool. I'm always looking for automation solutions for our homestead.
Have you automated many of your farm processes yet? More farm automation is definitely the direction I want to move in.
No not yet. We just bought some land and are in the early stages of setting it up. I'm really keeping an eye open for ways to reduce labour for both livestock and plants from the beginning. I have done things inefficiently in the past and really want to avoid that as much as possible.
I'm with you. Looks like we share a lot of common ground. Look forward to seeing where you take your homestead.
A very cool setup!
Thank you!
Great piece of work.
Thank you!
Wow, I've got to do something like that!
Good post! I'm going to follow you to see more post like this and for support us!
This deserves some attention. Upvoted and resteemed :]
Thank you!
it's a good idea to make things automated with simple tools. really creative
Thank you!