Re-roofing our Gambrel Roof Barn
It has officially been one year since I finished re-roofing our century old barn. Before I started the project, I had a hard time finding information on re-roofing a large barn roof. So, with that in mind, I decided I would lay out the process I went through. This is by no means a full authoritative post on re-roofing a barn roof, but rather a journal of sorts, covering the process I took to re-roof our barn.
WHY
Why re-roof this old barn myself? Here are just a few reasons I decided to re-roof the barn:
- Hiring someone else to re-roof our barn was cost prohibitive. Doing it myself would save me $15,000-20,000.
- Finding someone willing to re-roof our barn was a challenge in and of itself. Most contractors did not want to touch it, let alone even come out and look at it.
- Re-roofing was a skill set I lacked. This project could resolve that.
- If I didn’t get a roof on the barn soon, it would share the same fate that most turn-of-the-century barns are succumbing to, that inevitable and inescapable collapse due to neglect. There are at least a dozen collapsed barns within a 5 mile radius of our house.
- In Minnesota, a proper shelter for animals to escape the harsh winter weather is a must. This is our primary poor weather shelter for our animals.
Before taking on this project, I had never taken part in re-roofing anything. Growing up, I had watched my father roof and re-roof buildings, but being just a child, my attention normally shifted to projects of my own, like building that fort in the woods.
Not only had I not re-roofed a building before, but going into this project, I was uncomfortable with heights. Considering the unsure surface that was our barn roof, those heights were even more intimidating.
RESEARCH PHASE
Alright, the decision to re-roof the barn was made. Time to move onto the planning/research phase. Lets start with some dimensions. With dimensions, a material list can be formed. With a material list in hand, the material can be ordered and the project can move to the implementation phase.
For dimensions, I utilized the free 2D CAD software Draftsight. I have since discovered SketchUp, which would now be my preferred software of choice for building layout and design.
I drew up the roof in Draftsight, laid out flat, so I could determine the amount of steel roofing I needed to order. Each rectangle illustrates a single sheet of steel roofing. The white portions of the drawing represent the existing metal roofing installed on all of the additions on the barn. The red portion represents the portion of the roof that was in need of replacement.
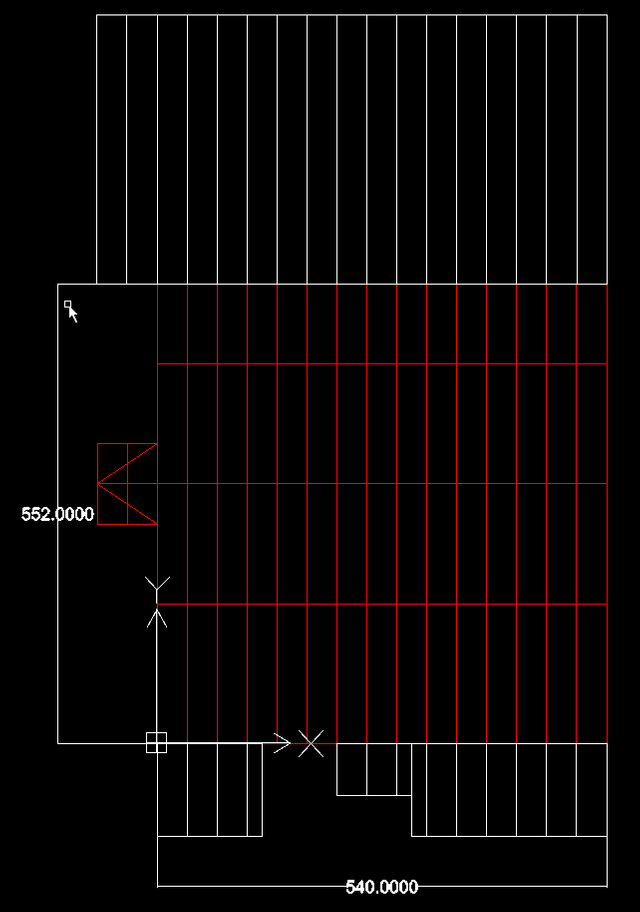
As you can see, I needed 62 sheets of steel metal roofing. It came out to:
(15) 8′ Sheets
(32) 10′ Sheets
(15) 12′ Sheets
I used off-the-shelf lengths (2′ even increments) as they were easier to obtain. As the barn was no longer square, each piece would need to be trimmed anyway, so there was no need ordering custom lengths.
In addition to the steel roofing, I would need screws and trim.
So, some basics on metal roofing. The peak or top most point of the roof requires “ridge cap”. This sheds water to either side of the roof at the top most point of the roof. I ordered 50′ of this. They came in 10′ sections.
The “hip” part of the roof, the part of the roof where the slope changes, required flashing. You can buy preformed roof flashing or flashing rolled up in bulk rolls (cheaper). I opted for the preformed flashing, as I didn’t know about the rolls of flashing at that time.
Along the front and rear of the barn, along the edge of the roof, I purchased “rake trim”. This trim provides a clean transition along the edge of the roof line. It also serves as another protective measure to keep water from gaining access to the buildings wooden frame underneath the steel roofing.
Finally, I installed metal fascia over the wooden trim along the edges of the roof.
The wildcard in materials list for me was the lumber requirements. Before installing a metal roof, you need to run “purlins” every 2′, horizontally. Typically, one will use a 2×4 for this “purlin”. This is the board that the metal roofing gets fastened to.
In my case, as you will see later on, the roof had been exposed to the elements for several years and had begun to sag significantly. My plan was to use lumber of various sizes as spacers, to give the finished roof a mostly square appearance.
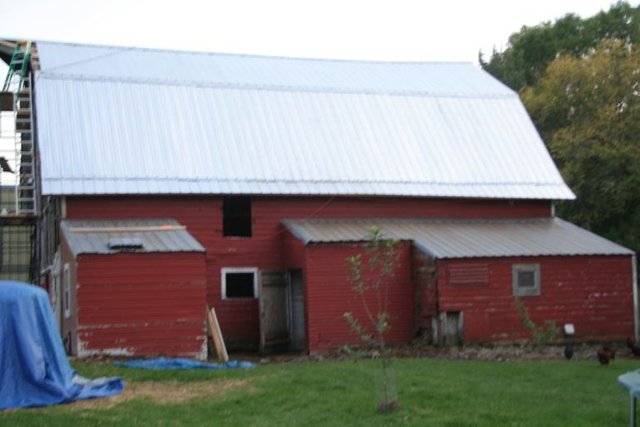
HUMBLE BEGINNINGS
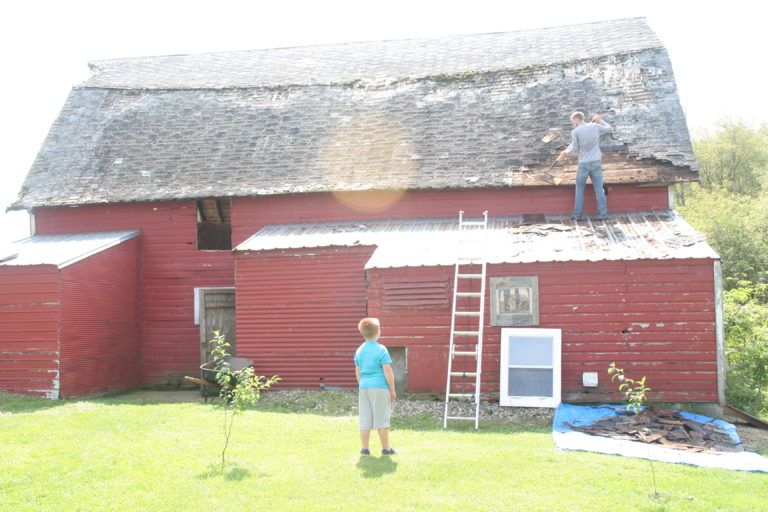
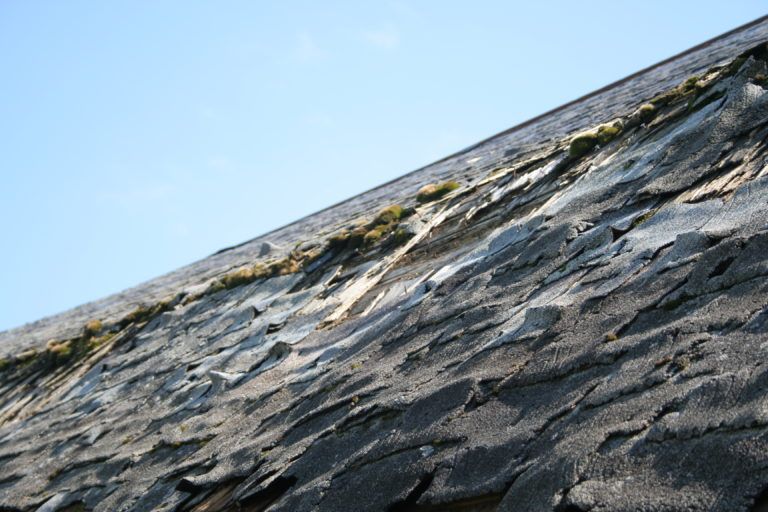
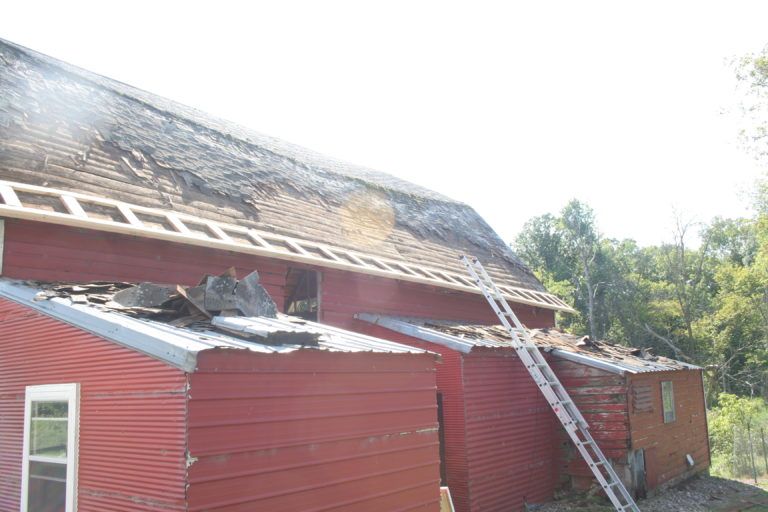
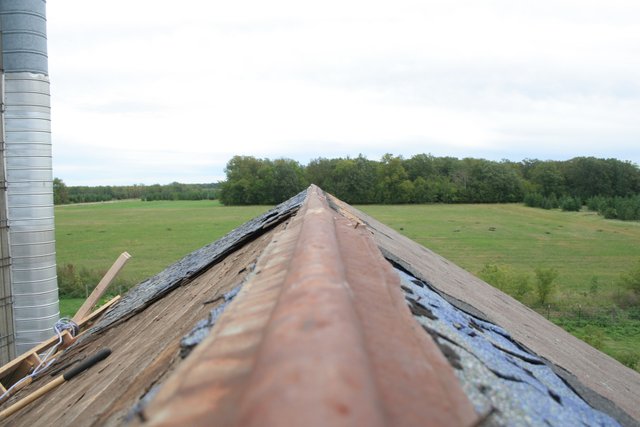
With materials on-site, a tarp on the ground, and a pitchfork in hand, I was able to fairly easily remove the shingles from the roof, a section at a time. The roof had the original wooden shake shingles installed, with two layers of asphalt shingles installed over them. Obviously, some places just plain had no shingles left at all!
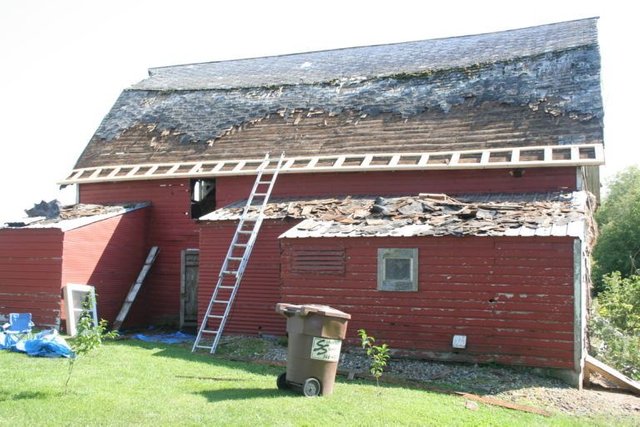
As I would clear a section, I would then affix my purlins onto the cleared off roof at 2′ intervals. These purlins acted as a ladder of sorts to allow me to increase my reach and access to further portions of the roof. I worked my way horizontally across the roof. Working horizontally allowed me to have access to the portion of the roof directly above the portion I just cleared. This became important as I reached very, lets say, “un-square” portions of the roof.
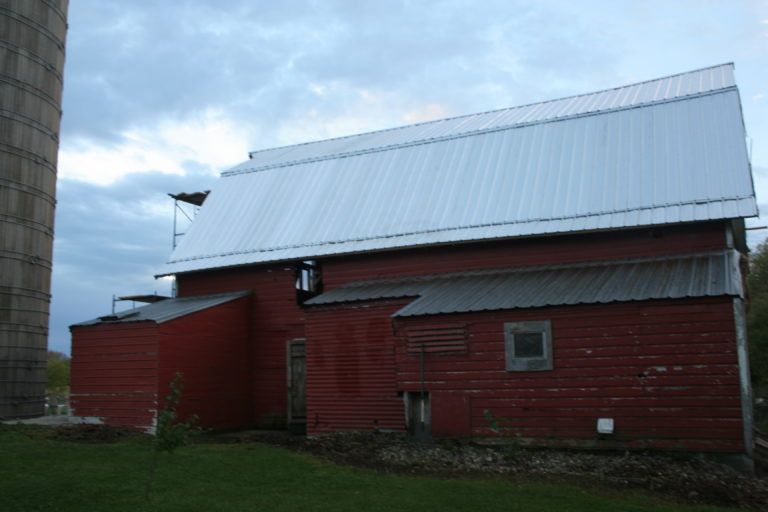
NEVER SQUARE
As I cleared portions of the roof in the ever more sagging regions of the roof, it became necessary to run a string line from one side of the roof to the other. This allowed me to shim up the purlins so the roof would come out looking square.

The further towards the middle of the roof I got, the worse it got. As you can see here, I literally had to build a short knee wall on the roof to compensate for the sag in the roof. Additional reinforcement and support on the interior will be completed at a later date.

FINALLY! METAL!
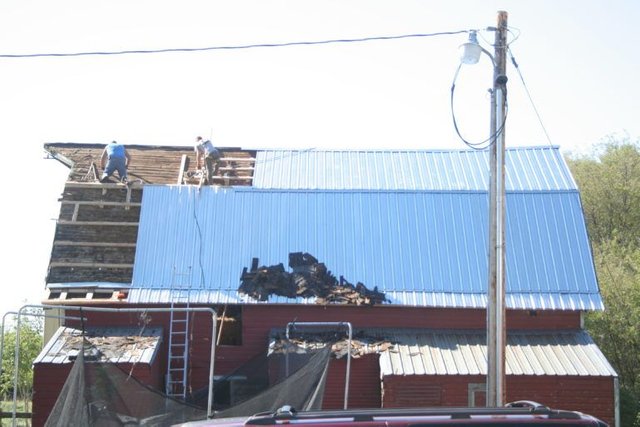
Once the purlins were in place, I started to measure, trim, and install the metal roofing, sheet by sheet.
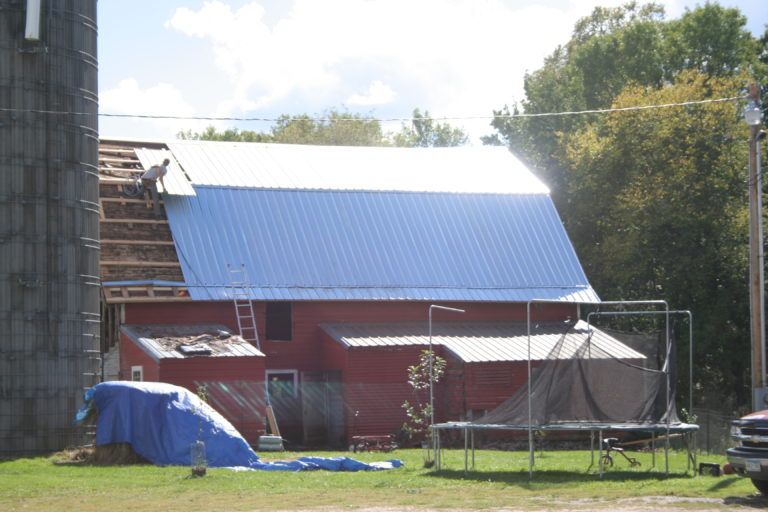
After the metal was on the roof, I used scaffolding to traverse the perimeter of the barn to install fascia and rake trim.
In my opinion, the overall roof turned out well. No where near perfect, but it has breathed new life into a barn that would have otherwise continued to rot and decay.
Some pointers worth noting that I either discovered during the project or received from others along the way.
- Do not skip the purlins. Do not install metal directly over asphalt shingles. Asphalt shingles and metal roofing contract and expand at different rates during temperature fluctuations. This will cause the shingles to rub against the metal like sandpaper, eventually leading to a rusted out roof.
- Invest in a safety harness. I have wife and children and couldn’t imagine having left them husband/fatherless because of my own ignorance and preference of avoiding the use of an in-expensive safety harness. $100 for the harness + a little inconvenience of dealing with the rope every time I wanted to move was a small price to pay to avoid a life changing fall.
- Buy twice the amount of screw you expect to use.
- Take a minute or two while you are up there to just enjoy the view of your homestead/farmstead. Besides our silo, the barn roof is the highest point on our property. It won’t be that often that I will get to take in a view like that.
- After a few weekends and many evenings on the barn roof, my fear of heights is nearly non-existent now.
- Use shoes with a good amount of traction. Don’t expect those shoes to look great when the project is complete. I wore holes on the outside of both shoes from their constant contact with the roof and constantly relying on them to hold me in place while in many tight spots up there.
- Once you remove that first shingle, expect the rain to come. We received over 10 inches of rain during the few weeks it took me to finish up this project!
Hopefully that gives you a fairly full glimpse into re-roofing that old barn. Are you thinking of taking on a barn roof? I am still by no means a roofing expert, but I would love to try to point you in the right direction if you have any questions!
-Jeremy (http://mnhomesteader.com/blog/)
Good step-by-step of your project. I would be terrified up there! I couldn't have even watched my husband up that high. I trust him, but I panic far too easily.
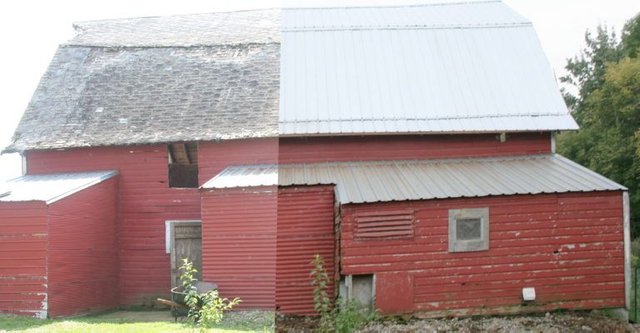
I think the finished project looks great! Our home is barn-style with almost the same kind of roof. I really like the before/after split photo. Good post!
Thank You! My wife was on edge every minute I was up there! It was a relief to wrap it up! We will be working on walls this fall and next spring.
I agree with you @hethur240, it Is indeed a Great job, I do not think someone hired would have done it better for him, neither would my relatives watch me go way up there. Hoping to see more of DIY like it in this community.
Weldone @mnhomesteader
Thank you for the kind words! This steemit community is awesome! I'm with you, bring on the DIY! I know I have more to come. In the middle of a full house remodel, plans for building a sauna and winter greenhouse, and I can't leave that silo just sitting there empty!
great job on the roof job! and excellent job on the research before hand. I guess there is Not much you can do with sagging roof beam and keep an open area inside the barn. Possible future problem? Nesting critters between the roof layers? just a thought. Thanks for the post.
I will be bound to have a happy healthy pigeon population :D. A lot of people pull their barns together with cables, but with the lean to's, that was out of the question. Thanks for the kind words!
hmmm I think I would also accept pigeons over what I am dealing with lol. I was thinking more along the lines of raccoons or other types of rodents. At the moment I am having a big problem with squirrels in my eves at the back of my house causing severe damage to the load bearing structure components. I have removed the aluminium under the eves to discourage them from making a nest there and that seems to have caused them to move to the front of the house and start doing the same before the snow falls. One thing I thought to my self was these animals are really smart to know that they could chew into the metal at the front eve to gain access to another suitable area for their winter sleep.
Yikes, biting through the metal? They sound fairly intelligent, or at least, persistant! We had chipmunks and a bat getting into our attic after we purchased our current house. I used caulking, fasteners, and galvanized steel flashing to seal up up the hole they were coming through. That has kept them at bay and out of the attic.
great job :)
Thank you!
Wow..what a great idea of working that roof..
Job well done sir @mnhomesteader
Thank you!
Your welcome sir @mnhomesteader
That's really great to see conservation
Its always good conserving our past anf seeing what yiu have done is awesome.
It is always a little sad for me to see an old building fall into disrepair. We had many people tell us to just burn or bulldoze the barn. Like much of the steemit community, I took the other path :)
Nice job you did my friend.
Congratulations @mnhomesteader, this post is the most rewarded post (based on pending payouts) in the last 12 hours written by a Dust account holder (accounts that hold between 0 and 0.01 Mega Vests). The total number of posts by Dust account holders during this period was 2442 and the total pending payments to posts in this category was $591.20. To see the full list of highest paid posts across all accounts categories, click here.
If you do not wish to receive these messages in future, please reply stop to this comment.
Great Job. I am in the phase of building my new home. Due to the lack of total budgeted amount I decided to do some work by myself. My roofing is flat and the real dilemma I have now is how to insulate . I need to work out both - hydroisolation and thermoisolation. When I'll decide and start the roofing, maybe I'll document it as well and post here a steemit.
What you did, is a real heroism to handle this without contractors. I hope I can do it too :)
Good Luck
Thanks for the kind words! We had a flat roof on our garage at the last place we owned. I didn't install it, but it was very well done with no water issues. They used rubber roofing like this: http://bit.ly/2xY4Zbe and seam kits: http://bit.ly/2xjojT9 The downside is that it is black and gets pretty hot on a sunny day, that was never a problem for us, but I suppose it could be in warmer climates.
As far as insulation, we just re-did our house roof last month and had it sprayfoamed for about 89 cents a sqft/1" thick. Not sure if that is in your budget, but it is by far the most efficient type of insulation I have found. We did about 4" of sprayfoam and now I am following up with some fiberglass insulation for a little additional insulation and sound dampening.
Good luck on the house project!!
Thanks for your advise. I really appreciate this.
Woooww... Amazing.
Thank you!
Your welcome brother
What an amazing job you've done, you need brute strength, guile and patience and you have it all. I would love to see shingles up there one day, perhaps when your homestead earns a small fortune and you can pay someone else to do it! Great stuff and to see hard work pay off is a delight.
Right!? Original cedar shake would be pretty sweet! With the age of the building and the potential for heavy snow in the winter months, it will probably be stuck with metal permanently for to help shed the weight of the snow.
There's me and my ignorance again. But you must agree it would look romantic. I applaud your devotion and hard work. I hope you enjoy your life, must keep an eye out I may learn some more. Thank you!
A superb job is to prepare you for the winter days
Thank you!! And you had to remind me about winter? Too much to do before it freezes!