For the Love of Clay Plaster: Building a Sauna
In Finnish tradition, when one first moves to the land they build a sauna that they can use and live in the first year while getting their feet on the ground. It serves the dual purpose of providing a restorative haven and also a tiny home of sorts while they establish other infrastructure.
When we moved to the land at Mountain Jewel we had basically no building skills. We were gardeners and needed a home on our raw piece of land as a necessity, but it wasn't what excited us about homesteading. To house us that first year we bought a used yurt on Craigslist.
Fast forward nearly 4 years
We are building a straw bale home and tending gardens & food forests. It becomes clear, however, that we will not get the straw bale house, begun in April (though dreamed of for much longer), closed in for winter. One of the reasons is that lime plaster requires above freezing temps to cure and we are about a month from our first freeze. As this reality settles in, that we will be spending another winter in our tiny cabin built during the Discovery Channel Homestead Rescue episode on our land, I realize that I cannot do another winter in that tiny space with Ini -- without running water or a place to wash off easily. We decide to build a sauna.
As the temps have cooled in the past few days, the decision to take a pause on the straw bale house and build a sauna seems a good one. It's hard to take clothes off and bathe outdoors when it's really cold out! (Though we have a well with a pump and electricity, our cabin is hundreds of feet away from that and there are no insulated indoor spaces capable of housing a shower.)
Earthen Plaster Practice
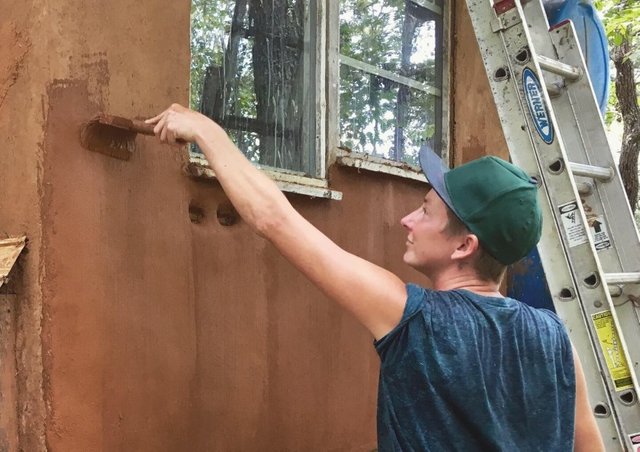
Painting on a clay alis (clay paint) onto an earthen plaster. I will go more into this in future articles.
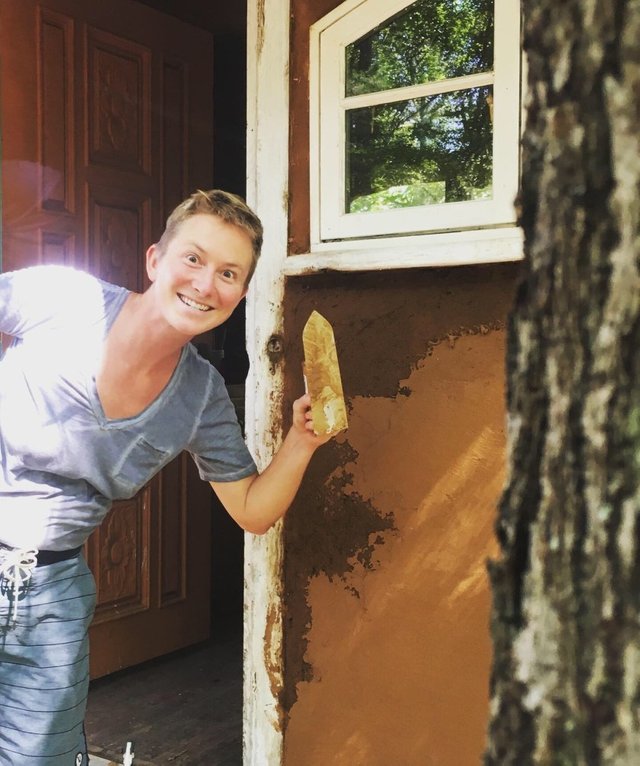
This season as I gear up for plastering an entire straw bale home (lime on most of the outside and a combination of lime and earthen plasters inside with an earthen floor), I have been honing my skill at earthen plasters. Thus far on the homestead we have created a composting toilet (the Fert Lab, pictured below) that is slip straw with a clay plaster and the facade of the solar shed is also slip straw with earthen plaster finish. A few spots on the exterior of the composting toilet were very eroded from direct water damage and the conventional studs were showing through in a few places due to the sand/wheat paste not being a good binder- we have since started to use fiberglass mesh to better connect wood and earthen plasters. I decided to start there.
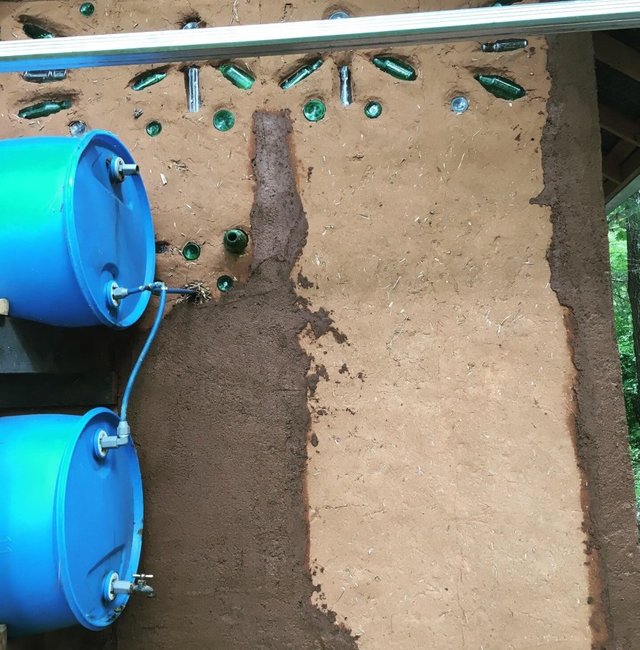
In these dark sections, the slip straw was revealed and the earthen plaster was greatly cracked. When water directly hits an earthen wall, the sand comes to the surface and the wall slowly washes away as the clay can only take so much before it erodes. The dark clay is a base leveling coat of plaster.
Fiberglass mesh stapled into a framing stud. Clay cannot connect with wood so this bridges the plaster gap. Notice the wet clay on either side. When applying a new coat of plaster, one must wet the clay to ready the particles for bonding.
Mixing earthen plasters is an art unto itself. Yes, you can basically take any clay rich soil and put it on the side of the wall and it will do some type of job at resisting the elements and closing in your building. However, without good ratios, you will get cracking, peeling away from the surface below, dusting, and a finish that leaves a lot to be desired.
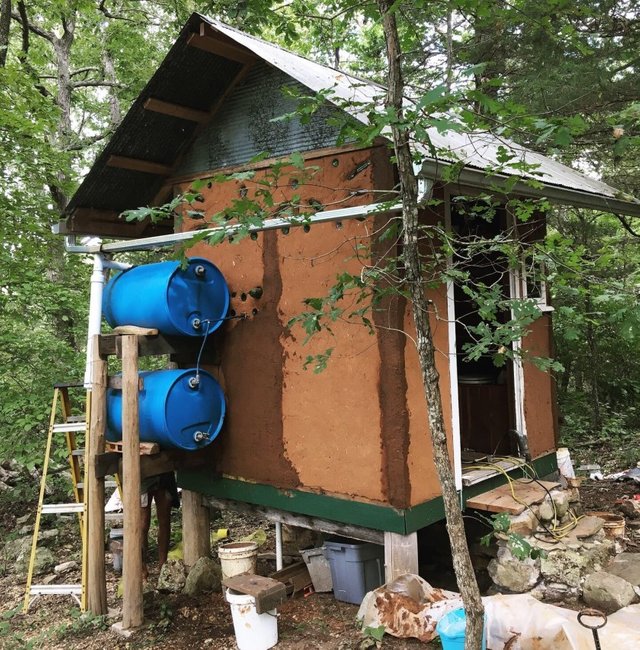
Solar shed perspective shot on many of the areas that needed attention. In future articles, I will detail the process and show final photos.
Being the stubborn creature that I can be, I had not followed all of the advice to do test patches and to sift the clay when making earthen plaster. This led to some cracking and unsuitable trials on my part that I went ahead and plastered the whole wall with (I did mention that I can be stubborn.) This time, however, I was really interested in honing my craft and not just getting the job done. It's my intention to get really good at this so I can live in a house that exemplifies how truly stunning earthen plasters can be.
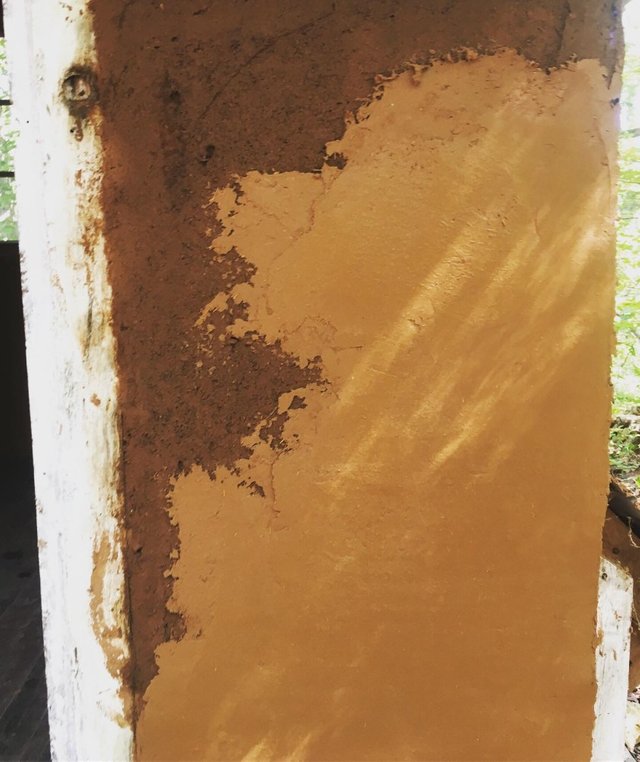
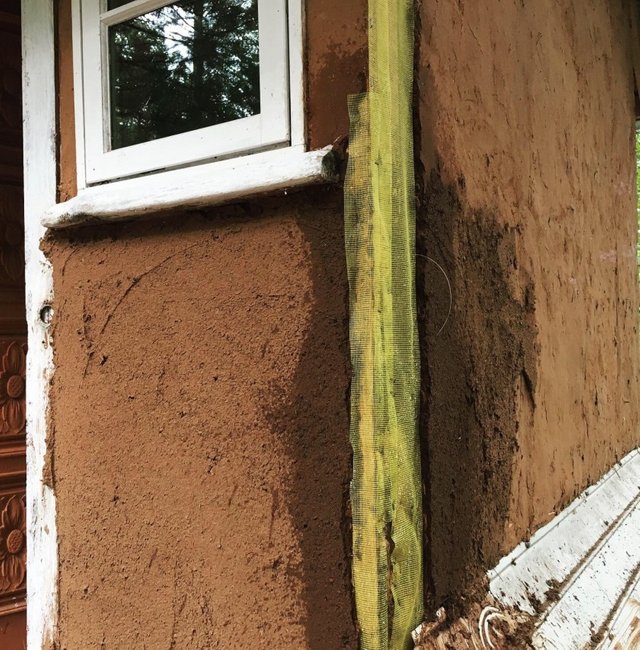
The dark brown is a straw and clay heavy leveling coat that prepares the wall for the final plaster which is usually very refined and creamy (lighter finish on right.)
This creamy plaster literally drove me wild with glee. A taste of earthen delights! A dream to apply!
So I practiced. And practiced. Made test patches and trials with our local clay, sand and straw mixes and I learned a lot. One mix I did was very heavy with clay (I had read from Athena Steen of the Canelo Project that a heavy clay mix with a lot of straw and little sand can actually be beneficial in areas where finishes are exposed to direct rainfall- sand comes to the surface when exposed to rain and often erodes quite quickly, whereas the heavy clay & fiber can provide more of a mat resistance.) Though I did have some slight cracking (imagine small broken blood vessels) on this finish, with a wrung-out sponge I was able to burnish the exterior and wet the clay enough that it filled its own cracks.
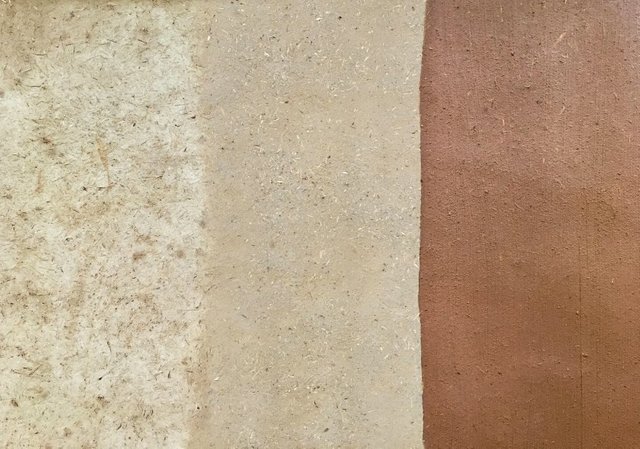
Left: clay heavy final plaster that has not been burnished. Notice the cracking and uneven drying due to heavy clay content. Middle: same plaster finish as on left but rubbed gently with a wrung out sponge. Notice that the surface now appears much more even, the cracks are (mostly) gone and a nice straw aggregate has appeared. Right: This is the clay alis (natural paint) that I have applied as a final coat (will go more into this in a future article.)
After realizing how a heavy clay finish performs, I was interested in experimenting with more sand. A basic ratio for earthen plasters is 1 part clay and 3 parts sand with a generous portion of chopped straw. This is a rough guideline because the "clay dirt" in each area of the world contains different levels of sand, silt and clay. You can do a test to figure out how much clay, slit and sand your soil contains and whether it is suitable for plaster. Sigi Koko has a good video:
When I made a ratio with 1 part of our clay with 3 parts sand and some finely chopped straw, the plaster felt nearly too sandy, too coarse and dense. It didn't feel right in my hand, but boy did it dry to a beautiful, crack-free finish! I'm learning by touch and I have a ways to go!
This is why it is so cool to practice with your own local clay - it's incredibly empowering. I am not simply following someone's recipe, but I'm learning about what the different ratios look and feel like myself. If you're interested in learning about earthen plaster, I encourage you to do the same. Because all of these are earthen ingredients, if the plaster doesn't turn out right I can wet it and use it again!
Sauna Dreams
After honing my craft on the Fert Lab, I was truly itching to plaster more walls. I was having dreams about plastering each night and woke up wanting to sift clay and mix up creamy gorgeous plasters. After Ini and I decided we were going to pause on the straw bale and build a sauna, we decided on a conventional stud framed building with slip straw (light straw clay) infill with an earthen plaster finish. Soon I would have more surfaces to play on! (Basically we built the sauna so I could plaster more!)
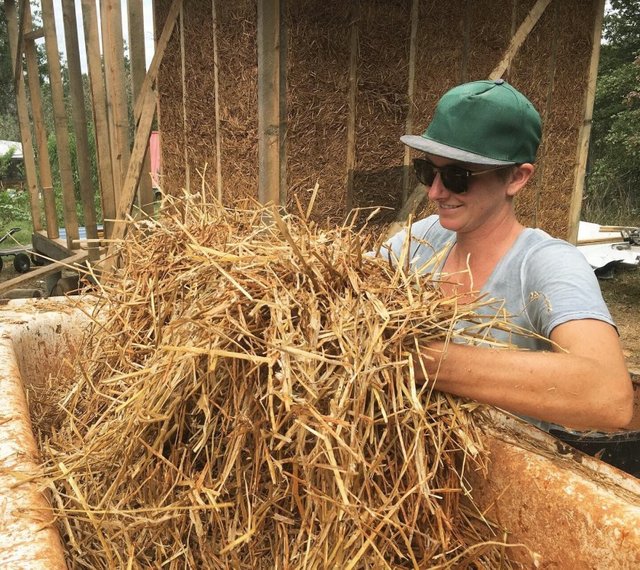
Mixing up a batch of slip straw earlier today! Stay tuned for a tutorial video and sauna and slip straw specific articles.
We started the sauna in early September and we've been working hard nearly every day on it. I'll make another post detailing our progress, but thus far we have built the foundation, framed all but one wall, finished the roof on the back of the building and completed nearly half of the slip straw infill. No doubt we are tired and building our muscles, but we are fueled by passion and our imaginings of baking in our sauna this winter!
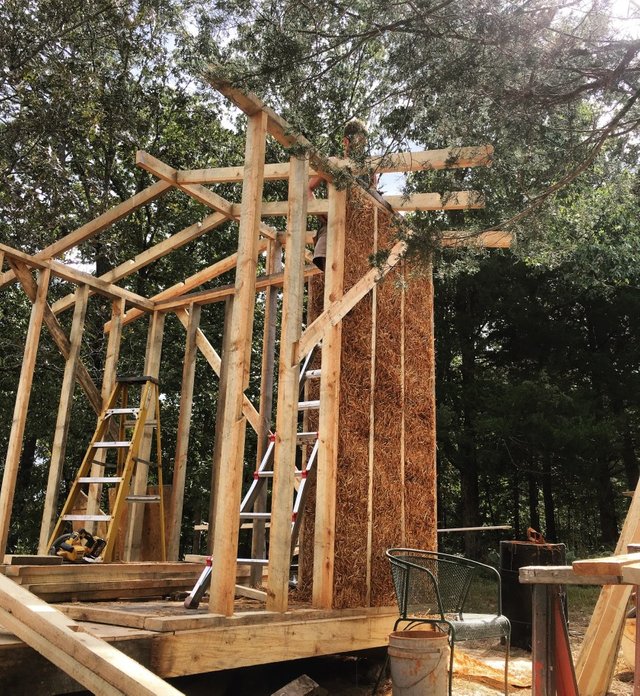
Photo from a few days ago. Roof and more walls completed at this point.
In coming posts, I'll detail our progress on the sauna, share some photos and details of my plaster process on the Fert Lab, provide some tutorials on the methods and practice of Slip Straw and Earthen Plasters. Stay tuned!
Posted from my blog with SteemPress : http://www.ozarkmountainjewel.com/2019/09/25/for-the-love-of-clay-plaster-building-a-sauna/
This is amazing! It's so exciting to see how much progress you have made on the homestead. I'll be looking forward to trying that sauna :) You have really refined the platering technique compared to our first attempt, lol!!! Looking forward to your next installment! love you! oxoxoxo
lol yes you were there for the very beginning of the plaster trials! lol how funny that was. i'll have to include that iconic photo of us in my fert lab specific update post!
maybe when you visit this fall the sauna will be in working order ;) we're doing our darnedest to get it there to be sure! love you XOXO
That makes perfect sense: you start out with the fastest and quickest (thus smallest) buildings, and as you work your way up to bigger and more elaborate ones, you are also becoming better and better with each building. And having a sauna I think is an essential thing in places where you have actual winters.
I'm excited to see the sauna video!
yes! thanks :) it has certainly worked for us too - to learn through building smaller buildings and it's a morale boost to finish things (especially that are usefull and healing!)
Was thinking about you guys over here in Thailand this morning and wandered over to check out what you've been up to.... WOW!! I'm very keen to build a sauna-steam room myself as part of the Earthship Artemis :) and definitely LOVE this!!
Leading the curation trail for both @ecotrain & @eco-alex.
Together We’re Making This World A Better Place.
Click Here To Join the manually curated trail "@artemislives" to support quality eco-green content.
thank you artemis! saunas are such a vital components of a healing regime <3 ! excited to see the sauna/steam room of earthship artermis - and earthship artemis in general :)!
Great photos and amazing write-up as usual! You guys are workhorses
Posted using Partiko iOS
lol yeah i guess we are huh! took a fun foraging day today though. and thanks!
This post was shared in the Curation Collective Discord community for curators, and upvoted and resteemed by the @c-squared community account after manual review.
@c-squared runs a community witness. Please consider using one of your witness votes on us here
Thank you so much for participating in the Partiko Delegation Plan Round 1! We really appreciate your support! As part of the delegation benefits, we just gave you a 3.00% upvote! Together, let’s change the world!
I love it!!! Excited to follow along for this journey. Didn’t know you were on a discovery channel she, very cool. I’m jealous, I’d love a straw bale sauna 😍
:) haha! you're welcome to come visit some time! <3
This is really fascinating! I am happy to live vicariously through your experiments on it though. Far too labor intensive for these old bones!
I will be watching avidly for all the promised posts about the different steps. :))
:) yes it is quite labor intensive. luckily we have some work parties lined up - teaching people and getting their help is a win - win. will be working on other posts soon!
Love the color, it's perfect!
Posted using Partiko Android
thanks! clay is beautiful!
Hello, @mountainjewel! Keep up the good work in building your sauna.
Do you know you can earn more on your quality article when you post via Build-it?
Build-it is a new tribe on the steem blockchain that serves as a central hub for DIY and How-to's contents on steemit. The recommended tags required when creating a DIY artcle are #diy, #build-it. #how-to, or #doityourself. You'll get rewarded with BUILD tokens, which can also be exchanged for steem on steem-engine when you use any of the recommended tags as well as posting via our website.
Have a question? Join us on Discord and telegram
This project is run and supported by our witness @gulfwaves.net. If you like what we do, vote for us as a witness on the steem blockchain.
hadn't heard of it yet, thanks!
Now you do :)