How to Cultivate Crickets at Home With Natural Methods Properly and Correctly
Who does not know the sweet sound of crickets? At night the crickets will usually sing, and make a lonely desert filled with the sounds of animals probably similar to this locust.
Crickets themselves are usually used as feeding birds chirping, fishing bait, or processed into pangs of high nutritional value. Because indeed, the nutritional content in crickets is very high and worthy for us make as a source of nutritional body. Of the many benefits of these crickets, making the cattle business very prospective future.
Moreover, the price of crickets itself is quite expensive in the market, can be above Rp 90.000 / kg, whereas the capital needed for civet cattle is not how. But it takes a special place that can not be in the neighborhood where we live, especially if our house with adjacent neighbors, because it is quite disturbing.

How to Cattle Crickets Step by Step
1. Location Requirements Cage Crickets
The first thing we have to do before the cricket cattle is preparing the occasional location or container for cultivation. Crickets need cages or containers that resemble or resemble their natural habitat in nature. Therefore we must make the cage of the crickets according to their natural habitat in nature.
Prepare a cage cage, here are the prerequisites that must be met:
- The maintenance location should be quiet, quiet and shady and get good air circulation for room temperature adjustment.
- Look for locations away from crowds or sources of noise like markets, roads, and more.
- The location should also be far from human activities such as passers-by and people who are not related to cultivation activities.
- The room should not be exposed to direct sunlight.
- Better away from trees to absorb the sun's heat freely.
- Away from the chicken coop or any other annoying animal.
- Try to avoid the location of many predators such as ants, lizards, geckos, and rats but this can still be minimized.
2. Ideal Cricket Cage Houses
Once we have a cricket cage location that matches the above criteria, the next step is to make a house or hut where we place the cage, or you can also make it behind the house / on the terrace / in the warehouse, but of course must meet the required criteria . Here are the home criteria or hut for a cricket cage:
- Ground floor is quite ordinary soil should not be coated with cast cement as long as it is dry and not too moist.
- Floor cultivated high to keep moisture especially during the rainy season.
- Semi brick wall, which is 1.5 meters of brick and at the top asbestos and wind2.
- Or a wall of asbestos top bethek bamboo for winds.
- The wall can also be bethek bamboo and on the outside is given plastic sheeting as a cover to maintain the ambient temperature.
- Roof of asbestos because with asbestos environmental temperature will be more stable and stay warm even when it rains.
- Tall roof tilt of 2.5m - 3.5 / 4m not too high to keep the room warm not too much incoming wind.
- Furthermore, the cage can be arranged according to the design of each farmer! but try the criteria like the above to disagree in adapting at the turn of the season.
3. Ideal Cricket Cage
The next step is to make the cricket cage ideal for crickets to live and grow throughout the year, this is very important because in its natural environment, crickets only breed in certain seasons according to natural conditions.
Cage crickets can be made of plywood / plywood designed like a crate but given the legs to avoid ants. Later on the legs are given a container in the form of bottle aqua that is cut and filled with used oil as a barrier of ants and predators rise to the stable. Why waste oil? because used oil can be obtained for free without additional charge and you can look it up at the nearest motorcycle / car workshop from your residence. Used oil serves as a predatory killer who is about to enter and fall into it. If water is not guaranteed if ant trapped dead therein sometimes swim and climb up the cage.
Cricket cage walls should also be smeared with mud fields so that crickets feel was in the original environment. In order not cramped crickets, on the top of the wall should be coated with masking tape or solation so that crickets can not climb.
But there is also a Caged Cricket from Kardus and this way is a type of New Cricket Cage, because logically container Feed Cricket made from cardboard can only be spent without the rest of the food above. So, it will be his home
How to make a cricket cage? Here are the materials you will need:
- Prepare wooden batten / wood for mounting tiles mounted on pegs. This wood is used to order box / cage maintenance of crickets.
- Provide triplex / plywood which will be used for wall or wall and base of cage / box
- Do not forget the nails used to assemble battens and triplex into box / cage crickets.
- Prepare also sludge mud to smear the walls of the cage, there is also a white cement / mill
- Provide also a brown solation or tape used for barrier at the top of the cage so that crickets can not escape.
- Waring / fishing nets are used for top cover so that predators such as moths and geckos and lizards do not go into the cage when the state is open.
- Bamboo is used for cage enclosures combined with plastic sheeting.
- Plastic sheeting for cage cover.
4. Making a cage of crickets
You can also be a builder, here are the steps how to create an ideal cricket cage:
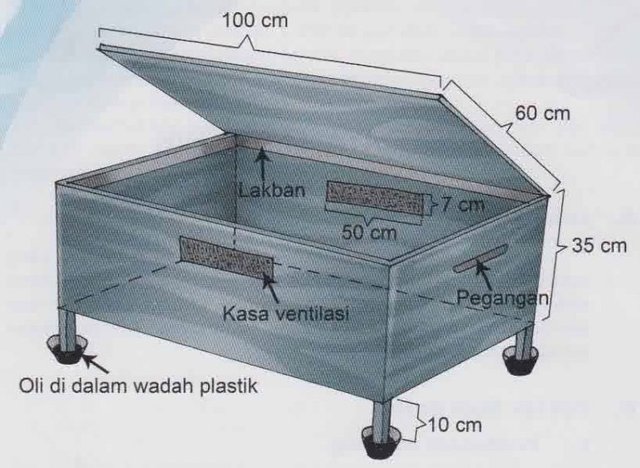
- Boxes made of board or plywood with bone from wooden bamboo / wood. Size length 100 cm, width 60 cm and height 30-40 cm.
- Use glue or cement on each connection and corner of the crate. The point is that the newly hatched crickets do not come out through the connection gap. The size of the newly hatched crickets is very small.
- The top surface should be able to open the lid using a hinge.
- On the front and rear faces are given ventilation holes. Size of ventilation hole 50 x 7 cm, hole position about 10 cm from above (see picture). Ventilation is covered with a fine-sized gauze screen so that the little crickets can not escape.
- On the side edge is given a gap or hook for the handle. Useful for easy lifting or sliding crates.
- On the inside of the inner side, approximately 10 cm from the top, give plastic insulation. The point is that crickets do not creep up.
- Place the legs on the four corners of the crate, approximately 10 cm high. The four legs will be placed on the mangkung filled with water or other liquids. Point to prevent pests such as ants into the cage.

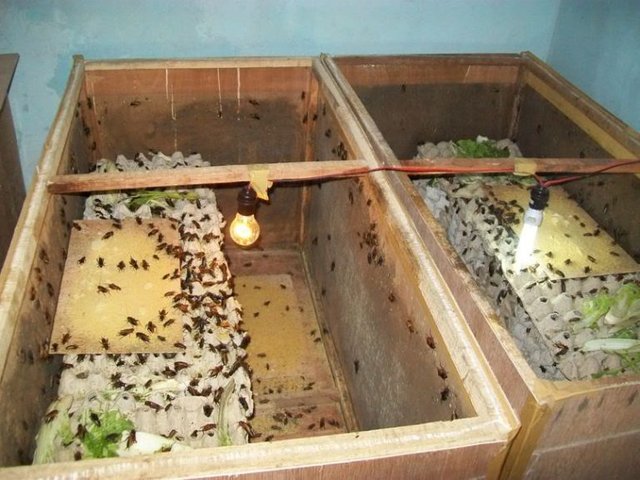
Cage crickets can also be made in layers, such as three stacks to save space and cultivation efficiency. The cage cage should be placed in a dark room, not exposed to direct sunlight. Besides sheltered from direct sunlight, civet livestock also requires calm. Should choose a room that has enough wind, dark, away from the hustle and bustle of human movement.

5. Living Media of Crickets
To be able to live like in nature, provide carpets or TRE are arranged piled up in the cage. TRE serves as a place for crickets activity, hiding until sleep. On the sidelines of the TRE is live crickets, lay eggs, until the harvest later.
Before TRE is used for the cage of crickets, should be dry in for 6 hours in advance so that bacteria, germs and diseases that are dead.

6. Preparing Seeds of Cicada
Once we have a cage for cattle, the next step is preparation of the cricket itself. For cricket seedlings are usually breed G. miratus and G. testaclus. Seeds can be purchased from feed stores that provide live feed. Actually other types of crickets can also be farmed, there are some species that are difficult or slow breeding.
Seedlings or breeders should be obtained from natural catches. Or if it is difficult, at least the seeds of the crickets are obtained from the wild. Because usually male cuttings are more aggressive catches of nature.

The characteristics of prospective cicada breeders:
- The antenna or antenna is still long, the whole limb is still complete, can jump far and nimbly, shiny colored body.
- Do not select crickets that when held out fluid both from the mouth and rectum.
- Male males raise a loud whine. The surface of the wing or back is wavy and rough.
- The female parent has an ovipositor on its tail, its tail is the middle part of an ovipositor. The size is large.
The easiest way to distinguish between male and female crickets is to see the tail. Male crickets only have two strands of the tail while the female is seen to have 3 strands of tail. Actually the middle tail is a vipositor.
7. Marry the crickets
After we have the prospective broodstock earlier, whether we get from nature directly or that we buy from the cattle shop, the next step is to marry the crickets in order to obtain the eggs we will cattle.
Place for marriage try different from the place of enlargement. The conditions of the cage to marry should be made similar to the habitat of crickets in nature. Cage walls can be smeared with clay, white cement and given dry leaves, such as teak leaves, banana leaves or wood shavings.

Crickets to be mated should come from the same species. When male and female sires differ species, marriage will not occur. To marry female and male breeder input insects with a ratio of 10: 2.
In a marriage enclosure, prepare a sandbox or soil as a nursery. During the marriage period the male cicadas will produce continuous rattling. The fertilized female cocks will lay eggs. Eggs are usually placed in sand or soil.
During the marriage period the crickets should get a sufficient feed intake. Examples of feed cabbage, mustard greens, kale, spinach, papaya leaves and other types of green vegetables. Dispose of the remaining feed every day, do not let the rotting feed inside the cage.
Some breeders there who provide a special herb for crickets that are being mated. For example, bran, fish meal, duck egg yolk that has been boiled and mashed, and some vitamins. He said that the eggs produced can be many and qualified. Is it effective? no test is only based on the experience of some farmers only.

8. Buying Eggs Crickets
If you feel you have not been able to marry crickets, the first step you can buy cricket eggs are ready to be hatched. There are many sellers of eggs crickets via online. Make sure you buy at a trusted seller and have good quality eggs.
9. Hatch the Cricket Eggs
Once we have the cricket eggs, the next step is to treat it in order to hatch. We need to know, cricket eggs will hatch after 7-10 days, starting from marriage. Maximum 5 days after the mother spawn (before hatching), separate the eggs. This is to avoid the parent eating his own egg.
Move into the egg hatch enclosure that is also at the same time enlarging the tillers. The color of the fertilized egg will turn from clear to turbid. After 4-6 days usually eggs hatch. Put the egg on a piece of cloth to keep it warm. For one large cage you can input 0.5 kg of eggs. At the time of hatching, the humidity of the cage should be kept by spraying water, or close the cage with a wet burlap sack.
10. Feeding
After we take care of the egg before, then the egg will hatch, the last days before the eggs hatching feed should have been given in the cage. Newly hatched hatchlings, 1-10 days old are given chicken feed (voor), made from soybeans, brown rice, and dry, smoothed maize. After 10 days, tangkangkan jangkring can be fed vegetables and corn. Furthermore feed can be added cassava, cucumber or yam.


11. Maintenance of the Cricket Cage
Cage crickets also need to be treated. Cage cage care is done so that the cleanliness of the cage is always awake. In addition, the humidity of the cage also needs to be maintained. make sure also feed is always available, because crickets will be cannibals if starving while feed is not available.
Try to get rid of food that does not run out, not to rot in the cage. Newly created enclosures should be washed first, do not still smell of vinyl when made of triplex. Way, coat the surface of the cage with sludge for drying and drying.
Check the water in the bowl or tin on the legs of the cage. Add or replace when the liquid is low. The liquid used can be water, kerosene, or other types of liquids that can prevent pests from entering the cage.

12. Harvesting
After we take care of crickets for a month or more, then we can harvest the crickets. There are two results we can get, eggs and adult crickets. Egg crickets are usually sold more expensive than the crickets themselves. Eggs are usually sold to the breeders of cricket enlargement.

Thank you, hopefully useful and add to our insights even if only limited knowledge, do not forget to comment and upvote because that's what I expect from all friends, and thank you for visiting and take the time to read this, bye my friend greetings @reserse
Upvoted on behalf of @thehumanbot and it's allies. Write less but write great original content, and do not use bid bots for at least 1-2 days, for your post to be recommended to other curators. If you are using any image or video, cite proper source. Even if its your own image or video, it's worth mention the same.
Great Original Works are rewarded by top Curators, refer posts from my Step-Brother @humanbot for more details.If you like this initiative, you can follow me in SteemAuto and upvote the posts, that I upvote.
And remember to do some charity when you are rich by contributing to me. Check out my Introduction Post for more details. If you have any concerns or feedback with my way of operation, raise it with @sanmi , my operator who is freaking in Steemit chat or discord most of the time.
Very comprehensive cricket guide!
Thanks to @sanmi, this post was resteemed and highlighted in today's edition of The Daily Sneak.
Thank you for your efforts to create quality content!