The Ultimate Guide to IMAGE ALIGNMENT and LINKS in Markdown! Become a pro right now with these easy tips!
Hello new comers, here is a detailed guide on how to upload images to your posts, align, and add links to them. So continue reading if you want to know more.
INTRODUCTION
Markdown may be new and confusing for some of you, and like the fairy godmother, I am here to render assistance.
What exactly is Markdown you may ask?
Well, to simply put, Markdown is a formatting tool that Steemit offers that allows you to use to write your posts, articles, journals, whatever. The other option, besides Markdown that Steemit has available to write your posts, is Editor. In my opinion, Markdown is easier to use, and you have more options to play around with if you want to have posts that look professional and individualized, to stand out from the rest.
POSTS AND IMAGES
Adding images to your posts/articles is a sure way to grab and hold the reader’s attention. Customizing the layout using photos can also add some uniqueness and professionalism to your content. This article shows how to add images and align it any how you want.
Please note that the first image that you upload on your posts will be the thumbnail that will show up on somebody's home/new/hot/trending/promotional tab. So you want it to be neat and enticing to attract the reader to click your post.

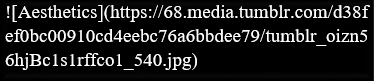
1. DEFAULT IMAGE ALIGNMENT
The simplest way to add images to your posts using markdown is with this coding command:

To obtain the IMAGE LINK, you simply right click on the image that you are using from the web, then click “Copy Image Address”.
Please note: There are no spaces or gaps between the symbols; the exclamation mark and the brackets, and no spaces between the brackets and the letter closest to it. For "Title of image" you can put whatever you want, no one is going to see it; it is just to complete the command so that the image can show nicely.
An example of what it should look like:
If done correctly, you will get this result:
(Notice how it automatically adjusts to the left)
2. CENTER ALIGNMENT
If you want your image to sit in the center of the section, use this very easy coding command:

Again, to obtain the IMAGE LINK on the internet, you simply right click on the image that you are using from the web, then click “Copy Image Address”.
Please note: There are no spaces or gaps between the symbol and the letter closest to it
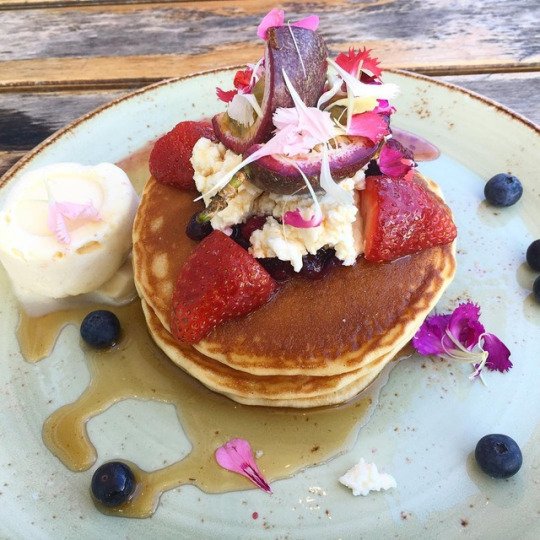
To demonstrate, it should look something like this:
If done correctly, you would get this:
(Notice how it sits in the center)
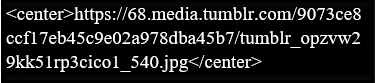
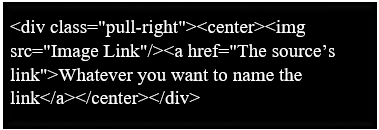
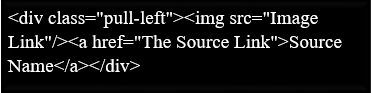
2a. CENTER ALIGNMENT WITH A LINK TO THE SOURCE
Adding a link to direct your readers to the source
To add the name of the source and the link at the bottom of the image, follow this coding command:
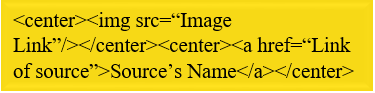
To demonstrate, it will look something like this:
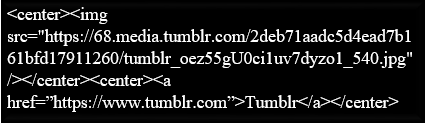
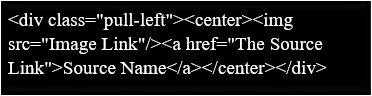
If done correctly, you should get:
(Notice the source at the bottom-center of the image)
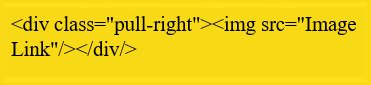
3. RIGHT ALIGN IMAGE WITH TEXT TO THE LEFT
For aesthetic purposes, if you want to align your image to the right with a paragraph or sentence to left of it; like they do on blogs and magazines, then type this command:
If at the bottom of the image you want to put a link to the source, you would use this command:

If you want the source's link to sit at the bottom center of the image, use this command:
To get the paragraph(s) or sentence(s) to appear to the left of the image: continue writing as normal after typing any of the above commands, and the text should appear on the left and the image to the right.
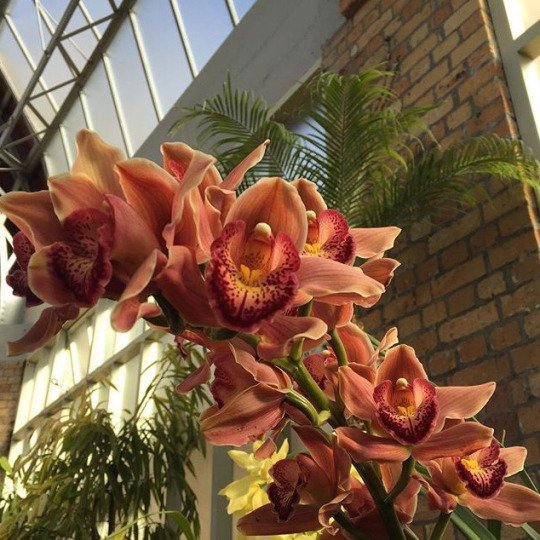
See the example below:
Image to The Right, Text to The Left
I like the way this looks; it adds flare and individuality to your posts. Also makes you look high tech; will have people asking you "how you get your posts to look so good?" To achieve this, you simply continue writing as normal after you type in the command.
To get back to the normal way of writing (to get back to writing at the bottom of the image), you simply put the <br> command as many times until you get back to the bottom of the image. For this image, I needed to put <br> 3 times (with or without spaces between each, does not matter).
I'm just gonna type nonsense to show you that the text is back to the bottom of this image.
See what I mean?
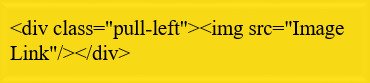
4. LEFT ALIGN IMAGE WITH TEXT TO THE RIGHT
For aesthetics purposes, if you want to align your image to the left and the text to right like they do on blogs and magazines then, type this command:
If at the bottom of the image you want to put a link to the source, you would use this command
If you want the source's link to sit at the bottom center of the image, use this command:
To get the paragraph(s) or sentence(s) to appear to the right of the image: continue writing as normal after typing any of the above commands, and the text should appear on the right and the image to the left.
See the example below
Image to The Left, Text to The Right
Again, individuality and professionalism will be added to your posts. Also makes you look high tech; people will definitely ask you "how you get your posts to do that?" To achieve this, you simply continue writing as normal after you type in the command.
To get back to the normal way of writing (to get back to writing at the bottom of the image), you simply put the <br> command as many times until you get back to the bottom of the image. For this image, I needed to put <br> 2 times (with or without spaces between each, does not matter).
I'm just gonna type anything to show you that the text is back to the bottom of this image.
See what I mean?
5. IMAGES THAT ARE LINKS
If you want your image to be a “link” to something, then you type in this command:

BONUS TIP: DIVIDERS!
In case you're wondering how I got the "fancy dividers" to separate the sections; I used the Center Image command (Tip #2 from above: Center Alignment) for the dividers. It is the same formatting code to center the image. I google searched "dividers" and looked until I found one that I liked.
You copy and paste the "image address" (image url) of the divider into the command.
Thanks for reading!
I hope this post was helpful.
Stay tuned, soon I'll be posting a detailed guide to other formatting functions in markdown.
Feel free to ask any questions. Don't be shy!

Welcome to Steemit @tajo :)
Make sure to participate in this weeks giveaway to get known in the community!
Here are some helpful tips to get you started:
Up-voted, commented, re-steemed, and even brushed my teeth this morning! LOL!
LOL, you made me spit out my water.
Thanks man, appreciate it
Thank you so much! I had been wondering how to do most of those things!
Re-steemed! (and bookmarked)
Not a problem, just trying to help any way that I can
What an excellent post again!
Thank you!
Btw, you can use three consecutive backticks to write code that won't be interpreted by markdown. Put ```on a new line, followed by the html code on the next line, this way people can copy/paste the codes you mentioned and modify them more easily. Will look like this:
Great idea, I didn't even thought of that. I was thinking to probably leave a link to a word document that people can use to copy and paste.
But this seems simpler.
Thank you @tajo! here´s the link for the post in Spanish version! Post in Spanish
Welcome to Steemit @tajo!
I'm a bot-helper, and I'm created to help. Congratulations on the registration on Steem - you really like it here!
Unfortunately, I can not make an upvote of your record - my steem power is still small. But in the future I will come back and do it. If you like me, make an upvote of my comment and follow me.
Your upvote will allow you to give more money to new users, such as you. Let's make Steem better together!
I follow you, and I hope you will follow me.
All the money I earn will be donated to charity.
Steem on!
Very good tips....
Thank you for sharing all these ideas.
Just exactly what I was looking for!! thanks a lot @tajo. May I have your permissions to translate it in Spanish?
Sure, no problem, once you credit me and leave a link to my original post :)
That's for sure, thanks. Great job by the way!