Come cambiare l'Hard Disk del tuo Mac - Parte 2
Eccoci qui alla seconda puntata di come sostituire l'hard disk interno del nostro mac montando un SSD qui il link della prima puntata, azione che porta ad innalzamento molto importante delle performance del vostro laptop.
Quinto passo
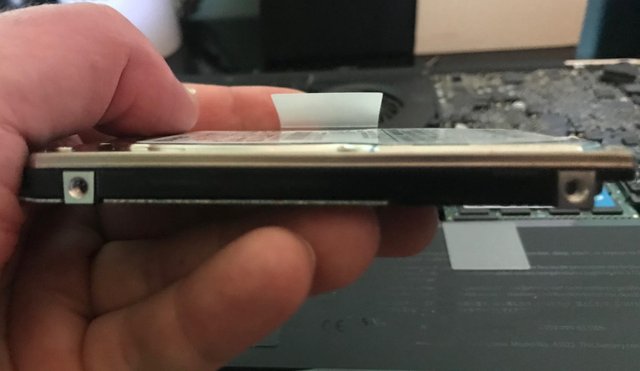
E' arrivato il momento di rimuovere le quattro viti che sono presenti sugli spigoli laterali del componente utilizzando un cacciavite Torx 6 (non vi preoccupate che nel kit del cacciavite consigliato potete trovare tranquillamente anche questa punta). Scartiamo ora il nostro nuovo SSD dalla scatola e avvitiamo le quattro viti che abbiamo smontato dal vecchio hard drive.
Sesto passo
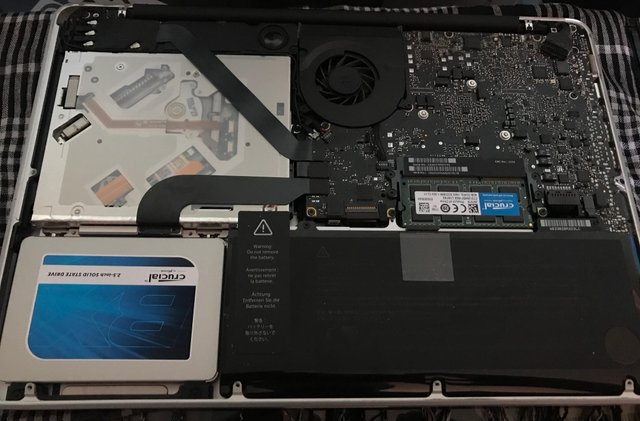
Ora attaccate alla memoria SSD la connessione SATA che avevano disconnesso precedentemente facendo molta attenzione al connettore. Una volta inserita con precisione, posizionate l'hard drive nell'apposito alloggiamento e riprendete il supporto di bloccaggio che avevate spostato in precedenza. Avvitate le viti del supporto e verificate che il disco sia perfettamente bloccato.
Settimo passo
Prima di riposizionare il case posteriore del laptop ricordatevi di riattaccare il connettore della batteria che avevate disconnesso prima di iniziare l'opera. Avvitate le viti facendo massima attenzione al loro posizionamento, ricordatevi che ce ne sono tre di lunghezza differente cxhe vi raccomando di avvitare per prime.
Settimo passo
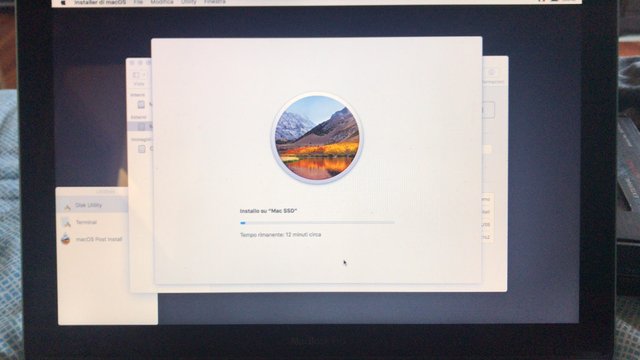
Passiamo ora alla parte software e quindi alla reinstallazione del sistema operativo. La prima cosa da fare è quella di inserire, a computer ancora spento, la memoria USB nel nostro Mac e poi accendere il nostro device tenendo premuto il tasto ALT dopo il suono di avvio iniziale. A questo punto, nel menù che vi verr mostrato avrete come unica opzione di avvio la memoria esterna inserita, premete dunque ENTER.
Ottavo passo
Una volta aperta la pagina di Utility Mac OS X premete su Utiliy Disco ed in seguito su Continua. Nella barra laterale che vi verrà mostrata, selezionate il disco SSD e andate nella sezione Inizializza. Date un nome ala memoria principale (es. "MAC SSD" e poi confermate il processo di inizializzazione. La procedura è abbastanza veloce e al termine chiudete la finestra.
Nono passo
Tornati sulla schermata di Utiliy MAC OS X cliccate su Installa OS X e iniziate la procedura di installazione completa di OS High Sierra. Selezionate l'hard drive sul quale installare l'OS e chiaramente selezionate la memoria SSD.
Decimo Passo
Terminata la procedura di installazione e configurazione del sistema operativo, potete verificare il nuovo hard drive installato andando su "informazioni su questo Mac", "Più informazioni" e infine "Archivio".
Completata tutta la procedura vi tocca soltanto misurare le prestazioni di avvio del Mac, prendete cronometro e noterete un abbattimento dei tempi considerevole.
Tutte le immagini sono di proprietà dell'autore di questo post
Congratulations @ecampisi! You have completed some achievement on Steemit and have been rewarded with new badge(s) :
Click on the badge to view your Board of Honor.
If you no longer want to receive notifications, reply to this comment with the word
STOPDo not miss the last post from @steemitboard!
Participate in the SteemitBoard World Cup Contest!
Collect World Cup badges and win free SBD
Support the Gold Sponsors of the contest: @good-karma and @lukestokes
Congratulations @ecampisi! You have completed the following achievement on Steemit and have been rewarded with new badge(s) :
Click on the badge to view your Board of Honor.
If you no longer want to receive notifications, reply to this comment with the word
STOPCongratulations @ecampisi! You have completed the following achievement on the Steem blockchain and have been rewarded with new badge(s) :
Click on the badge to view your Board of Honor.
If you no longer want to receive notifications, reply to this comment with the word
STOPCongratulations @ecampisi! You have completed the following achievement on the Steem blockchain and have been rewarded with new badge(s) :
Click here to view your Board of Honor
If you no longer want to receive notifications, reply to this comment with the word
STOPDo not miss the last post from @steemitboard:
Congratulations @ecampisi! You received a personal award!
Click here to view your Board
Do not miss the last post from @steemitboard:
Congratulations @ecampisi! You have completed the following achievement on the Steem blockchain and have been rewarded with new badge(s) :
Click here to view your Board
If you no longer want to receive notifications, reply to this comment with the word
STOPCongratulations @ecampisi! You received a personal award!
You can view your badges on your Steem Board and compare to others on the Steem Ranking
Vote for @Steemitboard as a witness to get one more award and increased upvotes!