Knifemaking, and how you can get started. (longest Steemit post ever)
Now, I’m by no means claiming to be an expert on the subject and my experience is limited, but I know enough to help you get started. Even though I’m only working on my second knife at the moment, I've done hours and hours of research and watched a whole lot of YouTube videos, I'd suggest you do the same before attempting to make a knife at all.
Knifemaking is an art almost as old as mankind itself, and like any other form of art, it has come a heck of a log way from where it started. Knives, however, have a huge variety of uses and an even bigger variety of designs and, well, variations. Covering every area and aspect of life from the kitchen, to the battlefield, to the outdoors, etc. knives have been used by mankind for more than two and a half million years, and every year we seem to be getting better at making them, but the basic idea of what a knife is never changes.
That’s part of the beauty of knives, even though we’ve been perfecting and altering them for ages, the basic design, idea, and concept have stayed basically exactly the same. That’s why there’s such a primitive satisfaction to making a knife, you feel so in touch with your pre-modern ancestors.
Except, of course, we have power tools.
Anyway, here’s what you’ll need to get started:
(No forging necessary)
- A design
- A piece of steel big enough to trace your design on (about 3-4mm thick steel sheets work best, depending on the type of knife you’re making)
- An angle grinder or band saw (I use an angle grinder)
- If you have a band saw, you’re still going to need an angle grinder.
- If you don’t have an angle grinder, but you do have a belt sander, you’ll need the belt sander.
- Number 5 only applies if you have a band saw as well.
- For your angle grinder, you’ll need: some steel cutting discs, steel grinding discs and some flap discs. (Don’t worry about the flap discs if you don’t mind sanding with sandpaper for all of eternity)
- Sandpaper, you’re still going to need sandpaper if you used flap discs.
- Free time.
Bear in mind, I didn’t plan on writing this blog before I started making this knife, so I apologise for the lack of visual content.
Step 1:
Firstly, you’re going to want to draw up a few designs, and pick the one that you figure is:
a) a good looking design
b) practical
c) simple enough for your unskilled arse to make
Now, as this was my second time doing this, I figured that I might as well try to do a bit more of a complex design, so this is what I came up with:
(I use the word “complex” very loosely)

I went with the one at the top.
Step 2:
Trace the design onto the piece of steel that you’ll be working with. I scanned my design to my PC and traced it on Corel Draw, then printed it out much larger, and pasted that onto my piece of steel. You can trace it onto the steel however you see fit, this is just the method that I like to use.

Step 3:
Use your angle grinder/band saw to cut out the basic shape of the knife(make sure that you’re using a steel cutting disc on your angle grinder or a blade that can cut through steel if you're using a band saw). The shape doesn’t have to be perfect just yet, you’re going to sort that out in the next step.
Bear in mind that you have to be careful when working with an angle grinder, it can only cut in straight lines, so I prefer to cut little serrations towards the line that I want to cut on, then cut the little pieces off. This method also generally makes it less effort and more fun to work with steel. Like so:

You'll end up with something that has the shape of a knife and you'll feel smarter, better and stronger than the rest of the world.
(As you can see, I changed the design of my knife a little to increase the length of both the blade and the handle.)
Step 4:
Using either a grinding or a flap disc on your angle grinder, grind away the rest of the steel that doesn’t go with your design. Also, get the edges nice and smoothed out, especially along the side where the edge of the blade is going to be, because if you leave any imperfections there, it will mess with the edge of your blade). At this point, your steel should be looking something like this:

The one at the top is the one you should be paying attention to.
Step 5:
As you can see, the blade is exactly 0% shiny at the moment, and that's boring. Also, the paper looks yucky. So we're going to clean it up a bit.
For this, I used an 80 grit flap disc, but you can use sand paper if you can't find flap discs.
Step 6:
Now that your blade is nice and shiny, you're probably already feeling unstoppable. Hold your horses though, it still can't cut things.
For this step, we're going to be making the bevel, or cutting edge, of the blade.
To establish the basic shape of the bevel, I used a grinding disc, as I feel grinding discs are better than flap discs for taking away large amounts of steel. Before you start, make a line along middle of the thickness of your blade, so that you know where the edge of the blade needs to be.
Then, at an angle, grind away at the excess material.
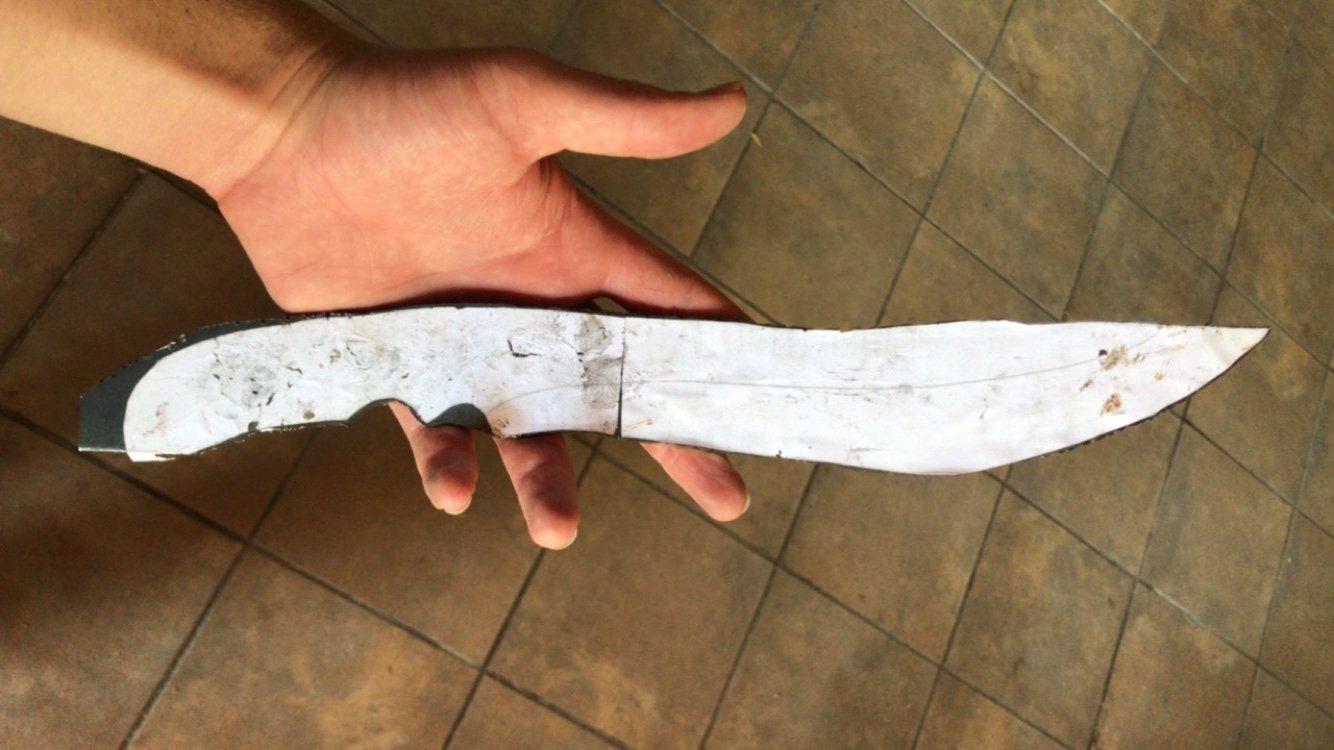
If you do this well, you should have a relatively nice bevel, but the surface will still be rough and unpolished. Now you may call your steel baby a knife:

After establishing the bevel/edge with the grinding blade, I smoothed it out with a flap disc, which resulted in this:
(turn on the volume for shweee sounds)
I then went over it a few more times with the flap disc to get it as clean and smooth as possible, and to fix some minor imperfections in the shape of the blade and bevel.
Here are some more videos of me playing with it:
(please excuse my friend's toes)
Step 7:
This is one of the more fun/dangerous steps.
To harden the blade, we're going to heat treat it. What does that mean? Heat treating is when you heat a piece of steel up to a critical point where a magnet will no longer stick to it and then just quenching it in a liquid medium, usually oil or water.
The "science" behind it:
Metals consist of a microstructure of small grains, the nature of the grains (size and composition of the grains) is one of the most effective factors that can determine the overall mechanical behavior of the metal. Heat treatment is basically just the easiest and most effective way for you to alter or manipulate the properties of a metal by controlling the rate of diffusion and the rate of cooling within the microstructure, allowing you to manipulate such factors as the hardness, strength and durability of the blade.
I built my own makeshift forge, used canola oil as my liquid quenching medium and I made this weird video to show you how I did it:
Post heat treat:

Now, that's not how a knife is supposed to look, so I'd suggest that you grab the flap disc/sandpaper again and start sanding away that black stuff!
Then you'll have your beautiful shiny baby back.

All that's left now is tempering and polishing the blade, before attaching the handle and sharpening it! (Always remember that sharpening the blade should be the very last thing that you do, otherwise you WILL cut yourself, knifemaking is a very hands-on hobby and it can be VERY dangerous if you are not careful. These are still "weapons"that you are working with.)
Stay tuned for the next chapter in my knifemaking journey, when I'll show you about tempering and making handles!
As a bonus, here's my first knife side-by-side with the second one:

Until next time
Driekus
Nice one!! I still want to join if the invite invite is till open.
Thanks! Of course, just let me know when.
Whats the invite for? I'm making my first knife too!
Sweet!
Invite you to a drawing competition
What would you like to draw?
Whatever way you slice it, these knives look pretty damned sharp.
Good work :)
Congratulations @driekus, this post is the second most rewarded post (based on pending payouts) in the last 12 hours written by a Dust account holder (accounts that hold between 0 and 0.01 Mega Vests). The total number of posts by Dust account holders during this period was 12134 and the total pending payments to posts in this category was $3991.20. To see the full list of highest paid posts across all accounts categories, click here.
If you do not wish to receive these messages in future, please reply stop to this comment.
Wow that is a pretty crazy difference between your second knife and your first! Looking forward to your next post as well :)
Much love - Carl
Thank you for the kind words, Carl!
Awesome, nice to see some knife makers here, I made a few last year but lost steam, seeing yours gives me motivation to continue, Cheers !
cool, i just know that 😊
Thanks!
I liked your post and your procedure to make a knife like that, congratulations.
Thank you!
Very nice thanks for sharing