EXPERIMENT OF USED ITEMS, MAKE SIMPLE SURYA ELECTRIC POWERLOADING
Solar panel is a tool that captures sunlight and then can convert it into electrical energy, before I have written about "Assemble Your Own 1000 Watt Electric Power Generator - Alternative Electrical Energy." And then in my post below, we can try to make solar panels simple one.
We can try to know how to make Solar Cell solar cells by preparing used CD boxes made of clear plastic, iron & copper plates that are useful as conductors, copper cables and silicone glue.
The first step is to make a cuprous oxide plate (rusty iron plate) box-shaped, then wipe one corner with sandpaper to be soldered with copper cable, the plate will serve as a negative side.
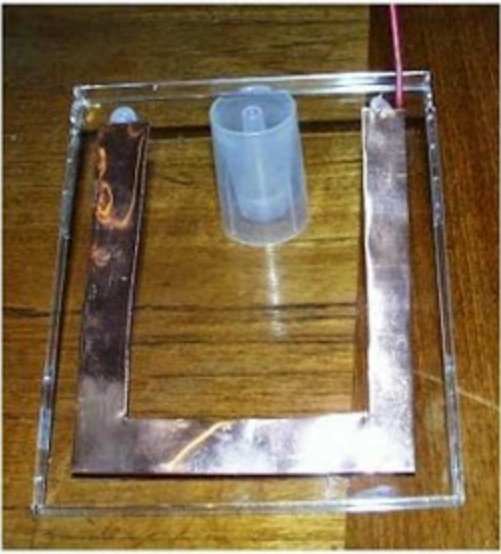
Then we make a positive plate by forming a U-piece of copper sheet, slightly larger than the cuprous oxide plate, with the inside of the U piece slightly smaller than the cuprous oxide plate. After that solder the copper wires on one side of the U plate. Glue the U-shaped plate on the clear plastic CD front with many silicone glue to avoid leakage. Make sure that the solder connections are completely covered with glue, or are beyond the shaped glue, as drawn.
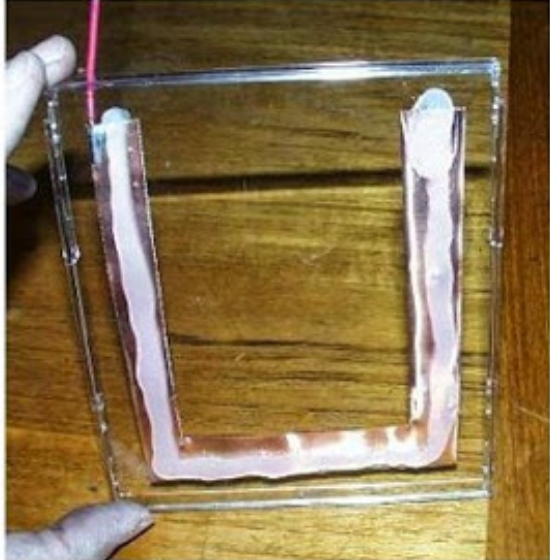
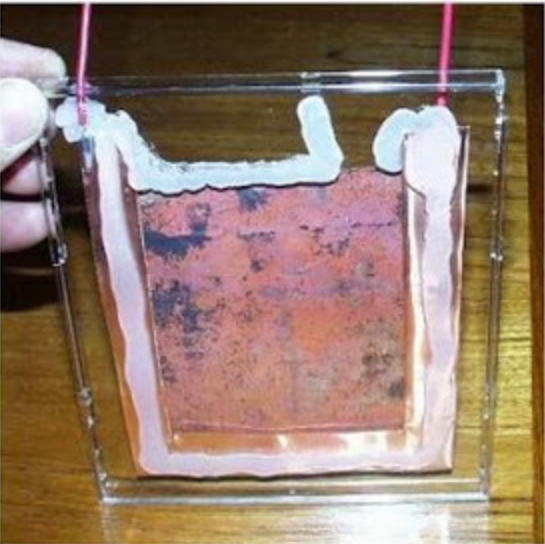
The picture above shows the back side of the solar cell (on the side not facing the sun). And the image below shows the front side of the solar cell, note that the silicone glue does not completely cover the U-shaped copper plate, because later part of the copper plate must come into contact with the brine.
The next step is to place a box-shaped plate on the U plate, but before glue back plate U to form a thick layer, the layer serves for the insulator and to make room for salt water. Again, not all copper parts are closed, so there will be part of the copper in contact with the brine. Glue the plate plate to the glue coating layer. You have to press hard enough to ensure that there are no gaps, but not so hard until the two plates touch each other.
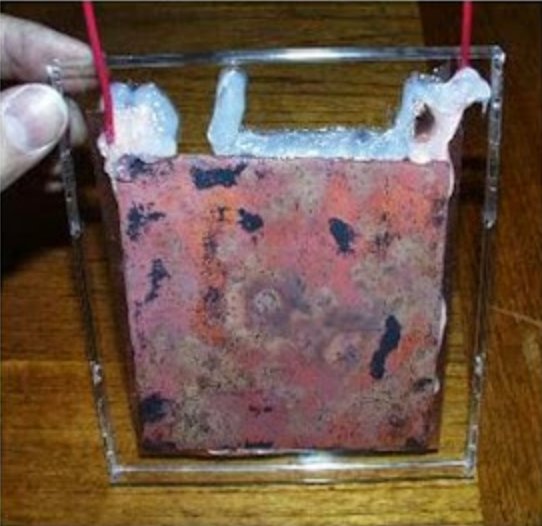
The picture above shows the back side of the solar cell (on the side that is not facing the sun). And the picture below shows the front side of the solar cell (the side that will face the sun), note that we will add an extra glue to form a channel at the top to let the salt water be added.
Next, use a large pipette to add salt water. Fill the cell almost to the top of the copper plate, so it almost spills out. Then close the duct with glue, and let the glue dry.

Solar cells or solar panels are tools to convert solar energy into electrical energy. Solar Cell is gaining popularity lately, in addition to the depletion of fossil enegi reserves, global warming issues, but the energy generated is also very cheap because the energy source (sun) can be obtained for free, and also environmentally friendly. A large-powered sollar cell can be found at alternative energy stores such as alpensteel.com or other stores. This solar cell is made from high-level silicon processing made in a large factory, which produces a large level of energy but is certainly not cheap. However, if you are a bit creative, you can make your own Solar Power from the materials you get from the hardware store and it only takes a few hours to make it. You can also create some renewable energy such as; Solar Street Light System, Led Lights, Solar Light, General Street Lighting, Battery, Accu, Battery, Regulator, Battery Control Regulator, Controller, Inverter, UPS, Wind Power, Green Energy, or Genset. Solar cell that we will make this time made from cuprous oxide and not silicon. Cuprous oxide is one of the ingredients known to be able to display photoelectric effects. Where it can convert light into electrical energy flowing in a material. The raw materials needed to make this solar cell include:
A shiny copper sheet that can be bought at an iron shop.
Two crocodile claws.
A Micro ammeter that can read currents between 10 to 50 micro amps.
An electric stove, can be obtained at an electronics store for approximately Rp. 100,000
A clear plastic bottle, can be used bottles of mineral water by cutting the top.
Salt table, just use 2 tablespoon salt table.
Faucet water.
Paste or can also use a wire brush.
Scissors (for cutting copper wire).
How to make it?
Follow these steps:
The first step is to prepare the electric stove, then cut the copper wire of the same size with the heater panel on the electric stove. But before wash hands first so that no oil or fat attached to the copper.
Clean the cut copper with a wire brush or sandpaper to prevent dirt or anything else that blocks the sun's energy from being absorbed.
After the copper is clean and dry, place the copper above the electric stove, then burn with the highest voltage.
When the copper starts to heat up it will appear that the oxidation pattern begins to form with a beautiful color blend of yellow and orange color. Some of the copper will be hotter and show black. Then after the colors disappear, the copper will change color to a bright red evenly.
Burn copper for 30 minutes until the copper layer becomes thick black. This is important because the black layer will peel off and the thin layer remains attached to the copper.
After burning for 30 minutes, turn off the stove. Leave the copper on the stove and let it cool naturally because cooling too fast will make the black oxide coating stick to copper. Once cool, the copper layer will shrink the black oxide will also shrink.
The black oxide layer will shrink slowly with different times, should be patient to wait for this process.
After the copper is cooled (takes about 20 minutes) most of the black oxide will disappear. Wash and rub gently with your hands on running water to clear the small granules. Wash slowly and do not stretch the copper as it will damage the red corpus oxide layer we need to generate energy.
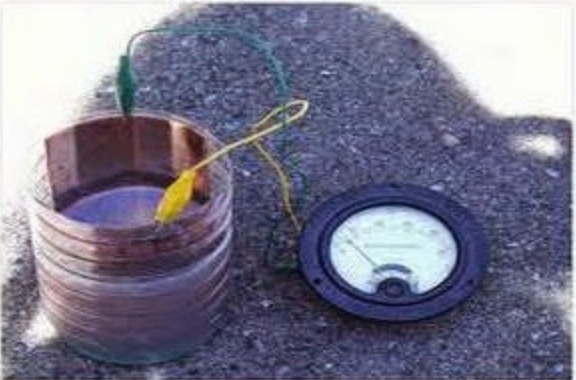
The next step is very easy and fast. Cut another copper sheet the size of the first copper we burned earlier. Bend both pieces gently and then input into plastic bottles without touching each other.
The copper that had been burned is the best side to face out the bottle because the surface is smooth and clean.
Pair 2 crocodile claws, one to the new copper and one to the burned copper. Attach the end of the cable from the clean copper plate to the positive terminal of the meter and the burned copper at the negative terminal on the meter.
Then mix 2 tablespoons table salt into water that has been heated, stirring until the salt dissolves in water. Put salt water into the bottle carefully, not to wet the crocodile claw that we have installed.
Included salt water should not drown the entire copper plate, you leave at least 1 inch of copper that is not submerged in water, this is to reduce the risk of crocodile claws exposed to water when moving the solar cell.
Congratulations! This post has been upvoted by SteemMakers. We are a community based project that aims to support makers and DIYers on the blockchain in every way possible. Find out more about us on our website: www.steemmakers.com.
If you like our work, please consider upvoting this comment to support the growth of our community. Thank you.