Drawer Flip By Sarah K
What do you do when you have an ugly dresser from the 70's and a clear exhaust space needing a remark augment its space? Flip those terrible dresser drawers into beautiful lavatory racks - that is the thing that! These drawers furnished me with an innovative approach to utilize the vertical space in this lavatory niche where I'll keep visitor toiletries, additional tissue, and washroom towels. I didn't know how this would turn out, however I was agreeably shocked how simple this task wound up being. Accumulate paint, a couple of apparatuses, a table saw, and your creative energy to make this search for yourself! Three chop down, repainted, and flawlessly set dresser drawers progress toward becoming restroom retires in this drawer flip task!
Time: 1 Days Difficulty: Medium

The dresser and racking alcove beforeThe dresser and racking niche some time recently.
Supplies: -Table Saw -Electric Sander -120 Grit Sand Paper -Chisel -Tape Measure -Carpenters Square -Pencil -Level -Finish Nailer -16 gauge 1.5 inch finish nails -Paint (your preference) -Stencil (optional) -1" Scrap Wood for supports

Stage 1 (discretionary):
Prep your dividers. I chose to stencil within this restroom alcove to include a touch of measurement. I have this same stencil work in the room simply off of this restroom, so I figured it is decent to reintroduce the example here. The dividers were at that point painted dim, so I utilized a shiny white to paint the stencil design. I utilized painters tape and shower glue to hold the stencil on the divider while I painted. When everything was stenciled, I enabled the divider to dry.

Stage 2:
Remove equipment from drawers Take off any equipment from the drawer and set aside to reassemble later.

Stage 3:
Cut your drawers to measure Unless you're truly fortunate and the drawers you need to use as racks are the very same size as the opening, you'll need to pare your drawers down. Drawers that are littler than the niche opening won't work. I cut off one side of the drawer utilizing a table saw. Do this for each drawer you need to use. Be cautious since you'll need to rescue each bit of the drawer.

Stage 4:
Disassemble each part After I chop down each drawer, I dismantled the opposite side and the substance of the drawer precisely. Hold the back of the drawer set up with the base of the drawer. I utilized a little etch to help pry the pieces separated. I needed the substance of the drawer to cover the niche opening. So ensure the substance of the drawer remains somewhat greater than the niche's opening. You would now be able to chop down the base/back of the drawer down to the correct size of the alcove's opening. Here is a photo of the considerable number of pieces isolated.

Stage 5:
Stand your aprts down Once every one of the pieces are separated, I brought an electric sander with 120 coarseness sandpaper to the drawers. This helped tidy up the sides and faces of the drawers I simply cut.

Stage 6:
Paint your drawers I chose to layer highly contrasting chalk paint on the drawers. This is the place you get the chance to have some good times refreshing these old drawers and having them fit into whatever plan plot you have going on.

Stage 7:
Start introducing from the base up Once everything was painted I began the establishment from the base of the niche and worked my way up. The main piece was the most straightforward since the base of the alcove would bolster it. I set the base of the drawer in the space and after that hit it a couple of times with the complete nailer for good measure.

Stage 8:
Use a level to include underpins The following level up is the place things began to get dubious. A level is your closest companion here. Utilizing scrap bits of 1" wood I made help rails that the drawer would sit over. Check on the divider where you'd like the base of the drawer to hit. Line up your help rail, ensure it's level, and after that nail it into the divider. Rehash this progression on the opposite side of the niche.

Stage 9:
Arrange your drawers Place your drawer over the help rails. Ensure it's in reality level.

Stage 10:
Attach drawers to bolsters If the drawer is level, nail the drawer to the help level. Rehash stage 9 and 10 the same number of times as you have drawers.

Stage 11:
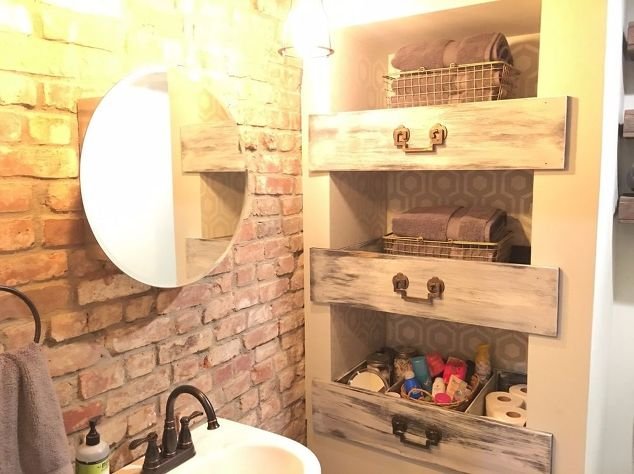
Add the drawer fronts and equipment Now, you should simply put the substance of the drawer before every rack so it would appear that the drawer is totally in consideration. Ensure it is level and nail it set up. Supplant the equipment.

Refined, practical, and remarkable! We adore this expansion to our restroom!

I unquestionably have exceptional shelvingI certainly have stand-out racking!

Hard work! My room need this! Lol!
I will follow your posts! =)
Followed and upvoted!
;
Now how cool is this!! Love it!!
oh~! good~ =) Thank you.
Thank you for share
Such a cool idea! Like it.