How to reform an old speaker........
A story of refounding an old speaker. It will help you also to refounding your own old speakers........
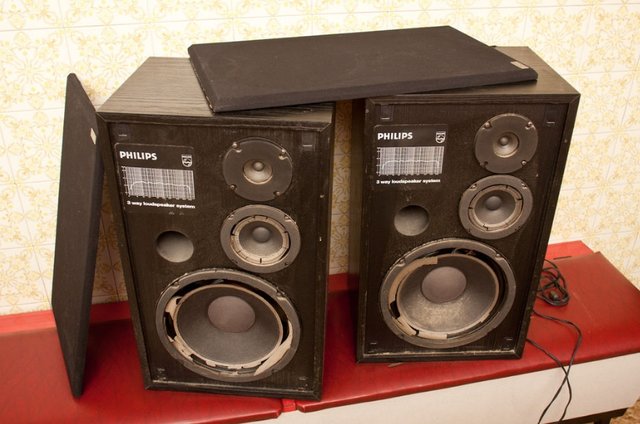
In last years it happened to me to run across ruined speakers more often than we would think. I love those old heavy and huge black speakers typical of '90 years. I obtained this pair for free, I decided to repair it and this time I supported the process with a full photographic documentation and a detailed instructable for your pleasure
গত বছরগুলোতে আমার মনে হয়েছিল যে, ভাঙা বক্তৃতাগুলির মাধ্যমে আমরা প্রায়ই চিন্তা করবো। আমি '90 বছরের সাধারণ যারা পুরানো ভারী এবং বিশাল কালো স্পিকার পছন্দ। আমি বিনামূল্যে এই জোড়া প্রাপ্ত, আমি এটি মেরামত করার সিদ্ধান্ত নিয়েছে এবং এই সময় আমি একটি সম্পূর্ণ ফোটোগ্রাফিক ডকুমেন্টেশন এবং আপনার আনন্দ জন্য একটি instructable সঙ্গে প্রক্রিয়াকরণ সমর্থন
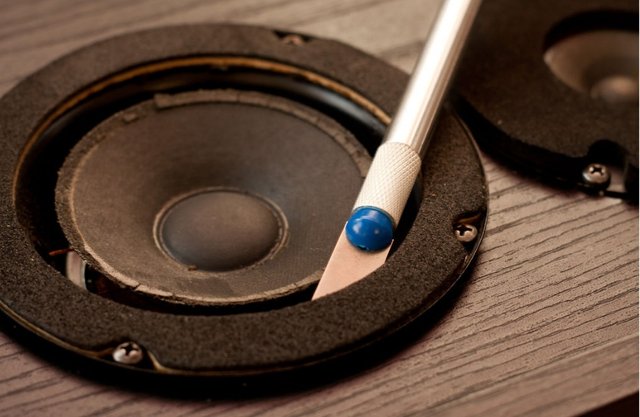
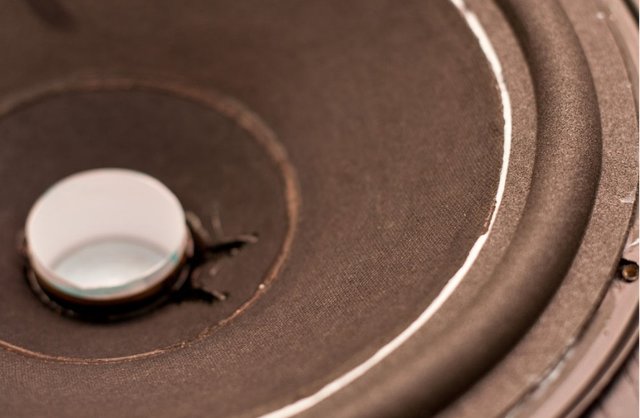
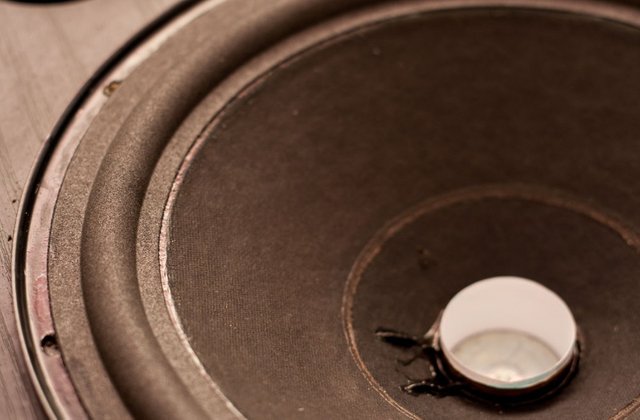
Step 1: Is It Really to Trash?
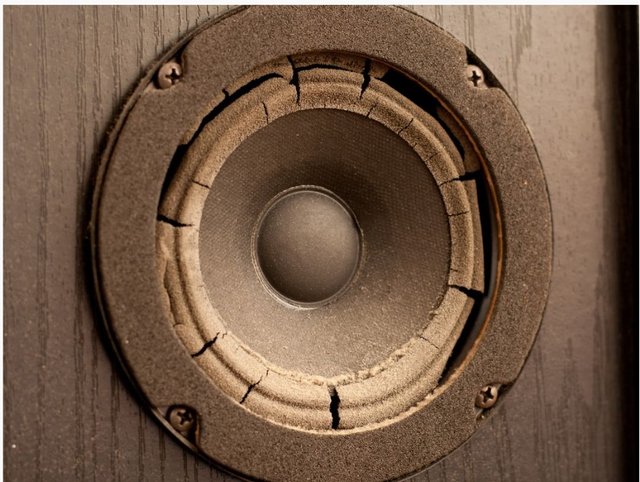
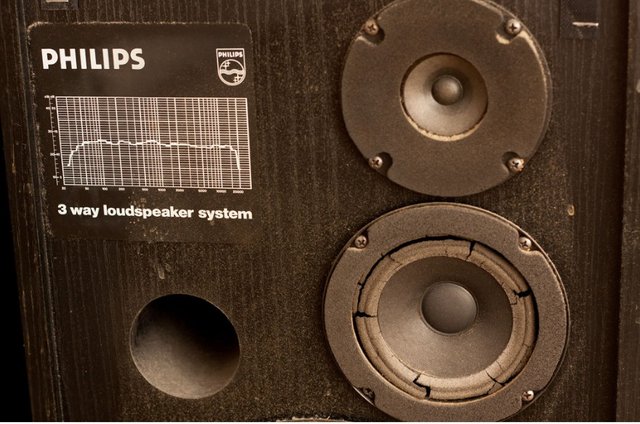
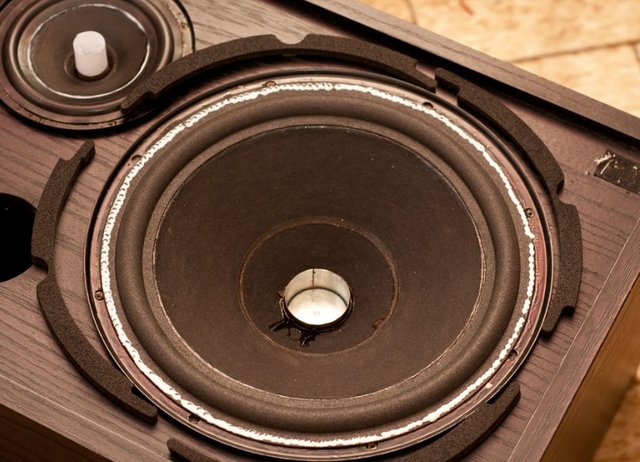
As you noticed from the first image the speakers appeared in a very bad situation. Actually you wouldn't tell, but this is an ordinary situation for a 20 years old woofer, indeed the edges (made of foam or rubber), after many years crumble. The tweeter's cone doesn't need to move as much as the woofers so there is no edge which could break. A speaker in this state usually emits a very low sound, and it's practically useless, many people throw it away, since a refurbishing professional service could be expensive. I will explain how to bring them back to life with a 15$ investment.
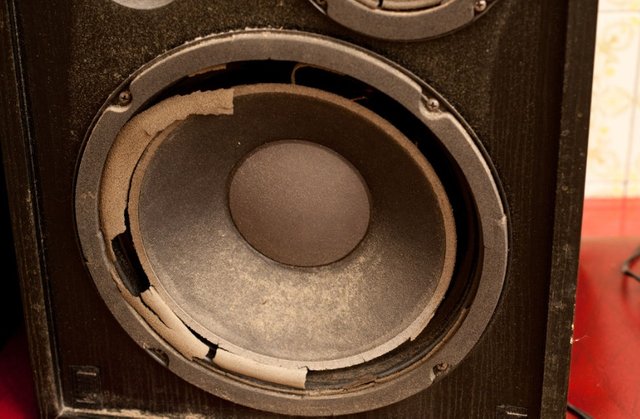
ধাপ 1: এটি সত্যিই ট্র্যাশে কি?
আপনি প্রথম ইমেজ থেকে লক্ষ্য হিসাবে স্পিকার একটি খুব খারাপ পরিস্থিতিতে হাজির। প্রকৃতপক্ষে আপনি বলতে পারবেন না, কিন্তু এটি একটি 20 বছর বয়সী woofer জন্য একটি সাধারণ অবস্থা, প্রকৃতপক্ষে প্রান্ত (ফেনা বা রাবার গঠিত), অনেক বছর পরে ভাঙ্গা। Tweeter এর শঙ্কু হিসাবে woofers যতটা সরানো প্রয়োজন নেই যাতে কোন প্রান্ত যা বিরতি হতে পারে এই রাষ্ট্রের একটি স্পিকার সাধারণত খুব কম শব্দ নির্গত করে, এবং এটি কার্যত অর্থহীন, অনেক লোক এটি ছুঁড়ে ফেলে, একটি refurbishing পেশাদারী সেবা ব্যয়বহুল হতে পারে। আমি 15 $ বিনিয়োগের মাধ্যমে তাদের জীবন ফিরিয়ে আনতে ব্যাখ্যা করবো।
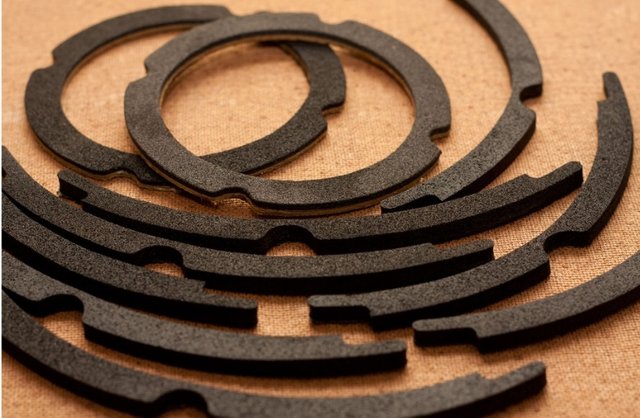
Step 2: The Replacements
All you need are the substitutes for your speaker's surrounds. You can choose either foam or rubber edges from eBay. To choose the right size unfortunately is not so simple as to choose between S, M or L. You have to measure the external diameter of the cardboard cone, and the inner diameter of the steel frame. Practically you need the exact inner and outer diameters of the bumping central stripe of the surrounds. The inner and outer diameters of the full rubber/foam piece could vary a little bit. Measures are usually specified in inches, so if your meter uses metric system, I suggest you to convert it in imperial units. Some surrounds sellers let you choosing between flat and sloping cone border, so choose that feature after inspecting your speakers, that will affect the slope of the surround's inner stripe. I bought these and these replacements for my speakers.
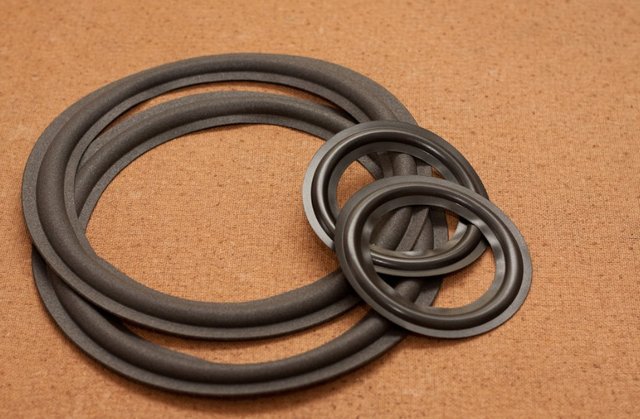
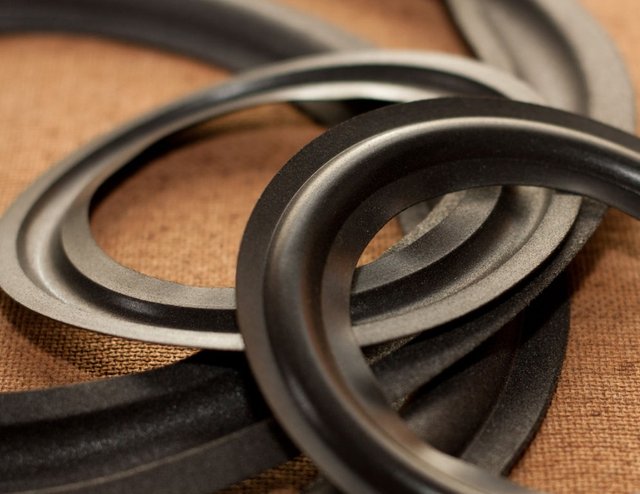
ধাপ ২: প্রতিস্থাপন
আপনার স্পিকার এর চারপাশে সব জন্য বিকল্প হয় প্রয়োজন। আপনি eBay থেকে ফেন বা রাবার প্রান্তগুলি চয়ন করতে পারেন সঠিক আকার নির্বাচন করার জন্য দুর্ভাগ্যবশত এস, এম অথবা এল এর মধ্যে নির্বাচন করা এত সহজ নয়। আপনি কার্ডবোর্ড শঙ্কুর বহিরাগত ব্যাস পরিমাপ করতে হবে এবং ইস্পাত ফ্রেমের ভেতরের ব্যাসটি পরিমাপ করতে হবে। কার্যকরীভাবে আপনি চারপাশের bumping কেন্দ্রীয় ধরণ সঠিক ভিতরের এবং বাইরের ব্যাসের প্রয়োজন। সম্পূর্ণ রাবার / ফেনা টুকরা ভেতরের এবং বহিরাগত ব্যাস একটু আলাদা হতে পারে। পরিমাপ সাধারণত ইঞ্চি নির্দিষ্ট করা হয়, তাই যদি আপনার মিটার মেট্রিক সিস্টেম ব্যবহার করে, আমি আপনাকে ইম্পেরিয়াল ইউনিট মধ্যে এটি রূপান্তর সুপারিশ। কেউ কেউ ঘিরে বিক্রেতারা আপনাকে ফ্ল্যাট এবং ঢালু শঙ্কুর সীমারেখা বেছে নিতে দেয়, তাই আপনার স্পিকারগুলির পরিদর্শন করার পর যে বৈশিষ্ট্যটি নির্বাচন করুন, এটি চতুর্ভুর ভিতরের পটিরের ঢালকে প্রভাবিত করবে। আমি আমার স্পিকারের জন্য এবং এই প্রতিস্থাপন কেনা।
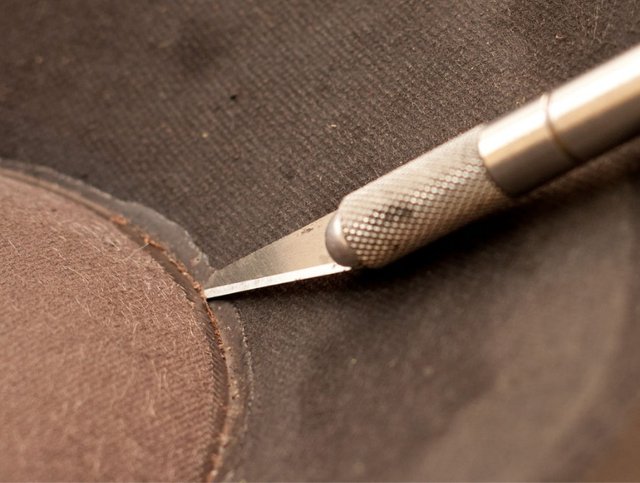
Step 3: Cleaning Process
Once obtained the replacements, first action is to remove old surrounds and clean cone and frame, so to obtain a smooth surface. As tool you can use a flat blade cutter, scratch out the foam and glue remains, ant pay attention to not cut the cardboard cone.
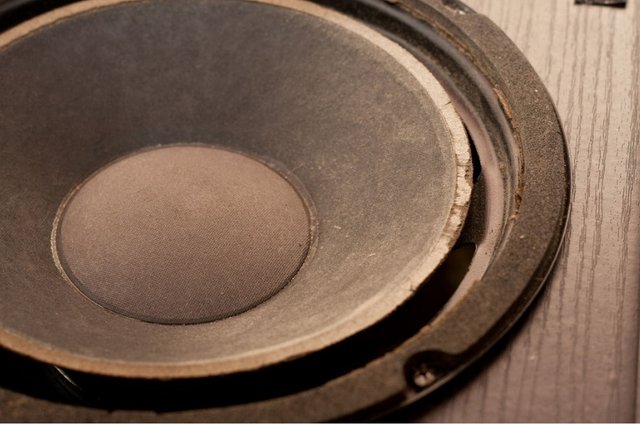
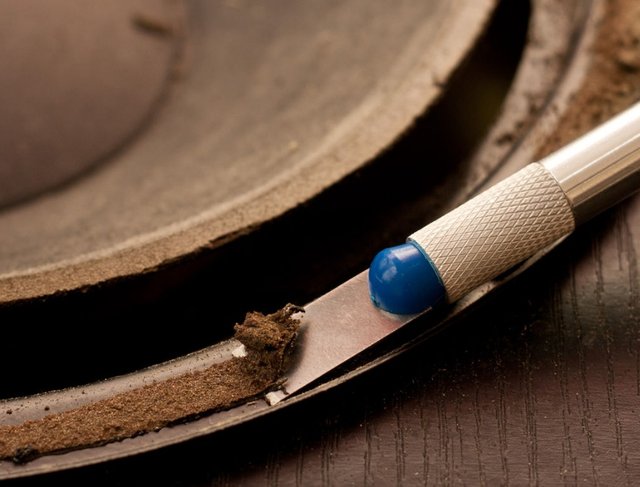
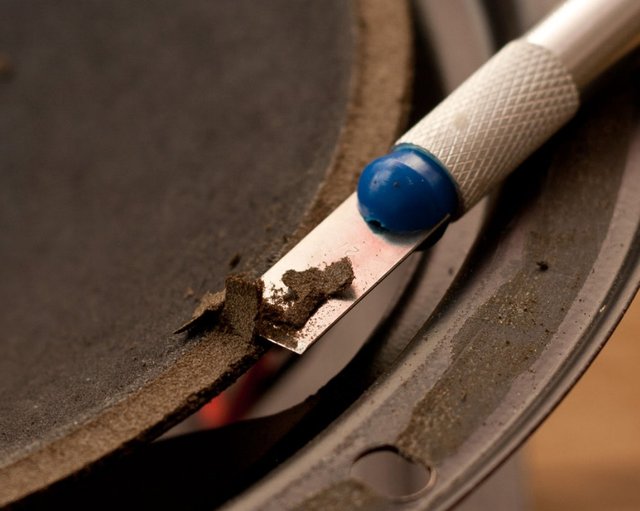
ধাপ 3: পরিষ্কার প্রক্রিয়া
একবার প্রতিস্থাপন প্রাপ্ত, প্রথম পদক্ষেপ পুরানো ঘিরে এবং পরিষ্কার শঙ্কু এবং ফ্রেম অপসারণ করা হয়, যাতে একটি মসৃণ পৃষ্ঠার প্রাপ্ত। সরঞ্জাম হিসাবে আপনি একটি ফ্ল্যাট ফলক কর্তনকারী ব্যবহার করতে পারেন, ফেনা এবং আঠালো অবশেষে আঁচড়ান, পিচবোর্ড শঙ্কু কাটা না antt মনোযোগ।
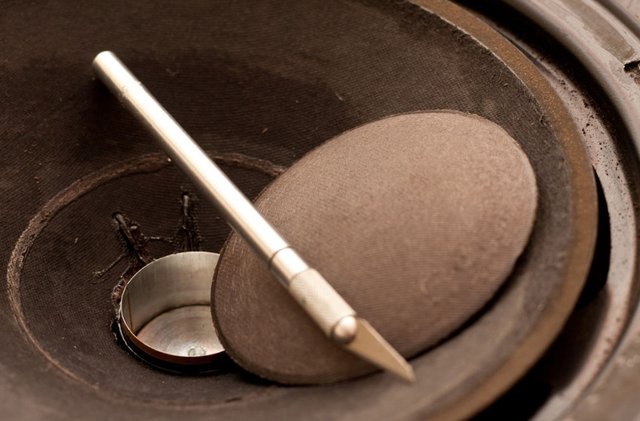
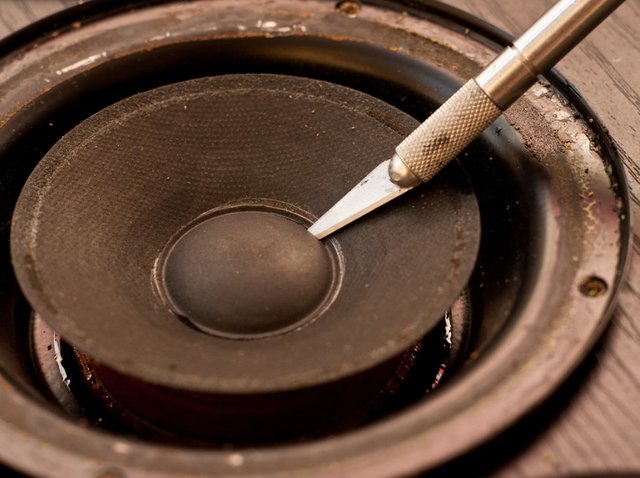
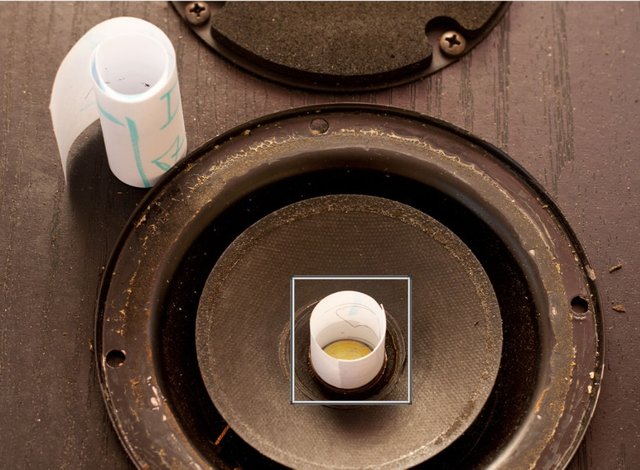
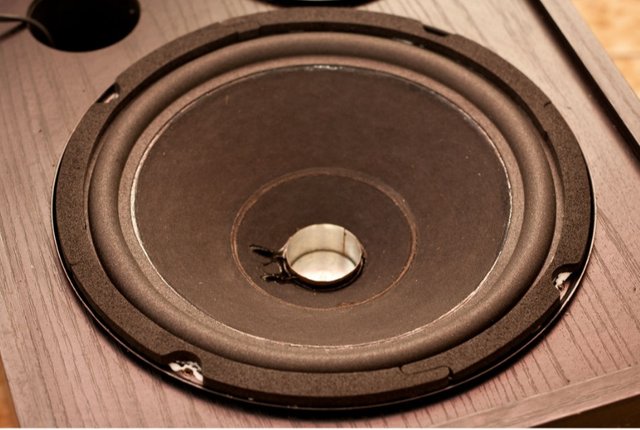
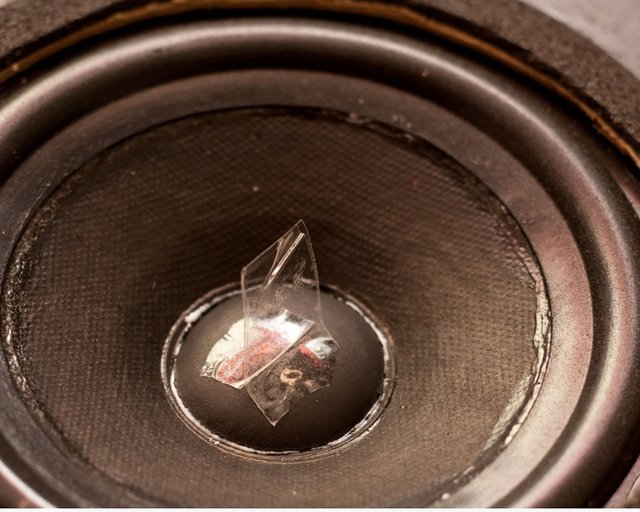
Step 4: Removing Big Domes
To center the cone during the gluing, wee need to obtain access to the central steel core. Since it's usually covered by a convex cardboard plate which protect the core from the dust, we have to take it off.
Dust covers have to be removed AFTER cleaning the surfaces from any dust and especially any iron filing remained after scratching the frame. Indeed magnet of the speaker will attract those filing, and they will obstruct the gap around the magnet, contrasting the cone movement.
With a cutter, paying attention to NOT CUT THE CONE, detach the dust cap from the cone. In the case of the subwoofer this parts are glued to the cone and with a small pressure they could be detached. We'll see that it's not so simple for the midrange speakers. You can try to leave a small hinge attached so to insert caps in the exact initial position.
ধাপ 4: বড় ডামস অপসারণ
গ্লুংয়ের সময় শঙ্কুকে কেন্দ্র করে, কেন্দ্রীয় ইস্পাত কোর অ্যাক্সেস পাওয়ার জন্য উঁচু করা প্রয়োজন। যেহেতু এটি সাধারণত একটি উত্তল পিচবোর্ড প্লেট দ্বারা আচ্ছাদিত যা ধুলো থেকে কোরকে রক্ষা করে, তাই আমরা এটি বন্ধ করতে হবে।
কোনও ধূলিকণা থেকে পৃষ্ঠতল পরিষ্কার করার পর এবং বিশেষ করে কোনও লোহা ফাইলিং ফ্রেমটি স্ক্র্যাচ করার পরে ডাস্ট কভার মুছে ফেলতে হবে। প্রকৃতপক্ষে স্পিকারের চুম্বক যারা ফাইলিং আকর্ষণ করবে, এবং তারা চুম্বকের চারপাশের ফাঁক আটকে দেবে, শঙ্কু আন্দোলনের বিপরীত।
একটি কর্তনকারী সঙ্গে, CONE কাটা না মনোযোগ দিতে, শঙ্কু থেকে ধুলো ক্যাপ বিচ্ছিন্ন Subwoofer ক্ষেত্রে এই অংশ শঙ্কু থেকে glued এবং একটি ছোট চাপ সঙ্গে তারা আলাদা করা হতে পারে। আমরা দেখতে পাব যে মিডারঞ্জ স্পিকারগুলির জন্য এটি এত সহজ নয়। সঠিক প্রারম্ভিক অবস্থানের মধ্যে ক্যাপগুলি সন্নিবেশ করানোর জন্য আপনি একটি ছোট হিংকটি সংযুক্ত করার চেষ্টা করতে পারেন।
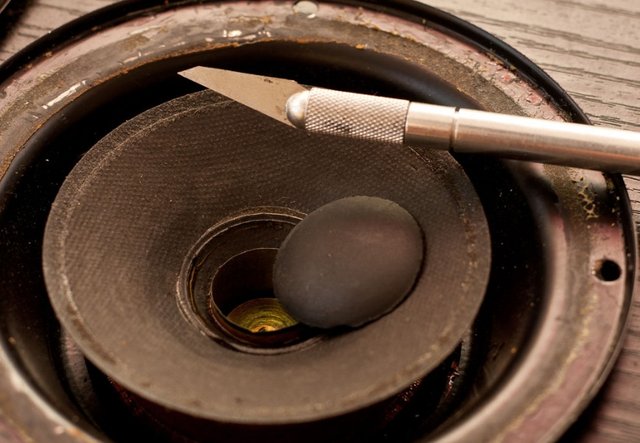
Step 5: And Little Ones
Indeed for these smaller speakers, the dust caps are glued much more tighter, and I learned that trying to unglue them could ruin the cardboard cone surface. So I decided to cut them at an inner circumference, as you can see in pictures. But please try not to cut the power wires which lay at the bottom of the cone.
ধাপ 5: এবং লিটল অন
প্রকৃতপক্ষে এই ছোট স্পিকারগুলির জন্য, ধুলো ক্যাপগুলি আরো অনেকটা আঁটসাঁট করে দেওয়া হয়, এবং আমি শিখেছি যে তাদের বিরক্ত করার চেষ্টা করার ফলে কার্ডবোর্ড শঙ্কু পৃষ্ঠ ধ্বংস হতে পারে। তাই আমি তাদের একটি ভেতরের পরিধি এ কাটা করার সিদ্ধান্ত নিয়েছে, আপনি ছবি দেখতে পারেন হিসাবে। কিন্তু অনুগ্রহ করে শঙ্কু নীচের অংশে রাখুন যা শক্তি তারের কাটা না করার চেষ্টা করুন।
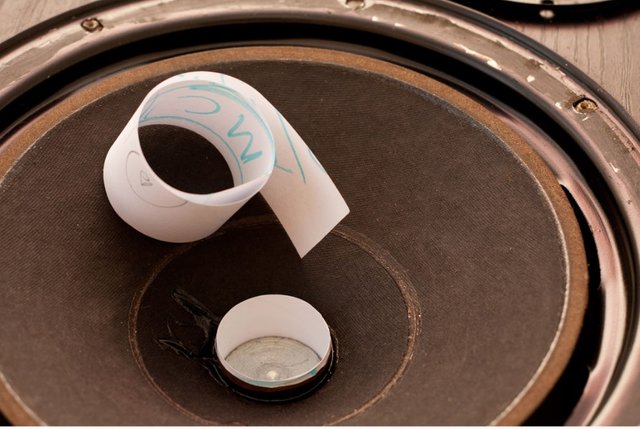
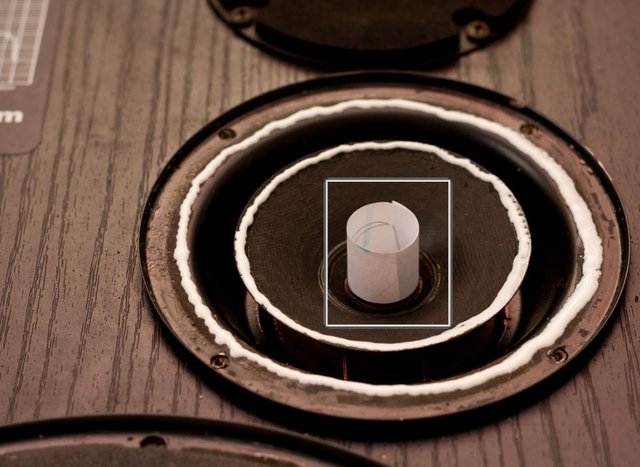
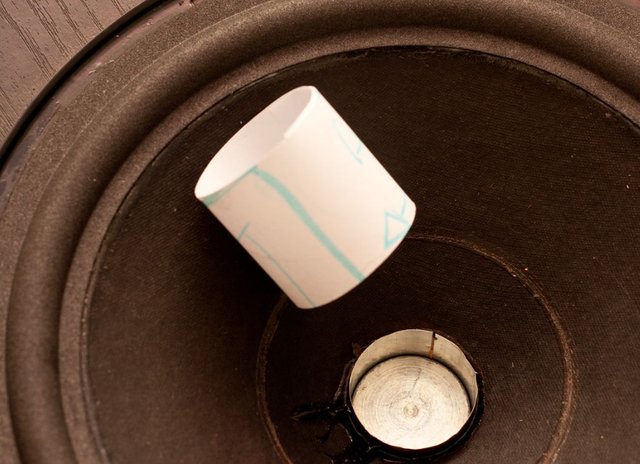
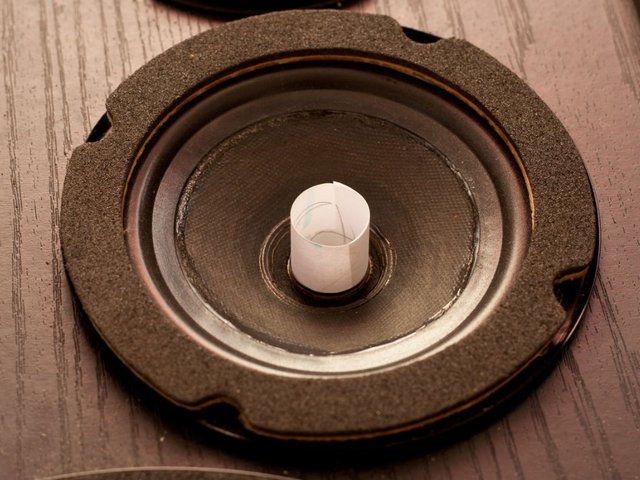
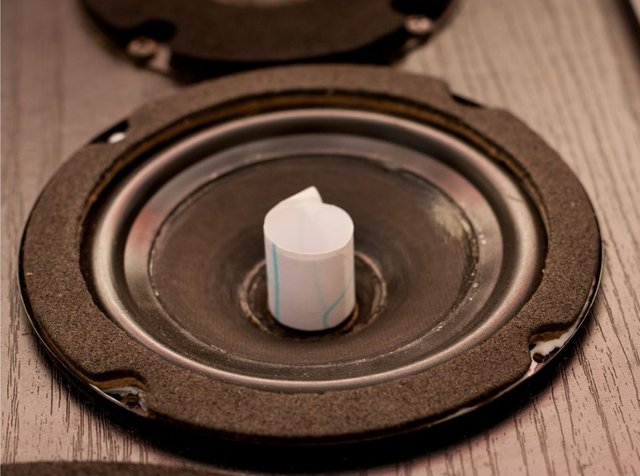
Step 6: Centering the Cone
The paper sheet is needed to form some paper stripes, so that they can act as spacer to isolate the cylindrical core from the metal tube connected to the cone. This thickness is not constant for every speakers, and you have to try with more sheets and l is double than on the opposite side. By the way this mistake doesn't affect the speaker functioning in my case, but choose a different sheet thickness if you encounter in a similar circumstance, or use four shims, trying different thickness.
ধাপ 6: কয়েন কেন্দ্রে
কাগজের শীট কিছু কাগজ ফিতে গঠন প্রয়োজন, যাতে তারা শঙ্কু সাথে সংযুক্ত ধাতু নল থেকে নলাকার কোর বিচ্ছিন্ন স্পেসার হিসাবে কাজ করতে পারে। এই বেধ প্রতি স্পিকার জন্য ধ্রুবক হয় না, এবং আপনি আরো শীট এবং দৈর্ঘ্য সঙ্গে চেষ্টা করতে হবে।
আমি একটি ভুল করেছিলাম যেহেতু আমার 80 জি / এম ২ শীটগুলি দিয়ে আমি যথাযথ বেধে পৌঁছানোর জন্য এক থেকে অর্ধেক বাঁক তৈরি করেছি। এটি একটি কেন্দ্রীভূত শঙ্কু ফলাফল করে না, কারণ একপাশে স্পেসার বিপরীত দিকে চেয়ে দ্বিগুণ। এই ভুলটি আমার ক্ষেত্রে স্পিকারের কার্যকারিতাকে প্রভাবিত করে না, তবে যদি আপনি একই ধরণের পরিস্থিতিতে সম্মুখীন হন, অথবা চারটি শিম ব্যবহার করেন, তাহলে ভিন্ন ভিন্ন বেধের চেষ্টা করছেন তবে একটি ভিন্ন শীট বেধ নির্বাচন করুন।
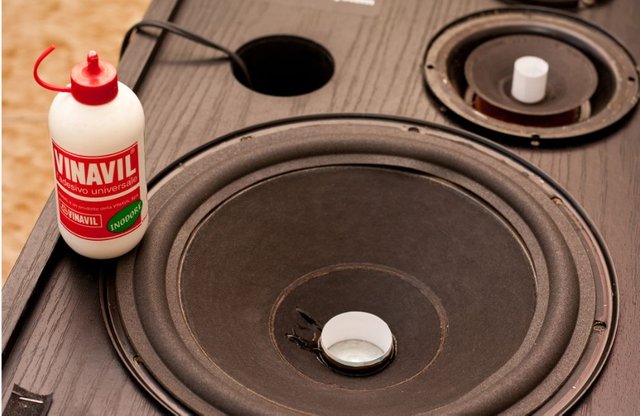
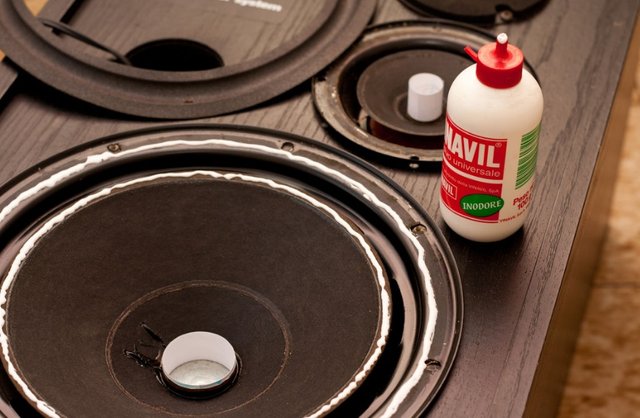
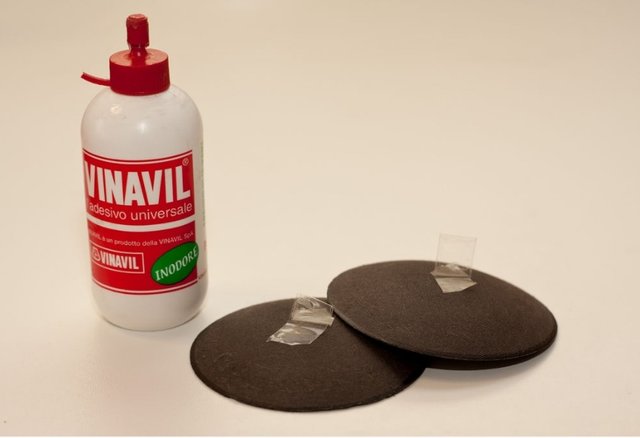
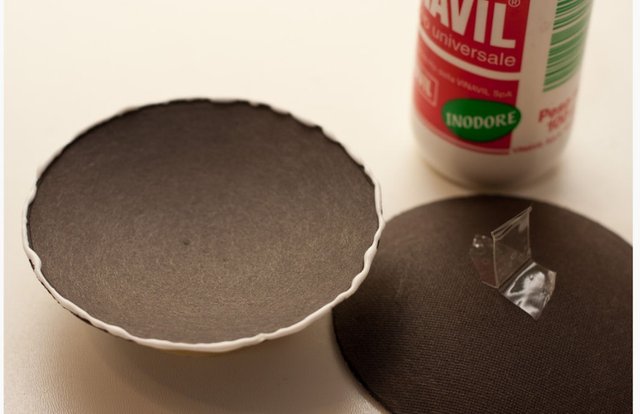
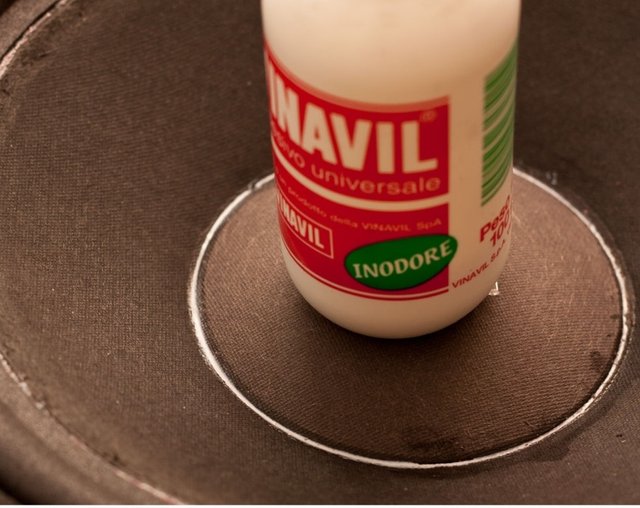
Step 7: Pour Glue
As glue any vinylic glue is good, but I suggest you to check that it will become completely transparent, some of them remain white after drying. With the paper cylinder well into position place the foam surround over the cone, so to see if it fits right. You can also remove the speaker from their wood case, but I find useful to have a so handy stand.
Add glue all around both frame and cone, try to pour the right amount of glue and to diffuse it uniformly.
ধাপ 7: আঠালো ঢালা
আঠালো হিসাবে কোনও vinylic আঠালো ভাল, কিন্তু আমি আপনাকে এটি সম্পূর্ণ স্বচ্ছ হতে হবে তা পরীক্ষা করার পরামর্শ, শুকানোর পরে তাদের কিছু সাদা থাকা। কাগজ সিলিন্ডার ভাল অবস্থানের মধ্যে ফেনা শঙ্কু জুড়ে ঘিরে, তাই এটি ডান ফিট যদি এটি দেখতে। আপনি তাদের কাঠের কেস থেকে স্পিকার অপসারণ করতে পারেন, কিন্তু আমি একটি খুব সহজ স্ট্যান্ড আছে দরকারী।
উভয় ফ্রেম এবং শঙ্কু জুড়ে আঠালো যোগ করুন, আঠালো সঠিক পরিমাণ ঢালা চেষ্টা করুন এবং একইভাবে এটি diffuse।
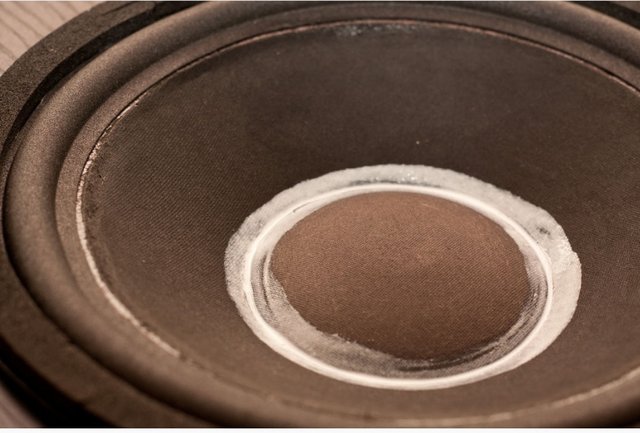
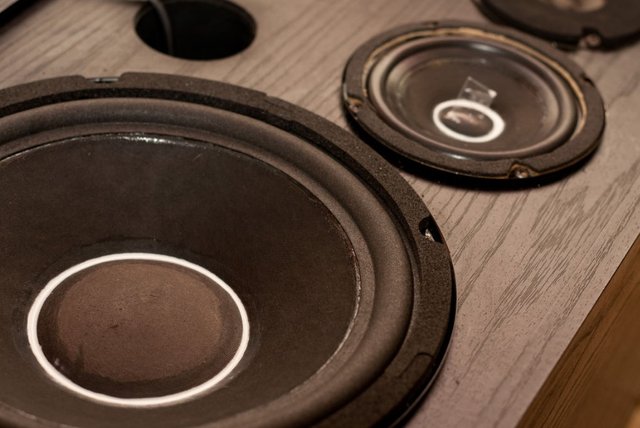
Step 8: Gluing Edges
Now add the foam edge pushing it gently over the glue. Avoid forcing the cone on one side or the other, since it has to remain centered. With your finger spread the excess glue, don't worry if it appears to be too much.

ধাপ 8: Gluing প্রান্ত
এখন আঠালো উপর আস্তে এটা ঠেলাঠেলি ফেনা এজ যোগ করুন। একপাশে বা অন্য উপর শঙ্কু জোরদার করা এড়িয়ে চলুন, এটি কেন্দ্রীভূত থাকা পর্যন্ত। আপনার আঙুলটি অতিরিক্ত আঠালো ছড়িয়ে দিয়ে, এটি খুব বেশি মনে হয় যদি চিন্তা করবেন না।
Step 9: ...glued
Indeed when the glue will dry any excess will magically disappear. You can now remove the inner paper spiral. Now make a constant pressure on the cone with your hand and check that there is no friction at all between core and metal ring. If you feel friction, and you are sure it's not due to an unbalanced pressure from your hand, you can unglue the external stripe of the surround, and glue it again letting it free to position.
ধাপ 9: ... নিখুঁত
প্রকৃতপক্ষে যখন আঠালো শুকিয়ে যায় কোনও অতিরিক্ত জাদুটি অদৃশ্য হয়ে যাবে। আপনি এখন ভেতরের কাগজ সর্পিল অপসারণ করতে পারেন। এখন আপনার হাতে শঙ্কু একটি ধ্রুব চাপ তৈরি করুন এবং কোর এবং ধাতু রিং মধ্যে সব সময়ে কোন ঘর্ষণ আছে কিনা তা পরীক্ষা করুন। যদি আপনি ঘর্ষণ অনুভব করেন, এবং আপনি নিশ্চিত যে এটি আপনার হাত থেকে অসমপূর্ণ চাপের কারণে নয় তবে আপনি চারপাশের বহিরাগত স্ট্রাইপকে আনলু করতে পারেন, এবং এটি আবারও অবস্থান থেকে মুক্ত করে দিতে পারেন।
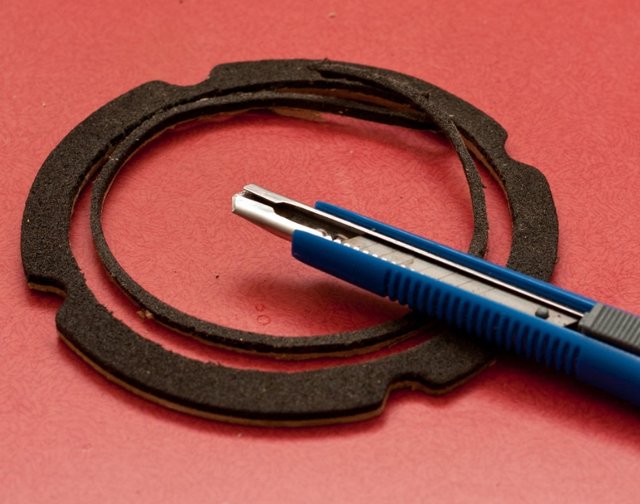
Step 10: Gaskets
Now set up all the foam gaskets cleaning them from any glue remains, by the way if your work is not accurate nobody will notice that ;-)
These gaskets are supposed to keep the front cover far from the surrounds, and to protect these from any accidental bump, anyway they are not essential.
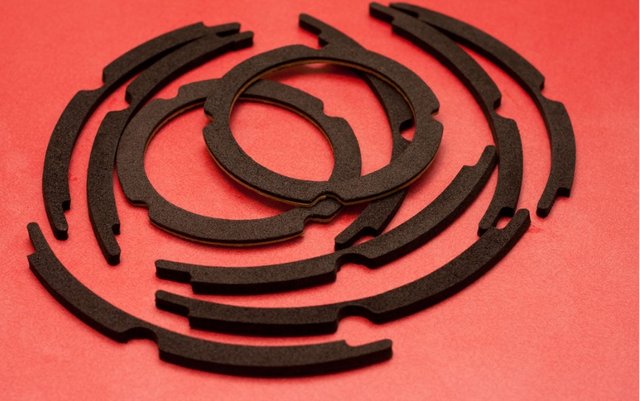
ধাপ 10: গেজেট
এখন আপনার ফাংশন কোন গ্লাস অবশিষ্ট থেকে তাদের পরিষ্কার সমস্ত ফেনা gaskets সেট আপ, যদি আপনার কাজ সঠিক না কেউ যে লক্ষ্য করবে ;-)
এই gaskets চারপাশে থেকে সামনে কভার রাখা অনুমিত হয়, এবং কোন দুর্ঘটনাক্রমে থেকে এই রক্ষা করতে, যাইহোক তারা অপরিহার্য নয়।
Step 11: Gaskets Glued on Subwoofers
Add some vinylic glue on the outer stripe of the surrounds and also on the metal frame circumference, then place the four parts of the gaskets so that they match with the holes and between themselves. Push them over the glue and let them drying.
ধাপ 11: সাবউফার্সগুলিতে গ্লাসগুলি জুড়ছে
চারপাশের বহিরাগত ধাপে এবং মেটাল ফ্রেম পরিধি উপর কিছু vinylic আঠালো যোগ করুন, তারপর গহনা চার ভাগে এবং তারা গর্ত সঙ্গে এবং নিজেদের মধ্যে মিলিত যাতে স্থান। তাদের আঠালো উপর ধাক্কা এবং তাদের শুকিয়ে দিন।
Step 12: ...and on Squawkers
As you notice the foam gaskets for the midrange speakers are too tight and the make an interference with the new surrounds. This could be easily fixed cutting away a stripe of gasket from the inside circumference.
ধাপ 1২: ... এবং স্কোয়াবকেরাগুলিতে
আপনি মাঝারি স্পিকার জন্য ফেনা gaskets লক্ষ্য হিসাবে খুব টাইট এবং নতুন চারপাশের সঙ্গে একটি হস্তক্ষেপ করতে। এটি সহজেই অভ্যন্তরীণ পরিধি থেকে গাসেট একটি ধাপে কাটা কাটা স্থির করা যেতে পারে।
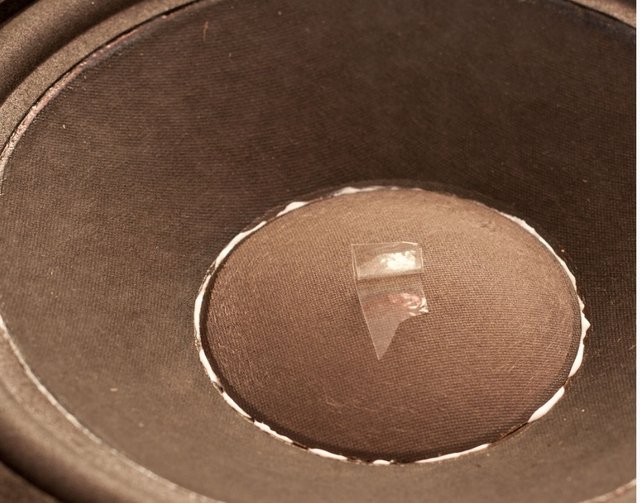
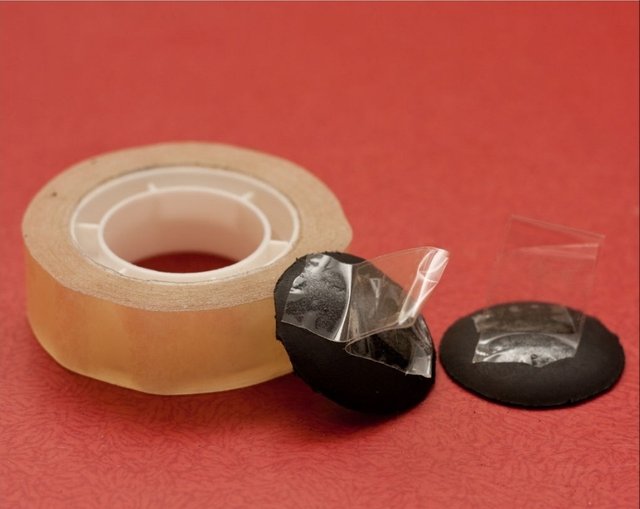
Step 13: Dust Caps...
If you arrived to this step with no mistakes you can be proud of yourself, since the worst is left behind.
Gluing back in place the dust caps is not easy but could not affect the behavior of the speaker, so proceed serenely ;-)
I used a pair of adhesive tape to handle the domes better, but use paper tape, since in my case this ruined a little bit the cardboard.
Place some glue all around the disc border, don't leave any interruption along the glue trail.
ধাপ 13: ডাস্ট ক্যাপস ...
আপনি কোন ভুল সঙ্গে এই ধাপে পৌঁছেছেন যদি আপনি নিজের উপর গর্ব করা হতে পারে, সবচেয়ে খারাপ পিছনে বামে হয়।
ধূসর ক্যাপ ফিরে জায়গায় gluing সহজ নয় কিন্তু স্পিকার আচরণ প্রভাবিত করতে পারে না, তাই serenely এগিয়ে ;-)
আমি আরও ভাল গম্বুজ হ্যান্ডেল আঠালো টেপ একটি জুড়ি ব্যবহৃত, কিন্তু কাগজ টেপ ব্যবহার, আমার ক্ষেত্রে এটি একটি কার্ডবোর্ড সামান্য বিট ধ্বংস তারপর।
ডিস্ক সীমানা কাছাকাছি কিছু আঠা স্থাপন, আঠালো পথচারা বরাবর কোন বাধা ছেড়ে না।
Step 14: ..glued on Subwoofers
Place the cone in his original position, push it gently trying not to leave big lacks of glue, and leave it drying. Any small split which appears without glue will be filled spreading glue with your finger. Place a weight (not too much of course!) over the cardboard dome until it's dry. Any further split in the gluing will be filled after.
ধাপ 14: .. Subwoofers নেভিগেশন গিঁট
শঙ্কুটি তার মূল অবস্থানে রাখুন, ধীরে ধীরে এটি আঠালো বড় অংক ছাড়ার চেষ্টা না করে শুকিয়ে ছেড়ে দিন। আঠালো ছাড়া প্রদর্শিত কোন ছোট বিভাজক আপনার আঙুল দিয়ে আঠালো ছড়িয়ে পূরণ করা হবে। কার্ডবোর্ডের গম্বুজের উপরে একটি ওজন (খুব বেশী না!) রাখুন যতক্ষণ না শুষ্ক হয়। Gluing মধ্যে আরও বিভক্ত পরে ভর্তি করা হবে।
Step 15: ...and Glued on Squawkers
The process to glue back in place the cover caps of the midrange speakers is identical to what you did for the subwoofers. Also in this case I suggest to use paper tape, you will have less damage to your caps when you'll take it off.
ধাপ 15: ... এবং স্কোয়াডারদের উপর ঘনীভূত
প্রারম্ভে আঠালো প্রক্রিয়া midrange স্পিকার কভার টুপি আপনি subwoofers জন্য কি হিসাবে অভিন্ন হয়। এছাড়াও এই ক্ষেত্রে আমি কাগজ টেপ ব্যবহার করার পরামর্শ দেওয়া, আপনি আপনার ক্যাপ কম ক্ষতি হবে যখন আপনি এটি বন্ধ নিতে হবে।
Step 16: Refinishing
When the glue around the caps is dry you can check there are no splits, and you can add some more glue just to be sure. Spread it with your finger and let it dry. The white will disappear if the glue is transparent enough, if not you can paint it with a black marker. Try not to add too much glue to keep low the weight of the cone and consequent inertia.
ধাপ 16: রিফিনিশিং
যখন ক্যাপগুলির চারপাশে আঠালো শুকনো থাকে তখন আপনি কোনও বিভাজক নেই তা পরীক্ষা করতে পারেন, এবং আপনি নিশ্চিত হতে আরও কিছু আঠালো যোগ করতে পারেন। এটি আপনার আঙুল দিয়ে ছড়িয়ে দিন এবং এটি শুকিয়ে দিন। যদি আঠালো যথেষ্ট স্বচ্ছ হয় তাহলে সাদা অদৃশ্য হয়ে যাবে, যদি না আপনি এটি একটি কালো মার্কার দিয়ে আঁকতে পারেন। শঙ্কু ও পরিণামের জারণের কম ওজন কম রাখার জন্য খুব বেশি আঠালো যোগ না করার চেষ্টা করুন।
Step 17: Final Breaking In
Assemble everything back and screw tighten each screw.
Your speakers are not ready to be placed around your hi-fi... you have to wire them but also to wait some more time before hearing them in all their new shape... anyway don't worry, all the exertion is done.
Indeed when you'll turn the hi-fi on, the sound will be horrific, that's because the new surrounds need to work for some time to loose their rigidity.
To do this process in the shorter time possible place speakers one face to the other, connect one speaker's wires reversed (positive wire on negative connection, and negative on positive), and let both speakers working with music at high volume... not too much high depending on your neighborhood ;-) By the way one speaker will cancel the sound of the other, and you will hear a low music.
After one hour, more or less, you can connect both speakers with right polarity and place them at your hi-fi sides.

পদক্ষেপ 17: চূড়ান্ত ব্রেকিং ইন
সবকিছু ফিরে এবং স্ক্রু প্রতিটি স্ক্রু আঁট আঁটসাঁট পোশাক
আপনার স্পিকার আপনার হাই-ফাই জুড়ে স্থাপন করার জন্য প্রস্তুত নয় ... আপনার তাদেরকে টেলিগ্রাম করতে হবে কিন্তু তাদের সমস্ত নতুন আকৃতিতে তাদের শুনা করার আগে আরও কিছুক্ষণ অপেক্ষা করতে হবে ... যাইহোক, চিন্তা করবেন না, সব কিছু করা হয়েছে ।
প্রকৃতপক্ষে যখন আপনি হাই-ফাই চালু করবেন, তখন শব্দটি ভীতিকর হবে, কারণ নতুন প্রজন্মের কিছুটা সময় তাদের কঠোরতা নিরসন করার জন্য কাজ করার প্রয়োজন হয়।
এই প্রক্রিয়াটি ছোটো সময়ের সম্ভাব্য স্থানগুলির স্পিকারকে অন্যের মুখোমুখি করতে, এক স্পিকারের পুতুলগুলির সাথে সংযোগ স্থাপন করে (ইতিবাচক নেতিবাচক সংযোগের উপর ইতিবাচক তড়িৎ এবং ইতিবাচক নেতিবাচক), এবং উভয় স্পিকার সঙ্গীতগুলির সাথে উচ্চ ভলিউম এ কাজ করে ... খুব না আপনার আশপাশ উপর নির্ভর করে অনেক উচ্চ ;-) একটি স্পিকার অন্যের শব্দ বাতিল হবে উপায় দ্বারা, এবং আপনি একটি কম সঙ্গীত শুনতে হবে
এক ঘণ্টার বেশি, কম বা কম, আপনি উভয় স্পিকারকে যথোপযুক্ত ধ্বনিতা দিয়ে সংযুক্ত করতে পারেন এবং আপনার হাই-ফাই পক্ষগুলিতে তাদের স্থানান্তর করতে পারেন।
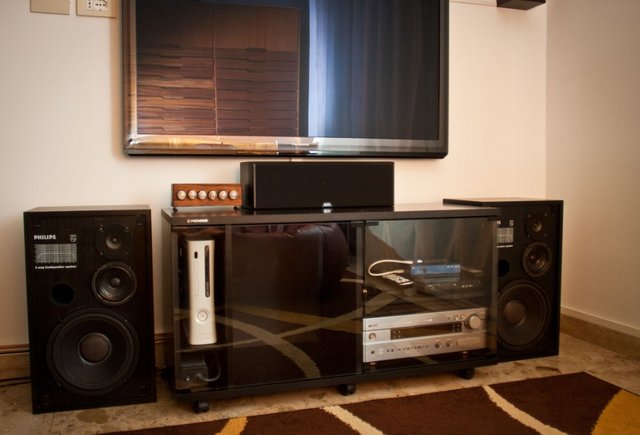
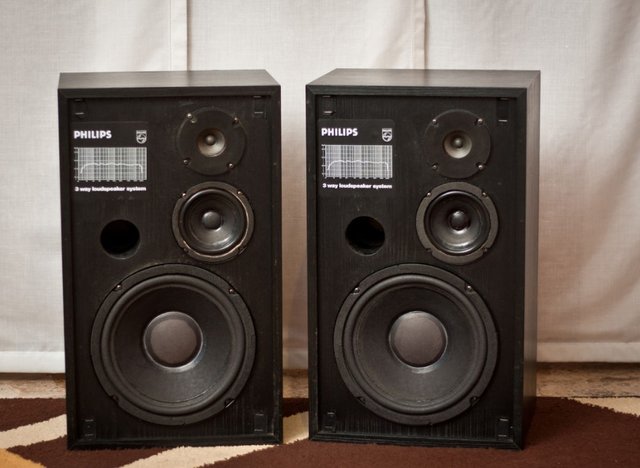
Step 18: Ready to Play!
Place also the two covers back in position, obviously after washing them. I had also to glue four new velcro pieces at their corners, because old velcro didn't work well anymore.
Now I can enjoy my new stereo system! Do you recognize another interesting project in the picture?
ধাপ 18: খেলতে প্রস্তুত!
স্পষ্টভাবে তাদের ওয়াশিং পরে এছাড়াও দুটি অবস্থানে ফিরে কভার, স্থান। আমি তাদের কোণে চারটি নতুন velcro টুকরা আঠা ছিল, কারণ পুরানো velcro আর ভাল কাজ না।
এখন আমি আমার নতুন স্টিরিও সিস্টেম উপভোগ করতে পারি! আপনি ছবির অন্য আকর্ষণীয় প্রকল্প স্বীকৃতি চান?