How to set up your own Bitcoin Lightning node?
Recently, we've noticed an increased interest in scaling solutions for a second-level Bitcoin network, such as the Lightning Network (LN), but I did not find simple and clear documentation for installing and configuring LN. It may be that the use of LN in a test network is only for programmers and users of Linux, but in fact everything is not so difficult. Installing the current LN client for Windows is not really very complicated, and can be completed in 30 minutes. What pleasantly surprised me.
Keep in mind that currently only the Bitcoin test network is supported. I will update the manual when LN can be used in the main BTC chain :)
The desktop client has a simple user interface (GUI) for interacting with the LND daemon, just like Bitcoin Core or Bitcoin Knots (or any other Bitcoin wallet for Windows) helps the user interact with the bitcoin daemon (bitcoind). Further it will be shown that Zap and Lightning-App show the same information, despite different interfaces.
Objectives of this tutorial:
- Installing Lightning-App or Zap Desktop (the most advanced LN applications)
- Opening a payment channel
- Buying virtual coffee at Starblocks (starblocks.acinq.co)
- Receipt of LN payments
- This tutorial uses Windows 7. If you have ever received or sent Bitcoin transactions, you will not find anything complicated here.
Part 1: Installing (5-10 mins)
If you do not want to use the Zap program and want to use only the Lightning App desktop, you can download the archive with the program from here: https://github.com/lightninglabs/lightning-app/releases/download/v0.1.4- alpha/Lightning- win32-x64v0.1.4.zip Just download, extract and run “lightning.exe” and everything should work. You can go directly to Part 2.
We need several programs to compile LN. Compiling LN is not that hard
Download Node.js for Windows and install: https://nodejs.org/en/download/
Download Git for Windows and install it: https://git-scm.com/download/win
Download Yarn for Windows and run the installer: https://yarnpkg.com/lang/en/docs/install/#windows-tab
We download Windows Visual C ++ Build Tools 2015 and also install: http://landinghub.visualstudio.com/visual-cpp-build-tools
After installing everything, restart the computer.
After the reboot, run the command line (Start → CMD.exe). Enter node -v, and press Enter. Then we enter git - version, and we press Enter. Then, enter yarn -v, and press Enter. If you see the versions of all three programs, you can continue.
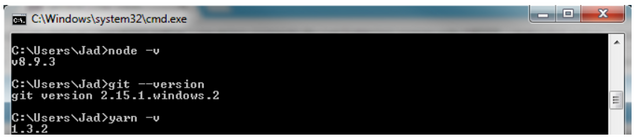
Make sure that git and yarn work.
Finally, install python version 2.7 by executing the following command: (double dashes are below).
npm --add-python-to-path = ’true’ --debug install --global windows-build-tool.
Part 1a: Installing Lightning-App (5 mins)
I recommend installing the Lightning-App first, since the LND daemon will install automatically. This will reduce the amount of work we do when installing Zap.
To start, create a folder where you want it. In this example, I installed here: C: \ Users \ Jad \ Desktop \ Tutorials \ Lightning-App
Next, click CMD.exe, and run as administrator, and go to the folder you created “cd C: \ Your \ Custom \ Path” (you can copy and paste into the command line with the right mouse button)

Now that we are in the right folder, we need to download all the Lightning-App source files into this folder. We do this with the help of the “git clone” command https://github.com/lightninglabs/lightning-app.git. Something about 189 MB will be downloaded. Upon execution, we will see the following:
All files are downloaded
We type "cd lightning-app", and press Enter. Then we enter the “npm run setup” command, and press Enter again. We are waiting for 2–4 minutes to complete the process, then enter “npm run package-electron”, and press Enter. Now we have a great .exe file, which we will use in the future.


Now we start and wait a couple of minutes until the installation is complete. If any unexpected errors happen - check that the command line is run with administrator privileges. I also encountered a problem when I had installed Visual Studio Community 2015, and it caused conflicts, so I first demolished it before installing Visual C ++ Build Tools 2015. If everything is successful, a new “release” folder will appear in the lightning folder -app with the following content:
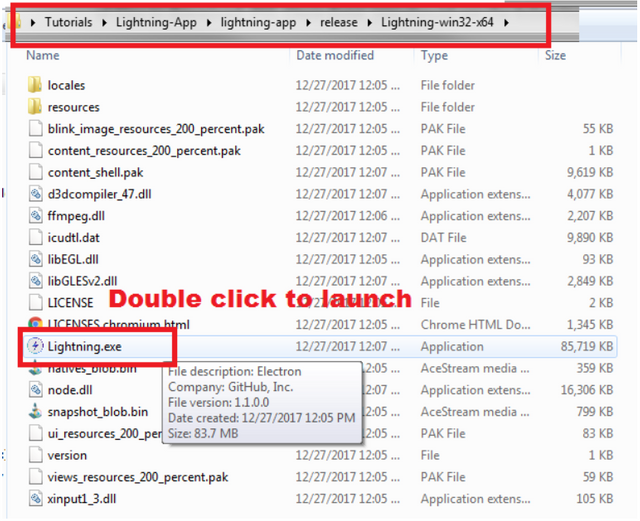
Ready for launch!
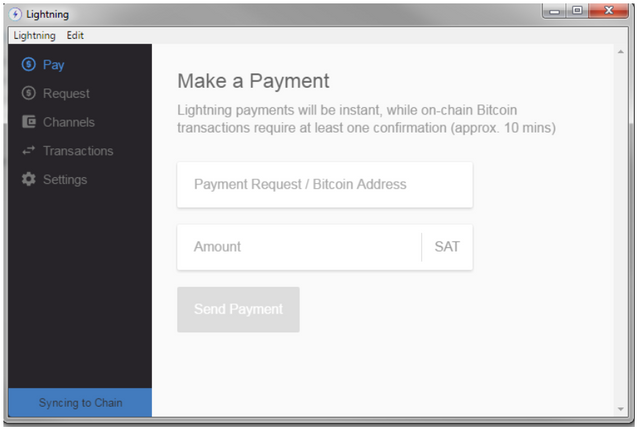
After launch we see the following. Synchronization takes 5–10 minutes and it’s enough to do it once:
You've done it!
Part 2: Opening the payment channel
In continuation of this tutorial we will play numbers in the application. You will need much less technical knowledge; however, here you will find many bugs that are still in beta programs.
First, we need free test bitcoins. Find your wallet address here:
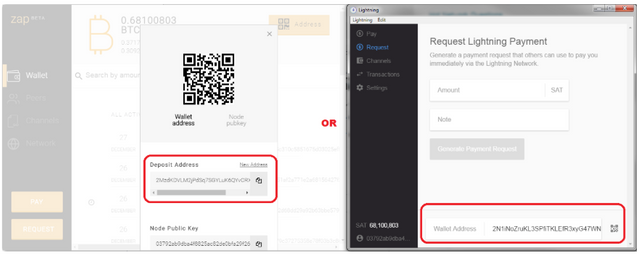
Get your wallet's address to receive BTC as an on-chain tx
Now go here: https://testnet.manu.backend.hamburg/faucet and send yourself free test network coins. As soon as the transaction has 3 confirmations, you can use the test network coins to open a payment channel.
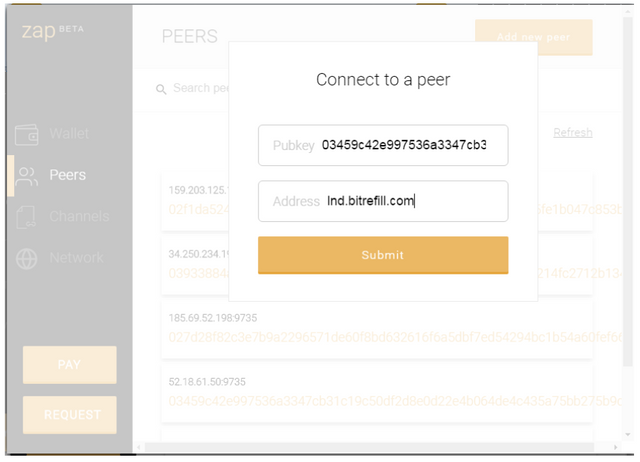
In this example, we will open the payment channel using BitRefill.com. Here is their beautiful guide! If you are using Zap, first click “Peers” in the menu on the left. Then “Add new peer” and enter 0298d0c6987e2e64451c7f723e15aff4dfca92f0e3973d214e206257abb0d1dd55 in the input field of the public key of the node and lnd.bitrefill.com in the input field of the host name. In the Lightning-App, simply paste the line 0298d0c6987e2e64451c7f723e15aff4dfca92f0e3973d214e206257abb0d1dd55@lnd.bitrefill.com after clicking “create channel” in the “Channels” tab:
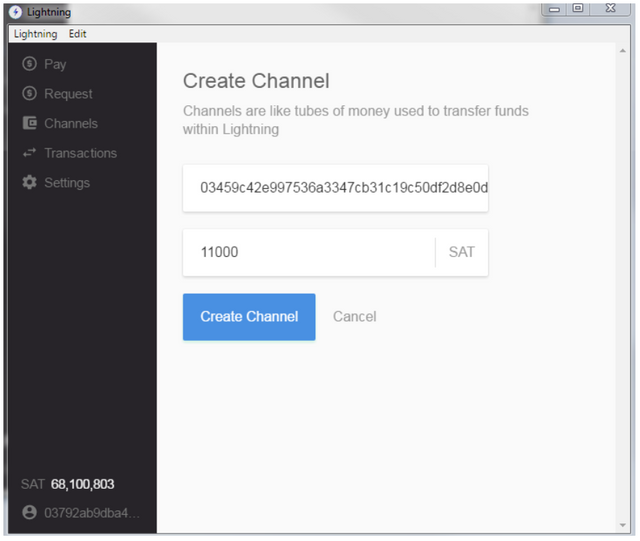
Creating a payment channel in the Lightning-App
In the Zap-app, you must first add “bitrefill” as a feast, before creating a payment channel. In the “peers” tab, click “Add new peer” and fill out the form:
Now we move to the laying of channels and create a payment channel with a public key 0298 [..] d55. The cool feature of Zap-desktop is that you can create bidirectional channels, so you can have some of the money on the other side of the channel. For example, you may know that you will do business with BitRefill for some time, and you pay for something in advance, perhaps you will open a channel with a certain amount of BTC immediately on the BitRefill side.
Now you should have one payment channel open. More different nodes can be found here https://explorer.acinq.co/#/
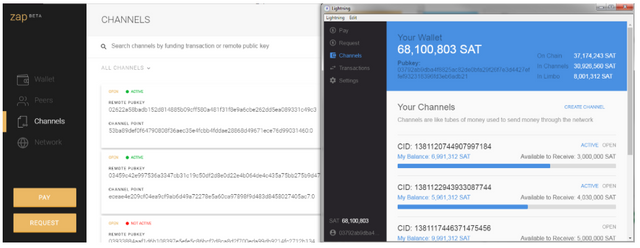
After three confirmations by the network, the channel will open. I also noticed that the channels are sometimes active and sometimes inactive. The BitRefill channel remains active. I assume this may mean that the other node must remain on the network. If you have problems with the connection, make sure that the firewall does not block the lnd.exe process, as well as check port 9735. You had to do this before you established the connection.
Useful Links:
A great Zap YouTube video by the founder: https://www.youtube.com/watch?time_continue=11&v=dhpg_8D2FPI
Lightning App Slack:
Can I mine with this node?
nope, it's more like an omniuseful API for your wallet, even the cold one
that's very in-depth, good job, team!
could you make more such tech tutorials?
The new HTC phone has all that done for ya ;)))
https://cryptobriefing.com/htc-phone-bitcoin-full-node/