Easy Batch image actions on MacOS with Automator and ImageMagick
I recently found myself with a large number of browser screenshots from which I wanted to remove the top part of the image.
I have a background in programming (though I'm not particularly active), work on MacOS, and had a Saturday morning to play around.
So, I thought I create a little script to do the work for me.
It turned out to be much harder than I had initially anticipated, and so I made notes and thought to make those notes public.
Below are my results.
My first thought was to go straight to Automator.
If you're not familiar with Automator, it's a little-known gem in MacOS.
It allows even non-experts to create sets of actions that can automate common tasks.
Getting Started
I like to start with a checklist of what I expect to accomplish.
I usually write this out as pseudocode and this becomes both the structure of my script and comments.
In this case, I wanted to
- [ ] grab files that I saved in
/tmp - [ ] crop the top 120 pixels
- [ ] resize to a width of 500 pixels
- [ ] save the new image with "-500px-copy" in the filename.
When working with a new Automator file, I always choose to create a workflow.
The benefit is that a workflow can be saved into any other format.
The project can also be saved and edited later if I change my mind about something.

Creating a new file in Automator
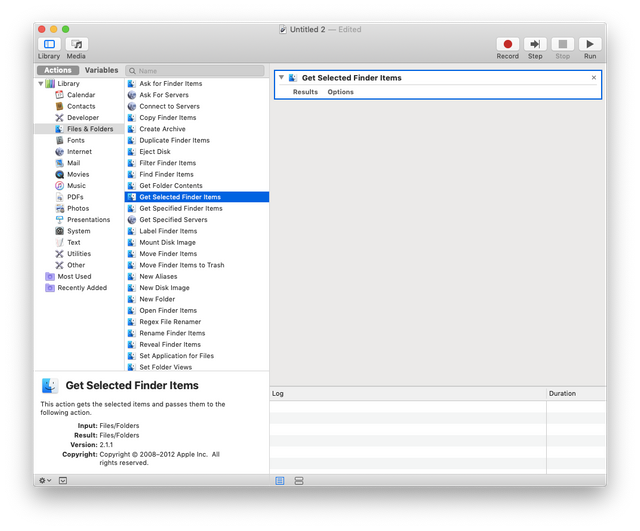
The next step is to select the "Files & Folders" category from the left side.
This presents all of the pre-built actions that are available for working on files and folders.
I used Get Selected Finder Items.
Before running the workflow, simply choose one or more files in the Finder and they will be picked up and run through the following steps.
Getting files to work with in Automator
Two Dead-End Approaches
Before I found what worked for me, I went down 2 dead-end avenues.
The first was trying to use the builtin "Crop Images" action.
This uses Quartz to simultaneously crop and scale images.
This action is better suited to cropping the edges around the entire image, not just taking off a piece from the top.
Since I have a version of Acorn, I also had Acorn actions in Automator.
The Crop action for Acorn is much better suited to what I wanted to do.
The problem I encountered there was that I originally purchased Acorn from the App Store.
The App Store has a really great feature called "sandboxing".
If you're not familiar with the term, it simply means that everything the app does is contained in a secure area that no other app can have access to.
The upshot for my project was that because of sandboxing, Automator doesn't have access to anything that Acorn does.
Which means that telling Acorn to do the cropping resulted in the image being opened and then just sitting there.
For what it's worth, the version you purchase directly from their website does not have this restriction.
ImageMagick to the Rescue
With the built-in options not working for me, I looked for other options.
ImageMagick is a full-featured image processing tool that I had already previously installed.
I had not actually used it before, though.
I quickly discovered that ImageMagick has a utility called "Convert" that did what I wanted.
The next step was to select the "Utilities" category and add Run Shell Script to my workflow.
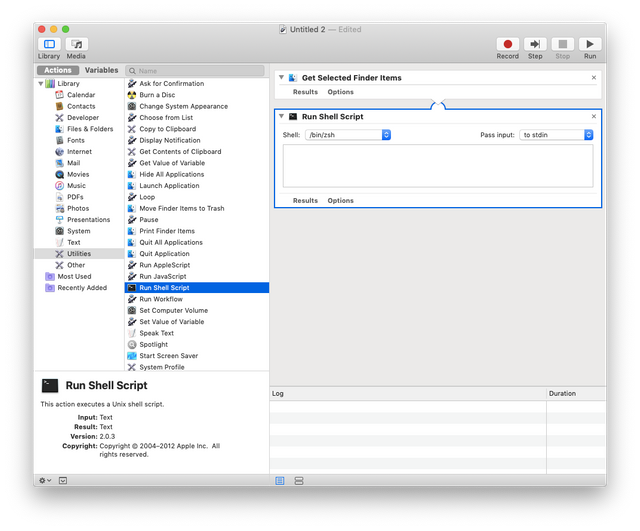
Adding a shell script to Automator
Automator allows you to choose from a number of different shells.
I like to use zsh, and since the syntax for the following code is the same as sh and Bash, it's possible to use the following snippets in one of those shells.
Change the "Pass Input" selector to "as arguments" and you should be presented with the following code snippet:
for f in "$@"
do
    echo "$f"
done
This means that each file selected in the Finder will be assigned to f one at a time.
echo is like print, so the file name will be printed out.
Click on "Results" below the text window to see the output.
This is completely safe, in the sense that it won't change anything so you can try it now.
Working with path names
Personally, I feel more comfortable working with path names in Python.
That is mostly because I have a lot more experience with it.
As a result, I needed to refresh my memory about how to do it in Zsh.
From the Zsh Mailing List Archive I found this helpful code snippet:
fred='/bin/path/fred.txt'
echo ${fred:e}        #    text
echo ${fred:t}        #    fred.txt
echo ${fred:r}        #    /bin/path/fred
echo ${fred:h}        #    /bin/path
echo ${fred:h:h}    #    /bin
echo ${fred:t:r}    #    fred
What I wanted to do was change file name.png to file name-500px-copy.png.
To do that, and remembering that my variable is f, not fred, I used this:
o="${f:r}-500px-copy.${f:e}"
I also wanted to see what the result looked like, to make sure that I was getting the correct result.
So, I printed out the original file name and the updated file name.
echo "$f" "$o"
A sample of my output shows that I was on the right track.
/private/tmp/Screen Shot 2018-11-10 at 9.49.50 AM.png
/private/tmp/Screen Shot 2018-11-10 at 9.49.50 AM-500px-copy.png
Working with ImageMagick's Convert
The syntax for calling convert is straightforward.
convert inputFile SOME ACTION outputFile
When using Automator, it's good to use the not just the command name, but the full path to the command.
In the Terminal, just type
which convert
On my system, the response was /usr/local/bin/convert.
If yours comes up blank, you'll need to install convert.
I planned to use 2 actions, -crop and -resize
Both take geometry information.
Firstly, the width x height of the final image.
-crop takes an additional offset from the top left corner in the form of±x and ±y.
Geometry information should not have any spaces.
For -crop, I wanted the final image to be 1485 x 800.
I also wanted to start from the top and cut off 120 pixels.
The resulting command is -crop 1485x800+0+120
For -resize, the command is -resize 500x500.
Final Code
Putting it all together, the final code looked like this:
for f in "$@"
do
    o="${f:r}-500px-copy.${f:e}"
    echo "$f" "$o"
    /usr/local/bin/convert "$f" -crop 1485x800+0+120 -resize 500x500 "$o"
done
And it looked like this in Automator.
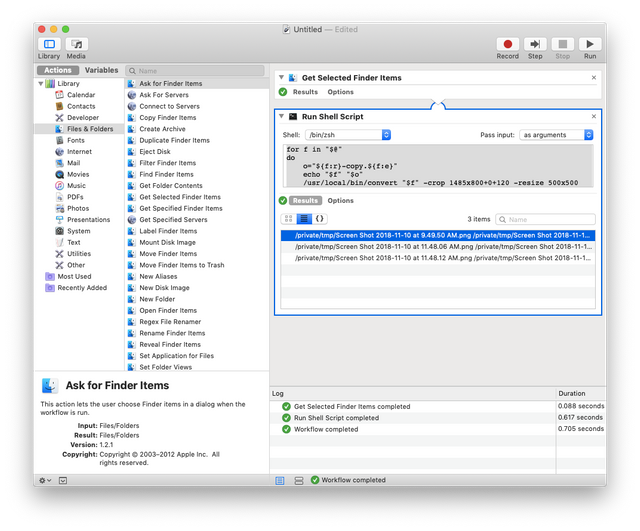
Final Automator Workflow
Hope that helps you start exploring one or more these tools.
If you do, don't forget to let me know your experiences in the comments below.
Hello! Your post has been resteemed and upvoted by @ilovecoding because we love coding! Keep up good work! Consider upvoting this comment to support the @ilovecoding and increase your future rewards! ^_^ Steem On!

Reply !stop to disable the comment. Thanks!