Pride Makeup Look.
I know it’s a bit late to create a PRIDE makeup look but I still want to show support because everyone should be loved no matter who you are, how you feel or where you’re from.
Back when I was younger and spent every Summer at my grandma’s campsite, I used to play a lot outside because the weather was amazing and I had one special friend. He used to play Barbie with me and he wore wigs all the time. I personally really enjoyed it because who doesn’t want that as a girl? He also did some beautiful hairstyles on me
At that age, I didn’t think of it as having a gay friends because it was normal to me and I could play Barbie with him. After years had passed, he told me that he felt uncomfortable in his own body like in the wrong body, he also told me that his "dead" sister would be in his "male body".
I don’t think that I could understand this at that age but I also didn’t care who he was inside or outside because he was a friend of mine and still is! I never had a problem with him because I knew him from a very young age and it was normal to me.
So, this just was a short story of what I’ve experienced and how I think about it!
Now, we can move on to the actual makeup tutorial.
Let’s start:
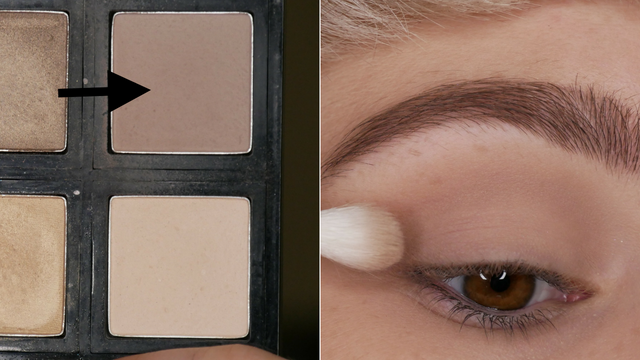
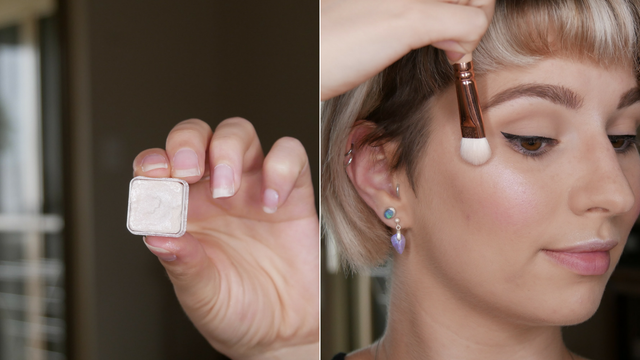
Step 1: Transition Shade.
As transition shade, you could go in with a contouring shade from the contour palette that you might have or choose it from an eyeshadow palette as I did.
Take a blending brush and place this shade in your crease and blend it towards the brows.
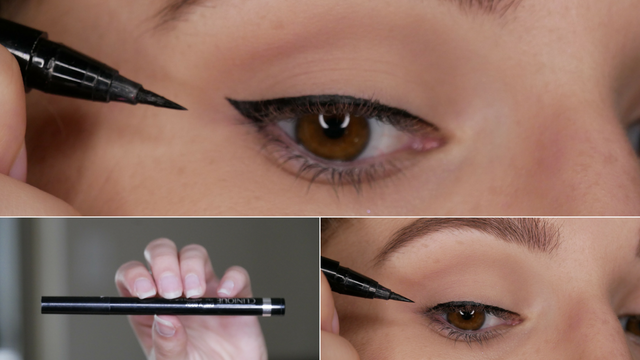
Step 2: Winged Eyeliner.
Now you can create a normal and basic winged eyeliner with whatever eyeliner you want. I personally prefer a tapered, precision brush pen and it’s a liquid liner. This applies so easy and you can create a very thin line but also thicken it as you want to.
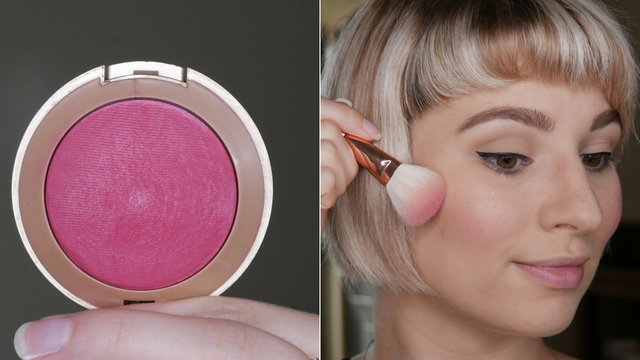
Step 3: Blush.
I went for a pretty pink and noticeable blush which I then applied to the apples of my cheeks with a blush brush.
There’s a reason why I did this before I finished off the eye makeup look.
Step 4: Highlighter.
Apply the highlighter after you’re done with the blush application.
You can grab a nice highlighting brush or just use your finger on the top of your cheek bones, nose and cupid’s bow. If you’re applying it with the brush and it doesn’t show up as much as you want it to, then dampen the brush with setting spray and it will help the highlighter to come back to life!
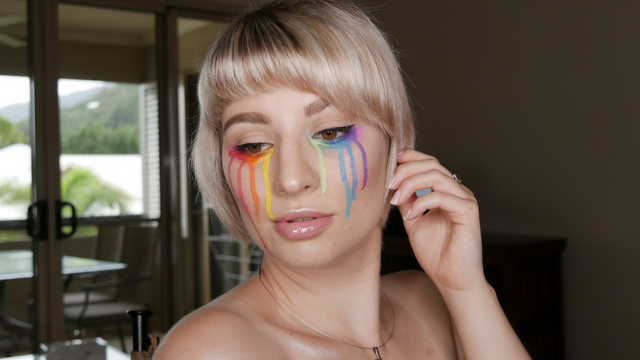
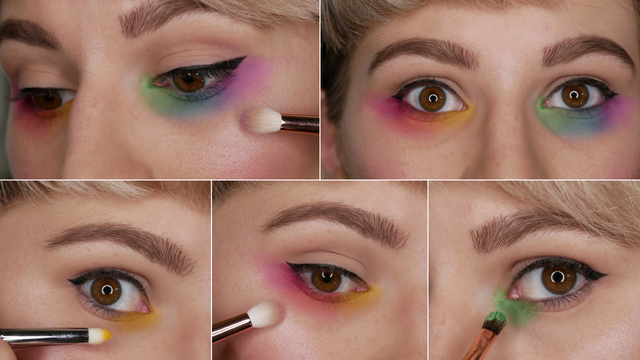
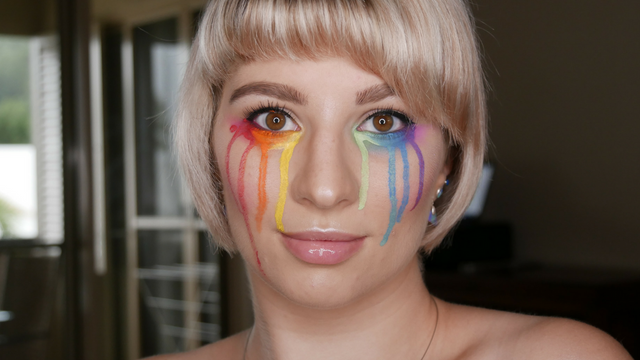
Step 5: Rainbow Shadows.
I kept my eyelids very simple because all the action happened on the lower lash-line.
So, basically what you’re going to do is apply the yellow, orange and red-red/pink on one side and apply the green, blue and purple shades on the other side. I used random eyeshadow brushes because you need for each shade a clean brush or you’re cleaning them in between if you don’t have enough brushes.
Don’t forget to blend the shades into each other so that you won’t see any harsh lines. You also can really smoke-out the lower lash line and take the shades lower as you normally would.
Step 6: Highlight again.
Use the same highlight from before and add a bit under your brows and inner corner of your eye.
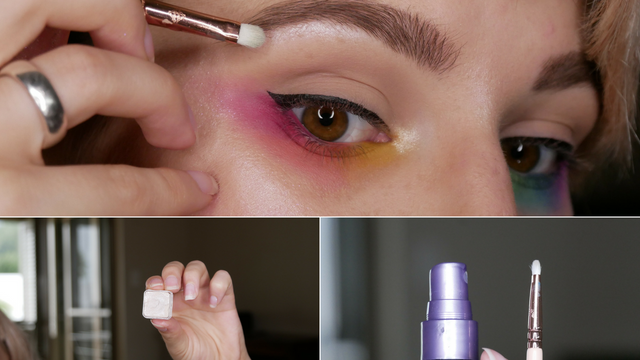
Step 7: Face Paint.
Use some water-activated face paint and go for the same colors (Rainbow shades) as you used as eyeshadow shades.
Get a cup of water and a detailing face brush. Start off with the first shades which is yellow. Add enough water to the yellow face paint and swirl the brush in it so that it’s nicely coated in yellow but wet.
Hold the brush to the inner corner section and let the yellow face paint drip down your lower lash line and cheek. It should look like you just cried yellow tears.
If the face paint won’t run down your cheek, add more water to the color so that it gets more liquidish.
Repeat this step with all of the rainbow colors.

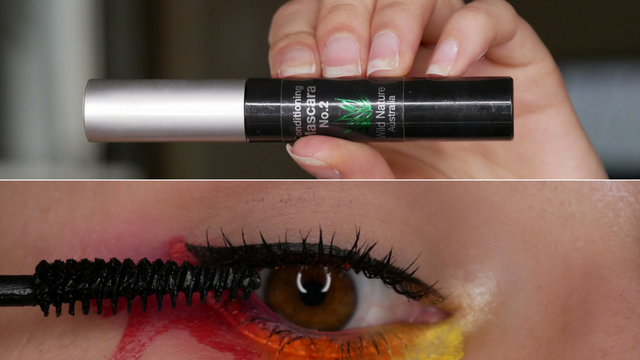
Step 8: Mascara.
Add a few coats of mascara to your lashes to complete the whole eye makeup look.
If you need to, you can also curl your lashes beforehand.
Step 9: Lips.
I kept my lips very simple because the main attention should be on my eyes that’s why I went for a normal clear gloss.
Be happy and feel good about yourself! It doesn’t matter what you’re doing, feeling or look like! You need to know what’s good for you because that’s what makes life so special!
xoxo, Melissa
Follow me on Twitter
Follow me on Facebook
Subscribe to my YouTube Channel
ALL MAKEUP GEEKS, feel free to RESTEEM this article! Let's keep spreading the word with real life everyday makeup application!
If you're someone who needs recognition for amazing an special content, don't be afraid to join the Promo-Mentor Channel

If I did wear makeup, I would definitely try this out because your content is amazing!
Thank you so much! :D
You are very welcome. Yay I can upvote some of your comments now :P
This post was shared in the Curation Collective Discord community for curators, and upvoted and resteemed by the @c-squared community account after manual review.
Honestly reading your personal anecdote and seeing the illusion of tears made me cry reading this. Your support is appreciated, it doesn't matter if it falls outside Pride month. This makeup was super simple and I'll be wearing it next June. Thanks so much for the post!
@anonymyst Thank you :) It's something that's so important to me because of the experience I've made. Everyone should love themselves!