How to Mine Monero on Your PC: A Beginner’s Guide to XMR Mining From How to Mine Monero on Your PC: A Beginner's Guide to XMR Mining 2018
Similar to Zcash mining and Ethereum mining, Monero mining (aka XMR mining) is very simple. Even better – you can still mine Monero with CPU, so your Mac or PC can actually earn you coins as well!
Post summary
Here’s a quick guide to mine Monero with your GPUs & CPUs:
Step 1 – Hook up your GPUs
Step 2 – Tweak your computer to maximize mining results
Step 3 – Join Minergate
Step 4 – Start mining!
- Monero mining – How is it different?
Monero uses a hashing algorithm known as CryptoNight, which is a memory-hard algorithm. Without getting too much into details, this type of algorithm is designed to resist the development of Monero-mining ASICs. Monero’s developers had their reasons for doing that, you can read about them here. Monero is deliberately best suited for CPU and GPU mining. Monero also differs in that it has a privacy protocol called ring signatures built in, designed to make it a leading privacy-based crypto in the market (competing with other privacy coins such as Dash and Zcash). Blocks on the Monero blockchain are mined in roughly two-minute intervals (Compared to Bitcoin’s ten-minute intervals).
- So, why should I mine Monero in the first place?
We’ll, here are some good reasons to mine Monero: Mining can be a great way to subsidize the purchase of a new, high-end GPU (or two, or three…) Monero is easily traded for bitcoins (BTC). It’s a cheap way to slowly build up a holding position in Bitcoin. BTC can be easily sold for cash, so mining XMR can be a good way to indirectly fill up your bank account or earn cash. XMR can also be sold directly on some major exchanges. Mining XMR, which is based on the CryptoNote algorithm, uses less electricity than both Ethash Dagger Hashimoto coins (Ethereum, Ethereum Classic, UBQ) and Equihash coins (Zcash, Zencash, Hush). This can lead to lower temperatures when heat output is a concern (yes, I deployed too many cards in a closed space once too!) and should also contribute to longer GPU card lifecycles. Finally, building a large XMR position now through mining may allow you to take advantage of price appreciation in the future—but with less risk than just buying. Let me explain: Mining crypto and holding it is similar to the old adage of buying low and selling high—except that most buyers don’t understand technical analysis and do this at the wrong times, meaning they’re buying high (during parabolic price increases) and selling low (during what could be normal price corrections on continued upward trends). However, buying gear and mining cryptocurrency with it allows you to have an income-producing asset in the gear itself, with aftermarket resale values holding very well and even appreciating. GPUs purchased for mining in 2015 and 2016 were often sold at a profit in 2017 due to the high demand in the market at that time. So, allowing your gear to earn money and selling that gear when your target is reached can potentially allow you to make your money back on the gear itself and pocket the crypto generated as profit.
- Calculating Monero Mining Profitability Before we get into the details of Monero mining, we need to perform some economic calculations.
First, head over to whattomine.com, which provides up-to-date figures for the current price, block time, and network hash rate (as measured in kilohashes per second—or KH/s—denoting thousands of calculations per second). Start out by filling in your cards’ details up at the top row and click on the GPU model number (e.g. the red square in the image below). Next, click CryptoNight (highlighted in blue) so it will calculate according to the right algorithm. Finally, click ‘calculate’ and you’ll see the following hashing and profitability info:
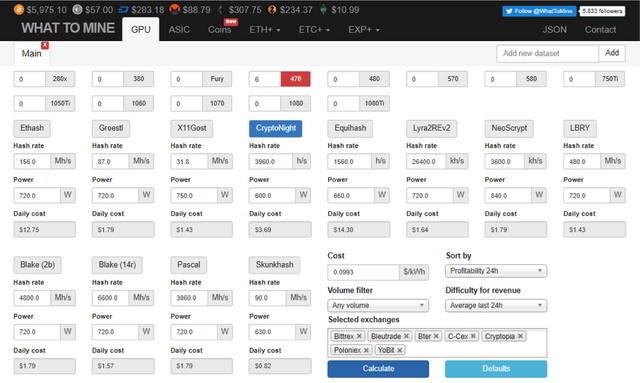
These figures will change based on when you run this analysis, but for the purposes of this example, we would net roughly $1 per day per GPU, depending on the model and configuration.
- Choosing Your Hardware .
Experimentation with various GPU selections in the calculator will reveal a card with the best price-to-performance-to-power consumption combination (expressed as MH/s per currency unit). Keep in mind that AMD cards outperform Nvidia cards for Ethereum mining purposes on the Ethash algo, but AMD doesn’t beat Nvidia when it comes to the Equihash algo using the EWBF miner. AMD does beat out Nvidia when it comes to mining Monero and the CryptoNight algo. The neat thing about CryptoNight, though, is that you can also still mine it with CPUs. A decent i5 or i7 CPU can still make you a small profit and get you in the crypto mining game! I suggest you look here for a full comparison of the best Monero mining HW.
- Mining Monero on Your PC - Walkthrough guide
The big advantage of the platform I’ll be showing you, minergate.com, is that you can use it on Windows or Mac, and you can mine with a CPU, GPU, or both (dual-mining), so it has a very low barrier to entry for a wide audience. For the purpose of this guide, we’re going to do a detailed walkthrough of setting up Minergate and a Claymore miner. Note: This is not Claymore’s Ethereum Miner we covered on our Ethereum mining post; for Monero mining, we’ll use his CryptoNote miner. If you have AMD cards, then mining Ethereum is usually the most profitable option; however, Monero is a strong coin that’s focused on privacy and it has a large following. Diversification of your mining resources can be a very lucrative strategy as you wait for that specific coin’s price to spike to empty out some of your mining earnings. The whole process of downloading your miner, configuring things, and getting going should take less than 20 minutes. We’re going to do a walkthrough of mining Monero on Windows 10, but note that you can also mine on Windows 7 or 8, as well as on Linux and Mac.
Step 1: Get Your Video Card Drivers Installed
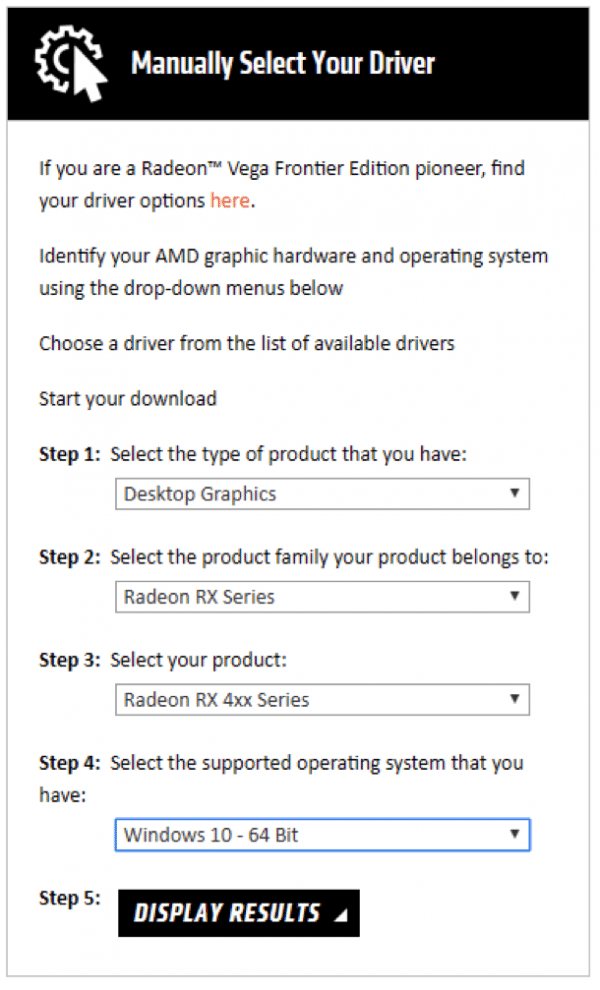
AMD GPUs: Head over to amd.com to download your GPU drivers. Go to amd.com and choose Support & Drivers. Enter your GPU information and click Display Results.
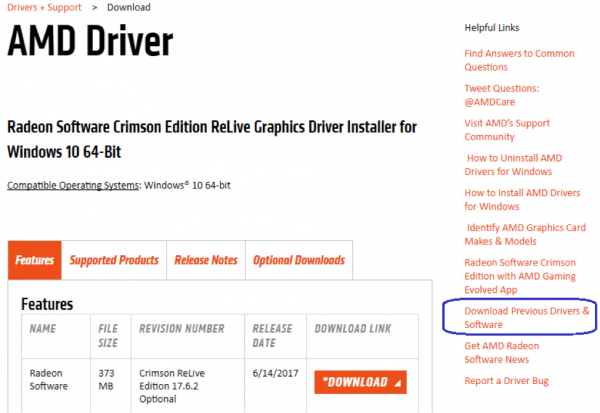
You can click the Download button for the current driver or choose Download Previous Drivers & Software on the right-hand side. This will allow you to choose older versions that are known as great drivers for mining based on your cards:
R9 and older: use 15.12
RX 4XX Series: use 16.9.2 or 16.10.3
RX 5XX Series: as these are newer, I’d recommend going with the current driver for now
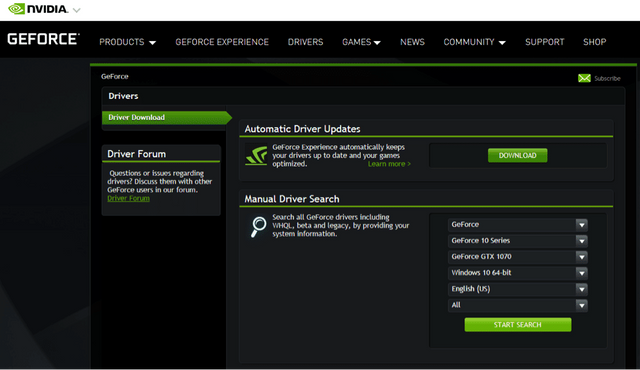
Nvidia GPUs: To get the latest Nvidia GeForce drivers, go to https://www.geforce.com/drivers, enter your card info, click Start Search, and download the current version from the results.
Install your GPU drivers like you normally would and reboot. You’ll know your GPUs are recognized correctly if you go into Device Manager (search in the Windows search bar) and don’t see any warning marks on your GPUs. Shown correctly, it should look something like this:
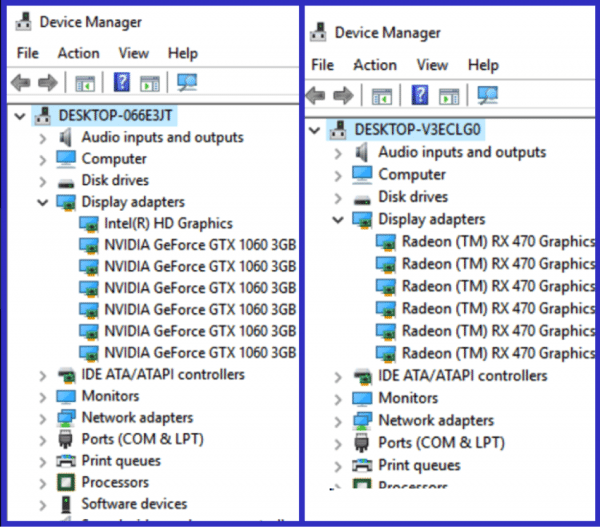
Troubleshooting tip: Some miners have had success installing all GPUs at once and then installing the drivers. Others prefer to install only one card, install the drivers, shut down the system, install the rest of the GPUs, and let them all be recognized by Windows (you’ll experience the system lagging, some flickers, or some brief black screens while each card is detected by Windows).
I’ve had success both ways, so if you run into an issue with one method, delete the drivers and try the other method. If you do need to remove your drivers, use the DDU (Display Driver Uninstaller) program from Guru3d.com to remove everything cleanly, and then start over.
Important! The next part of this tutorial refers to using MinerGate as a mining software. After receiving several complaints about the company we decided to review it personally. Make sure to read our MinerGate review to get a better idea of the downsides. If you don’t want to use MinerGate you can skip straight to step 4.
Step 2: Register a Free Account at Minergate
n order to easily mine with your CPU and GPUs, including laptops, you’ll need an account at Minergate. Click the Sign Up button at the top, and then set up your account with a valid email address and secure password.
Step 3: Download the Minergate Software
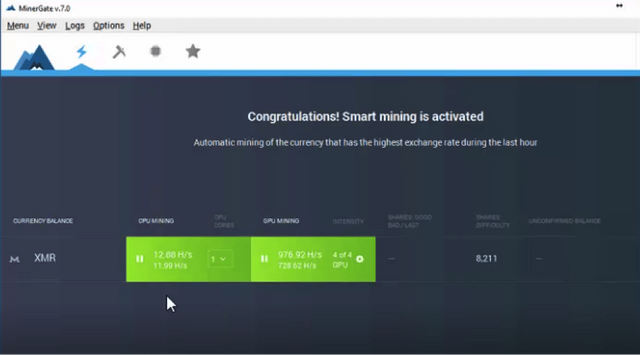
The next step is to download the Minergate software. Click on Downloads at the top, and it should detect the right version for you (i.e., Mac, Windows, Linux). Run the downloaded file to install Minergate, and just click like you normally would through any other installation process. After the installation has completed, run the program, enter the email you registered with, and click on Start Mining. Next, click on Start Smart Mining—this option will look for the most profitable coin for you to mine and start you hashing! That’s it—it’s literally that easy to get mining with this easy-to-use platform.
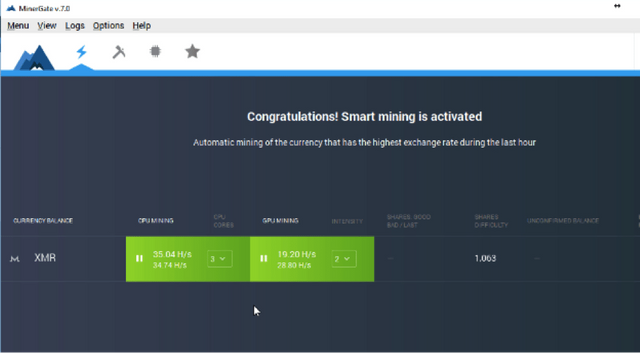
The above image shows CPU and GPU mining on a laptop with an old i7 2630 and integrated graphics. The below image shows a mining rig with a Celeron 1840 CPU and four RX 470s. Your performance with Minergate GUI smart mining will vary quite a bit based on the specs of your equipment.
Being able to mine with a click button GUI like this is amazing, as it lets almost anyone get started with mining without any fuss, .bat files, or configuration. Just click a button and boom—you’re mining crypto… But we want to take it to the next level. Read on to see how you can maximize your Monero mining and increase your performance almost 2.5x on mining rigs!
Step 4: Advanced: Maximizing Your Monero Mining Rig
Nvidia Mining Rigs:
On mining rigs that have Nvidia cards, you’re going to want to mine with the EWBF miner, but if you have a decent CPU (i5 or i7), you can also mine with your CPU using Minergate! The Minergate platform doesn’t conflict with the EWBF or Claymore miners, so you can dual-mine using Minergate to run your CPU and another miner to mine Ethereum, ZCash, etc.
AMD Mining Rigs:
On mining rigs that have AMD cards, you can take your Monero mining to the next level using a Claymore miner built for the CryptoNight algorithm that runs on AMD cards. Go back to the Minergate Downloads page, scroll all the way down, and click on Alternative Miners. If it doesn’t take you to the Claymore CryptoNote GPU Miner page, click on that option on the left. Download the XMR .bat file using the download icon all the way to the right on the XMR line. Go back to the Miner page and click on the bitcointalk link to this thread (a reminder: only download miners from their original bitcointalk threads). Click on the MegaDownload link, download the miner, and extract it to your desktop. Move the .bat file you downloaded earlier into the Claymore CryptoNote Miner folder on your desktop. The .bat file has to be in the same folder as the miner application for it to run properly.
Step 5: Tweak Windows Settings
Some settings should be modified in Windows to get you ready for mining. First, you don’t want your computer to go to sleep, as it will interrupt your mining. Go to your Power Settings and set it to Never Turn Off or Sleep.
You’ll want to modify your system page file and manually set it to 16,384 MB (16 GB).
To minimize the disruptions to your mining and settings, you may also want to disable Windows Updates. If you feel more secure leaving them on, you can do so; just understand that there are frequent updates that sometimes reboot your system without your involvement, and this will stop your mining.
If you’re running Windows Defender or some other antivirus program, add an exclusion to it so that it doesn’t flag the entire Claymore miner folder and Windows doesn’t try to identify the Miner program as a virus or try to disable or delete it.
Step 6: Run the Miner
Once you’ve completed your Windows tweaks, run the miner by double-clicking the .bat file you created. If Windows pops up a firewall approval message, provide the necessary approval, and you’re off and running with the Claymore CryptoNote miner hashing hard for Monero! In my test example, four RX 470s were capped at around 1,000 h/s with the Minergate one-touch GUI platform, but running the Claymore miner on the same rig gets us over 2,400 h/s! That’s almost a 2.5x improvement! Claymore is a beast when it comes to AMD miners, and it has proven so time and again. The neat thing is running the Claymore miner in this fashion is still mining to your Minergate account, and you can run the Minergate GUI to mine on your CPU and run the Claymore GPU at the same time.
Step 7: Check Your Progress!
When you’re logged in to Minergate, go to your Dashboard to monitor your active workers and see your overall mining progress. Click on the Withdraw button to send the Monero you have mined to another Monero wallet or exchange.
Congratulations @adamgrabowski! You received a personal award!
Click here to view your Board of Honor
Congratulations @adamgrabowski! You received a personal award!
You can view your badges on your Steem Board and compare to others on the Steem Ranking
Vote for @Steemitboard as a witness to get one more award and increased upvotes!