HowTo: Monero node behind Tor with Oled display on a Raspberry Pi
I wanted to build a birthday present and what better than a plug and play Monero node on a Raspberry Pi. Right?
Disclaimer: I am a Linux noob and just fought my way through tutorials that i found on sites like http://pinode.co.uk/ (helped a lot. Thanks!) and similar. Encountered some bugs on the way, that is why i started this HowTo. For me to remember how i did it. And maybe it helps you over some bumps. If you want to follow my journey you will need rudimentary knowledge of the command line and javascript plus some patience. If you need a birthday present for next week, no chance.
List of components
- Raspberry Pi 3 (case + cooling etc. if you fancy)
- Power Source
- OLED display with i2c adapter like this
- MicroSD for Pi
- USB data storage with enough space for the Monero blockchain (i used a 256GB stick that i had spare)
Costs around 0.4 XMR.
End result
Setup Raspberry Pi
Follow the easily get started tutorial until you created the ssh file.
Connect over ssh
Look up ip on your network.
Start it headless with putty or ssh pi@{ip}.
Config
sudo raspi-config
Set new password for pi user!
Expand filesystem!
Update OS on Pi
sudo apt-get update
sudo apt-get upgrade
Move eveything to USB
I read that lot of read/write might destroy your card in the long run. Not 100% if this is needed but anyway:
Git is useful no matter what.
sudo apt-get install git
Plug in your device and find out where or what it is.
sudo lsblk
It's going to be /dev/sda, else you probably don't need this tutorial. Be sure you want the next step. Loss of data might occur.
sudo fdisk /dev/sda
d -> gone
w -> back
Ready for a helpful script from adafruit, i personally put it in a new folder called setup, just to keep an overview:
mkdir setup
cd setup
git clone https://github.com/adafruit/Adafruit-Pi-ExternalRoot-Helper.git
cd Adafruit-Pi-ExternalRoot-Helper
sudo ./adafruit-pi-externalroot-helper -d /dev/sda
Ahh the first error. Something something file system.
Got around it by reading https://github.com/adafruit/Adafruit-Pi-ExternalRoot-Helper/issues/5
and then using nano to edit the script and add that 5 second sleep. Do the same if you have the same error.
sudo nano adafruit-pi-externalroot-helper
106 info "fs create" "Creating ext4 filesystem on ${target_partition}"
107 + sleep 5
108 mkfs -t ext4 -L rootfs "${target_partition}"
sudo ./adafruit-pi-externalroot-helper -d /dev/sda again and yep it gives you a second chance to abort, but if you accept, it starts doing something without telling you exactly what.
Took 2 min for me, but be patient on older devices.
sudo blkid -o export /dev/sda1 to check out the PARTUUID.
sudo nano /boot/cmdline.txt and the root=PARTUUID= ... could show the one you just found. Else copy paste.
sudo reboot
Bäämmm the external devices blinks.
Run stuff without shutting it down when closing (screen)
Search online for an introduction to "screen" if you want to know more. There are lots. This one is not bad.
sudo apt-get install screen
then start a new screen
screen bash
and you can rejoin with
screen -r
screen is really useful and we will need it later.
Increase size of swapfile
sudo nano /etc/dphys-swapfile
edit the size of the swapfile from 100 to 1000
sudo dphys-swapfile setup
sudo dphys-swapfile swapon
Ready.
Finally Monero
A dependency we need:
sudo apt install libboost-all-dev
mkdir ~/bin
cd ~/bin
quick check if your OS is running 32 bit and make sure we need the ARMv7 Monero version:
lscpu
Output should look like
Model name: ARMv7 Processor rev 4 (v7l)
wget https://downloads.getmonero.org/cli/linuxarm7
tar -vxf ./linuxarm7
i found out, that if i start the monero daemon behind tor on a raspberry pi it will take a week or longer to sync. It is nice if you already have a raw blockchain from trusted source to import, else you can do
wget https://downloads.getmonero.org/blockchain.raw if you trust that source.
this is going to take a while ... depending on your download speed. Then:
./monero-blockchain-import --verify 0 --input-file ./blockchain.raw
now this is going to take around 4-5 days.
And then you could delete the raw blockchain:
rm -rf ./blockchain.raw
Some privacy please (TOR)
sudo apt-get install tor
sudo apt-get install tor-arm
sudo service tor status
looks goood. Let's create a password to monitor TOR later. And do not use PASSWORD pls.
tor --hash-password PASSWORD
Copy hash for pasting.
sudo nano /etc/tor/torrc
Big file, use ctr-w to find: #ControlPort 9051 - and remove the hashtag to activate it.
Same with HashedControlPassword and also paste your hash there.
sudo systemctl restart tor.service
this does what it says.
If you want to connect a local PC you can temporarily allow until next reboot with
sudo iptables -I OUTPUT -p tcp -d 127.0.0.1 -m tcp --dport 18081 -j ACCEPT
(add this to some startup routine if you need it permanently)
ARE YOU READY
Have your pi ip to fill out the xxx.xxx.xx in the next command and go for it.
DNS_PUBLIC=tcp TORSOCKS_ALLOW_INBOUND=1 torsocks ./monero-v0.11.1.0/monerod --p2p-bind-ip 127.0.0.1 --no-igd --rpc-bind-ip 192.xxx.xxx.xx --rpc-bind-port=18081 --confirm-external-bind --block-sync-size 10
Wait a little and shortly you will be happy to use ctr-a, release a and press d, and have the screen detached. screen -r to get back into it. (screen introduction already told you that, and similar tricks).
The sync from here will still take a couple of hours to days depending on how deep the raw blockchain went. If you are synching without blockchain import it could take forever. But i gave up on my first try after a few days.
Status
./bin/monero-v0.11.1.0/monerod --rpc-bind-ip 192.xxx.x.xx --rpc-bind-port 18081 status
with your ip to check on the status.
arm
to check on tor's status.
Shutdown
./bin/monero-v0.11.1.0/monerod --rpc-bind-ip 192.xxx.x.xx --rpc-bind-port 18081 exit
to shut monero down. And
sudo service tor stop
to shut tor down.
Start on boot
I tried different approaches but the boot process on raspberry has me suprised every time. Let's try this one that i found having regular success:
Create a startup script:
sudo nano ~/startup
and feed it our monerod on torsocks line:
DNS_PUBLIC=tcp TORSOCKS_ALLOW_INBOUND=1 torsocks /home/pi/bin/monero-v0.11.1.0/monerod --p2p-bind-ip 127.0.0.1 --no-igd --rpc-bind-ip 192.xxx.x.xx --rpc-bind-port=18081 --confirm-external-bind --block-sync-size 10
and do not forget to change it to match your ip.
Now we can start that script detached with screen from the rc.local (runs at the end of the boot process).
sudo nano /etc/rc.local
to do stuff on boot. Before exit 0 add:
... sleep 10 su - pi -c "screen -dm -S monerodscreen ~/startup" exit 0
The 10 second sleep is to give the raspberry time to finish some network duties before running torsocks. We run it in a screen named monerodscreen on a user called pi. Bingo.
Install and Config OLED display
Solder or wire up the OLED display as in instructions. I then glued the display to the transparent case from the inside.
Then you can follow this i2c tutorial.
After runnind the i2c-detect it looks like the OLED or something else is on:
0 1 2 3 4 5 6 7 8 9 a b c d e f
00: -- -- -- -- -- -- -- -- -- -- -- -- --
10: -- -- -- -- -- -- -- -- -- -- -- -- -- -- -- --
20: -- -- -- -- -- -- -- -- -- -- -- -- -- -- -- --
30: -- -- -- -- -- -- -- -- -- -- -- -- 3c -- -- --
40: -- -- -- -- -- -- -- -- -- -- -- -- -- -- -- --
50: -- -- -- -- -- -- -- -- -- -- -- -- -- -- -- --
60: -- -- -- -- -- -- -- -- -- -- -- -- -- -- -- --
-> cx3c
cool.
Nodejs
i am not versed enough on linux to figure nodejs installation out by hand myself. But the awesome nodesource helps out with the oneliner:
curl -sL https://deb.nodesource.com/setup_9.x | sudo -E bash -
after that it is easy to install and you even get some info what you are doing:
sudo apt install nodejs
and then a quick
node -v
-> 9.4.0 (at the time of my installation)
A fancy nodejs with everything you need!
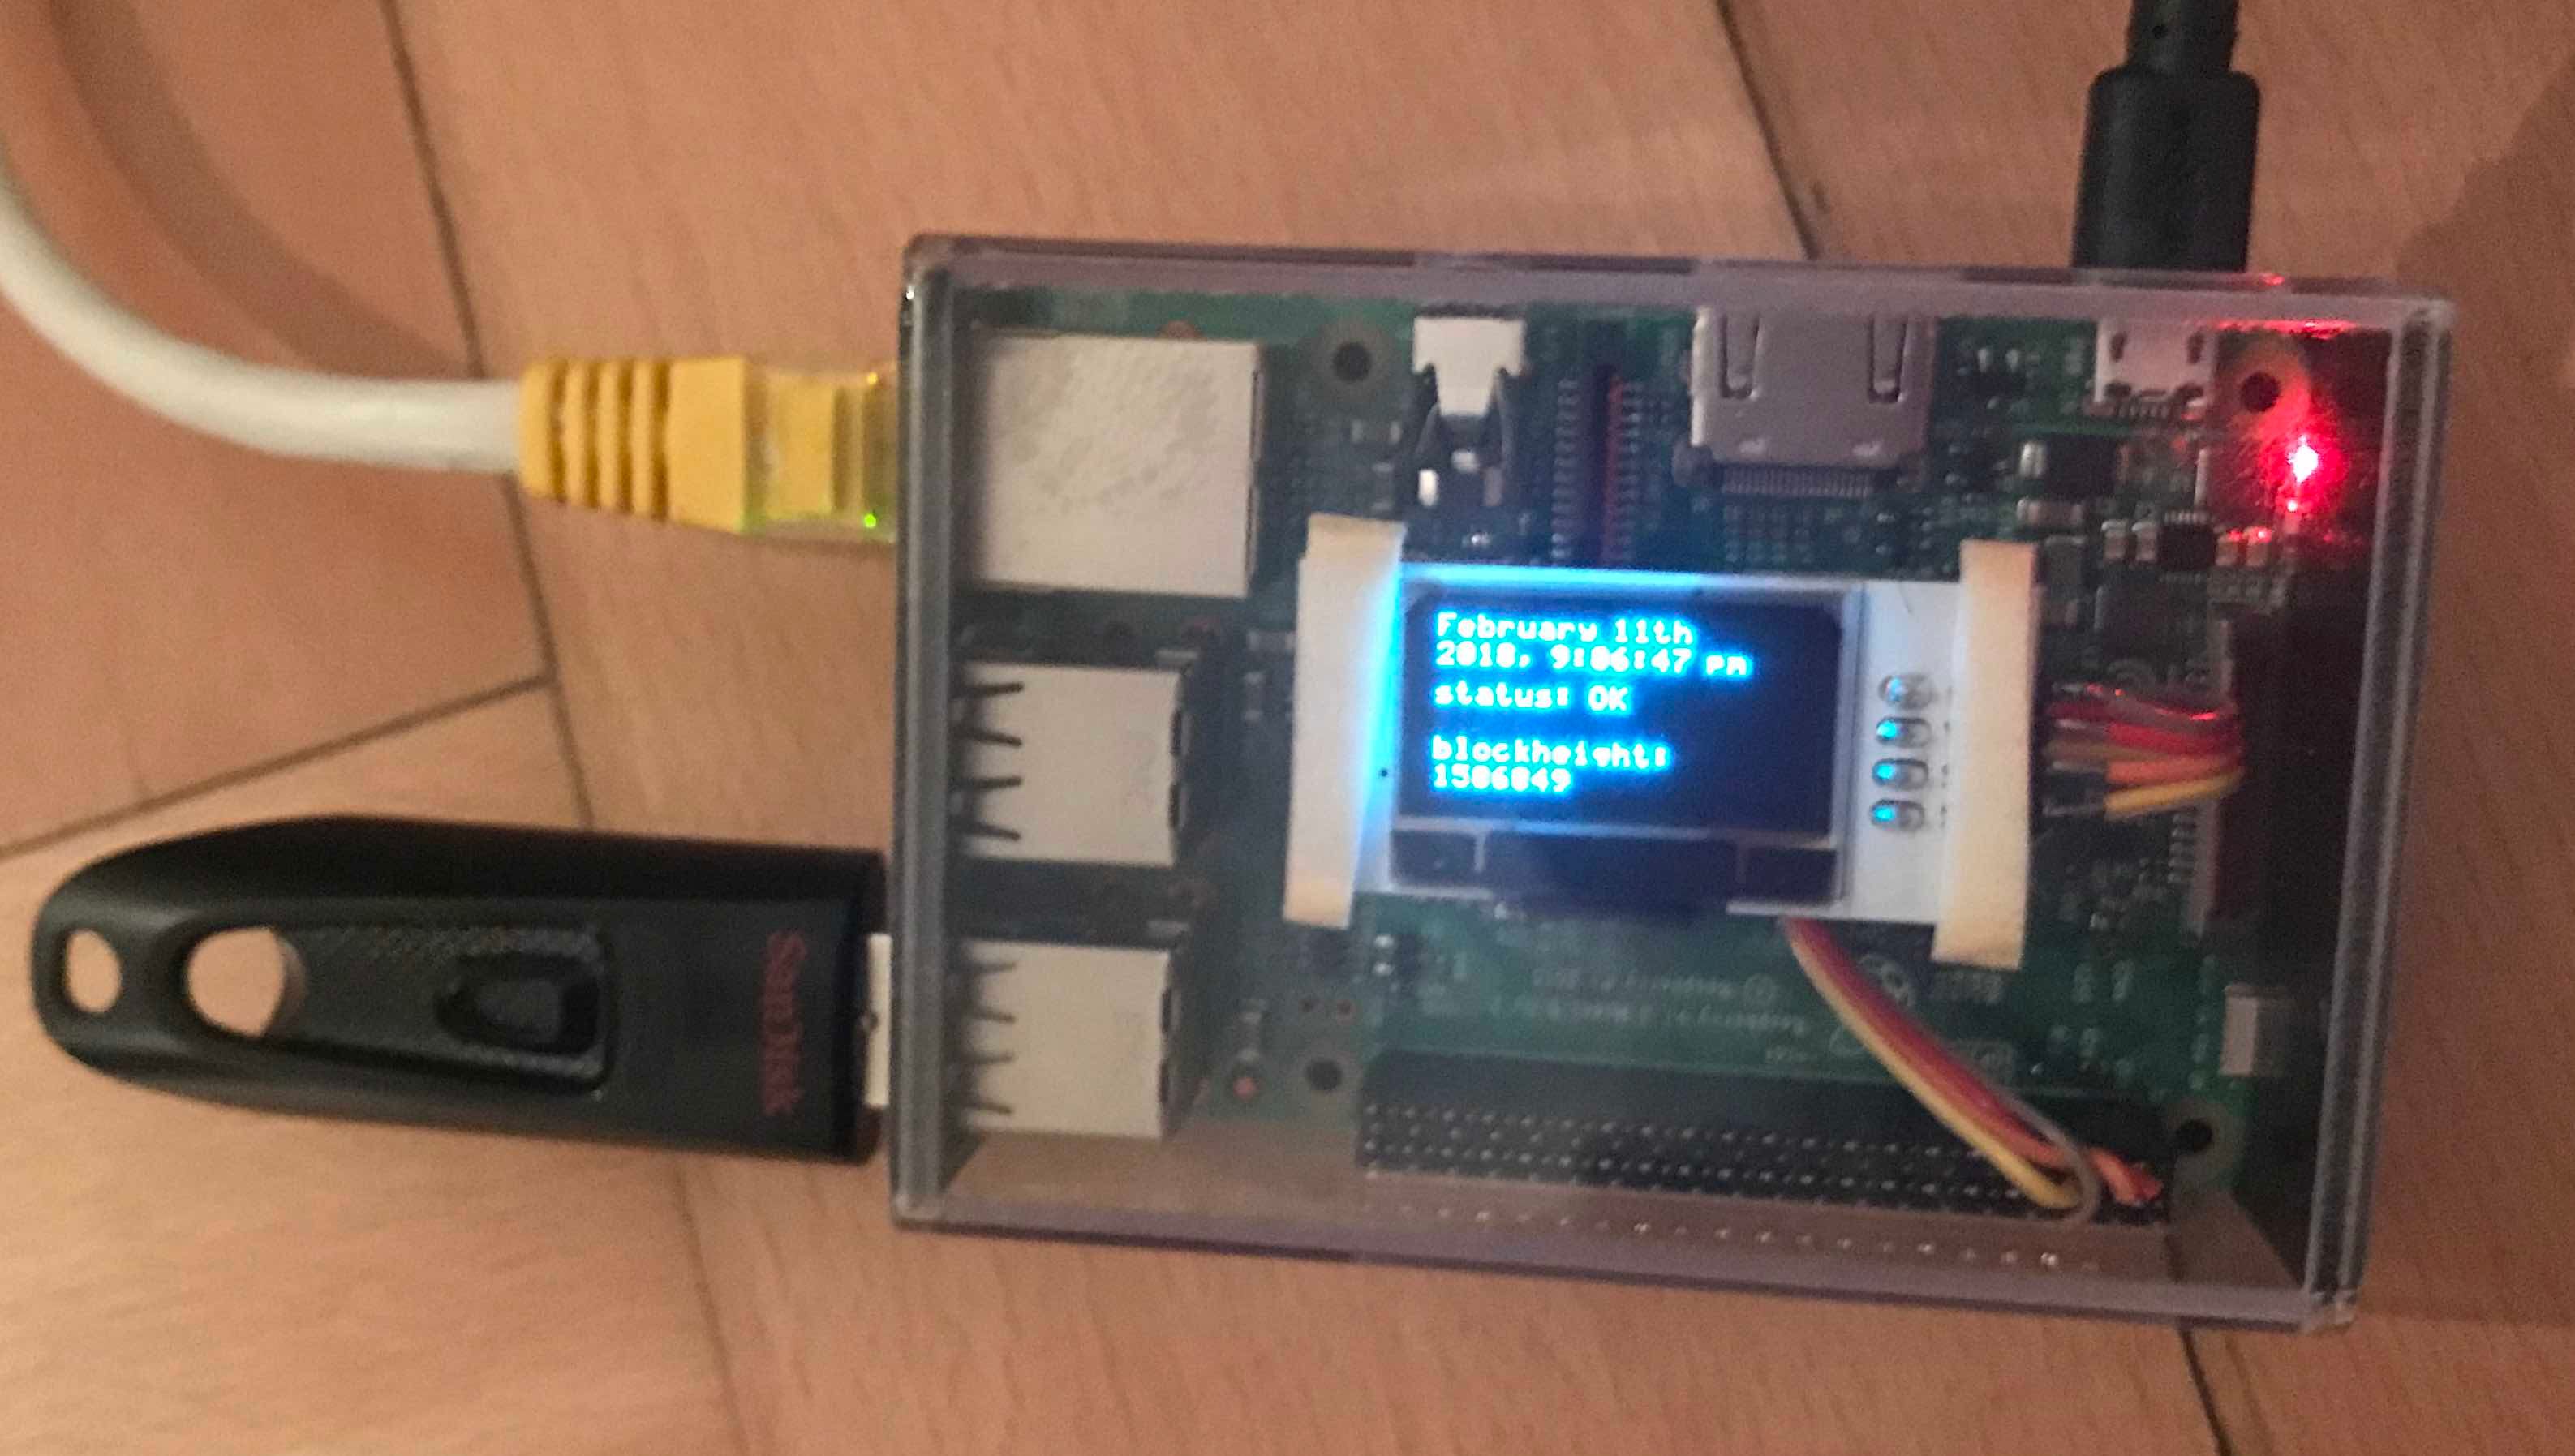
Monerod blockheight on the display
I was hoping to get the display to run on the oled-js-pi driver, but there were some bugs and i decided to fork the repository because there is no activity around it. Here is my repository with different bugs, but a script added to show height and status. It just requests the monerod rpc endpoint for height and shows this and the date, to make sure we are did not crash. If you have good ideas to improve this - please.
git clone https://github.com/nashequilibro/pi-oled-monero
cd pi-oled-monero
npm install
Now we are able to run it and the display should be showing the time and after successfully connecting to the daemon a status and blockheight. Those do update once a minute.
It takes one argument. The ip of the monero daemon running device.
node index xxx.xxx.xxx.xx
Add this to a new startup script if you wish (i called it startupmon), including the path to the index.js:
sudo nano ~/startupmon
add the line:
node /home/pi/pi-oled-monero/index xxx.xxx.xxx.xx
and then add the script to our startup routine:
sudo nano /etc/rc.local
and enter this line before exit 0:
su - pi -c "screen -dm -S oledscreen ~/startupmon"
and you have a monero node behind tor with a tiny little display. Both the display process and monerod run on screens in the background after startup. Check it out with screen -ls.
There was some heavy lifting necessary, but what i learned about the pi and monero was worth it. Took me around three weeks from scratch. Happy birthday!
Wow man, you have put some work into this!
I really like the OLED screen you have put into the PI. thats a nice gimmick that I will remember and maybe use in some of my previous projects!
Go on with it!
Congratulations @nashequilibro! You have received a personal award!
Click on the badge to view your Board of Honor.
Do not miss the last post from @steemitboard!
Participate in the SteemitBoard World Cup Contest!
Collect World Cup badges and win free SBD
Support the Gold Sponsors of the contest: @good-karma and @lukestokes
Congratulations @nashequilibro! You received a personal award!
You can view your badges on your Steem Board and compare to others on the Steem Ranking
Vote for @Steemitboard as a witness to get one more award and increased upvotes!