How to make Wooden Combs to Sell Online or at Craft Fairs
Did you know that a wooden comb is one of the best things for your hair?
Yes, indeed!
A wide toothed, wooden, comb will glide smoothly through your hair, massage your scalp and release the natural oils, (sebum), from your skin. This oil is transferred from the roots of the hair follicles and distributed to the separate strands leaving a rich sheen and healthy body.
Truth be told, I suppose a plastic comb would do the same, but here's where the difference is. Wooden combs do not transmit static electricity, therefore, less split ends and an easier time of it when you are having a "bad hair" day!
That, my friends, is what I tell all of our customers that come up to browse our booth at the craft fairs.
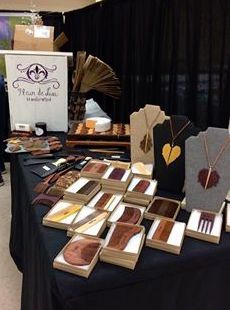 Our Comb Display at a Craft Fair this Season
Wooden combs have become one of our top selling items.
When we first started to go to craft fairs, I knew that I wanted to become a vendor, but wanted to sell unique items that wouldn't be easy for other sellers to compete with. Browsing on Etsy, I came across a seller of wooden combs.
"I can make those," I said!
It wasn't as easy as it looked!
The first mistake I made, was ripping some very expensive exotic material into strips to make my comb blanks. Unfortunately the teeth I fashioned broke off when I passed my thumb over them.
For my next attempt, I found a likely piece of scrap material that was left from a cutting board project. I cut my next blank across the grain. Unfortunately, I cut my blank too thin, which left the back weak and it too went on the scrap pile, in two pieces.
Several attempts later, I finally had a reasonable blank that I thought would hold teeth, and not break in half. I brought it to the band saw, and again attempted to cut teeth into it.
No matter how hard I tried, or how many useless jigs I invented, the band saw was obviously not the tool for cutting comb teeth.
I made another blank and brought it to the table saw. This time I used a small scrap and extended the reach of my miter gauge to just shy of the saw blade. Very carefully I cut some reasonable teeth into my blank. These proved to be uneven and the process was also very dangerous. Downright scary!
The result was a usable comb but too ugly for resale. Scrap heap again.
I wasn't getting very far with this, and knew I was about to make a trip to the ER, unless, I could come up with a better method. So, I put the project away and began searching the internet.
I found a video on YouTube by Howcast. This informative piece showed how to make a simple box joint jig, or as some call them, finger joints.
A light went off in my head! I could modify this to cut comb teeth as well!
Here's the link to that very video.
Anyway, I made a simple version of this jig, attached it to my miter gauge, and soon had several decent blanks to work with.
I ran into the house with my first "finished" version and proudly showed it to the Missus!
"Wow, a curry comb," she says!
I was crestfallen, but didn't let it show.
"Uh, yeah, do you think we could sell these?"
She looked the item over and handed it back, and said, "No," then turned back to her sewing machine.
Back to the drawing board.
So, now it's the size of the teeth, or more importantly the size of the gap between the teeth.
My saw blade kerf is the standard 1/8th inch, so I ran down to the big box lumber yard and had a look at their saw blades to see if I could find something thinner.
No luck.
Back home I found one on Amazon.com that was 3/32nds wide, and not too expensive.
I ordered it and waited for delivery.
The big day arrived! I took my shiny new blade out to the garage and got to work.
Unfortunately, the jig I originally made had a 1/8th inch guide in it and wouldn't work with the new, thinner kerfed blade.
I took this opportunity to fashion another jig, but one much better and safer too.
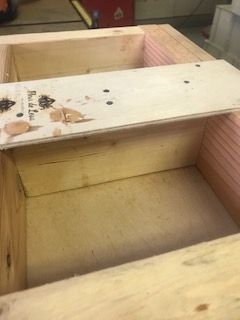
I started by making a small sled from 1/4 birch plywood and some 2 X 4 scraps. Using a caliper I took a small piece of maple to the belt sander and fashioned a sliver 3/32nds thick. This I glued into a slot, cut with the new blade, into a 1 x 4 .
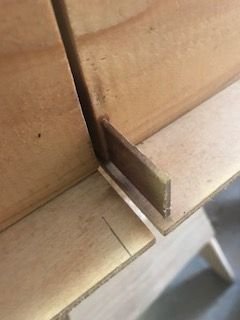 Sliver of Hardwood Glued Into a 1X 4
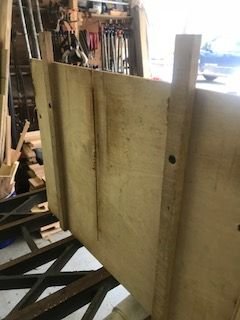
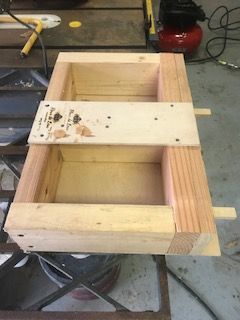 The Finished Sled
Next, I ripped a strip of maple just wide enough to fit into the grooves in the cast iron tabletop of my saw.
I passed this strip through my planer so the thickness was about a 16th of an inch less than the depth of the grooves . This I cut into two equal lengths and placed each into a separate groove.
Using the edge of the table as a reference for squareness, I placed the sled over these runners and fastened them to the bottom with some short screws.
It is important to mention here, to secure one runner first then apply sideward pressure to the outside edge of the groove. Then, use a thin wedge on both ends of the other runner to wedge it to the outside of the opposite groove before you secure it. This will mitigate any slop in the runners.
 Bottom of Sled With Runners Attached
Once I had the runners installed, I placed the sled on my saw table and cranked the blade up about 3 inches.
I ran the sled through the blade about half way and removed it. For a safety measure, I took a short piece of 2 X 4, the same length of the inside width of the sled and glued it, edge down, over this kerf.
Next, I ran the sled through the saw once again and cut through the center of this piece. This protected my hands by shielding the moving blade from being exposed inside the sled.
For an extra measure of safety, I took a short piece of 1/4 inch birch plywood and glued it over this "guard" and fastened it to the main sled with nails either side of where the blade passed through.
 A View of the Center Guard that Covers the SawBlade
I then took the 1 X 4 with the guide attached to it and positioned it one saw blade width to the left of the saw kerf cut into the sled, as seen from the rear of the saw.
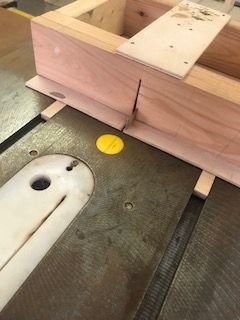 Sled Positioned on Saw (Note tooth guide positioned left of blade kerf) This is a front view.
Below is a video of me using this sled. It's about ten minutes long and covers the whole comb making process.
Let me just add this.
I encourage you to use all the safety gear available to you. This includes ear and eye protection, breathing protecting, dust collection measures, and the available guards that come with your equipment. I am negligent in this, on account of being old and stupid, and my equipment has changed hands several times and the original safety guards are missing.
You must always be aware of where your flesh, and the saw blade are! Take appropriate measures so that they don't meet unexpectantly.
After I cut out the teeth, I rough sand the blanks into shape on the belt sander. I then sand them with the hand sander using 120, then 220, and finally 400 grit paper.
What I failed to show, in the above video, is me shaping the end of each tooth to a dull point with a small triangle file. I also pass a piece of 400 grit paper through each tooth to account for any splinters.
We like to put our brand on each item so, I use a small brass iron to burn our logo into the wood.
Then I use my drill press to buff each comb to a smooth polish. You can get these buffing wheels at Harbor Freight.
Then they go for an over night dip in a mineral oil vat.
I buy the mineral oil at the Walmart pharmacy in 16oz bottles. It's food safe so it must be "hair safe" too.
The next morning I take them out of the oil, wipe them off and set them aside to dry for a few days.
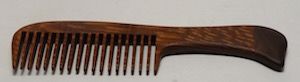
I have made several different styles of combs, but I find the beard combs and traditional pocket combs are the best sellers.
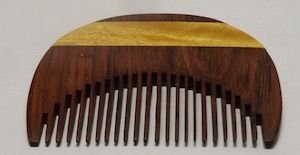
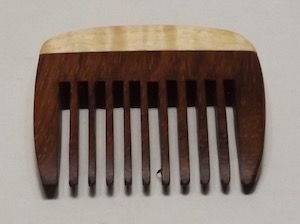 Beard Comb of made Jatoba with Curly Maple Inlay
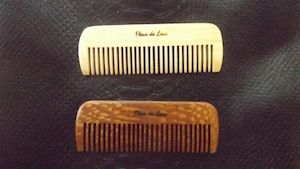
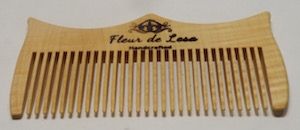
Pocket Combs made of (top) Maple (bottom) Leopardwood
Ladies with especially long hair are fond of this style
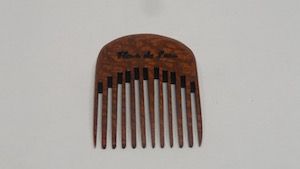
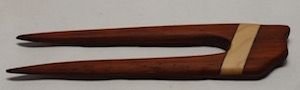
I also make bun combs and hair forks.
Stylist are partial to this type.
I'm always trying to improve the products we make and sell and while creating this post I discovered a YouTube video of a new saw blade that is supposed to be the thinnest in the world.
I'm going to include, here, a link to the video produced by the designers, because I think all woodworkers could benefit from this source.
This blade is supposed to have a kerf as thin as a dime.
I'll be making fine toothed combs next season!
If this video has value to you, please share with someone that may benefit from it.
I'd like to thank @brandonfrye for turning me on to the free gifs you can use to jazz up your post. See the one below!
If you aren't acquainted with @brandonfrye's contribution to the Steemit community then check him out! This guy is an awesome source of information for minnows like me!
Also I want to give credit to the actual creator of this great gif @justcallmemyth. This guy is an awesome artist and very generous to offer his creations free.
Please, check them both out, follow and resteem them!
Oh, and if you'd like this gif you are welcome to copy if from me.

And as always....CARRY ON!


Hi @beekerst. I'm glad you're finding time to write such great posts.I can never make any of the things you do, but I do enjoy reading your posts. Keep sharing with us your interests!
Awe! Thanks for your kind support @beeyou! This is just an awesome bunch of people up in here!
So glad I stumbled across your post. This is a great product and what makes it even more wonderful is the heart and soul poured into it. I hope your family does well with it at the craft fairs. I imagine they're a great hit. Kudos to you for all the blood sweat and tears you poured into your craft :)
We don't do it full time, we both have full time jobs at the moment but we are getting all our ducks in a row so that we can have something to do in retirement. Thanks for the comment and the resteem! ! I love to get feedback!
Great post and a nice project. It is always good to have small craft items on a stand.
We have started a woodworking community here on steemit and would welcome you. We have a discord channel, link here: Woodworking on Steem Discord Channel And a weekly woodworking post competition ,
you can read the post here
Thanks @jist
Thanks @jist I tried the discord link above but it wouldn't work, I tried searching for the channel also....no luck...bugs? Anyway thanks for the kind words! I also entered my post in the contest ....... wish me luck!
I just tried it and it was ok. When you click it should take you straight there. Let me know if you get stuck. Check out @woodworkcurators and put you competition entry in this weeks compettion post. ( My bad I didn't update the link). I have put your post up in the post promotion section of the discord channel. Thanks
When I click the discord link, it downloads an empty file with no extension, named v9YaGYw, however it also opens the discord page, it may be a quirk with my Macbook Pro....I donno. I try a search using the string #woodworking and just woodworking as the search string there but no luck. I'll re-enter my post for the competition. Thanks.
I tried it from woodworkcurators account and it worked. Must be a glitch or something. The channel is called Woodworking on steem so see if you can find us on discord. I am sure we will get there in the end. Thanks.
We want to support our newbies that are dedicating time to writing a great post. Great job @beekerst!
Congratulations you have been upvoted and resteemed as part of #newbieresteemday's top 10 posts for the day! ...
We invite you to use our tag to connect with more of our members. To learn more: Come Join Us!!! (Newbie Resteem Initiative)
I am honored! Thanks for all the kind support from #NewbieResteemDay initiative!
You can read about us here
Thanks for the support @woodworkcurators! I am honored to be recognized!