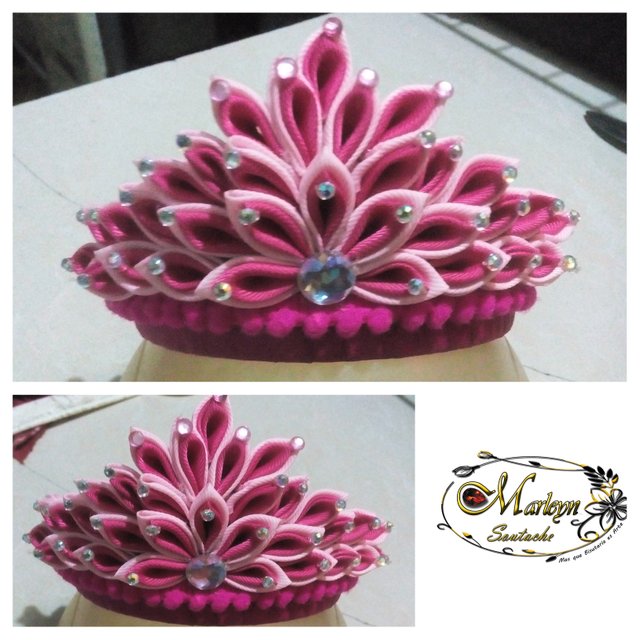
Dare to learn with me! Step by step tutorial, of beautiful Corona Tiara Magistral style, Echo by hand
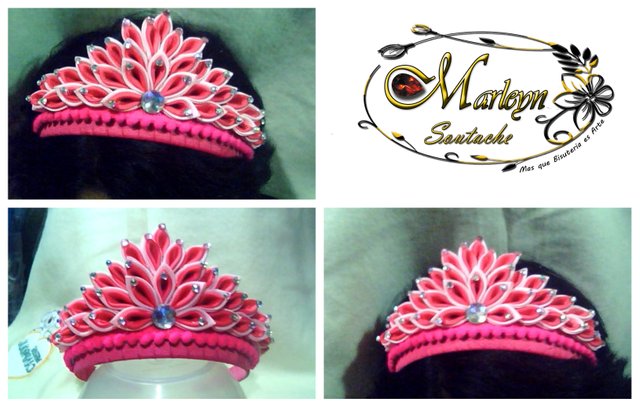
Hello, it's a great honor to have the opportunity to write a new tutorial, as you always know how to make tendrils, although in these days I will make some changes, my 9-year-old daughter asked me for headbands, tiaras and hooks, I will take the opportunity to show you how to do it in the most explicit way possible to make the princesses of the house happy or even to sell them and help you with extra money, I hope you like it in this I am very new it is the first time I do it I am open to their councils and teachings, my daughter loves to use it every day, today was her piano concert and this was her gift:)
All the images are taken with the camera of the computer and the collage is made with an excellent page that is called [Befunky] (https://www.befunky.com/create/collage/) I recommend it is easy and practical use. I wish you like it, as you already know it more than my work, it is my passion, I love what I do, I share it with you with a lot of love ...
.
Now, without saying anything else, we begin:
If you have a question, do not hesitate to write me, I will be happy to help you.

Materials:
4 Meters of razo ribbon 4 cm wide
Base for headband
Silicone gun
Silicon bar
2 meters of tape 1 cm
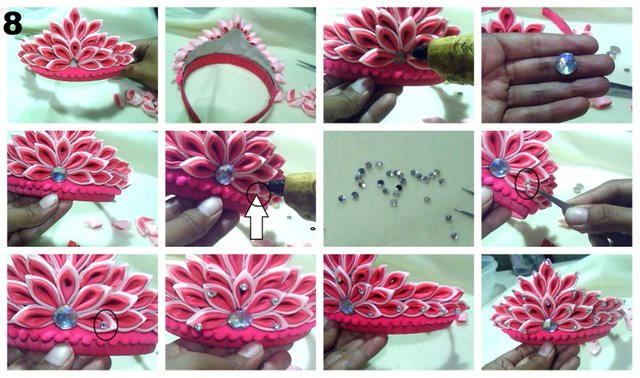
Apply flat round 1.5 cm in diameter
Thick cloth or leather for the base
36 Apply round flat 0.5 mm in diameter
20 cm tassel ribbon
Love, encouragement and patience ... Step by step we will learn!


STEP 1: Let's start by wrapping the headband, I use 1 cm wide tape about 2 meters, I recommend not cutting the tape only to line and at the end short because sometimes tape is missing or sometimes left over. When finishing the headband we will make the top of our tiara you can use thick fabric or leather and I use leather is stronger and more durable as you can see in the sequence of images you have the measures of 20 cm long the center 5 cm high, you leave 3.30 cm and 3 cm high, we leave again 3.30 cm long and measure now 2 cm high cut and the shape of our crown will be marked on the leather and cut. we must have the previously hot silicon gun and halfway down the strap we stick the leather as I show you in the last two images.
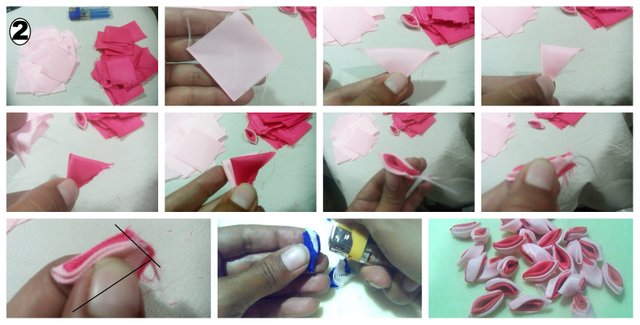
STEP 2: This is the longest step, well I am learning late two days doing these petals, we must make 36 petals to have the complete crown. Cut 72 squares of 4 cm * 4 cm I recommend that you look at the sequence of images. It bends pointed tip from top to bottom, then we fold again from the right tip to the left this in both boxes, it is placed one on top of another and we fold again it should be seen as the image 7 the remaining tip always remains as distorted cuts and burns, at the bottom the tip is cut and burned in the picture 8 I show you with a line where you cut and burn. Explaining it in this way is a little complicated I will make a video for greater ease :) remember you have to make 72 petals if you will make them in two colors as I do it, I have 36 of each color.
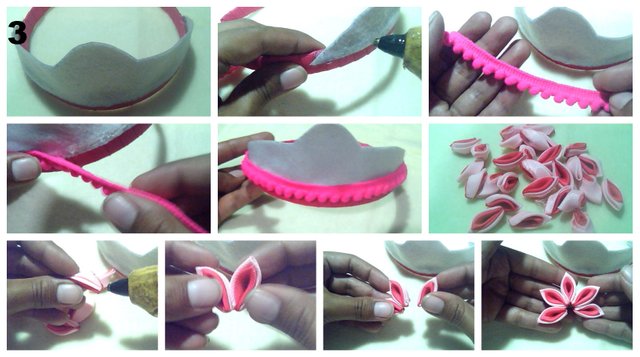
STEP 3: With the help of the silicon gun we are going to stick the tassel tape we must cut it 20 cm long, you can get it in a haberdashery used for the end of the curtains , we will stick it from end to end on the leather. While the tassel tape dries, we will form the central flower, grab a petal, place a small drop of hot silicon on this paste another petal and so on until we have stuck 5 petals and form half flower as I show in the last image.
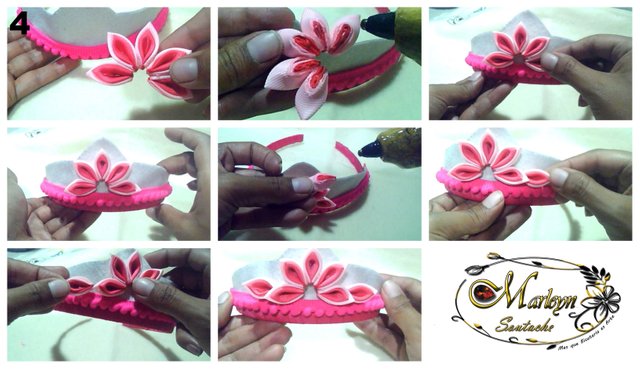
STEP 4: In the previous step we made the middle flower of the center now we are going to place hot silicon on the back of the half flower and paste it carefully not to burn in the center of our tiara or crown, next to the last petal on the bottom place hot silicon paste another petal performs this process on both sides.
I hope that my designs like them as much as I like them, learn with pleasure ...!
If you have a question write me a comment, I will be happy to help you with any detail, I hope that my designs like them as much as I like, learn with pleasure ... Thank you for your support and your incentives and donations with that I can buy more material and follow every day with the tutorials!

Never forget that Power is Wanting and if you want You can ...
You are Light you are Energy, YOU CAN ... That the infinite universe Conspire so that everything always is better ... They are wanted ...
STEP 5: We continue with the previous step in the lower part we must place hot silicon little by little and we will stick 4 more petals to complete until we reach the tip of the leather, this process must be carried out in both sides of our tiara should stay like this in the last image.
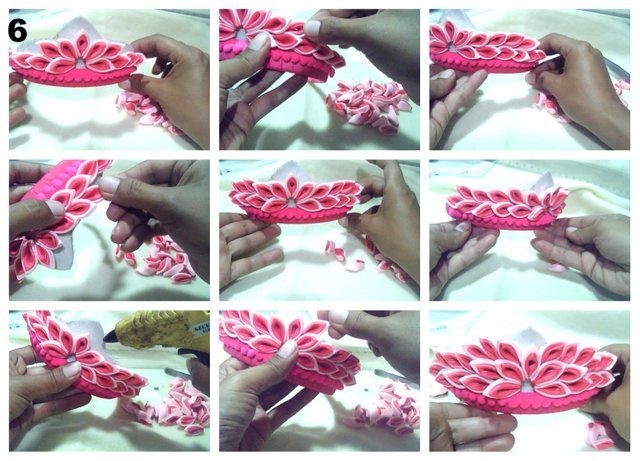
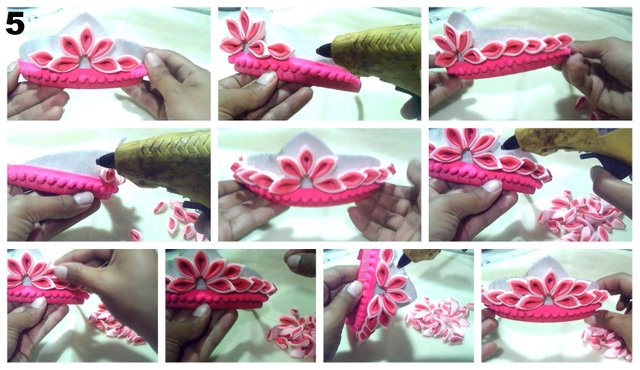
STEP 6: In this step we continue to stick the petals of our crown now we must stick 5 more petals on the top, that is, the second line on each side must See yourself as images 5 and 6 of this sequence. For the third line you should take as a guide the central flower above the second petal, place hot silicon and stick the third line of petals that will be 3 petals you can guide yourself looking at the sequence of images.
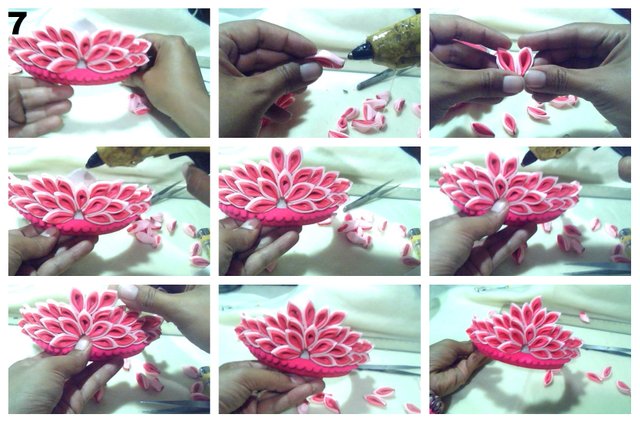
STEP 7: This part excites me our crown is taking shape, for this part take a petal on the tip to put a drop of hot silicon paste another petal, now guiding us from the central flower we should place silicon on the petal of the center of the flower look at image 5, stick the two petals on each side of the newly attached petals will be placed a petal more see image 7, to finish the last petal we will place it right at the tip you should look like this in the last image.
Hello!
This post has been manually curated, resteemed
and gifted with some virtually delicious cake
from the @helpiecake curation team!
Much love to you from all of us at @helpie!
Keep up the great work!
Manually curated by @vibesforlife.
@Helpie is a Community Witness.
For more information about our project,
please visit this month's UPDATE post.
Hi, @marleyn!
You just got a 0.12% upvote from SteemPlus!
To get higher upvotes, earn more SteemPlus Points (SPP). On your Steemit wallet, check your SPP balance and click on "How to earn SPP?" to find out all the ways to earn.
If you're not using SteemPlus yet, please check our last posts in here to see the many ways in which SteemPlus can improve your Steem experience on Steemit and Busy.
Great tutorial and beautiful outcome.
Namaste, JaiChai