The way to Create an exquisite Observational Drawing: eleven recommendations for excessive faculty art students
Observational drawing is an vital factor of many high college artwork publications, along with GCSE/IGCSE and A degree artwork. Often, drawing is the core technique of discovering, investigating, growing and communicating thoughts. While it is established that there are many wondrous styles of drawings – and that non-representational drawing techniques have an essential function in scholar artwork tasks – it is usually high-quality to demonstrate capable, sensible observational drawing competencies to the examiner (specifically within the early stage of a task).
What follows is a list of guidelines that have been written in particular for high school artwork college students who're trying to enhance the realism in their observational drawings. It is for the ones who've already decided on some thing suitable to draw (see this guide for deciding on subject remember if you want help with this) and who recognize how to compose a drawing nicely (this will be included in a subsequent article).
Tip 1: observe what you are drawing
Failing to have a look at what you're drawing is one of the most fundamental mistakes an artwork pupil can make
This sounds obvious, however it is the most commonplace errors made via artwork students. Many students try and draw matters the manner that they assume they should appearance, rather than the manner they truely do look.
The best way to report form, share and detail correctly is to examine the supply of facts. Human memory does now not suffice. Bureaucracy, shadows and details are hard enough to replicate whilst they are right there in front of you; when you have to make them up, they appear even much less convincing. As a way to produce an first-rate observational drawing, you have to observe: your eyes ought to always dance from the piece of paper to the object and back once more. Not simply once or twice, but constantly.
Note: even if you pursue a theme approximately mythical creatures, fairy memories or some different imaginary shape, you have to work as a whole lot as possible from statement. Piece your creatures together from fragments of lifestyles. Get dressed humans up after which draw them or merge exceptional parts of insects or creatures collectively (the usage of artistic license as suitable) as opposed to creating a whole form or scene out of your head.
Tip 2: Draw from real gadgets every time viable
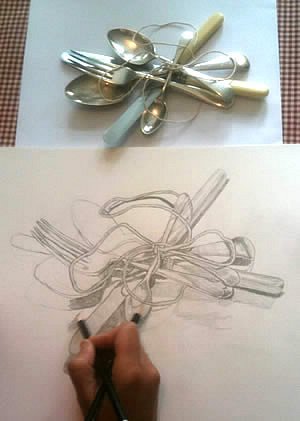
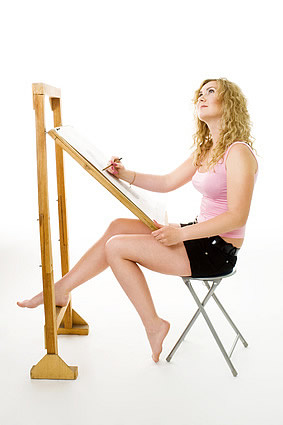
The word ‘observational drawing’ normally implies drawing from life (see the top notch observational drawing exercise set via artist and trainer Julie Douglas). Ask any art trainer and they may listing the advantages of drawing from objects which can be sitting directly in the front of you. You are furnished with a wealth of visible facts…changing light conditions; wealthy textures; views of the challenge from trade angles; in addition to records from different sense…smells and noise from the surroundings etc. Transcribing from three-dimensions to two is in the end a great deal more difficult than drawing from a picture, however it often outcomes in drawings that are ‘richer’ and more actual.
(This doesn’t imply, however, that you must in no way draw from pics. Students frequently traipse from domestic to highschool and lower back once more: it is able to be impractical to hold and installation complex nevertheless life preparations time and again once more. Some topics – including landscapes and nude fashions – also are unavailable in maximum school room settings. It may consequently be proper coaching to set up a still existence arrangement within the flesh (or visit a region) and begin drawing immediately from the concern, the usage of pix to finish the work at home).
Tip 3: Don’t trace
At some stage in records, brilliant realist painters have traced from pictures or worked from projections blown up onto walls. However these painters aren't high school art students; nor are they assessed on their potential to duplicate shape.
There's an area for tracing in IGCSE or A stage artwork (along with when tracing over some thing you have got already drawn or growing a repeat sample), however tracing from snap shots after which honestly applying shade or tone isn't suited. Such methods of ‘drawing’ contain minimal talent, train you little and run the chance of manufacturing clunky, soul-less outlines. Don’t do it.
Tip 4: Understand perspective
As gadgets get similarly away they appear smaller. The replication of this alteration of scale on paper (thru the usage of vanishing points) is known as ‘angle’. The fundamentals of perspective are generally taught in junior high college; by way of year 10 at the cutting-edge. If you are a senior artwork student and have by some means overlooked this lesson, treatment this situation urgently. There are not many theoretical aspects of artwork which might be crucial to study, however that is one among them. Please view the perspective handouts within the pupil artwork guide unfastened teacher assets to get you started out.
Tip 5. Use grids, pointers or tough bureaucracy to get the proportions proper earlier than you upload details
Many students start with a tiny detail (the eye on a face, for example) and then gradually add in the rest of the image…ending up with a drawing that is badly proportioned or doesn’t fit on the page (or floats aimlessly in the middle of it). This can be avoided by approximating the basic forms before adding details or by using guidelines to ensure that proportions are correct.
If working from a photograph, using a grid can result in highly accurate work. It allows students to focus on one small segment of the image at a time and gives arbitrary lines from which distances can be gauged. This can be a helpful strategy when precise, detailed images are required and can itself become a celebrated component in an artwork. As gridding is methodical and involves meticulous plotting of lines, however, it is important to acknowledge that this approach runs the risk of producing tight and regimented drawings that lack in ‘spirit’ and should thus be approached with care.
Many college students start with a tiny element (the attention on a face, as an instance) after which step by step add in the rest of the picture…finishing up with a drawing that is badly proportioned or doesn’t fit on the page (or floats aimlessly in the middle of it). This can be averted with the aid of approximating the primary paperwork earlier than adding information or by way of the use of tips to make sure that proportions are accurate.
If working from a image, the use of a grid can bring about exceptionally correct paintings. It lets in college students to attention on one small section of the photo at a time and offers arbitrary traces from which distances can be gauged. This can be a beneficial approach while precise, designated snap shots are required and can itself emerge as a celebrated element in an artwork. As gridding is methodical and involves meticulous plotting of strains, but, it is essential to well known that this approach runs the threat of producing tight and regimented drawings that lack in ‘spirit’ and need to as a result be approached with care.
If operating from existence, roughly sketching outlines of the most important paperwork will let you get the proportions proper, before you upload the info. Even as you try this, you ought to continuously test which factors line up (i.E. Edge of nostrils lining up with edge of eye) and the scale of each object need to be expected when it comes to the things which can be beside it. You need to get used to seeing matters not in phrases of absolute scale, but in phrases of the way one factor compares to another.
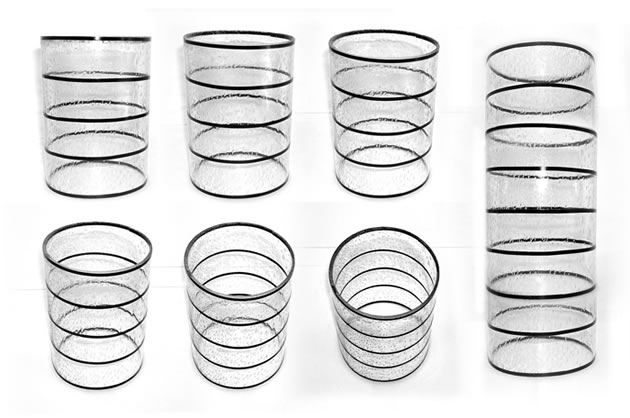
Tip 6: Be cautious of ellipses
Ellipses – the oval shapes that are visible at the top of cylindrical items along with bottles or jars – frequently ‘journey up’ a weak drawer. They are able to ship a right away sign that a pupil isnot looking at what they're drawing. All ellipses, no matter what angle they may be viewed from, have to be rounded (no longer pointed) on the ends, as illustrated in the photo to the left (through Rachel Shirley) and under (sourced from IDsketching).
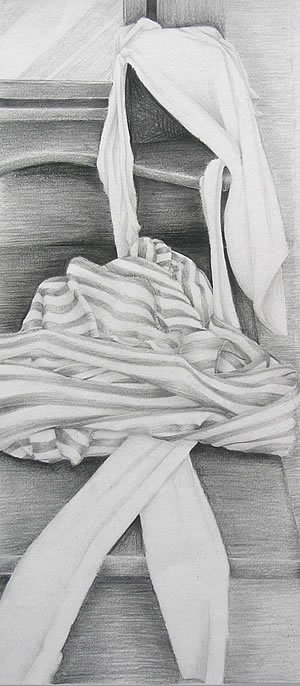
Tip 7: keep the outlines mild
As your drawing is fleshed out in greater element, with attention given to the subtle versions in shape and shape, the natural inclination – specifically of the newbie drawer – is to want to darken within the outlines, to assist make sure they're seen. Do now not try this.
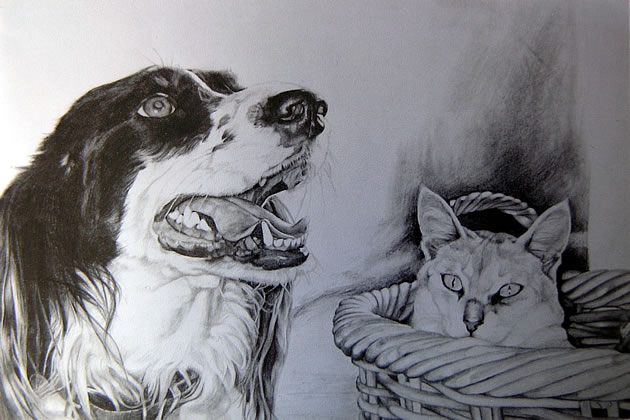
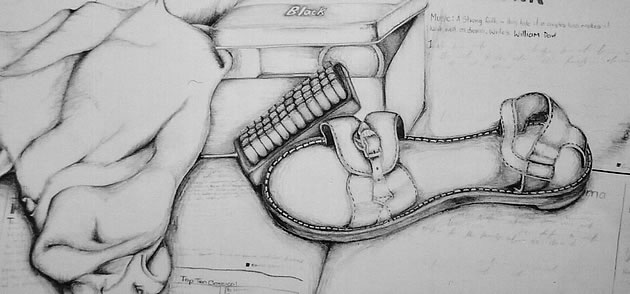
Real items do not have dark traces running round each area. Edges must rather be described by means of a alternate in tone and/or shade, as inside the stunning graphite drawing with the aid of an IGCSE art pupil proven to the left.
In case you are generating a line drawing, a cartoon or a few other photograph image, outlines can be darkened, however in an observational drawing – specifically one which you want to be sensible – darkish outlines are by no means suggested.
Tip 8: Have a good range of Tone
In terms of applying tone in your drawing, as with the whole lot else, take a look at the item. Observe wherein the light and darkish regions are and replica what you notice. In almost all cases, your drawing ought to have a full range of tone, from black, via a multitude of greys (or coloured mid-tones) through to white.
Some students – having learnt how to combo tone easily from dark to mild – expand the unfortunate addiction of randomly shading all surfaces from dark to light. Tone have to by no means be invented and it ought to by no means be applied with the aid of guesswork.
Tip 9: Use mark-making to bring surface fine and texture
When producing an observational drawing, the mark-making used have to help to convey the feel(s) of the difficulty depend. There are a multitude of different methods a pencil can strike paper – hatching / dashes / smudges / dots… assume cautiously earlier than you decide which method to apply.
Tip 10: consist of / pass over detail as necessary
One region where college students frequently come to be disheartened is inside the depiction of enormously complicated subjects. While drawing bushes, flora and trees, it isn't important to copy each leaf or stick. While drawing someone, it isn't always important to depict every strand of hair. The artist is always in a function to pick and select what goes in their artwork. As long as the choice is based on what is aesthetically pleasant for the work (in place of looking to omit something that is difficult to attract…that's regularly the using pressure in the back of students trying to dispose of sure aspects of their image) there may be not anything incorrect with omitting positive info from a drawing. In reality, often the composition is less cluttered and smooth on the eye due to it.
There are many procedures to this. On occasion each unmarried element might be recorded with accuracy. Every now and then a sure place of a drawing is rendered in full, with different elements trailing away.
Tip 11: Insert your very own soul
Maximum of the pointers above are aimed at helping a student create extra realistic observational drawings. This closing tip is something special. It's miles a reminder that now and again it's miles the difference among the actual object and the drawing that subjects.
Even though observational drawings are typically predicted to be sensible in nature, they do not want to be hyper-sensible (in other phrases, they don’t need to appearance precisely like a picture). Often, it's miles the unrealistic parts: the surprising mark-making – the gap among the real object and what is drawn – wherein the soul sneaks in. It is the splendor in smudges and irregularities and creative interpretation. Even an IGCSE or A degree art pupil is an artist. Embrace this!
please remove flag back