PhotoVisions tutorials: How I make panoramic landscapes + example
Good Day Steemians!
Today little more about technical side of creating my PhotoVisions works - making of Panoramic Images manually using Adobe Photoshop and a pack of good tips how to make good material for this kind of technique.
Panoramic images are one of my best technique when shooting landscapes, outdoors. It is powerfull stuff which allows us to show much more than single shot, which can take You inside the scene using good perspective and stitching technique.
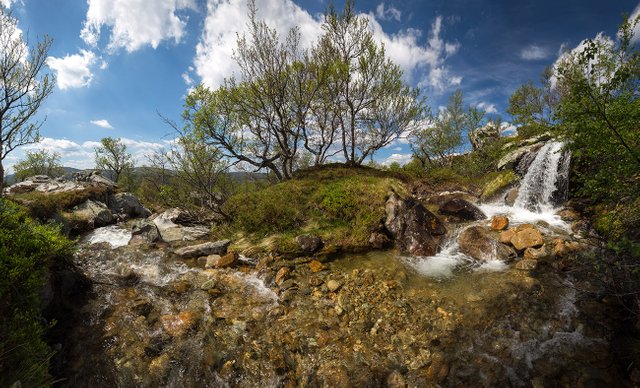
This is an example photo which I will describe later in this post:
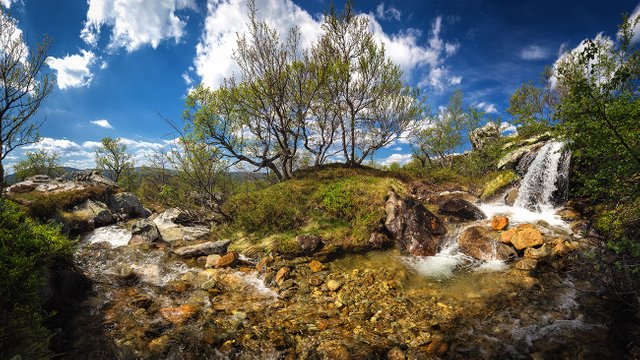
Photo: Panoramic shot taken few days ago in Femundsmarka National Park in Norway.
WHY MANUALLY ?
This is the question which needs to be explained in the beginning. Many of You can say - why to spend so many time and effort to stitch the images manually when Photoshop has built-in tool to do it automatically... Yes, it has something like that, but have You ever tried it on different kind of shots? Probably not if You ask such questions. This tool is working well but only sometimes. Almoast every time it needs some addictional correction of horizon line, of barel distortion, of colours on the sky, of multiplied elements... and many more. I tried to use it and almost every time I wasn't happy with the effect and in final - was doing it manually. Anyway - I love to have control over the process and to work with my photos doing something I have in my mind, not something that will computer do without my decision...
There are also other programs and tools to make panoramic shots, but it is not the subject of the post- If You are using some of them, just write in a comment and we can discuss about them.
MAKING THE GOOD MATERIAL
The most important stage of the whole process is to prepare good shots on place. How to get such thing? Few simple rules which You never should brake!:
- shoot only in full manual mode, never use automatic white balance, shutter speed or aperture setting - all of the setting should be set before start shooting the series for the panorama.
- be sure that You will check the settings on a different places of Your panorama - like on the picture above - left hand side was very bright, because of the position of the sun, right hand side was much darker, because of the shadows and distant form the sun light. Always be sure not to overburn the brightest parts! - You can take out some details from the shadows but You will never get anything from the overburned areas.
- use tripod if possible - using the tripod is not so necessary but will help the work. It will not only stabilize the shots but when You set a good level of the camera, You can be sure that every single frame will have straight horizon.
- Manual focus - this part is something I am not using many times, but in many cases, it destroyed my shots... just imagine the situation when You shoot 8 pictures for the panoramic work, using a little bit open aperture, because of the bad light conditions, and in one frame we have some elements placed much closer than on the others. Auto- focus will probably set the focal point on that elements making the whole background blurred - we wont see this until we start stitching the panorama - 7 shots will be perfectly sharp and this one - will have blurred most part of the frame. It won't look good after placing such frame among others - our whole work will goes to garbage.
So once again - use manual focus...just in case. - Remember to watch out on polarizing filters! In sunny day with open, blue sky - some parts of the sky will be much darker than the other - it will be not only hard to stitch in a good way but also will look horrible. It is not such a problem when we have some clouds covering the blue sky... On the example photo You can see that right side of the sky is much darker than the left side... but in this case it doesn't look bad, because we have some clouds and most of the frame is taken by ground elements. But it is always a thing to remember! If it looks good, You can take a risk and use the polarization filter... if not - simply shoot without it. It is always possible to use some polarization tools in later post processing.
- Practice will make You perfect! - In my whole "photographic life" I made I think much more than a 100 panoramas - I spend many hours sometimes, working on one shot - now it doesnt take so much time for me because I simply know how to prepare good material and how to stitch it in effective way. Just practice and I am sure every next of Your work will be better and better.
EXAMPLE WORK
I am opening all the photos at once using CameraRAW in Photoshop, I mark all the photos and set all the settings to be synchronized. Thanks to that I am sure that every change I make will be the same at all shots.
Using CameraRAW I am doing little correction of shadows and highlights, making them less contrasted, I always rise up the sharpness to 50 and setting "Remove Chromatic Aberration" option. Don't use global Lens Profile Correction option - it will deform the photos and make them hard to stitch.
In Camera RAW You can use other options if necessary, but this is a minimum I am making. Then, You open all the photos at once - it will take some time...
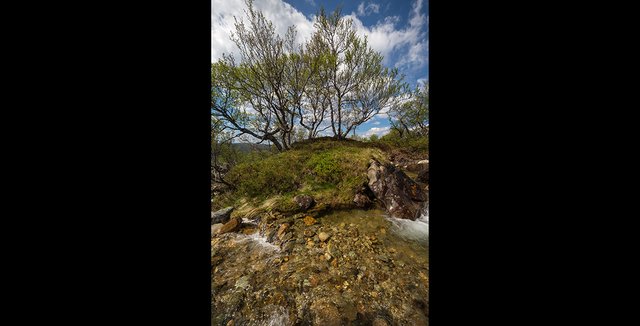
For the presented photo I chose 8 single photos. Before I started I double checked in a preview if they are all sharp and they have similar colours and brightness level. I always start the work by choosing the middle photo - this is my starting point. Than I set up Canvas in a size of expected panorama. I make Canvas only in horizontal directions, because I wont build up the photo in vertical way.
First stage:
The most tricky part is chosing the place where to stich the photo - from my experience, it should be placed ALWAYS near the middle of the next photo. I Copy/Paste the next shots from left side or right side, beginning from the center and going further to the border. One photo at a time. Using Opacity (50%) I make the pasted photo transparent, to find the good stitching point. If there is a visible horizon - it should be always placed in one level, If there are some characteristic points near the middle - use it to center the photo on them. Correct position of the stiched photo will make next step much more easy.
After placing the photo I cut the parts of the photo which don't need, showing the photo below. Than, using Mask layer tool, I put a white mask on the shot and than, using a Brush tool and black paint, I am trying to make an invisible stitching line between the two shots. Always try to use natural lines to hide the stitching line - like a dark parts of the trees, dark areas of the rocks, surfaces like clouds or a water are always simple to use as well.
And for the information - If You never used Photoshop, work on layers, masks - You will not probably understand this technicque. It is all about making the layers from the shots and hiding the parts of them - creating one, big, good looking picture.
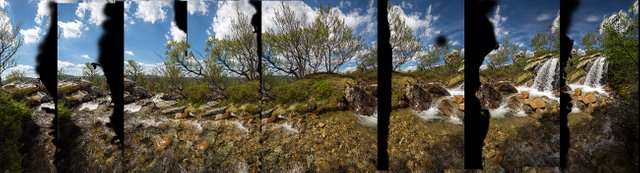
Below is my example photo with separate shots, already cutted and masked" - I spread the shots to show You how they look like...
And here - final work, before framing and further processing:
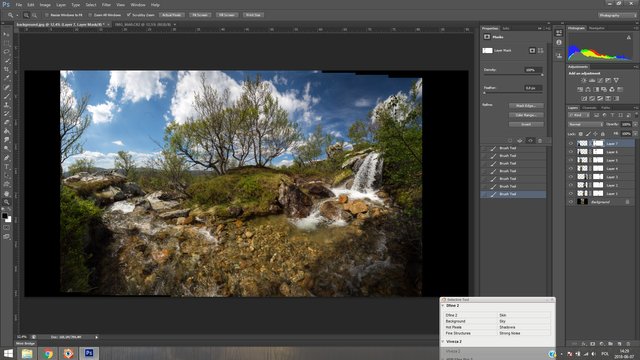
On the right side You can see 7 different layers and 8th which is the middle, starting photo as a background.
NEXT STAGE
Is to crop the image. Using Tranform tool, correct some distortions if necessary. Flat the image to one layer. Remove the dust and later - Your standard post processing activities ;)...
Final Panorama before processing:
And after:
To post processing Your images I recommend a set of great Tools and Filters called NIK Collection. It is working as a plugin to Photoshop but of course , working the same way in Adobe Elements. It was free tool some time ago, I am not sure how it is now.
Thanks for watching guys! If You have some thoughts or opinions about this post - as always write in a comment or join my Discord channel: https://discord.gg/ApdDcNh
If You are interested in more of my Tutorials You can check the links below:
Aurora shooting part 1: https://steemit.com/photography/@photovisions/how-to-shoot-aurora-borealis-part-1-the-gear
Aurora shooting part 2: https://steemit.com/photography/@photovisions/how-to-shoot-aurora-borealis-part-2-the-settings
Macro shooting part1: https://steemit.com/photofeed/@photovisions/my-photovisions-23-my-macro-worlds-vol-1
Macro shooting part2: https://steemit.com/photofeed/@photovisions/my-photovisions-24-my-macro-worlds-vol-2-some-tips-and-gallery
<><><><><><><><><><><><><>
If You like my work, check my portfolio site asphotovisions
More information About Me
Any questions or opinions - write a comment. Great thanks for supporting my work!
Thanks for watching and have a great day!
Upvoting, Resteeming and Following are the best way to show the authors that You like their work, it supports them not only finacially but what more important gives a huuuge amount of positive energy to create more interesting posts and work on future projects!
wow great guide @photovisions, ill give it a try at some point.
Get your post resteemed to 72,000 followers. Go here https://steemit.com/@a-a-a
Thank you! Upvote!
My pleasure! Thanks!
Very good post and very helpful brother, congratulations and good luck !!!
Triple thanks @sawyn !
Thank you for your tutorials! So many new things learnt!
I am happy You liked it!
You have been scouted by @promo-mentors. We are a community of new and veteran Steemians and we are always on the look out for promising authors.
I would like to invite you to our discord group https://discord.gg/vDPAFqb.
When you are there send me a message if you get lost! (My Discord name is the same as here on Steemit)
Thanks for invitation for the group and for the support!
Congratulations @photovisions! You have completed some achievement on Steemit and have been rewarded with new badge(s) :
Click on the badge to view your Board of Honor.
If you no longer want to receive notifications, reply to this comment with the word
STOPTo support your work, I also upvoted your post!
very usefull
It is the basic rule, I am glad You read the post :) Thanks!