Step by step instructions to make your exhausting iPhone photographs Instagram-commendable
I am in no way, shape or form an expert picture taker. I do have a DSLR, however I disregard it very regularly and don't try to take it with me. Fortunately, telephone cameras have progressed significantly. With the expansion of picture mode and double focal points, iPhones are equipped for delivering some quite staggering pictures — even ones that could be mixed up for being gone up against a more costly camera. Be that as it may, a camera is just as successful as the individual utilizing it. Regardless of whether you're utilizing a $2,000 DSLR, or an iPhone that you can fit in your pocket, you have to know how to utilize it to get the best outcomes.
Here's how to make your boring phone shots more Instagram-worthy with just a few clever edits:
Step 1: Framing, grid, and rule of thirds
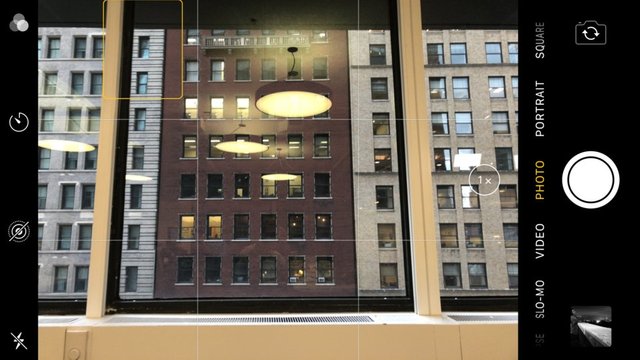
Before you can take a photo of anything, you have to get it in the casing. From that point forward, it's basically up to you where you need to outline your subject — however there are a couple of principles that can help with your arrangement in case you don't know where to begin.
The "manage of thirds" is a well known technique for creation in photography, and your iPhone has devices fabricated right in that will enable you to accomplish it. Essentially, following the manage of thirds implies envisioning the picture split into nine a balance of, with a framework of three level and three vertical lines partitioning the picture. You need to keep your subject, or other essential components, in one of the "thirds" of the picture, near where the lines cross, as found in the framework above.
To get the grids on your camera, go to Settings > Camera > Grid, and turn it on.
You in no way, shape or form need to take after this manage, yet it unquestionably makes some satisfying pictures if utilized accurately.
Step 2: Setting your introduction
You likely realize that tapping on the screen while in the camera will center around the region you're tapping on. In any case, it additionally coordinates the presentation to whatever you're tapping on too.
To test this out, point your telephone at a window where a great deal of light is coming in. On the off chance that you tap on the window, everything outside will end up unmistakable, yet everything inside will get quite dim. In the event that you tap on something outside of the edge of the window, the light getting through the window will get extinguished, while everything in the room is obvious.
On the off chance that you need somewhat more control over this, you can tap and drag your finger up or down subsequent to tapping. Dragging down will set the presentation lower, as should be obvious above, and dragging up will bring the introduction higher.
On the off chance that you need to bolt your presentation and center to a particular question, hold your finger down on that protest for a couple of moments until the point that you see "AE/AF Bolt" show up at the highest point of the screen. Presently you can point the camera anyplace you need, and the concentration and presentation settings from what you tapped on will be spared.
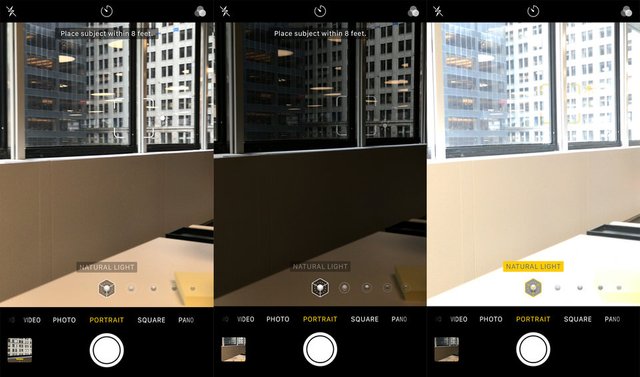
Step 3: Taking your photograph; utilize representation mode, in the event that you have it

The representation mode, paying little mind to its name, isn't just to take pictures of individuals. It's extremely valuable for getting up near your subject and obscuring out everything out of sight. This is an impact known as "bokeh," or profundity of field, and it's a simple method to make your photographs look significantly crisper and more expert.
For best outcomes, draw near to your subject. This will make greatest obscure out of sight (if that is the thing that you need), and your subject will be decent and centered.
Also, on the off chance that you have companions to take photos of, this is an awesome method to influence them to resemble an Instagram display without doing much work.
Step 4: Picking an altering application
In this way, you've taken your photograph, you've surrounded it legitimately, and the presentation is perfect. In any case, you're not done yet — now it's a great opportunity to alter.
There are huge amounts of free altering applications you can utilize, however I basically stick to two: Adobe Lightroom (on work area and versatile), and VSCO. Adobe offers free Lightroom preliminaries, however you'll require an Inventive Cloud membership for broadened utilize. VSCO is free and has some free channels, yet extra channels can be obtained.
I lean toward Lightroom and I'll walk you through the nuts and bolts of altering in that application, despite the fact that the ideas are all inclusive and can be utilized anyplace.
Step 5: Trimming your photograph
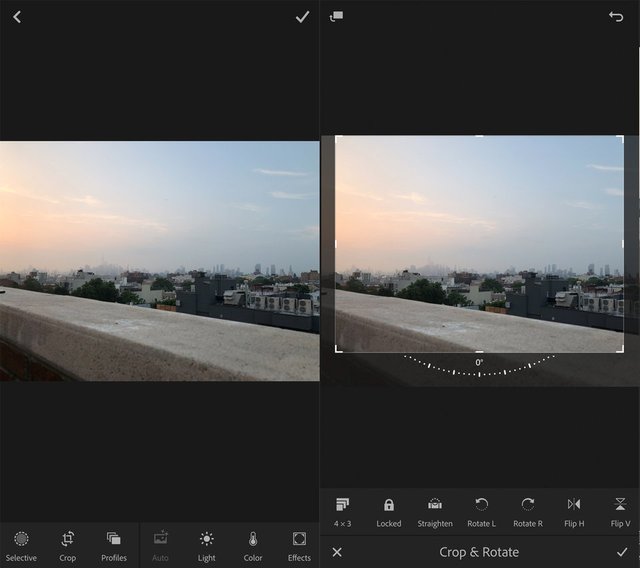
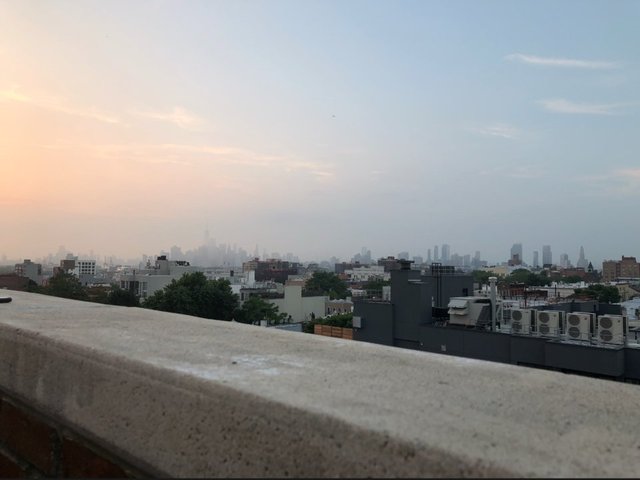
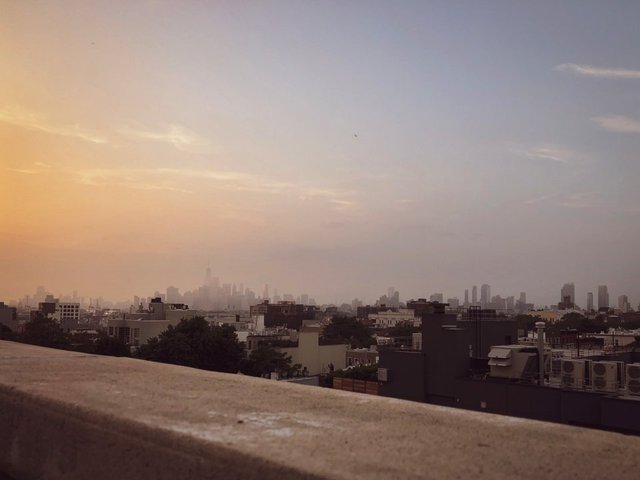
I took this photograph on the top of my flat, and my initial step was to edit it a little since I needed less of the overhang in the edge. On the off chance that you have to fix your photograph by any stretch of the imagination, you can do it with the editing instrument too. Lightroom even has an auto-rectify highlight that will do all the work for you.
Step 6: Altering the presentation, features, and shadows
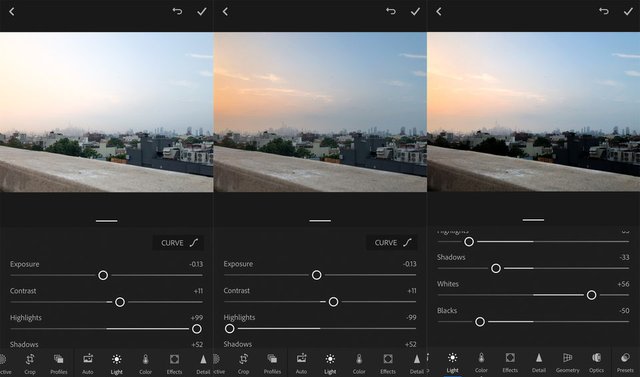
Next, it's a great opportunity to deal with your light settings. On the first above picture, I just marginally turned the presentation down, since the telephone's camera got it beautiful spot-on in any case. At that point, for impact, I turned the features as far as possible up.
As should be obvious, the "light" parts of the picture have turned out to be washed out as you turn the features up. In the event that the features are extinguished in your picture, you can take a stab at turning the features down to make them more obvious. Similar works with shadows, the dim parts of your picture. You can turn them up or down to make them pretty much unmistakable.
I wound up turning the features down really far to demonstrate the impacts of the nightfall in the sky, at that point balanced the shadows, blacks, and whites to my inclination. The third picture is the last result of these progressions.
Step 7: Filters
Presently for the fun part: channels.
Try not to give anybody a chance to ridicule you for utilizing channels — they make exhausting pictures in a split second not exhausting any longer. Channels are not only for wannabe-picture takers on Instagram, and each photographic artist has a tendency to alter their pictures to some degree.
What you shouldn't do, be that as it may, is simply slap a channel on your picture and retire until tomorrow. Make a point to look through the greater part of the settings and modify them in the wake of applying the channel. I did that procedure in reverse here — by and large I would apply the channel and make modifications from that point onward, however it worked out alright.
I picked the "warm shadows" channel in Lightroom to give the photograph a hotter look, since it was taken at nightfall. Apple has some alright channels, best case scenario, and Instagram has some OK ones incorporated with the application. Play around with them and choose what you like best.
Step 8: White adjust and clamor diminishment
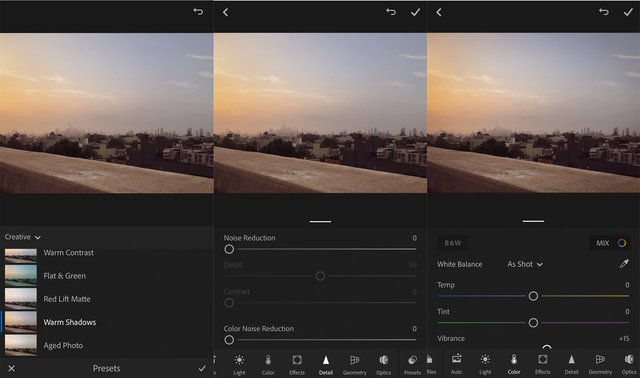
I didn't wind up using these impacts for my picture, however it's great to know how.
Commotion diminishment can be utilized when your photograph is incredibly grainy, which for the most part happens when you take a photo in a low-light circumstance. Be cautious with this slider, on the grounds that in the event that you slide it too far you will lose a huge amount of detail in your picture. Utilize slight, exact alters until the point that the grain is no more.
White adjust can either be utilized for aesthetic impact or to amend the picture. Especially with terrible lighting, genuine "whites" in the picture can appear as an alternate shading — once in a while a grayish or yellow. Utilizing the "programmed" white adjust will endeavor to settle this, or you can roll out the improvements yourself.
Case time: Transforming drilling photographs into affected photographs
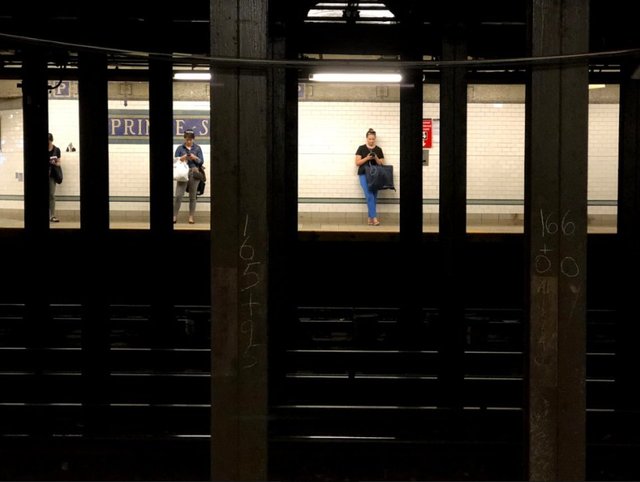
Here's a photograph I took while sitting tight for the metro. As should be obvious, it's exceptionally exhausting. I wouldn't be gotten dead posting this photograph on Instagram, however after a couple of alters it will look great to go.
For this picture, I'll be utilizing the free VSCO application — the procedure is essentially the same as in Lightroom.
The procedure

I began by including a high contrast channel, which is the initial step of making a drilling photograph into a cool and gaudy one.
I needed the tram pillars to be dull and vague, so I turned the introduction down, turned the shadows down, and afterward balanced the features and whites somewhat to influence the subjects to emerge. At that point, I turned up the difference to make the qualification amongst light and dim significantly more grounded.
At last, I edited the picture to remove the superfluous dead space in the picture and to center around the subjects.
The last item
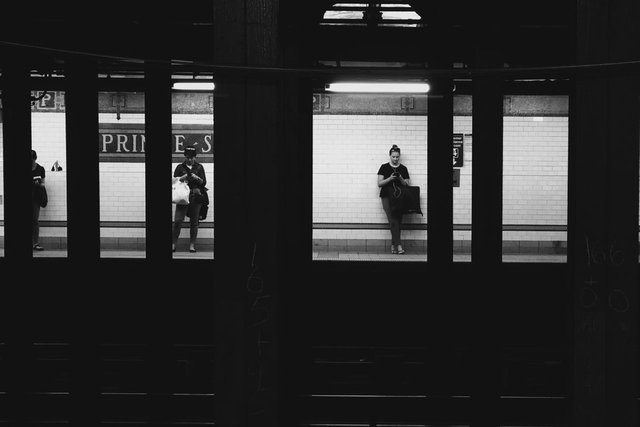
What's more, there you have it — it's unquestionably not my best work, but rather its vastly improved than the exhausting picture I began with. Presently it's prepared to be presented on my Instagram page for online clout.