Tips and Tricks on Capturing That Amazing Long Exposure Photo!
Imagining those stunning silky seascape and soft clouds photographs? Those are captured through a long exposure shot. This shot is typically made using a long-duration shutter speed. Having the shutter open at longer duration allows you to capture any motion within that time frame. These will appear as a blurry effect, thus the impression of motion and dreamy mood effect to the photo.
This is a great but simple technique that can up your photography game. I'll be sharing some tips that can help you achieve technique in a fun way.

Manual exposure, 20secs, f11, ISO 200
Location and Timing
The first step in capturing great long exposure shots is choosing the right location.
Remember that long exposures are ideal for representing movement in your photo. So whatever location you choose, always make sure to have motion within the shot. Majority of the long exposure shots have water because there will almost always be movement with water.
The best time to capture long exposure shots are during sunrise, sunset, blue hour and golden hour. The lighting on these time of day allows you to open up your shutter speed long enough without overexposing the shot. Also, did I mention that almost everything captured in these times looks beautiful? So plan and scout your location ahead of time and arrive there early so you can have enough time to setup your gear.

15secs, f8, ISO 200
Things You Need (Aside from a camera)
- Tripod - A good and sturdy tripod will allow your camera to remain still throughout the full capturing process. So it's important choose a good quality one. Also make sure that your camera is properly mounted before you start shooting.
Quick tip: A lot of tripods has a hook in the center. Make sure to weigh it down with something heavy like your backpack.
- Neutral Density(ND) Filter - ND filter is a dark piece of glass and is typically attach to the camera lens. This reduces the amount of light that pass through the camera thus, allowing you to use longer shutter speed even in the brightest time of the day. I normally use a 10-stop ND filter when shooting in a mid day setting. This allows me to use shutter speeds up to 30 seconds at least without overexposing my image.
10secs, f13, ISO 200
Quick tip: Focus on your framing and subject first before adding the ND filter. Filters can be really dark and make your focusing difficult once you have it in place.
- Remote shutter - Pressing the camera shutter can instantly cause blur to your photo. Using a remote shutter allows you to take the photo without touching the camera itself. This is totally not necessary as you can always set a timer (at least 2 seconds) in your camera before it starts to take a shot.

30secs, f8, ISO 200, 10-stop ND Filter
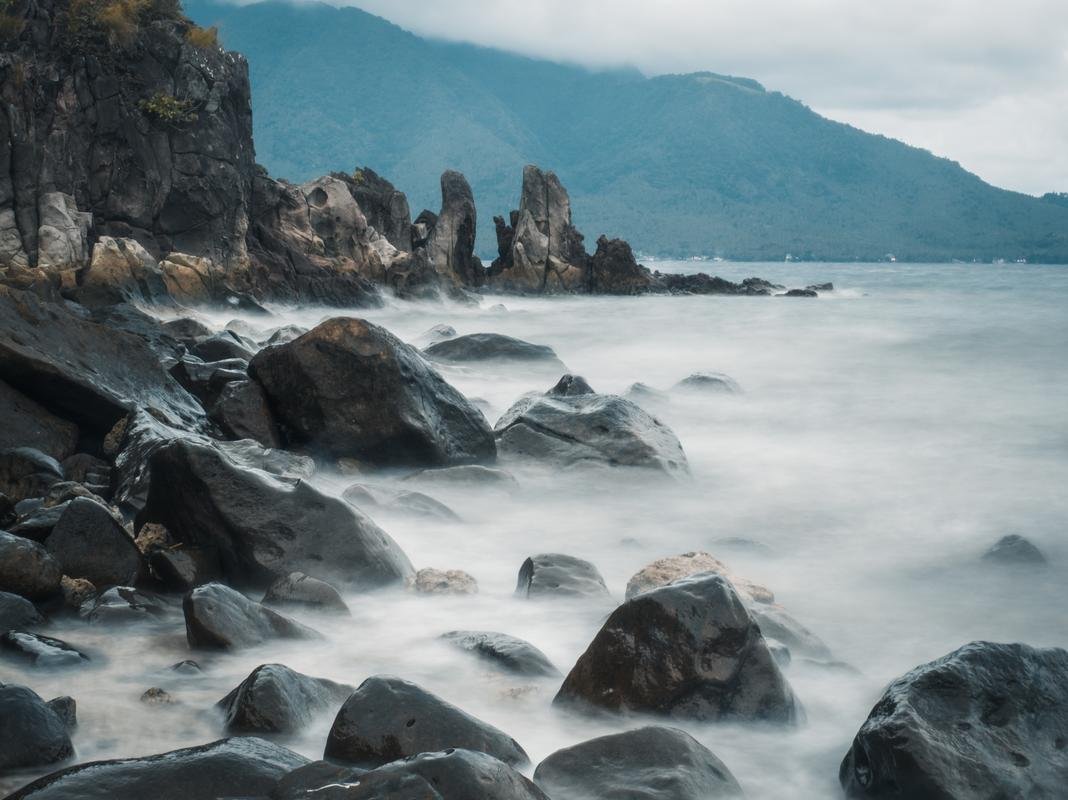
Composition
The success of your photo will highly depend on this main factor: Composition. Take time to visualize the shot because what you see with your eyes usually turns out different from what you'll capture on your camera.
As per any good landscape photos, they are usually consist of a foreground, middle and background.
Foreground will help draw the viewer's eye into the shot. Rocks, boulders and boats are some of the good foreground objects. Middle is usually where your subject is or it is the subject itself. And the background can contain streaking clouds, stars or the sun. Dividing your composition like this will add depth and interest to your photo.

15secs, f11, ISO 200
Quick Tip: The rule of thirds can always be applied to balance the foreground, water and the sky in your composition.
Recommended Camera Settings
First is to have your camera in full manual exposure mode.
- Shutter Speed will mostly depend on the lighting available and also on your ND filter if you are using one. It is also dependent on the subject itself. A bigger wave will just need a faster shutter than a calm one. Try starting out using 10-15 secs. It will require a bit of experimentation so be prepared and don't be afraid to try a range of shutter speed.
- ISO will be needed to be as low as possible to avoid noise. Also, having a low ISO will allow you to have longer shutter time. I would recommend starting at ISO 100-400 range.
- Aperture will also be needed to be step down as well. Remember for aperture, less is better. Having the aperture at its smallest will introduce lens diffraction and in turn make your image progressively less sharp. I recommend shooting within the f8-f11 range and or something closer to your lens's sweet spot.

60secs, f16, ISO 200, 10-stop ND Filter
Post-Processing
There will always be different opinions about post-processing your photos. But that is for a different topic. What you need to make sure is not to leave the photo having a blue or green tint specially when using ND filters. You can easily fix this by shooting raw and adjusting the Temperature and Tint slider in Adobe Lightroom. Cropping can also be made on post.
Once I have my Sony Alpha A7R iii I shall return to your post and swallow these tips WHOLE. Hopefully we'll see another bull run shortly, from which I shall gather the necessary resources for my oh-so desired camera which I have lusted for for oh-so many years (10 to be exact.)
Ohhhh man. That is a powerful camera!(and damn expensive too). Can't wait for the bullrun indeed! Profit taking time.
@ajcordenete, thank you. Your post is very educative. It is amazing.
You have hit on a few of the sort of tips that are usually missed in these kinds of post :
That's great to see. Your images are brilliant and that's a well written article. Keep it up, would love to see more from you.
Thank you for pointing that out! There are still a lot of areas to improve on. But thank you again for noticing the strong points! Cheers!
Congratulations @ajcordenete, this post is the third most rewarded post (based on pending payouts) in the last 12 hours written by a Dust account holder (accounts that hold between 0 and 0.01 Mega Vests). The total number of posts by Dust account holders during this period was 16870 and the total pending payments to posts in this category was $4333.66. To see the full list of highest paid posts across all accounts categories, click here.
If you do not wish to receive these messages in future, please reply stop to this comment.
thanks for this post! gonna try to take some photos today! :)
Awesome! I'm looking forward to what you can capture today!
Oh man!! loving it! thanks for the tips, very useful!
Thank you! Glad that I can offer something to the community.
Good tips! Thanks!
Thank you!
Very nice Photo
Thanks for Sharing.
Regards from Berlin
Thank youuuu!
This is a valuable guide for those learning photography. Once all the technical aspects are covered, the composition definitely needs to shine. You've nailed it with all these examples!
Indeed. Composition is king. Thank you!
amazing!
I am a photographer too!
my account is @jumartphoto~
Nice to read!