#STEEMGIGS: (how-to) — How to deal with images in Steemit
Hello Steemians!
In this post I will show you some details related to the images in steemit. Previously we had already talked about the cover image in particular. Now we will refer to the images within the body of our post.
Image reuse
First, there is a popular belief that they directly affect our bandwidth, although this is not the case since they do not actually reside inside the blockchain, but on a separate server. The only thing that is stored in the blockchain is its address. Even so, it is good practice not to exceed when uploading images to steemit and whenever you want to re-use an image, the ideal is to use the link of your location and not load it again.
Let's see how to do it:
We will right click on the image we want to reuse and choose the option copy image location.
We can simply paste the link if it has an extension png, jpg, bmp or any other image extension, on the other hand if we have an address like this:
https://steemit-production-imageproxy-thumbnail.s3.amazonaws.com/U5du7Ui8JeifftfhknQ9daBV163aLJ5_1680x8400
it is necessary to add ![]().
- Paste the address copied between the parentheses. For example for the previous case would be as follows:

By doing that the image will be shown in our post in the following way:

That's all, for those with Internet problems this technique will even help them save a few megabytes.
Positioning images
When using images we can use the same positioning techniques as with the text. We will make some examples with a small image to make the changes more noticeable. The images are aligned by default to the left, so placing them immediately will appear that way.
 positions the image as follows:
To center it, it is necessary to add <center> and </center> to the sides. For example when writing:
<center></center>
This is the result:
To place an image on the side of the text we can use:
<div class="pull-left">
line break

linea break
</div>
This text will be on the right side of the image.
Note that when you finish the text that you will leave on the side you must add a separator. You can do it by entering -------------------- after having taken a previous line break. To leave the image on the right we just have to change the left to right , it would look like this:
<div class="pull-right">
line break

line break
</div>
This text will be on the right side of the image.
line break
----------------------------
This is the result:
This text is on the left side of the image. Again the text must be of a length according to the image.
An alternative to this is to use tables, using tables we can divide the space. The number of columns defined by a table is given by the amount of |, one is used to open and close, For example to divide into two columns we would use the following format:
|||
| --- | --- |
| | Our text or another image |
Which results in:
| Our text or another image |
One more example with 4 columns:
|||||
| --- | --- | --- | --- |
| Image or text 1 | Image or text 2 | Image or text 3 | Image or text 4 |
With what we achieve this:
Image size
When we load an image in Steemit it usually has the following appearance in the editor:
! [MOSQUETEROS_MINI.png] (https://steemitimages.com/DQmaMpkj4pEYSdsSjMg8fc3JYH6z6V8mHq5rcJv3yZYFxvX/MOSQUETEROS_MINI.png)
And in our browser it looks like this:

To change the size of the image regularly we should use some editor to achieve it. Although editing the image is recommended, there is a small trick to reduce the size of our images. To do this we must precede https://steemitimages.com/800x800/ to the address of our image. For the previous example it would look like this:

To reduce the size of the image you can change the 800x800. Changing any of the figures the image will be dimensioned so that maintaining its proportion occupies at most the indicated figure, for example if we change to:

The image looks like this:

If you are using busy.org it is likely that you do not notice any difference and that is because the trick only serves for images that are displayed on steemit.com.
Another alternative is to use a web resizing service, for example:
On that page they only need to upload their image, this can be done by dragging it to the inside of the page.

Automatically you will get the resize options.
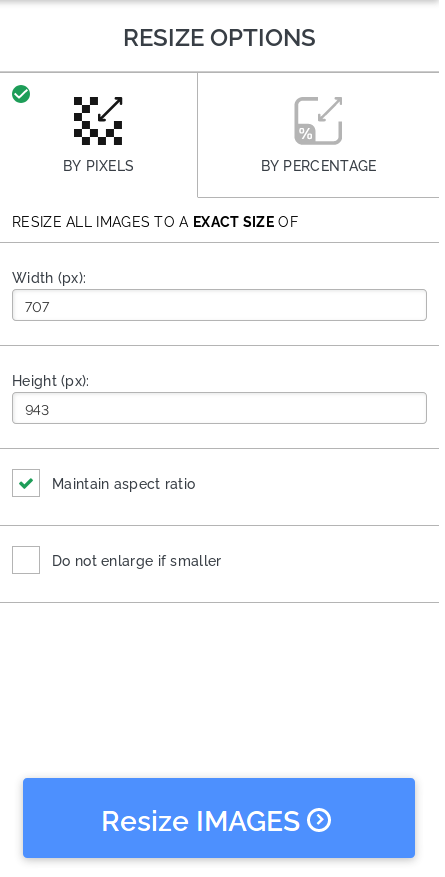
When you click Resize images it will take you to a page where you can download them with the dimensions that you have specified.

IMAGE LINKS
This is quite useful when we refer to others of our post, or in the signatures of our comments. The central idea is that those people who click on our images are redirected to another website. To achieve this we use the following syntax:

The link refers to where they are going to redirect the person who clicks on the image. Well steemians, we will take advantage of this last example to say goodbye. By clicking on the next image you will be redirected to our group in Discord.

As always we hope that our tips and tips will lead you to enrich your blogs.
Woah, thank you for contributing specialized knowledge and for using https://steemgigs.org/surpassing-google
Real thanks
Thank you very much. You have a great project.
This could help us create an organize and more attractive articles..thank you for sharing @mosqueteros
Good topic for us dear
Thanks for sharing. After readinf, i think i dont have problems with that again. Keep posting
thank you for good info..
all the best
Wow great! thanks for the info it really helps a lot.
Wow! you made my life easy. This is my struggle on how to set the size of the image. Thnx for sharing!
Your tips are very helpful. I will have to loop back around to resteem for the newbies in our community. You wrote it simple enough for us all to understand. Thanks!