What I Learned - CISCO Networking : Creating a Simple Network with Standard ACL Filtering (Step-by-Step Method)
Voila Steemians!
It's me again, Justin.
I'm back on track. I've been very busy lately from my studies, self - projects, arts and studies and studies. Hahahaha. But I never missed to be online for the platform. I keep on reading lots of blog posts and do comments and stuffs.
Right now, I'll be posting on what I learned during my computer networking class. We were given an activity last meeting about our recent topic "Access Control List" - to create a network with Standard ACL.
OVERVIEW
Before I start with the simulation part, let us first discuss on what does Access Control List do.
What is ACL?
Cisco provides basic traffic filtering capabilities with access control lists (also referred to as access lists). Access lists can be configured for all routed network protocols (IP, AppleTalk, and so on) to filter the packets of those protocols as the packets pass through a router.
You can configure access lists at your router to control access to a network: access lists can prevent certain traffic from entering or exiting a network.
What Access Lists Do
Access lists filter network traffic by controlling whether routed packets are forwarded or blocked at the router's interfaces. Your router examines each packet to determine whether to forward or drop the packet, on the basis of the criteria you specified within the access lists.
Access list criteria could be the source address of the traffic, the destination address of the traffic, the upper-layer protocol, or other information. Note that sophisticated users can sometimes successfully evade or fool basic access lists because no authentication is required.
Why You Should Configure Access Lists
There are many reasons to configure access lists; for example, you can use access lists to restrict contents of routing updates or to provide traffic flow control. One of the most important reasons to configure access lists is to provide security for your network, which is the focus of this chapter.
You should use access lists to provide a basic level of security for accessing your network. If you do not configure access lists on your router, all packets passing through the router could be allowed onto all parts of your network.
When to Configure Access Lists
Access lists should be used in "firewall" routers, which are often positioned between your internal network and an external network such as the Internet. You can also use access lists on a router positioned between two parts of your network, to control traffic entering or exiting a specific part of your internal network.
To provide the security benefits of access lists, you should at a minimum configure access lists on border routers—routers situated at the edges of your networks. This provides a basic buffer from the outside network, or from a less controlled area of your own network into a more sensitive area of your network.
On these routers, you should configure access lists for each network protocol configured on the router interfaces. You can configure access lists so that inbound traffic or outbound traffic or both are filtered on an interface.
Access lists must be defined on a per-protocol basis. In other words, you should define access lists for every protocol enabled on an interface if you want to control traffic flow for that protocol.
Standard or Extended ACL
All access lists are either standard or extended access lists. If you only intend to filter on a source address, the simpler standard access list is sufficient. For filtering on anything other than a source address, an extended access list is necessary.
Named access lists are specified as standard or extended based on the keyword standard or extended in the ip access-list command syntax.
Numbered access lists are specified as standard or extended based on their number in the access-list command syntax. Standard IP access lists are numbered 1 to 99 or 1300 to 1999; extended IP access lists are numbered 100 to 199 or 2000 to 2699. The range of standard IP access lists was initially only 1 to 99, and was subsequently expanded with the range 1300 to 1999 (the intervening numbers were assigned to other protocols). The extended access list range was similarly expanded.
Standard Access Lists
Standard IP access lists test only source addresses of packets (except for two exceptions). Because standard access lists test source addresses, they are very efficient at blocking traffic close to a destination. There are two exceptions when the address in a standard access list is not a source address:
- On outbound VTY access lists, when someone is trying to telnet, the address in the access list entry is used as a destination address rather than a source address.
- When filtering routes, you are filtering the network being advertised to you rather than a source address.
Extended Access Lists
Extended access lists are good for blocking traffic anywhere. Extended access lists test source and destination addresses and other IP packet data, such as protocols, TCP or UDP port numbers, type of service (ToS), precedence, TCP flags, and IP options. Extended access lists can also provide capabilities that standard access lists cannot, such as the following:
- Filtering IP Options
- Filtering TCP flags
- Filtering noninitial fragments of packets
- Time-based entries
Simulation
Now, let's start for the simulation of ACL:
We are given with this network and scenario:
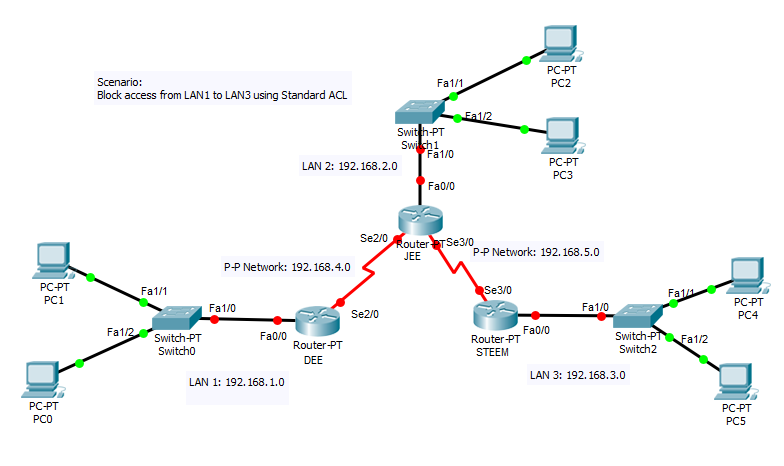
1.We must complete first the Addressing Table.
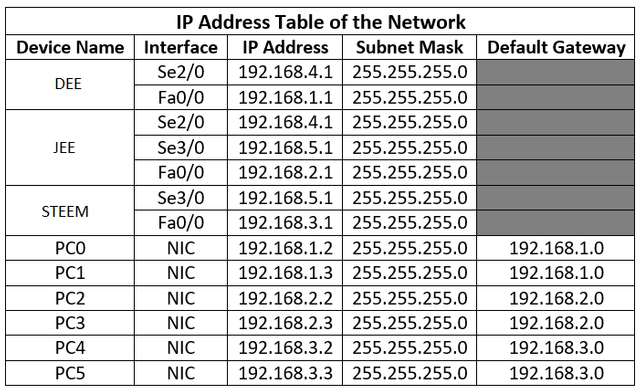
We will be using simple IP Addressing for easy implementation of the network. 😉
2.Apply the IP addresses to the Serial and FastEthernet interfaces according to the Addressing Table and activate the physical interfaces. For serial DCE interfaces, make sure to set the clockrate to 128000.

DEE > en
DEE# config terminal
DEE(config)# int se2/0
DEE(config - if)# ip address 192.168.4.1 255.255.255.0
DEE(config - if)# no shutdown
DEE(config - if)# clockrate 128000
DEE(config - if)# ex
DEE(config)# int fa0/0
DEE(config - if)# ip address 192.168.1.1 255.255.255.0
DEE(config - if)# no shutdown
DEE(config - if)# ex
Do the same on other routers according to the Addressing Table.
3.Assign IP addresses and default gateways to the PCs according to the Addressing Table.
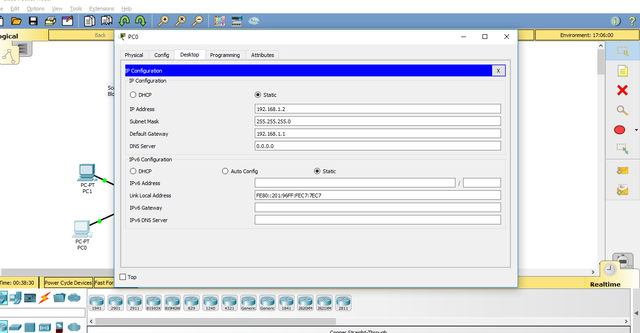
Double-click on the PC.
A pop-up window will appear, locate and click on the Desktop Tab.
Click on the IP Configuration icon.
Apply the IP Address and Default Gateway.
4.Advertise network to other network. We will be using RIP routing for each routers. Then, configure default static route on the routers.
DEE Configuration
DEE(config)# router rip
DEE(config - router)# network 192.168.1.0
DEE(config - router)# network 192.168.4.0
DEE(config)# ip route 0.0.0.0 0.0.0.0 se2/0
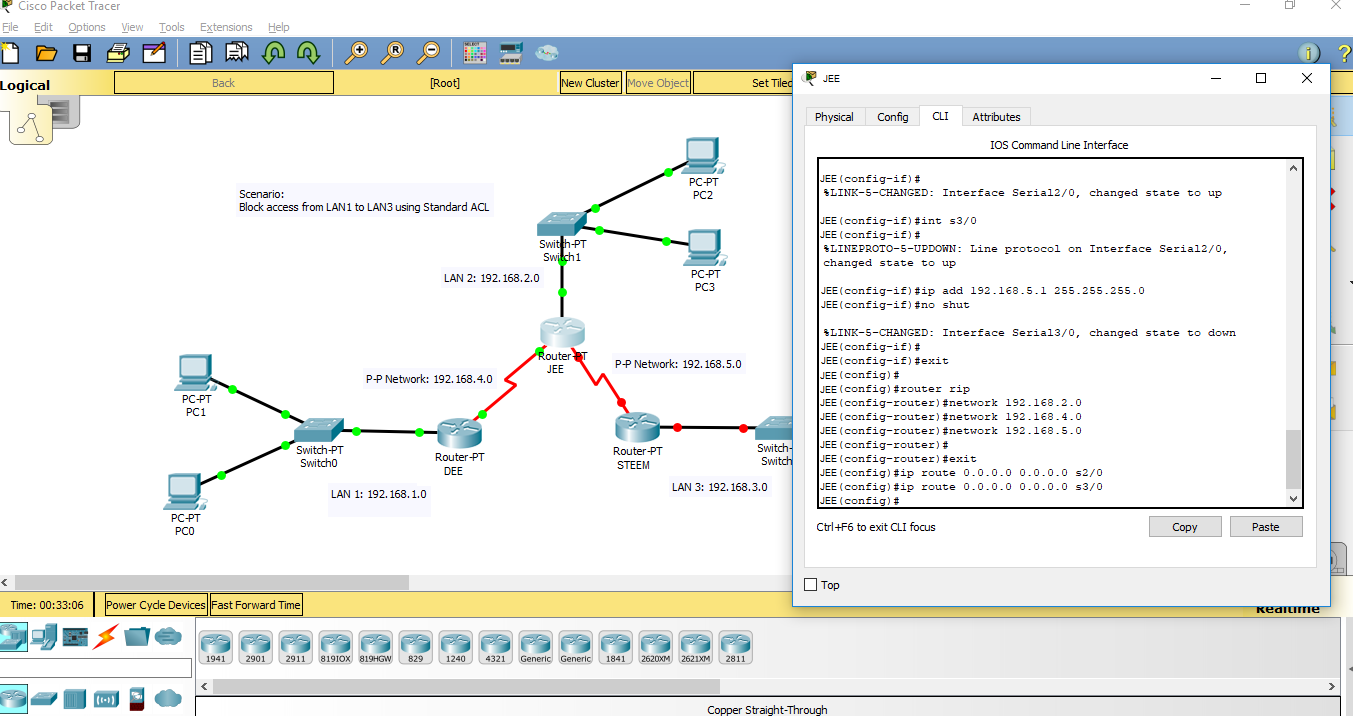
JEE Configuration
JEE(config)# router rip
JEE(config - router)# network 192.168.2.0
JEE(config - router)# network 192.168.4.0
JEE(config - router)# network 192.168.5.0
JEE(config)# ip route 0.0.0.0 0.0.0.0 se2/0
JEE(config)# ip route 0.0.0.0 0.0.0.0 se3/0
STEEM Configuration
STEEM(config)# router rip
STEEM(config - router)# network 192.168.3.0
STEEM(config - router)# network 192.168.5.0
STEEM(config)# ip route 0.0.0.0 0.0.0.0 se3/0
5.Test the connectivity between networks by pinging PC to PC.
Double-click on the PC.
A pop-up window will appear, locate and click on the Desktop Tab.
Click on the Command Prompt icon.
Type (the ip address to ping is based on what you wanted to test).
            C:\ ping 192.168.3.3
Make sure that the pinging is successful, if not, do troubleshoot the network. You might have missed something.
6.Apply Standard ACL based on the scenario. The scenario says, "Block access from LAN1 to LAN3". In standard ACL, it should be configured on the router which is near to the destination network/host where it is denied. So, our standard ACL should be configured on STEEM.

STEEM(config)# access-list 14 deny 192.168.1.0 0.0.0.255
STEEM(config)# access-list 14 permit any
STEEM(config)# int se3/0
STEEM(config - if)# ip access-group 14 in
STEEM(config - if)# ex
STEEM(config)# int fa0/0
STEEM(config - if)# ip access-group 14 out
Note: Standard ACL number list ranges from 1 - 99, you can choose to any number within the range. Don't forget to put permit statement if you start with deny statement for the router has implicit deny capabilities which blocks all incoming access of the network. Also, an inbound and outbound interface ACL strengthens standard ACL filtering.
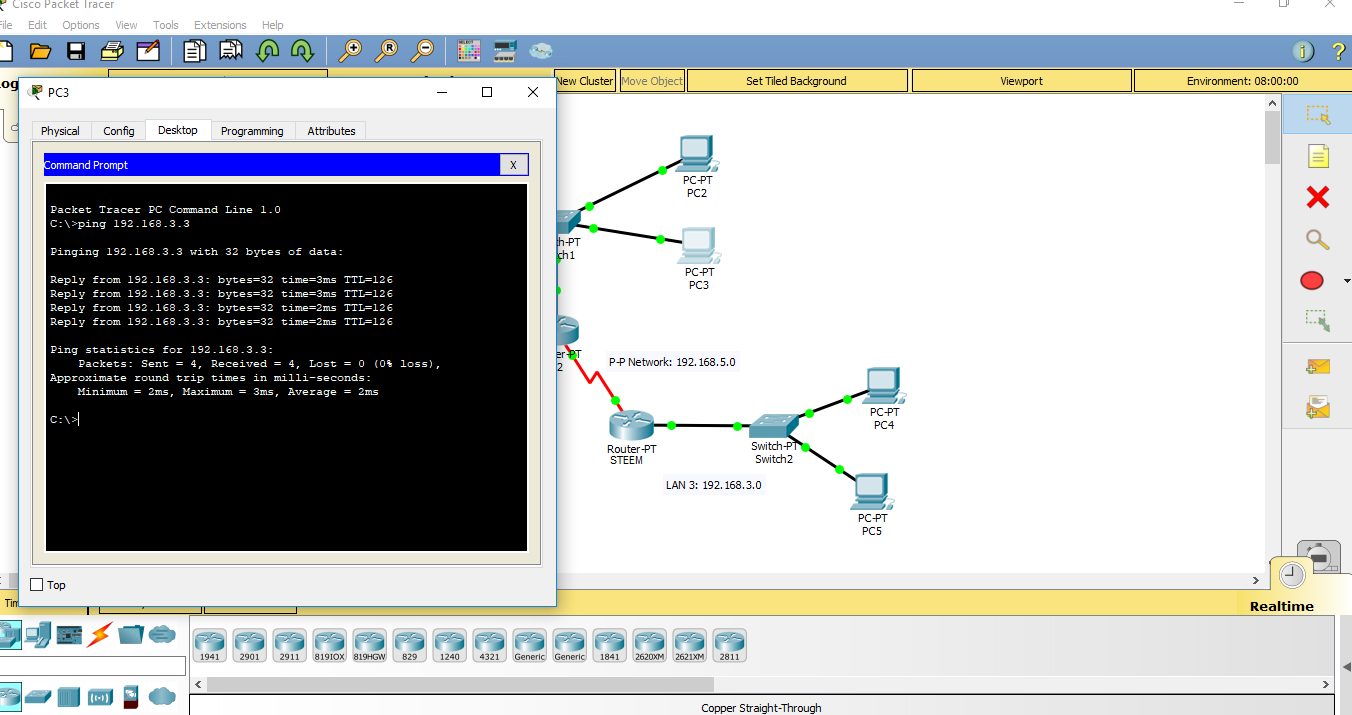
7.Ping to check if our configuration is correct.
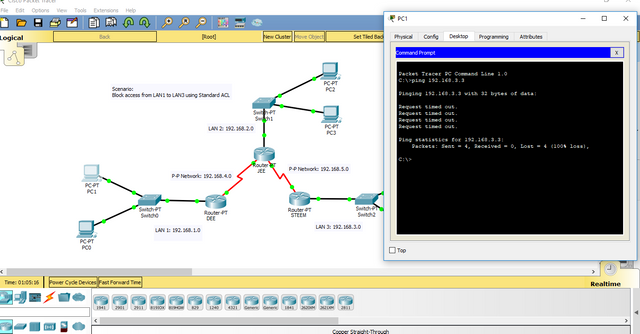
Pinging using a PC connected to LAN1. We were unable to access a PC from LAN3 due to the ACL security.
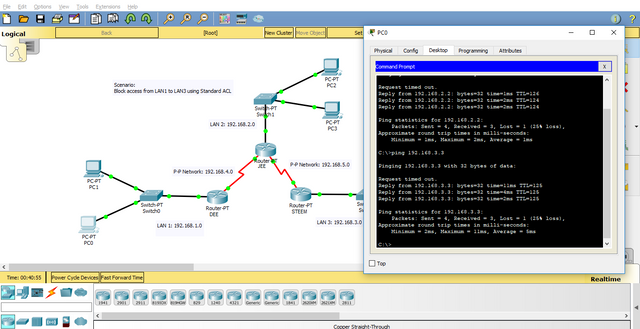
In comparison from above image, we used another PC connected to LAN2. The PC is able to access to the PC connected from LAN3 since it is not blocked by the ACL security of the router STEEM.
And that is how to configure Standard ACL to your network.
Thanks for dropping by.
Merci beaucoup!
Don't forget to Upvote, Resteem and Comment.
I would really Appreciate it!
DEEJEE, signing out.
Thank you very much for this amazing post @deejee. I now understand how to configure the network with acl. You're a life saver 😁