[Week 3] Google IT Support Professional Certificate #18 || Course 3 WEEK 3 Operating Systems and You: Becoming a Power User{Part 2}

This is part 2 of Week 3 Course 3
Check out part 1 here... http://bit.ly/2nhSKBA
10. Windows: Underneath the Hood
We've talked a lot about the practical aspects of installing software, which has been abstracted for us in the form of package managers. But as someone who might be working in IT, it's also important for you to understand what happens underneath the hood, when installing or removing software. In other words, what really happens with the underlying technology when you perform this action. You might come across a situation where a package you install, modifies a configuration file that it's not supposed to, and then starts causing issues for you. So how does software installation work underneath the hood? Let's take a look at how an EXE gets installed in Windows. When you click on an installation executable, what happens next depends on how the developer of the program has set their application app to be installed. If the EXE contains code for a custom installation that doesn't use the Windows installer system, then the details of what happens under the hood will be mostly unclear. This is because most Windows software is distributed in closed source packages. Meaning you can't look at the source code to see what the program is doing. In this case though, although you can't read the instructions the developer has written, you can use certain tools to check out the actions the installer is taking. One way to do this, will be to use the process monitoring program provided by the Microsoft CIS internals toolkit. This will show you any activity the installation executable is taking, like the files it writes and any process activity it performs. You can read more about the Microsoft CIS internals toolkit in the next supplemental reading. So what about MSI file, or an executable wrapping an MSI? Again, the application itself will be closed source, so you won't be able to peek at the source code to see what it does. But, installation packages that use the MSI format have a set of rules and standards they need to conform to, so that the Windows installer system can understand their instructions and perform the installation. There are more to MSI files than it might seem at first. In fact, they aren't simple files at all. They're actually a combination of databases that contain installation instructions in different tables along with all the files, objects, shortcuts, resources and libraries the program will need all grouped together. The Windows installer uses the information stored on the tables in the MSI database, to guide how the installation should be performed. They'll know where files and application data should go, and any other things that should happen to successfully install the program. The Windows installer will keep track of all the actions it takes and create a separate set of instructions to undo them. This is how it lets users uninstall the program. If you're curious about the details of what goes into an MSI file, or want to create a Windows installer package yourself, check out the orca.exe tool that Microsoft provides. It's a good way to satisfy your curiosity. Orca, is part of the Windows SDK or software development kit, but you don't need to be a programmer to use it. Orca can help you edit, or create Windows installer packages. So, feel free to explore what it can do. We've provided a link to the tool in the supplementary reading. Wow, there's a lot going on underneath the hood in a Windows installation, and it's all kicked off by a couple of clicks. So what about LIX? Glad you asked, that's up next.
For more information about various ways you can create and edit Windows installer packages, check out the following links: Process Monitor, Windows Installer Examples, and Orca.exe.
https://docs.microsoft.com/en-us/sysinternals/downloads/procmon
https://msdn.microsoft.com/en-us/library/windows/desktop/aa372837(v=vs.85).aspx
https://msdn.microsoft.com/en-us/library/windows/desktop/aa370557(v=vs.85).aspx
11. Linux: Underneath the Hood
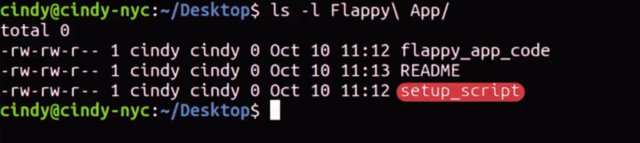
In Linux, software installations are a little bit more clear. We mentioned in an earlier lesson that you can install software directly from source code. This method changes depending on the software because different programming languages are compiled differently. We won't go in-depth about software development, but let's say we had an archive with a simple package we want to install. This is my Flappy app package. I've already extracted it, so you can see there's a setup script. This is a script file that will run a bunch of tasks on the computer in order to set up the package. And then flappy_app_code, this is the actual software code. The README is a pretty standard file contained in source archives that has information about the archive. It not so subtlety asks you to read it before you do anything.
The set of script is what we're concerned with since it tells us how to install our package. A sample setup script can contain program instructions like compile flappy_app_code into machine instructions, copy compiled flappy app binary to slash bin directory, or create a folder to slash home slash, whatever the username for flappy app is. This is a very simple overview of what happens when you install a simple package. In the end, the software developers decide what their software needs to work and runs tasks to get it working. It's up to the developer whether those tasks are creating files or updating directories. If you knew the programming languages used, you could read these instructions yourself. But that's a bit out of scope for this course. Anyways, that's how software installation works on Linux in a nutshell.
12. Windows: Devices and Drivers
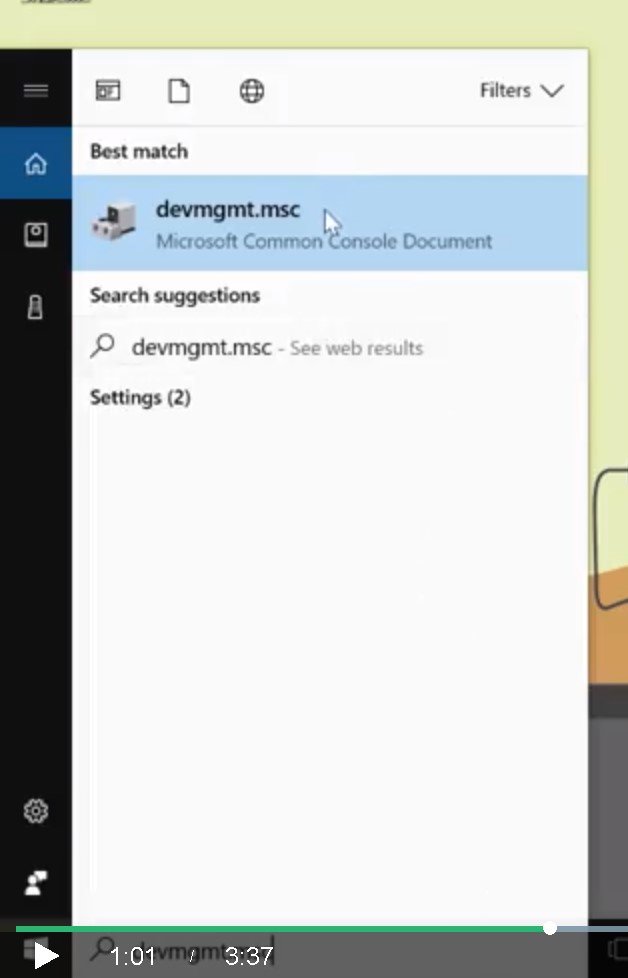
An important piece of software that we've talked about, but haven't really seen in action, is a driver. Remember that a driver is used to help our hardware devices interact with our operating system. In this lesson, we're going to talk about device drivers and how to manage them. First, let's talk about how to manage the devices that our computer sees, and then we'll go over how we install drivers for them. In Windows, Microsoft groups all of the devices and drivers on the computer together in a single Microsoft management console called the Device Manager. You can get to the Device Manager in a couple of different ways. You can open up the Run dialog box and type in devmgmt.msc. Or you can right-click on This PC, select Manage, and click on the Device Manager option in the left-hand navigation menu. I'm just going to open it up from here.
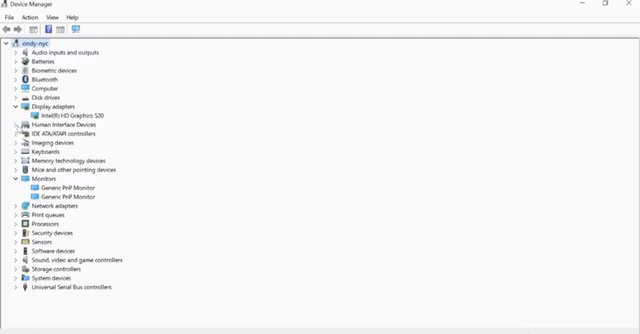
Most devices you've got on your computer will be grouped together according to some broad categories by Windows. So any displays you might be using with your computer would show up under the Monitors section in the Device Manager.
Like so. This grouping usually happens automatically when you plug in a new device. It's part of the plug and play system that Windows uses to automatically detect new hardware plugged into your computer. It then recognizes and installs the appropriate software to manage it.
If you're interested, you can read more about the PnP system in the supplementary reading. We'll give you an overview of how this works too, so you can get a feel for it. When you plug a new device, like a mouse or keyboard, into your computer, the Windows operating system will go through a few steps to try and get it working. Most vendors or computer hardware manufacturers will assign a special string of characters to their devices called a hardware ID.
When Windows notices that a new device has been connected, the first thing it'll do is ask the device that's been plugged in for its hardware ID.
Once Windows has the new device's hardware ID, the OS uses it to search for the right driver for the device. It looks for it in a few places, starting with a local list of well-known drivers. Then it goes on to Windows Update or the driver store if it needs to expand the search. Sometimes the device will come with an installation disk, which contains custom driver software and you can tell Windows to look there too. Finally, Windows will take the driver software it found and install it so you can use your new device. Although this process mostly happens automatically and behind the scenes, you can interact directly with the Windows drivers through the Device Manager console we mentioned earlier. You can expand any of the categories in the Device Manager to view the devices inside them, like so.
You can also use the all-powerful Windows right-click to open up a menu with options to work with them.
You can uninstall, disable, and update a device driver from this menu. You can also tell Windows to look for hardware changes like a newly plugged in device.
Finally, if you choose Properties from the right-click menu, you can see some details about the device and its driver.
Like its manufacturer and the driver version being used.
If you're interested in accessing drivers through Windows CLI, check out the following reading for more info.
For an Introduction to Plug and Play click here. https://docs.microsoft.com/en-us/windows-hardware/drivers/kernel/introduction-to-plug-and-play
As discussed in the previous lecture, when Windows notices that a new device has been connected, the first thing it will do is ask the device that's been plugged in for it's Hardware ID. For more information on hardware identification click here. https://docs.microsoft.com/en-us/windows-hardware/drivers/install/step-1--the-new-device-is-identified
Once Windows has the Hardware ID of the new device, the OS uses that ID to search for the right driver for the device, For more information on this click here.
https://docs.microsoft.com/en-us/windows-hardware/drivers/install/hardware-ids
It looks in a few places for the driver, starting with a local list of well-known drivers, then going onto Windows Update or the Driver Store. For more information click here.
https://docs.microsoft.com/en-us/windows-hardware/drivers/install/step-2--a-driver-for-the-device-is-selected
13. Linux: Devices and Drivers
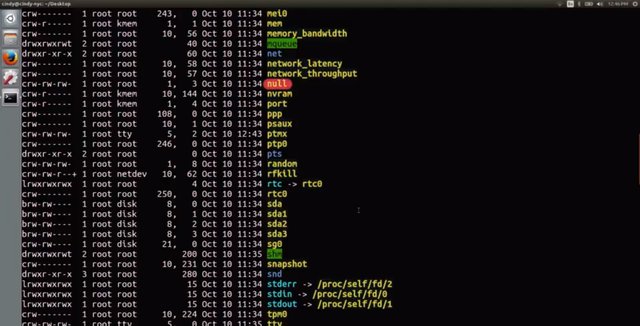
Ubuntu has a slightly messier way of showing us device management. In Linux, everything's considered a file, even hardware devices. When a device is connected to your computer, a device file is created in the /dev directory. Let's take a look at this directory.
There are lots of devices in this directory, but not all of them are actually physical devices. For example, the /dev/null devices in here. We won't talk about all the device types in Linux because there are a lot of them. But we'll go over the more common ones you'll see, character devices and block devices. Character devices, like a keyboard or mouse, transmit data character by character. Block devices like USB drives, hard drives, and CD-ROMs transfer blocks of data. A data block is just a unit of data storage. Remember from an earlier lesson, that the first bit you see in an LS-L command is the type of file. So far, we've seen dash which stands for a regular file and a D which stands for a directory. But in this output, we can see we have a few other file types. Some of them have B for block device and C for character device. If you'd like to learn more about that other device types, you can check out the next supplemental reading. Let's look at some of the block devices we'll be interacting with in this course. You'll see a few files that start with /dev/sda or /sdb. SD devices are mass storage devices like our hard drives, memory sticks, et cetra. If you see an A after SD, it just means the device was detected by the computer first. So you might see something like /dev sda, /dev sdb, /dev sdc. Revisiting the /dev/null device, we can see it's considered a character device because it's used to transfer data, character by character.
This is a pretty simple overview of device files. I left a lot of stuff out that you don't necessarily need to know now. If you want to learn more about the inner workings of devices in Linux checkout, you guessed it, the next supplemental reading. Let's talk about updating device drivers for Linux. With Windows, we were able to just click update driver and in most cases that works. In Linux, things are a little more complicated, and at the same time pretty easy. I'm not trying to be confusing. You'll see what I mean in a moment. Device drivers aren't stored in the /dev directory. Sometimes, they're part of the Linux kernel. Remember, that the kernel of our machine handles the interaction with hardware. The kernel is a really monolithic piece of software that has lots of functions including support for lots of hardware. These days, a lot of hardware support is built into the kernel. So when you plug in a device, it automatically works. But if there are devices that don't have support built into the kernel, they most likely have something called a kernel module. Well, what's this kernel module thingy? For a lot of developers, touching software like the Linux kernel is kind of intimidating. Instead, they can create kernel modules which extend the kernel's functionality without them actually touching it. So, if you need to install kernel module for a specific type of device, you can install the same way we've been installing all software in Linux. Keep in mind that not all kernel modules are drivers. We won't get into kernel modules, but if you'd like to read more, I've included a link to that as well in the next reading. Since we just need to get started and get hands-on with the operating systems, this should be more than enough. Let's keep moving.
For more information on Device Files click here https://en.wikipedia.org/wiki/Device_file
and for Udev click here. https://en.wikipedia.org/wiki/Udev
14. Window: Operating System Updates
You've made it to the last lesson in this module where we're going to cover the most important software, the operating system. We've already looked at how to install and maintain applications like a word processor, graphical editor, etc. Then we looked at how to install device driver software too. Now we're going to look at the core operating system updates. Spoiler alert, they work just the same way as every other software we've installed.
It's important to keep your operating system up to date for lots of different reasons. You want the newest features that your operating system has, and you want the security updates that your operating system needs. When your operating system manufacturer discovers a security hole in the OS, they do their best to create a patch for this hole.
A security patch is software that's meant to fix up a security hole. When you have an operating system update with security patches it's vital that you install those patches right away. The longer you wait the more prone you are to being effected by a security hole.
As an IT support specialist, it's very common to routinely install operating system updates to keep your system up to date and secure.
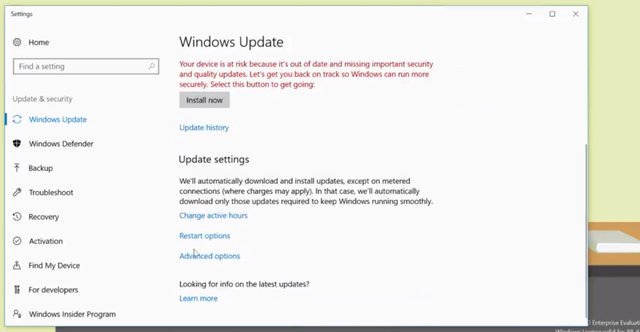
Windows usually does a great job of telling you when there are updates to install. The Windows Update Client service runs in the background on your computer to download and install updates, and patches for your operating system. It does this by checking in with the Windows Update servers at Microsoft every so often, you can learn more in the next reading. If it finds updates that should be applied to your computer it'll download them, if you decided to allow it to, more on that later. Once the download has completed, depending on your Windows Update settings, the Windows Update Client will ask you if it's okay to install the updates or just go ahead and install them automatically. This process usually requires a restart of your computer, which the Client performs after requesting permission. In versions of Windows before Windows 10, you can tell Windows to manage your updates in a few different ways. You could have the Windows Update Client install updates and patches that Microsoft releases automatically or can let Windows Update know that you want to decide whether or not you'd like to download and install them. You can even turn off updating entirely, but that's probably not a good idea for the security reasons we talked about. You can configure Windows Update by searching updates in the search box and going to Windows Update setting.
From there, you can tell the Windows Update Client to check for new updates, look at the history of updates installed, or change the way that it'll download and apply patches by clicking into the settings section.
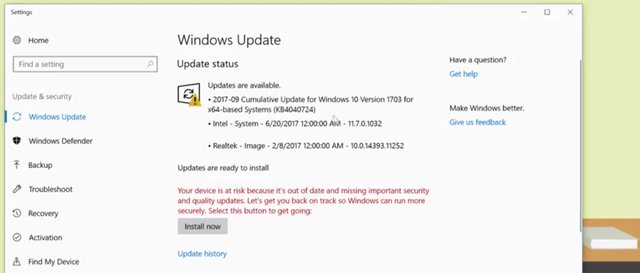
From there, you can tell the Update Client how you want to manage your updates and even set a time when you want them installed.
Windows 10 does things differently, instead of downloading a handful of independent updates that you can choose to apply or not apply to your computer, updates are cumulative. This means that every month a package of updates and patches is released that supersedes the previous month's updates.
The idea behind this is that computers will need to download less stuff in order to be up to date. As an example of how this might be beneficial, think about a Windows machine that's been turned off for a while. When it boots up again after a long period of inactivity, it'll need to download all of the updates that it's missed and apply them. If it's been off for a really long time, this could mean it'll need to download and apply hundreds of updates. With the cumulative update model, a computer like that would only need to download the latest cumulative update, then be good to go.
One downside to this is that in Windows 10, installing updates is no longer optional. You also can't pick and choose the updates you want to apply, since they're all rolled into one monthly release.
Microsoft has announced that the update model in Windows 7 and 8 will also be moving in this cumulative package direction. So, Windows 10 users won't be alone.
15. Linux: Operating System Updates
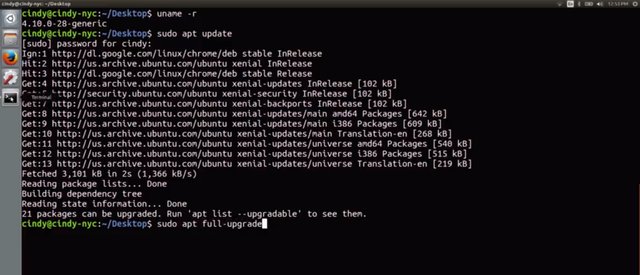
In Linux, you've already learned how to update and upgrade software on your machines. When using the apt update and apt upgrade command, they may already install security updates for you. But when you run apt upgrade, it doesn't upgrade the core operating system. In windows, our OS package is Windows 10. In Linux, It's the kernel along with other packages. The kernel controls the core components of our operating system. Like our word processors, the kernel is just another package. The kernel developers regularly include security patches, new features, and fixes for bugs in their updates. If you want to get all these things, you should be running a new kernel. To first view what kernel version you have, we going to learn a new command called uname. The uname command gives us the system information. If you use the dash r flag for kernel release, you'll see what kernel version you have.
You can see that I have kernel Version four point one on here. To update the kernel and other packages, we use our nifty apt command with the option full dash upgrade. Before running this command, remember to update your application sources with APT update. Sudo apt update. Now, we can run sudo apt full upgrade.
If there's a new version of the kernel Available it will install it for us. Once you reboot the computer, you can start using it. You can verify the latest kernel is being used with the uname dash r command. We left out a few details about kernel installations and security updates, but this is a good start updating your system. If you're curious about learning the intricate details of kernel and Linux updates, check out the supplemental reading. With that, we've covered all the essentials to help you hit the ground running with software installation and maintenance. Great work. You learned how to install standalone packages, use package managers, and work with archives, device drivers, and core operating system updates. These skills will be super useful as an IT support specialist. Next, we're testing you again on both bashing Windows. When you finished, I'll see in the next module.
For more information about the Linux kernel, check out the Wikipedia article here.https://en.wikipedia.org/wiki/Linux_kernel
You can also read this article about how Linux updates work. https://www.linux.com/learn/linux-101-updating-your-system
You can also check out this article on updating Ubuntu Linux using the command line here.https://www.cyberciti.biz/faq/how-do-i-update-ubuntu-linux-softwares/
How was this week for me

Not want to say more about this week was just OK.Very Boring.
To Join this course click on the link below
.jpg)
Google IT Support Professional Certificate http://bit.ly/2JONxKk
LInks to previous weeks Courses.
[Week 2] Google IT Support Professional Certificate #16 || Course 3 WEEK 2 Operating Systems and You: Becoming a Power User
http://bit.ly/2nhSKBA
[Week 1] Google IT Support Professional Certificate #15 || Course 3 WEEK 1 Operating Systems and You: Becoming a Power User {Part 2}
http://bit.ly/2naOweX
[Week 1] Google IT Support Professional Certificate #14 || Course 3 WEEK 1 Operating Systems and You: Becoming a Power User {Part 1}
http://bit.ly/2M4pn3C
[Week 6] Google IT Support Professional Certificate #13 || Course 2 WEEK 6 Troubleshooting and the Future of Networking
http://bit.ly/2O1750T
[Week 5] Google IT Support Professional Certificate #12 || Course 2 WEEK 5 Connecting to the Internet
http://bit.ly/2AskNrx
[Week 4] Google IT Support Professional Certificate #11 || Course 2 WEEK 4 Networking Services
http://bit.ly/2LGQrpN
[Week 3] Google IT Support Professional Certificate #10 | Course 2 WEEK 3 Peer-graded assignment|
http://bit.ly/2JRgzJy
[Week 3] Google IT Support Professional Certificate #9 | Course 2 WEEK 3 The Transport and Application Layers |
http://bit.ly/2NEphwQ
[Week 2] Google IT Support Professional Certificate #8 | Course 2 WEEK 2 The Network Layer
http://bit.ly/2v4FqnN
[Week 1] Google IT Support Professional Certificate #7 | Course 2 WEEK 1 The Bits and Bytes of Computer Networking
http://bit.ly/2LJsg6G
[Week 6] Google IT Support Professional Certificate #6 | | Course 1 WEEK 5 Troubleshooting | A Moral Week
http://bit.ly/2Ll866U
[Week 5] Google IT Support Professional Certificate #5 | Course 1 WEEK 5 Software | All basic knowledge about software.
http://bit.ly/2NIWebL
[Week 4] Google IT Support Professional Certificate #4 | |Course 1 WEEK 4 Networking | All basics about networking.
http://bit.ly/2mFsbWJ
[Week 3] Google IT Support Professional Certificate #3 | | Course 1 WEEK 3 Operating System | Installing Windows & Linux.
http://bit.ly/2OglOWH
[Week 2] Google IT Support Professional Certificate #2 | | [Google + Coursera] Course 1.Hardware | The main components & how to assemble these
http://bit.ly/2LJALPi
[Week 1] Google IT Support Professional Certificate #1 | | WEEK 1 Introduction to IT | Kevin Limehouse | An overall View
http://bit.ly/2OerzUI
Google IT Support Professional Certificate #0 | Why you should do this Course? | All details before you join this course.
http://bit.ly/2Oe2t8p
#steemiteducation #Computerscience #education #Growwithgoogle #ITskills #Linuxcommands #powershell #googleitsupportprofessional
Atlast If you are interested in the IT field, this course, or want to learn Computer Science. If you want to know whats in this course, what skills I learned Follow me @hungryengine. I will guide you through every step of this course and share my knowledge from this course daily.
Support me on this journey and I will always provide you with some of the best career knowledge in Computer Science field.
.gif)