New to Steemit? Here's A Mini Survival Guide for You
Hello and welcome to my post!
Yes, I am writing in English as of today because I am posting a mini-guide here in steemit. (Yung Tagalog po gagawin ko din bukas siguro mas casual yun "sabaw" typing hahaha")
Day by day a huge number of steemians are joining on this amazing platform, some are experts already in their field and majority are newbies on this industry especially the blogging and crypto-currency thing.
I myself is a newbie on both and if they will be discussing about crypto, hard fork, trade etc . I am always getting a headache and I immediately fades away from the background.

I am currently affiliated with @steemitfamilyph and @promo-mentors group. And these groups are really A M A Z I N G. As far as I know, @steemitfamilyph which is (led by @jon24jon24) has a few veteran members in our country but all of them are really helpful especially the newbies starting on their steemit journey. While @promo-mentors (led by @futurethinker) group has a diverse number of people both veteran and newbies as well sharing the idea and they also have mentors in this group which can help you improve your post.
I was once a newbie and help from folks is really needed. That is why I think it is really good to create this thing to share what are the things that I learned from this site. I do hope that this mini-guide will be of assistance to you :)

WHAT BRINGS YOU HERE?
It was an advertisement from a facebook "friend" brought me to this site. He stated that this works like facebook but in return, you are getting some money and the best part of it is it is all for free. Some people will think that having this kind of stuff is really a scam but since I do have the "trust" created on that person because he is successful in the "online world" I immediately jump in. ( I then found out that he is not active on this site anymore after a couple of weeks being here. I don't know the reason why 😆 I never contacted him at all because I do not know him personally)
So whoever brought you on this site, may it be your friend, your lover or the person that you are stalking to like your ex be thankful to them because this is really an amazing site.
GETTING STARTED ON THE SITE
I believe at this point you already registered and have your own username and password. Some still view this link even if they are not yet registered on this site but let's assume that you have that. Now the most crucial part is to keep your password. Because according to the FAQ's (which is I am guilty of not reading before) there is no way for them to recover your account if you lose the password or your owner key.
So NEVER, forget the password. Save it, write it down on a piece of paper and keep it in a safe. I already saw a lot of folks experience this and they created a brand new account again.Imagine if you will have a good set of followers already and a steady income stream on this site then one day you forgot the password. Tsk!
Aside from Password you also have Keys in your account. Each key has their own corresponding task they can be found in your Wallet Tab > Permissions

CREATING YOUR POST/ MARKDOWNS AND STYLING GUIDE WITH IMAGES
I know you are excited about posting your works here in steemit.com me too! and a lot of us are super excited about it. Welcome to the wonderful world of blogging.
As you try to see the preview of your post, you saw that it is just words and just plain letters no art or what not. Don't worry you can make the post look good by using the markdown styling guide. I'll be using some screenshots for you to know the difference on what I am telling.
Headers:
For headers you need to use the "#" symbol and then space and then the letter/phrase that you want to type just like the image shown:

Header1
Header 2
Header 3
Header 4
Header 5
Header 6
For the italic font you can use either underscores or asterisk. There shouldn't be any space after the _ or the * sign.

this is an italic text
this is an italic text
For the bold font you can either 2 underscores or 2 asterisks. Same thing no space after the _ or the * sign.

this is a bold text
this is a bold text
For the text that has a bold and italics combined, you will need to use 3 underscores or 3 asterisks.

This has a bold and italic text combined
This has a bold and italic text combined
For the text that has a strikethrough effect, you can use the ~~ to do that

Sample of strikethrough text
For the numbered and bullet list here's what you can do.

- Number 1
- Number 2
- Number 3

Note: You can input random numbers but still you will get the same result/ as long as there is no decimal on it.
For the bullets you can just use the "*"

- Sample text
- Sample text
- Sample text
For quotations, you can just use this sign ">" and then enter the text that you want to write, or the quote from a famous person or someone.

In order to succeed, we must first believe that we can - Nikos Kazantzakis
Inserting links and make it look nicer is also one of the things that you need to do. Who doesn't want to make their blog post look clean right?
To do that you can just use brackets then the title of the link, after that parenthesis and the link. There shouldn't be any space after the bracket sign.

You can also add some emoji on your post to make it look cooler. Here's a Steemit Emoji Master List that has been created by @blueorgy.
On default once you insert the image on your blog sometimes it will be in the center, left or even right part of the editor no worries about it you can also edit that by using the following information. Let's use this nice image that I got from Pixabay as a reference.
In uploading an image you can either just copy the image or copy the image location if the image comes from the web or just copy and paste the image on the editor, either way, it will give you the same result. On this guide, we will just use the "Copy Image Location"
Default Image Alignment:

Center Image Alignment:


This makes the image be at the center of the editing page.
Since we also tackled inserting the link to the source, it will now be easy for you to input the image source link after your image but as a refresher here's what you can do.
Since I want to see the image in the center I will still be using the "< center>" command ( I intentionally put a space after "<" so that the command will show but in reality it shouldn't have.

Image Source
Now we sometimes want to give another vibe in our blog post, to make it look good and we want to have the image be like the usual magazines, news article or other blogs no worries about it you can also do that!
Let's work on the right part wherein the image is on the right part of the screen and then on the left, you will have your text posted.

Then if you want to have the image source be placed at the bottom of the image you can definitely do that too. To do it you can just follow the code:

The process will be the same if you want the image to be on the left part and the text is on the right part. You just need to change the "right" message on the code to "left" and you are all set.
TO INTRODUCE NOW OR POST AND INTRODUCE LATER?
Now you are all set! Ready to start spamming posting here in steemit 😎
Some say that immediately after you create an account, you should fire away that introductory post. Some will say that you gather first a few followers when you write some stuff and then afterward go and shoot that #introduceyourself post.
Here's my take on that: I think that after your account has been created, you should immediately create an intro post already. In that way, the people will know you. Plus there's a lot of folks lurking checking the #introduceyourself post from time to time to support the fellow steemians. Some folks who did their introduction post become a hit and some failed and I am one of those hahaha I have a very few cents in my intro post.
But as per searching the Intro post of the folks who earned a good one here's what I have noticed: ( By doing this, it will give you more chances but it is not a guarantee though because we will never know what the steemians are looking for actually)
- They have a "Selfie" with their username and the date when they joined.
- They mentioned the people who introduced steemit to them.
- They write something like hobbies, interest and the things that they can share to this site and more pictures!
- They also give some ideas on what people from steemit.com will expect from them.
- They used the correct tag #introduceyourself or #introducemyself
Those are the things that I have noticed, again if you will follow that it is not a sureball that you will get a lot of people upvote your post but rest assured that there will be some greeting you a warm welcome may it be a bot or some people.
While I am writing this post I saw this one good sample of the said Introduction and you can still greet the person who created that post a warm welcome 😉
PROOFREADING YOUR POST
Before hitting that submit button at least you try to read and check the post that you created. I myself is not good with grammars and spellings especially if it is written in English and for my readers to better understand what I am trying to say I try to read it twice or thrice.
If the sentence or phrase is not looking good then I try to check other alternatives. Also, I use grammarly in some cases to check if there are words misspelled. You can also rely on their recommendation "at times" for the grammar usages but it really depends on you. For your readers to better understand what you are saying always try to proofread your works.
USING TAGS PROPERLY
Once you have created your awesome post now it is your time to target your audience, the people who will be reading your blog post.
Using the correct tag for a post is really important because if you incorrectly use that and been caught by the steem-cleaners group for sure you will be receiving a warning from them. Or a flag in the long run.
There are also users who use their voting power to flag post that has incorrect tags so you really need to comply with it. Aside from that other users may report you from using an incorrect tag to steem-cleaners using their site and get a portion of rewards in the future.
You can always check the Abuse Guide from Steem-cleaners using this link so that we can make sure that you will not be in trouble in the future
On the right side of your editor, there's a word rewards button. It has 3 radio buttons there


We will only focus on the 2 Option the Power Up 100% and the Default 50%-50%. The decline pay-out is no-brainer it just means that you do not want to be paid for your post.
Starting with the 
This option is used if you want all of the possible earnings to be converted into Steem Power. The computation or the amount of Steem that you will get will depend on how much is the value of the Steem in the market after your pay-out. You can get an idea of much the dollar amount is by checking the coinmarketcap site Please note that until the rewards are transferred to your wallet what you see in your post is the amount in USD. This is where the confusion is starting because newbies and also like me is wondering before on why the Steem that I got doesn't match the Steem amount that I am expecting.
Then the next is 
For this option, the rewards will be split in half. 50% will be directed to Steem and then the other 50% will be converted into Steem Dollars. Steem Dollars can be converted into Steem for you to have more Steem Power and influence on the site or you may transfer it to exchanges to have it converted into real-world money.
Each post will have a 7 days timeline, this means that people can "upvote" your post to give you a reward or "flag" your post to lessen the reward/visibility of your post. If less than 12 hours before the pay-out people can still "upvote" the post, however, the reward will not be issued to them anymore so better "upvote" the post before it reached the 12 hours deadline.
CURATION REWARDS IN A NUTSHELL

Kid, there is a problem with my pay-out! You told me that the amount will be directed to my wallet why I am only seeing a small amount there? And what is this Authors and Curators Payout?
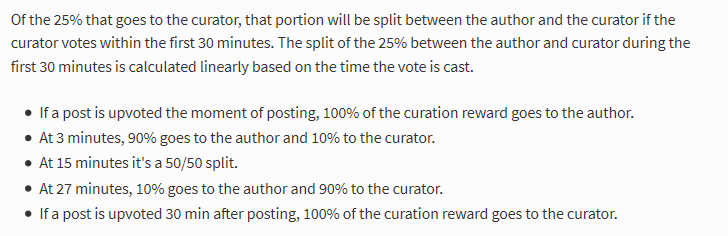
No need to worry about it so here's what happens man. After 7 days you will receive your reward on your post the breakdown would be 75% will go directly to the author and then 25% will be going to the curators. The short explanation is seen in this screenshot from FAQ's
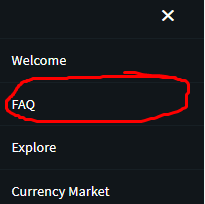
Usually the FAQ's is a life saver because it can definitely answer some of the basic questions that you have in mind. I myself admit that I did not check that in my first week but I just checked it after a few weeks since I want to be familiar with the site and know the basic stuff here.
I think I somehow covered the most basic part of the steemit posting. There's actually a lot of things that you should be checking in the future but for now, by utilizing the following rest assured that you will never go wrong on posting here.
I'll try to create more of these tutorials in the future because I think this is what I can do most in the community. I am no expert with regards to technical writing, wring a poem, singing, arts etc and I always write my post in our local dialect so I do hope that you somehow enjoyed reading and was able to grasp some of the stuff here.
Being a part of the @promo-mentors crew rest assured that I am here to guide and help you and if you want your profile to be checked on I'll be glad to do that for you.
I am a part of @steemitfamilyph. Join us!
Be a member on our Facebook page -- Click this Link

Everything a starter needs to survive is here. Great compilation boss
Thanks @wdoutjah I am always thinking on what I can type these days and decided to do this tutorial instead.
hahaha.. drafted a 1500ish content around lunch and trimmed down a bit during proofreading.. hehe kinda drained my energy for today T_T
Haha I can understand that. I am doing this since morning hahah. It is really hard to speak in English my nose is bleeding already 😂 😂 😂
Hey! Thanks for this. I was just thinking how to center a text. And I was doing this: < c > < /c >, and wondering why it wasn't working. Hahaha. Appreciate the post 🤗💚
Sure thing! I am glad I was able to help you out. It is also my problem when I started since I do not know how to code stuff.
Amazing tutorial my friend! steemit doesn't give me some stuff.... its really disappointing!
Hey thanks for dropping by and leaving a comment. Steemit has a lot of tutorials out there but you will need to search because it is alao created by some veteran steemians.
All the best here and wishing you success!
this will be interesting. thank you
very nice article:)
Steem On!
Hey thanks @steem-gigger really appreciate you dropping by.
Nice! This is very helpful for newbies. Great content as always, bes. May pa-kalapati ka pa na divider. Haha. :))
Hehe ganun daw bes, needed na may divider ng very light para di malito ang mga readers. Thanks for appreciating more to come from me.
You deserved my 100% upvote worth 0.02 (sobrang laki diba). Haha!
Hahah bes salamat sa 0.02 malaking bagay yan wag ka. Nasa steemit block chain yan forever. Kaya malaking bagay parin yan.
Thanks for sharing this. I will be sharing your link to new friends I invited here. :)
Yes sure thanks for that @hundredlbsbeauty sobrang appreciated ko yan. Basic guide on image formatting and markdowns as of now so that we can make the blog post somehow look really good.
very informative! specially to a newbie like me.. ", surely i will do all your tips! #Following and Resteemed, my kabayan.
Hey @noime thanks for the comment. Somehow this is really a lenghty post from me and English pa. Haha I am glad that you find this mini guide helpful. My plan was indeed a success then.
Thank you so much for this. 😊
You are most welcome! Should you have questions let me know
Good going man!! The article is excellent! You made it very simple for new starters to understand and the dividers are a good touch.
You have done so well with the Ohana and we are really proud seeing you spread your wings and soar with @promo-mentors.
You will do so much good in Steemit!
Thanks @maverickinvictus! I am really do appreciate you dropping by and leaving this comment. To be noticed by sempai! Hahaha
Hello, you received a boost courtesy of @steemdunk! Steem Dunk is an automated curation platform that is easy and free for use by everyone. Need an instant boost? Send 0.200 SBD with your full post url as the memo to @steemdunk for an upvote. Join us at https://steemdunk.xyz
Upvote this comment to support the bot and increase your future rewards!