How To Draw A Portrait With Charcoal Powder (Bilingual)
Last night I slept early at 8:00 PM and woke up exactly at 11:00 PM. Waking up at this hour certainly will be hard to sleep again. I was speechless what should I do to spend time at the situation like this. Usually I only watch movies, but it seems I was not interested to watch. Therefore I decided to work. Boredom can sometimes be the best time to work.
Tadi malam saya tidur lebih awal yaitu jam 8 .00 PM dan terbangun tepat jam 11.00 PM. Terbangun jam segini pastinya akan susah untuk tidur lagi. Aku terdiam apa yang harus saya lakukan untuk menghabiskan waktu pada situasi seperti ini. Biasanya saya hanya menonton film, tapi rasanya tadi saya tidak tertarik untuk menonton. Oleh karena itu saya memutuskan untuk berkarya. Rasa bosan kadang bisa jadi waktu terbaik untuk berkarya.
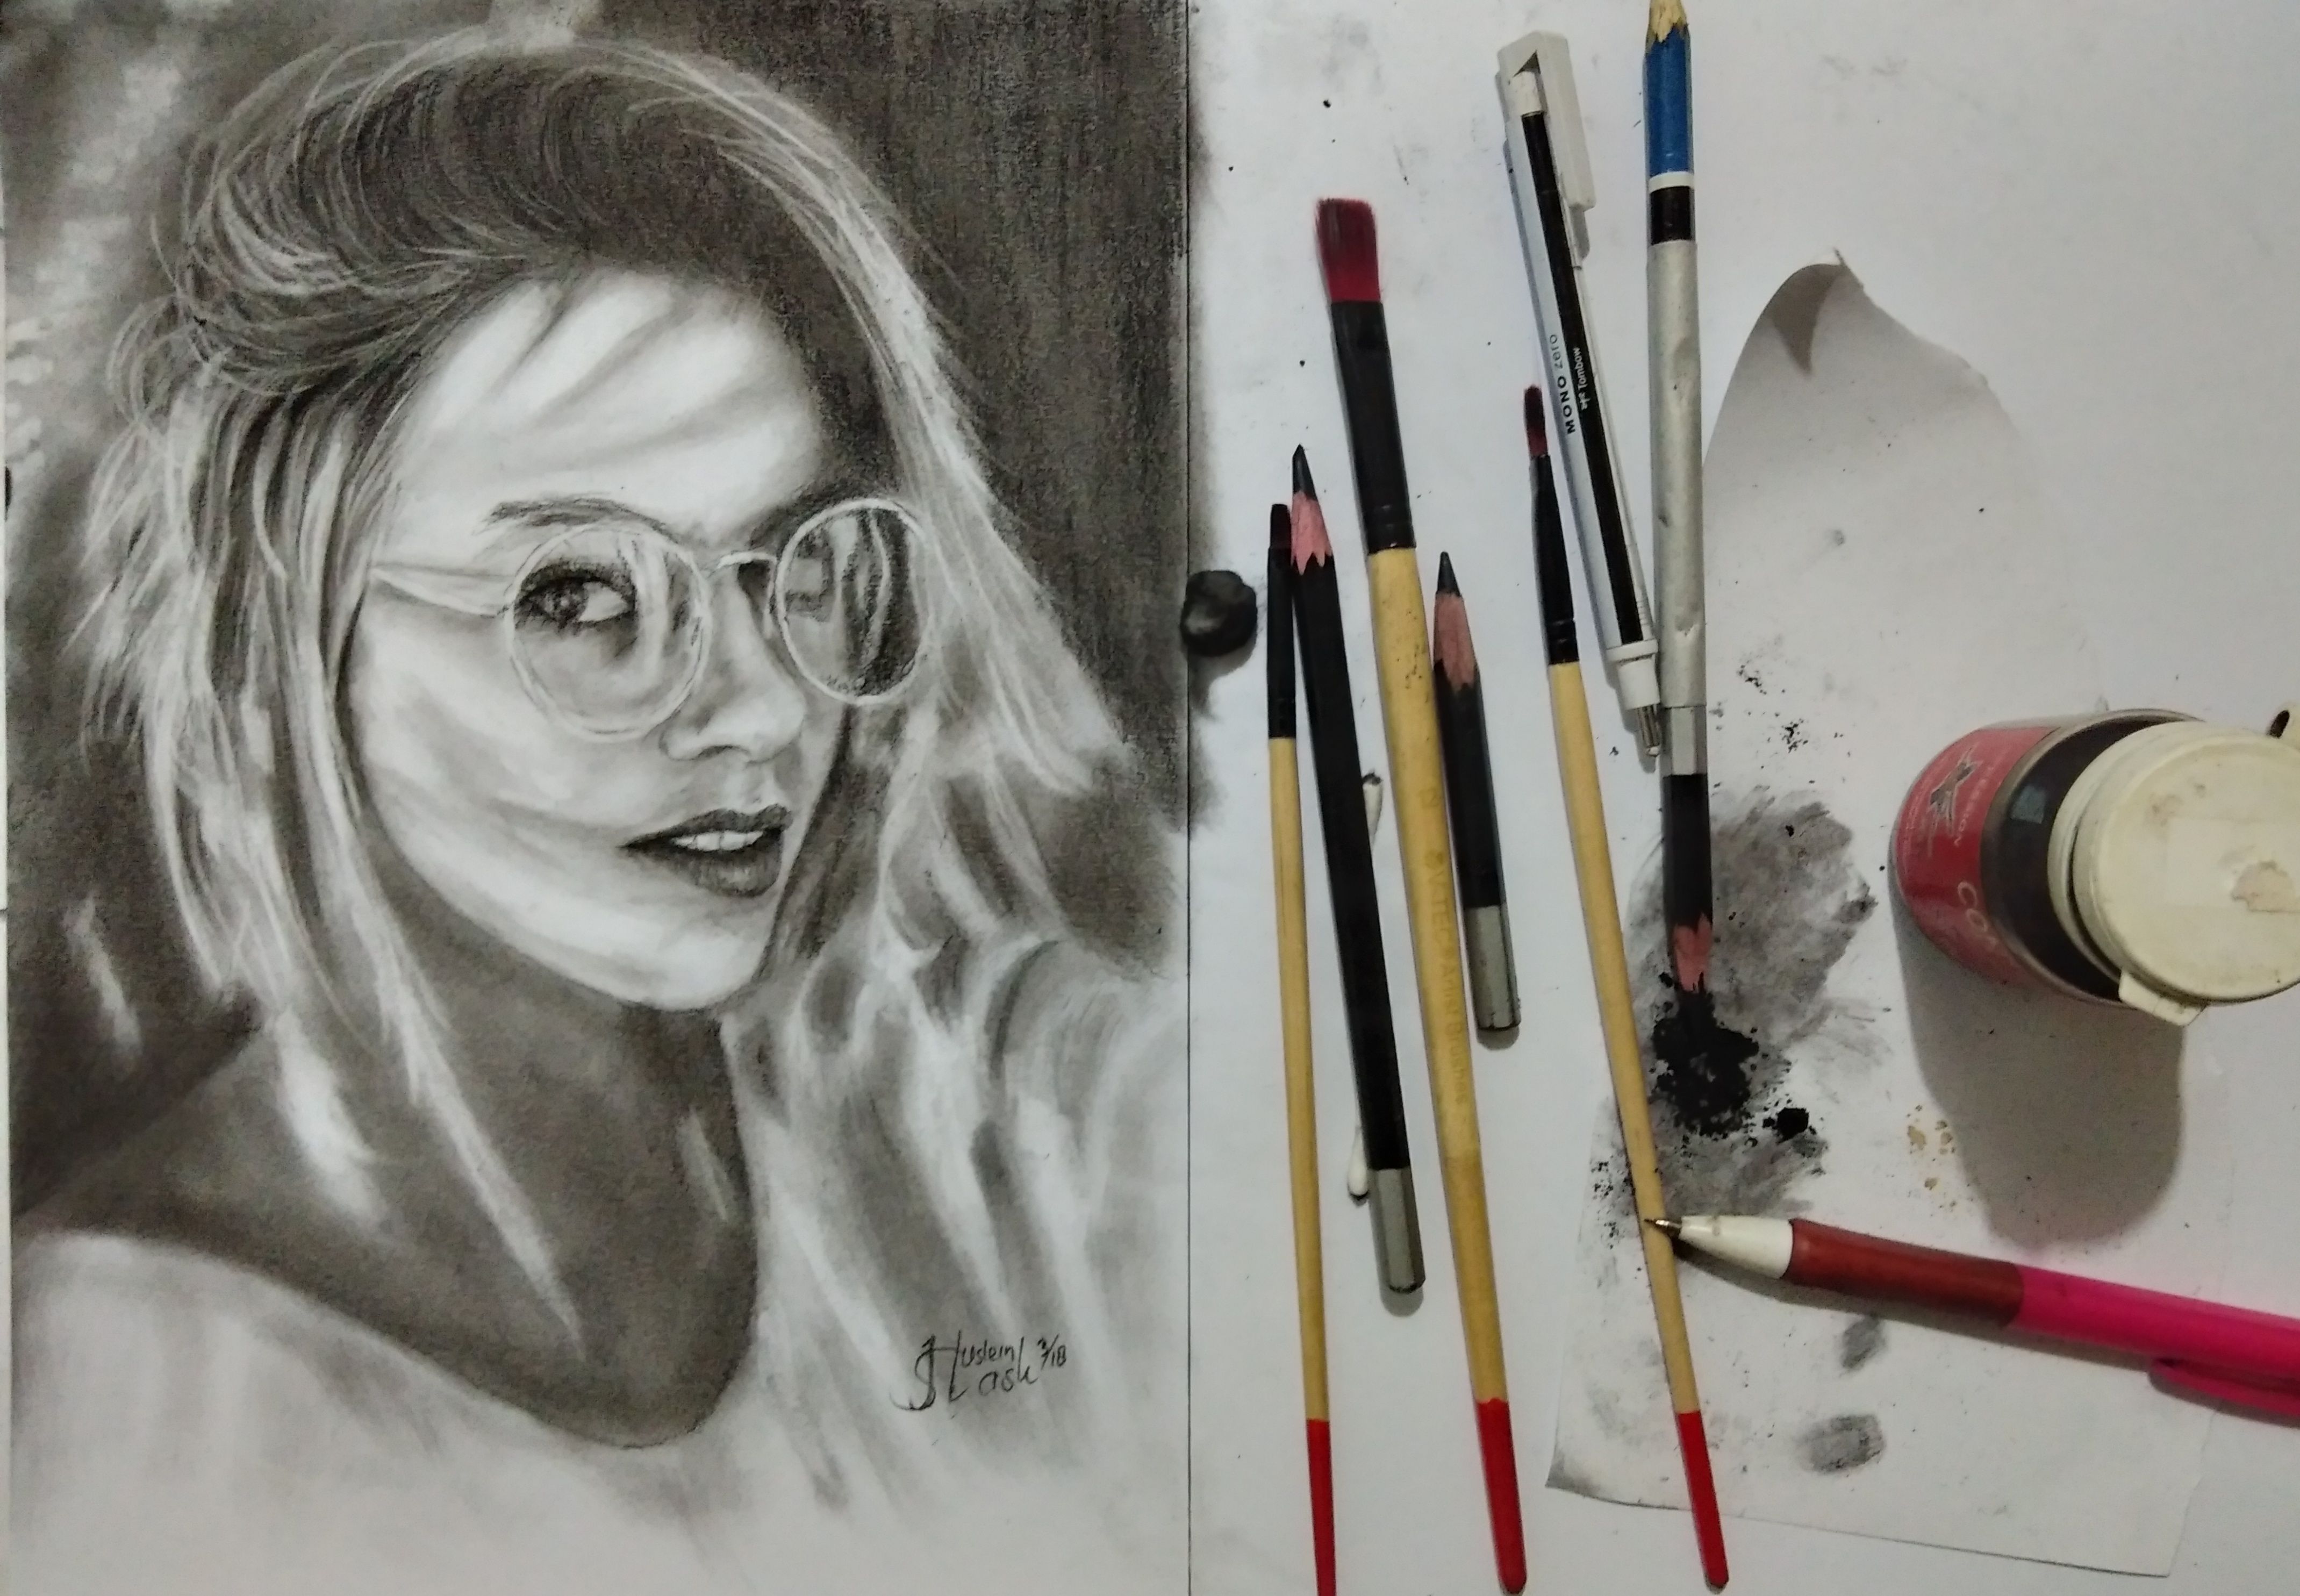
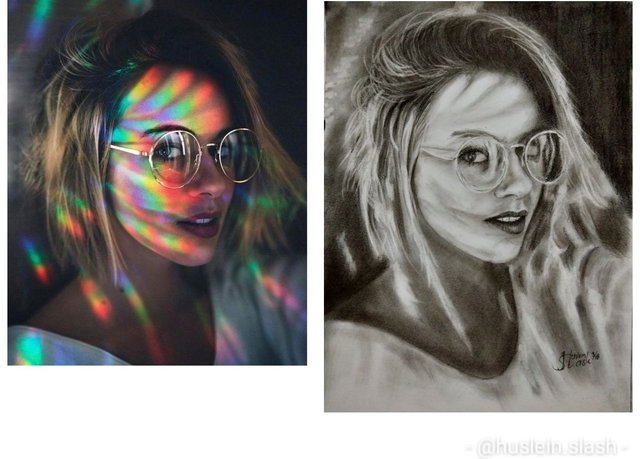
I drew a portrait of a girl with glasses under the colored light. The picture is very nice and challenging me because there are many shadows. I found the reference image in Marvelous Portrait Photography by Kai Böttcher. It's been a long time since I wanted to draw an object like this, and finally I could do it. Drawing object like this will get a great result if the medium that we use is supporting, plus more patience. So, I tried to draw with charcoal powder.
Saya menggambar potret gadis berkaca mata yang berada dibawah cahaya lampu berwarna warni. Gambarnya sangat bagus dan sangat menantang bagi saya karna banyak terdapat bayangan disana. Sudah lama saya ingin menggambar objek yang seperti ini, akhirnya kesampaian juga niat saya. Menggambar objek seperti ini akan mendapatkan hasil yang bagus bila media yang kita gunakan mendukung ditambah lagi kesabaran yang tinggi. Jadi saya coba menggambar dengan media serbuk konte.
As we know that using charcoal powder media is not easy and takes a lot of time. That's why I rarely use this medium. But it does not matter because I have a long time tonight. The main thing is patience for the results as we expect.
Sebagaimana kita tau bahwa menggunakan media serbuk charcoal tidaklah mudah dan membutuhkan waktu yang tidak sedikit. Itulah sebabnya saya jarang menggunakan media ini. Tetapi tidak masalah karna saya punya waktu yang panjang malam ini. Hal yang paling utama ialah kesabaran agar hasilnya seperti yang kita harapkan.
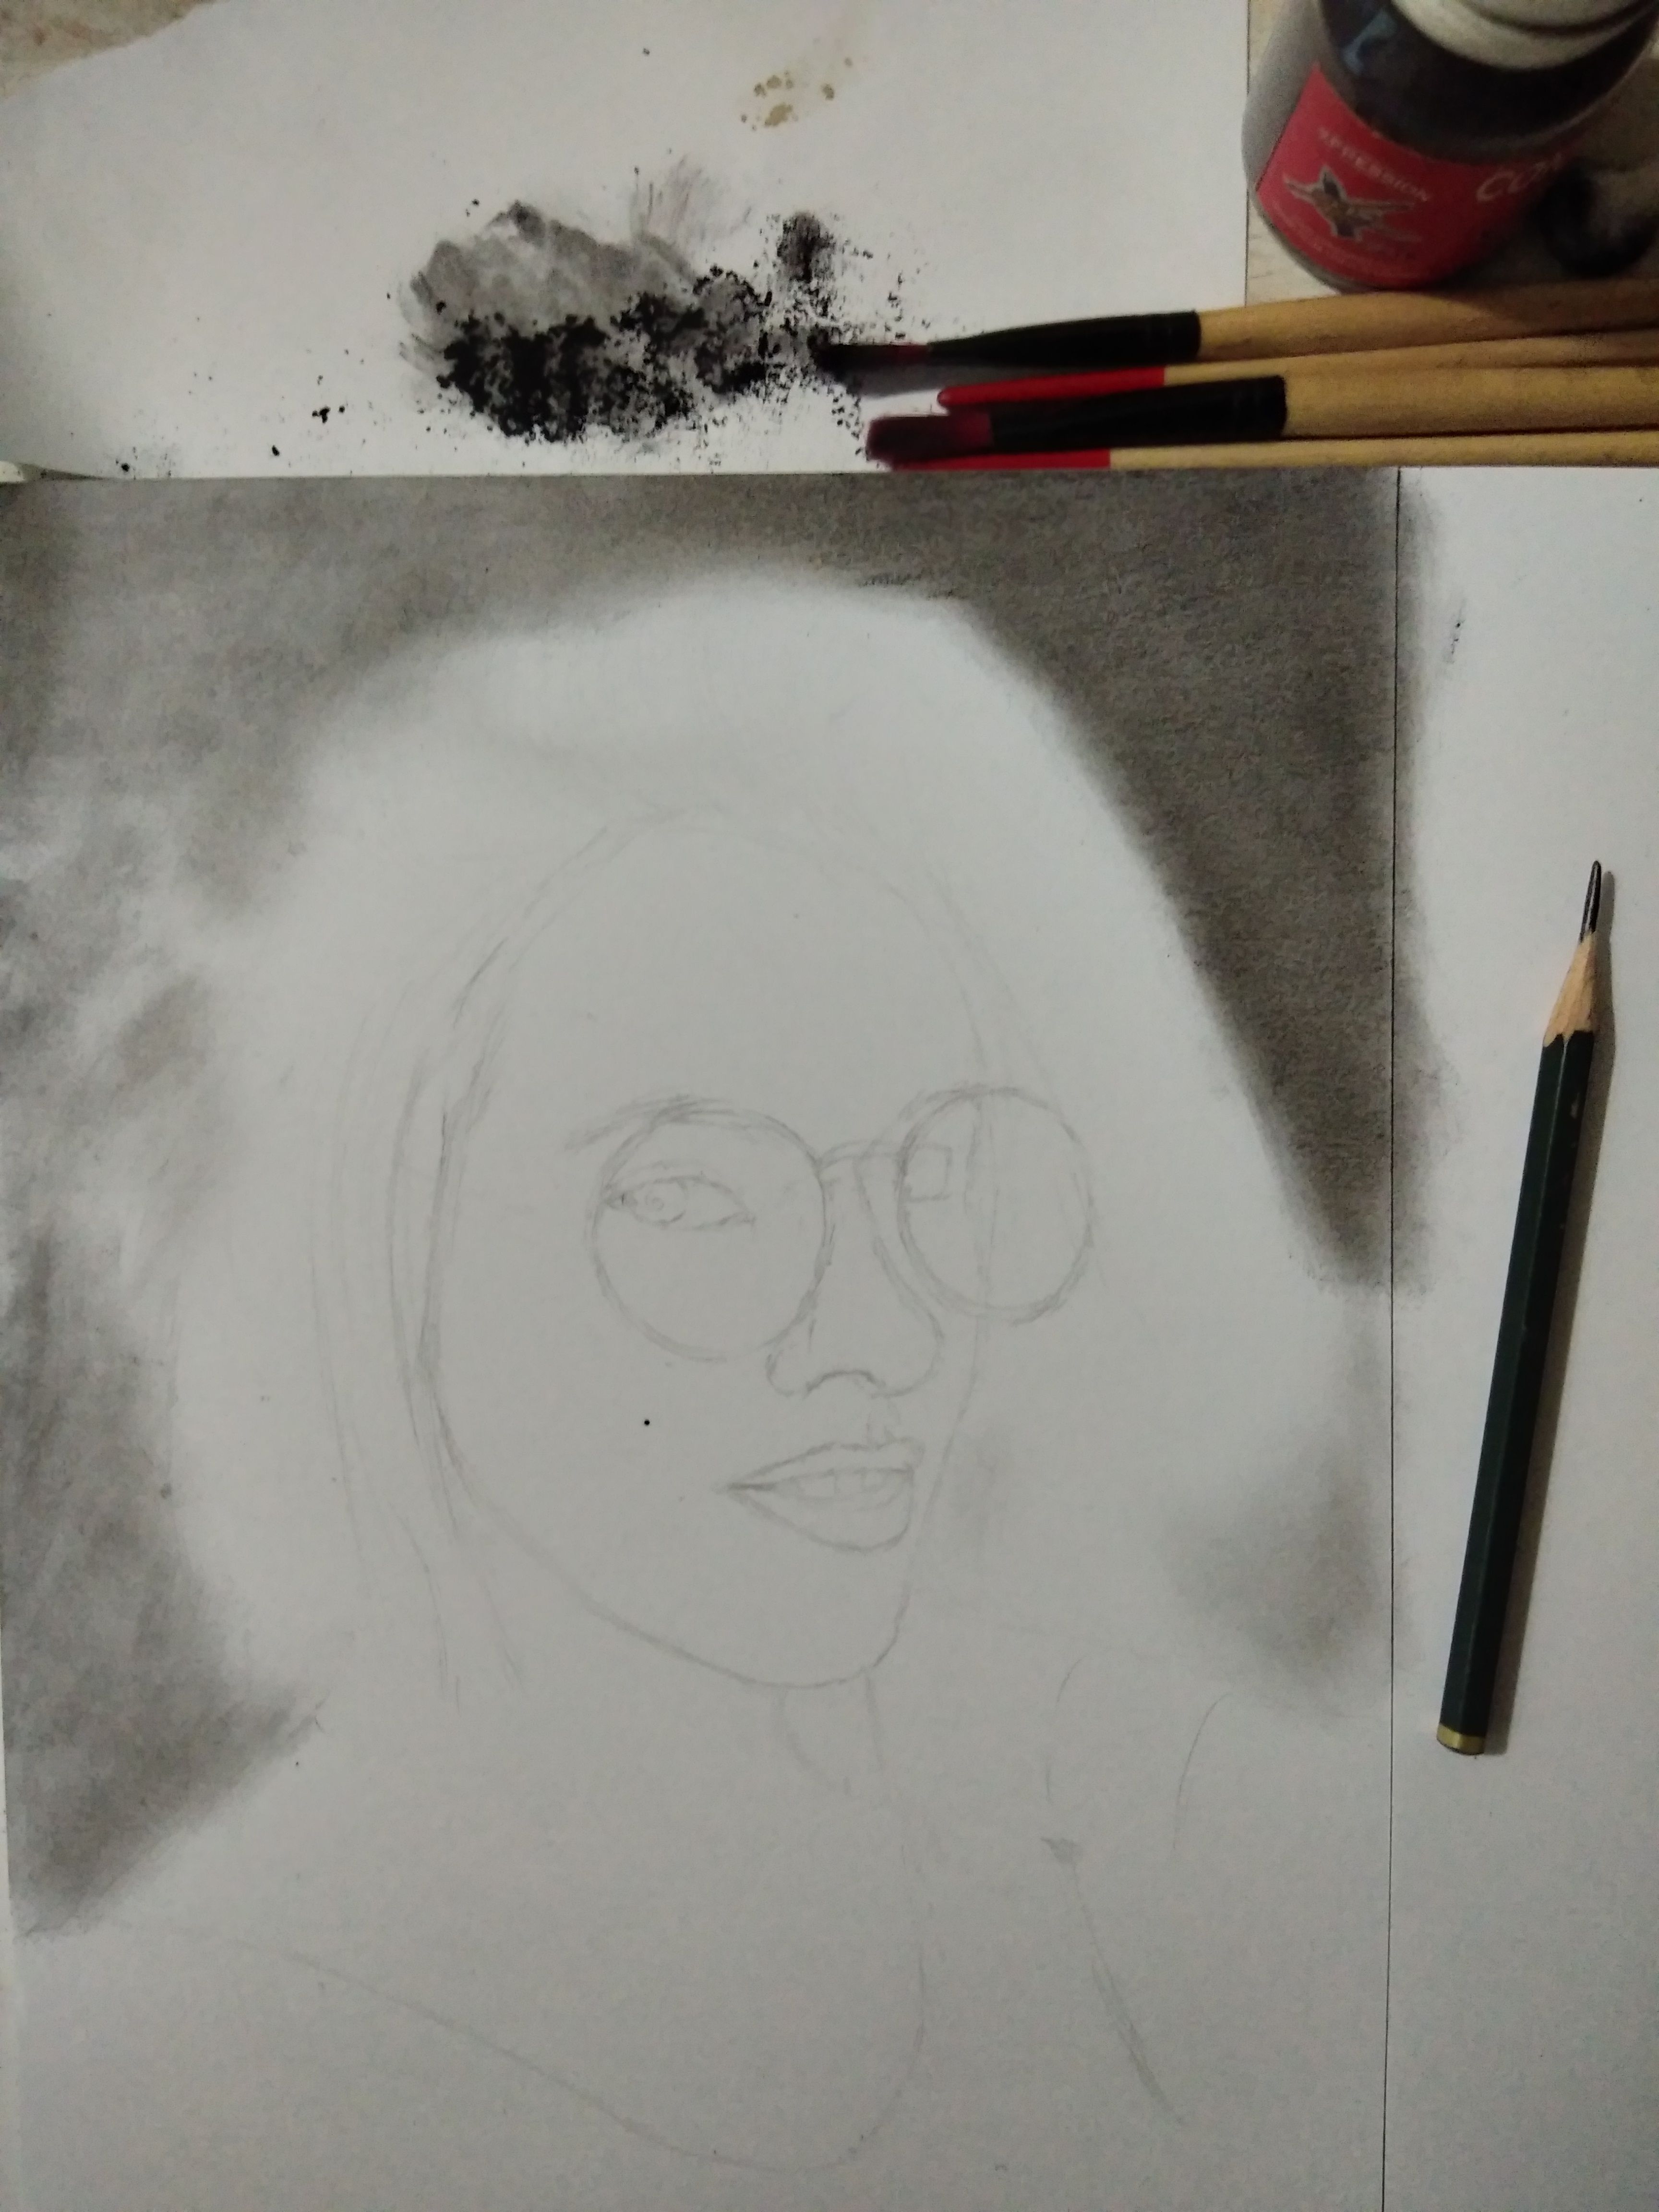
Mediums, Technique And Process
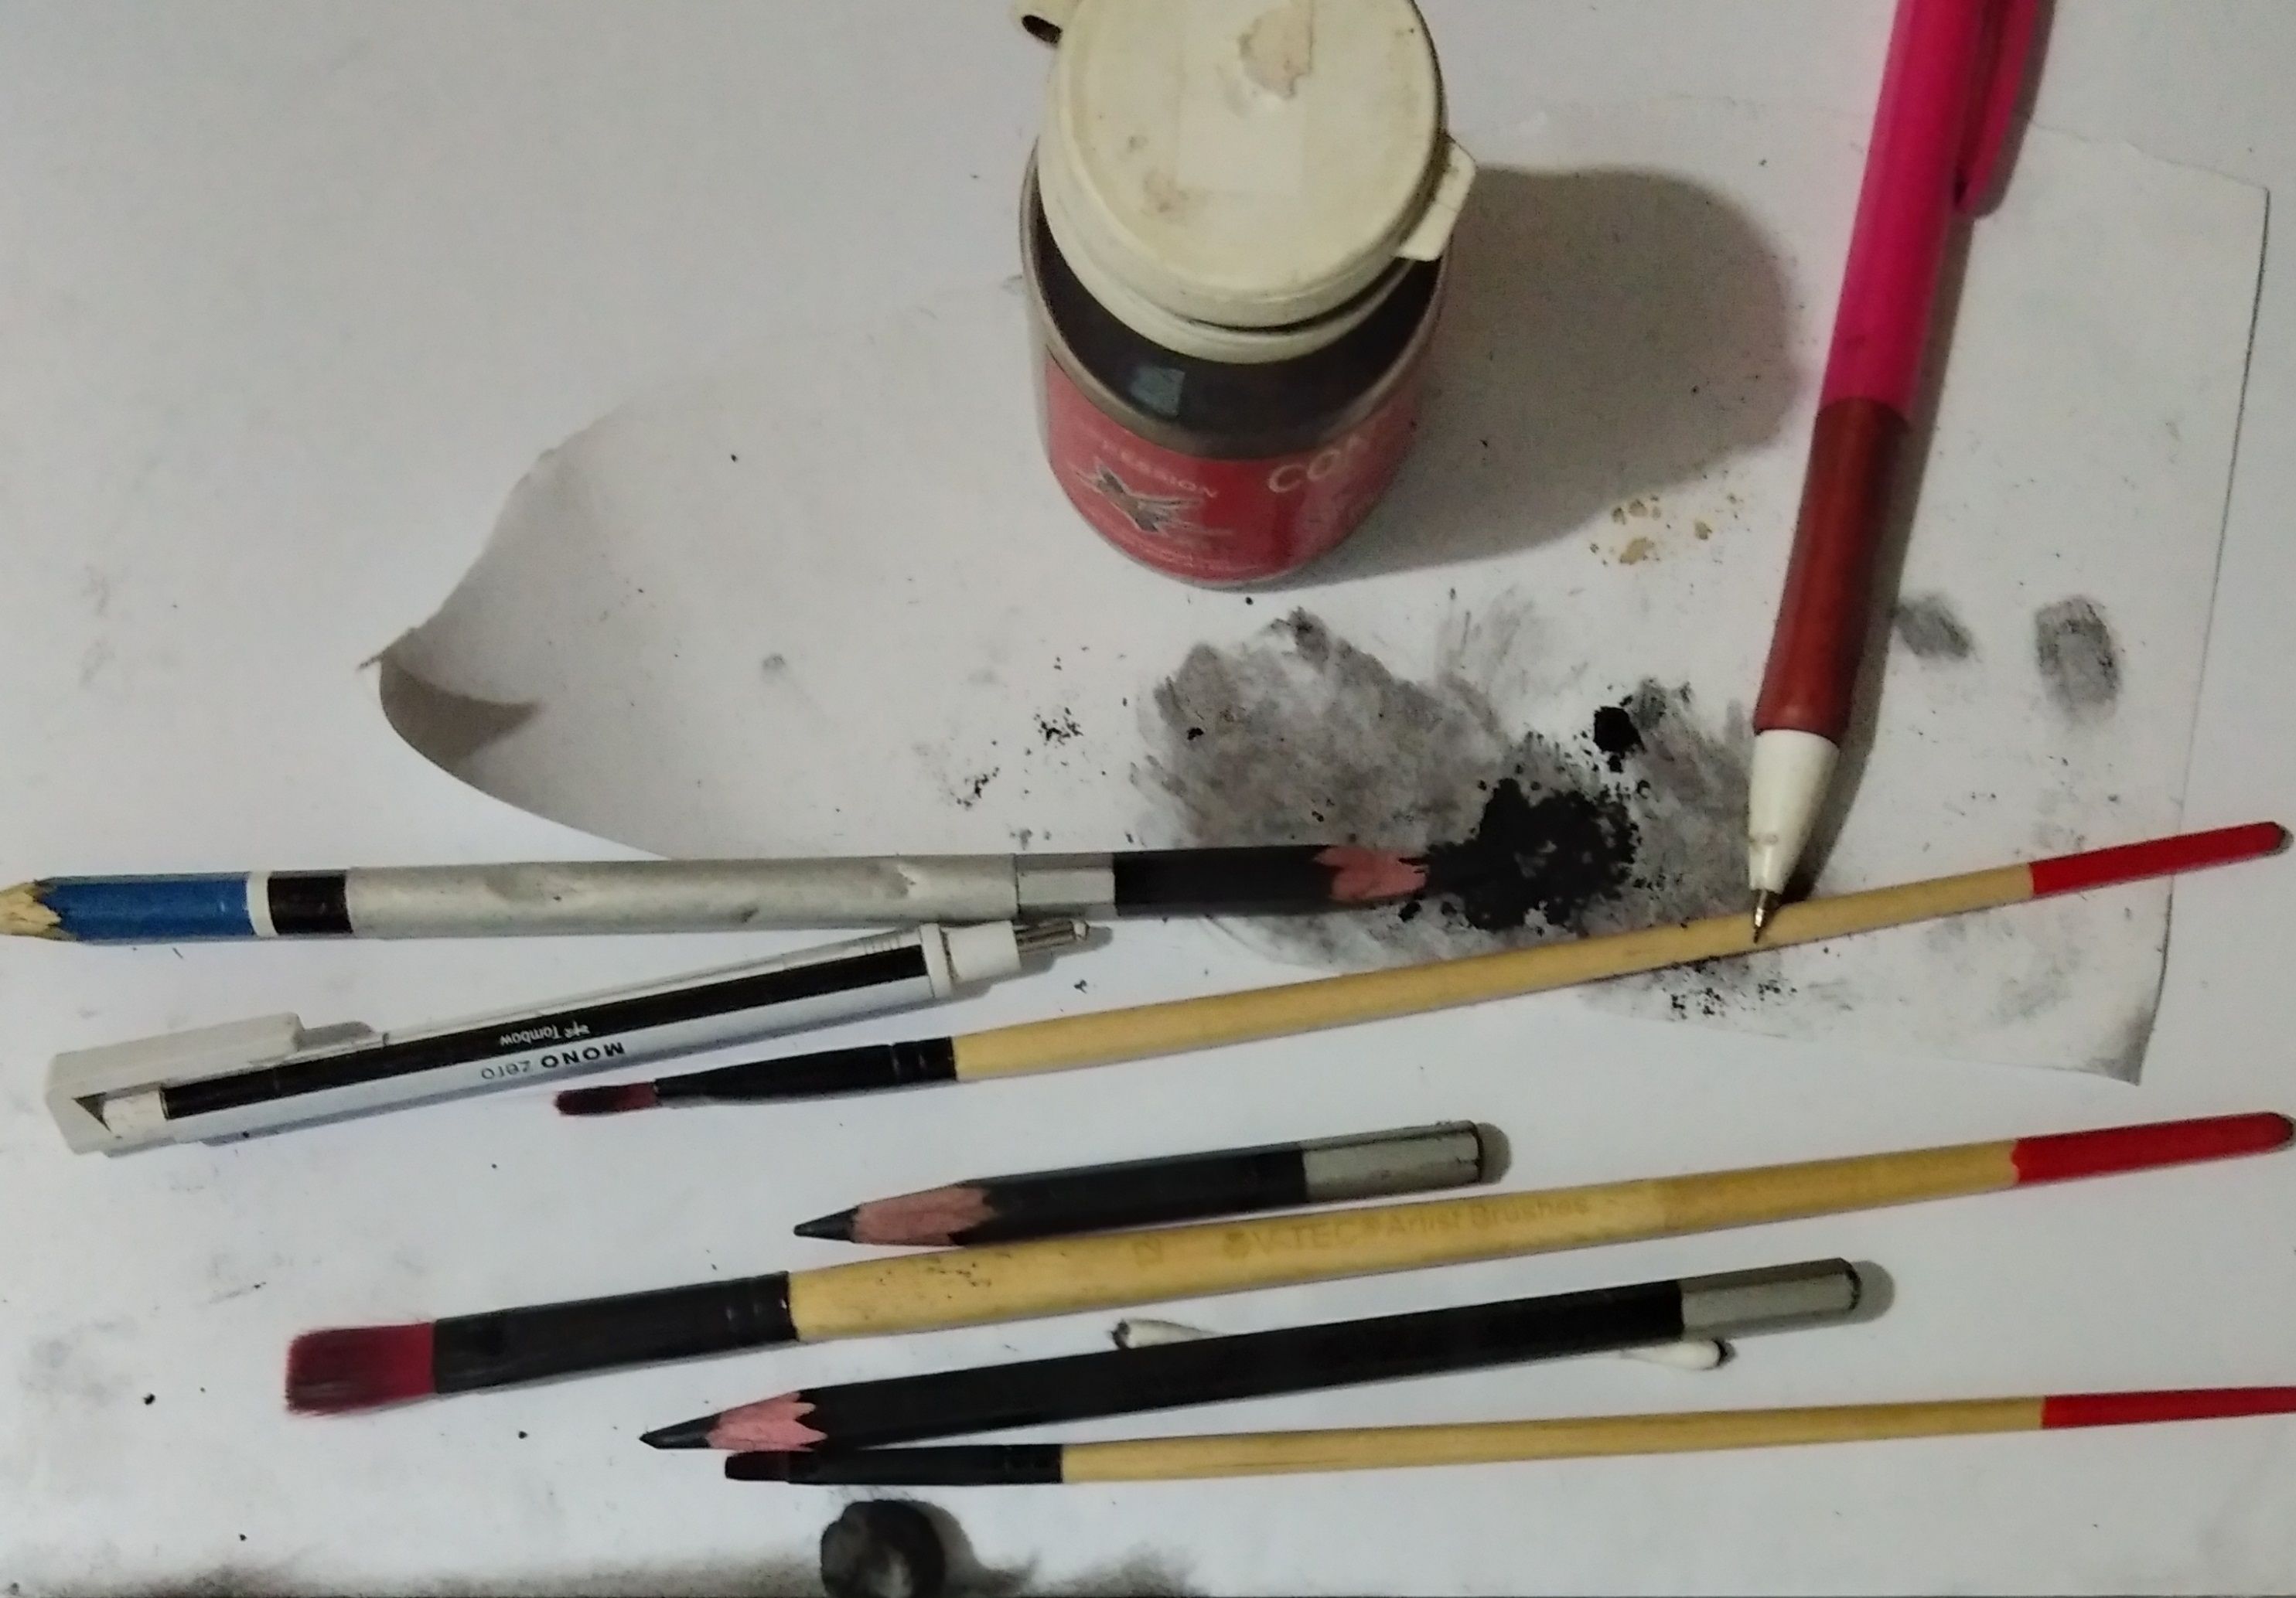
A. Medium
    1. Conte Powder
    2. Brush
    3. Charcoal Pencil
    4. Mechanical pencil
    5. Mono-zero Eraser and Grid Eraser
    6. Cotton
B. Technique
The technique that I used to draw with this media is dussel technique by blocking media using brush and cotton.
Teknik yang saya pakai untuk menggambar dengan media ini adalah teknik dussel dengan cara membloking media menggunakan kuas dan kapas.
C. Process
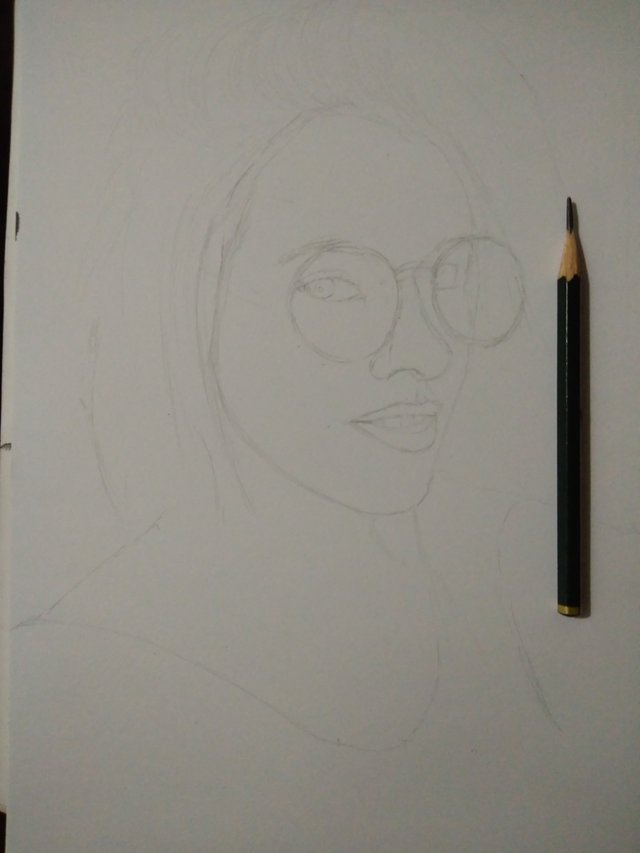
First I made a sketch using a 2B and mechanical pencil. This is the most basic in drawing, try to make the proportions accordingly. Here I only used the eyes projection technique or approximately technique. If not too experienced we can use the grid technique but it takes a lot more process of course. Everyone has their own technique whichever is more comfortable for themselves. Do what you want as long as the result is as expected.
Pertama sekali saya membuat sketsa dengan menggunakan pensil mekanik dan 2B. Ini yang paling dasar dalam menggambar usahakan agar proporsinya sesuai. Disini saya hanya menggunakan teknik kira kira. Bila belum terlalu berpengalaman kita bisa gunakan teknik grid namun itu butuh banyak proses lagi tentunya. Setiap orang punya tekniknya masing masing terserah mana yang lebih nyaman bagi diri sendiri. Lakukan seperti apa yang kamu inginkan asal hasilnya sesuai seperti yang diharapkan.
Next, I blocked the background with the powder and rubbed it with cotton. Because the charcoal powder I use is not good quality, I do it repeatedly and added again by shading it with charcoal pencil then rub it again to get the maximum dark color. When using charcoal media, the pencil should also be charcoal. Don't mix it with graphite pencil because it will never coalesce if you do not have any special skills. I often fail after several times mixing the two.
Selanjutnya, saya membloking bagian background dengan serbuk dan menggosoknya dengan kapas. Karena serbuk charcoal yang saya pakai kualitasnya kurang bagus, saya melakukannya secara berulang ulang dan ditambah lagi dengan mengarsirnya dengan charcoal pencil kemudian menggosoknya lagi agar mendapatkan warna gelap maksimal. Bila memakai media charcoal, maka pensilnya juga harus charcoal. Jangan mencampurnya dengan pensil grafit karna tidak akan pernah menyatu bila belum punya keahlian khusus. Saya sering gagal setelah beberapa kali mencampur keduanya.
Then, I proceed by blocking the hair in the same way as creating a background.
Kemudian, saya lanjutkan dengan membloking rambut dengan cara yang sama seperti membuat background.
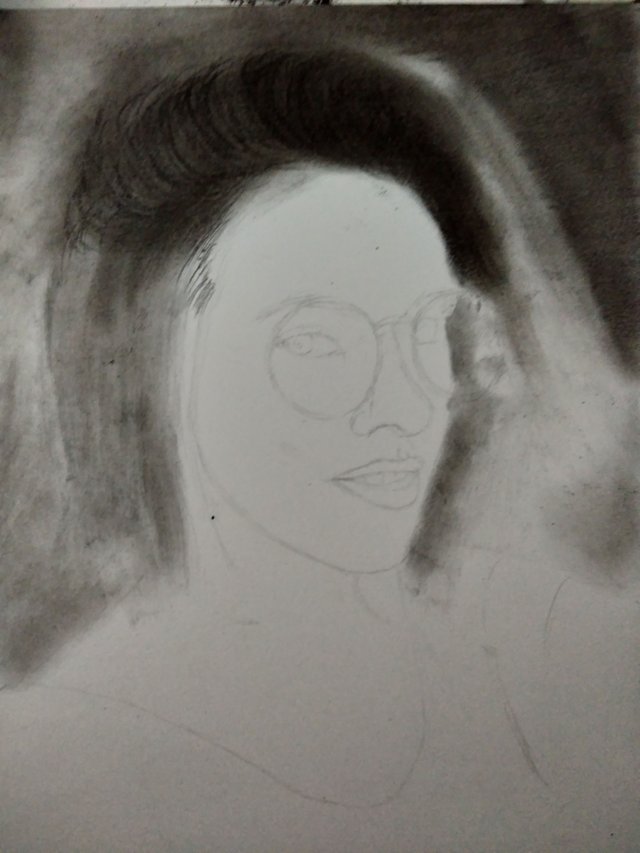
After that, I blocked again the face. Here I just blocked it thinly, so I use a brush. It should be noted that it should not be arbitrary and too thick. It can complicate us in doing the next step.
Setelah itu, saya kembali membloking bagian wajah. Disini saya hanya membloking secara tipis oleh karena itu saya menggunakan kuas. Perlu diperhatikan bahwa tidak boleh asal asalan dan terlalu tebal. Itu bisa mempersulit kita dalam mengerjakan tahap selanjutnya.
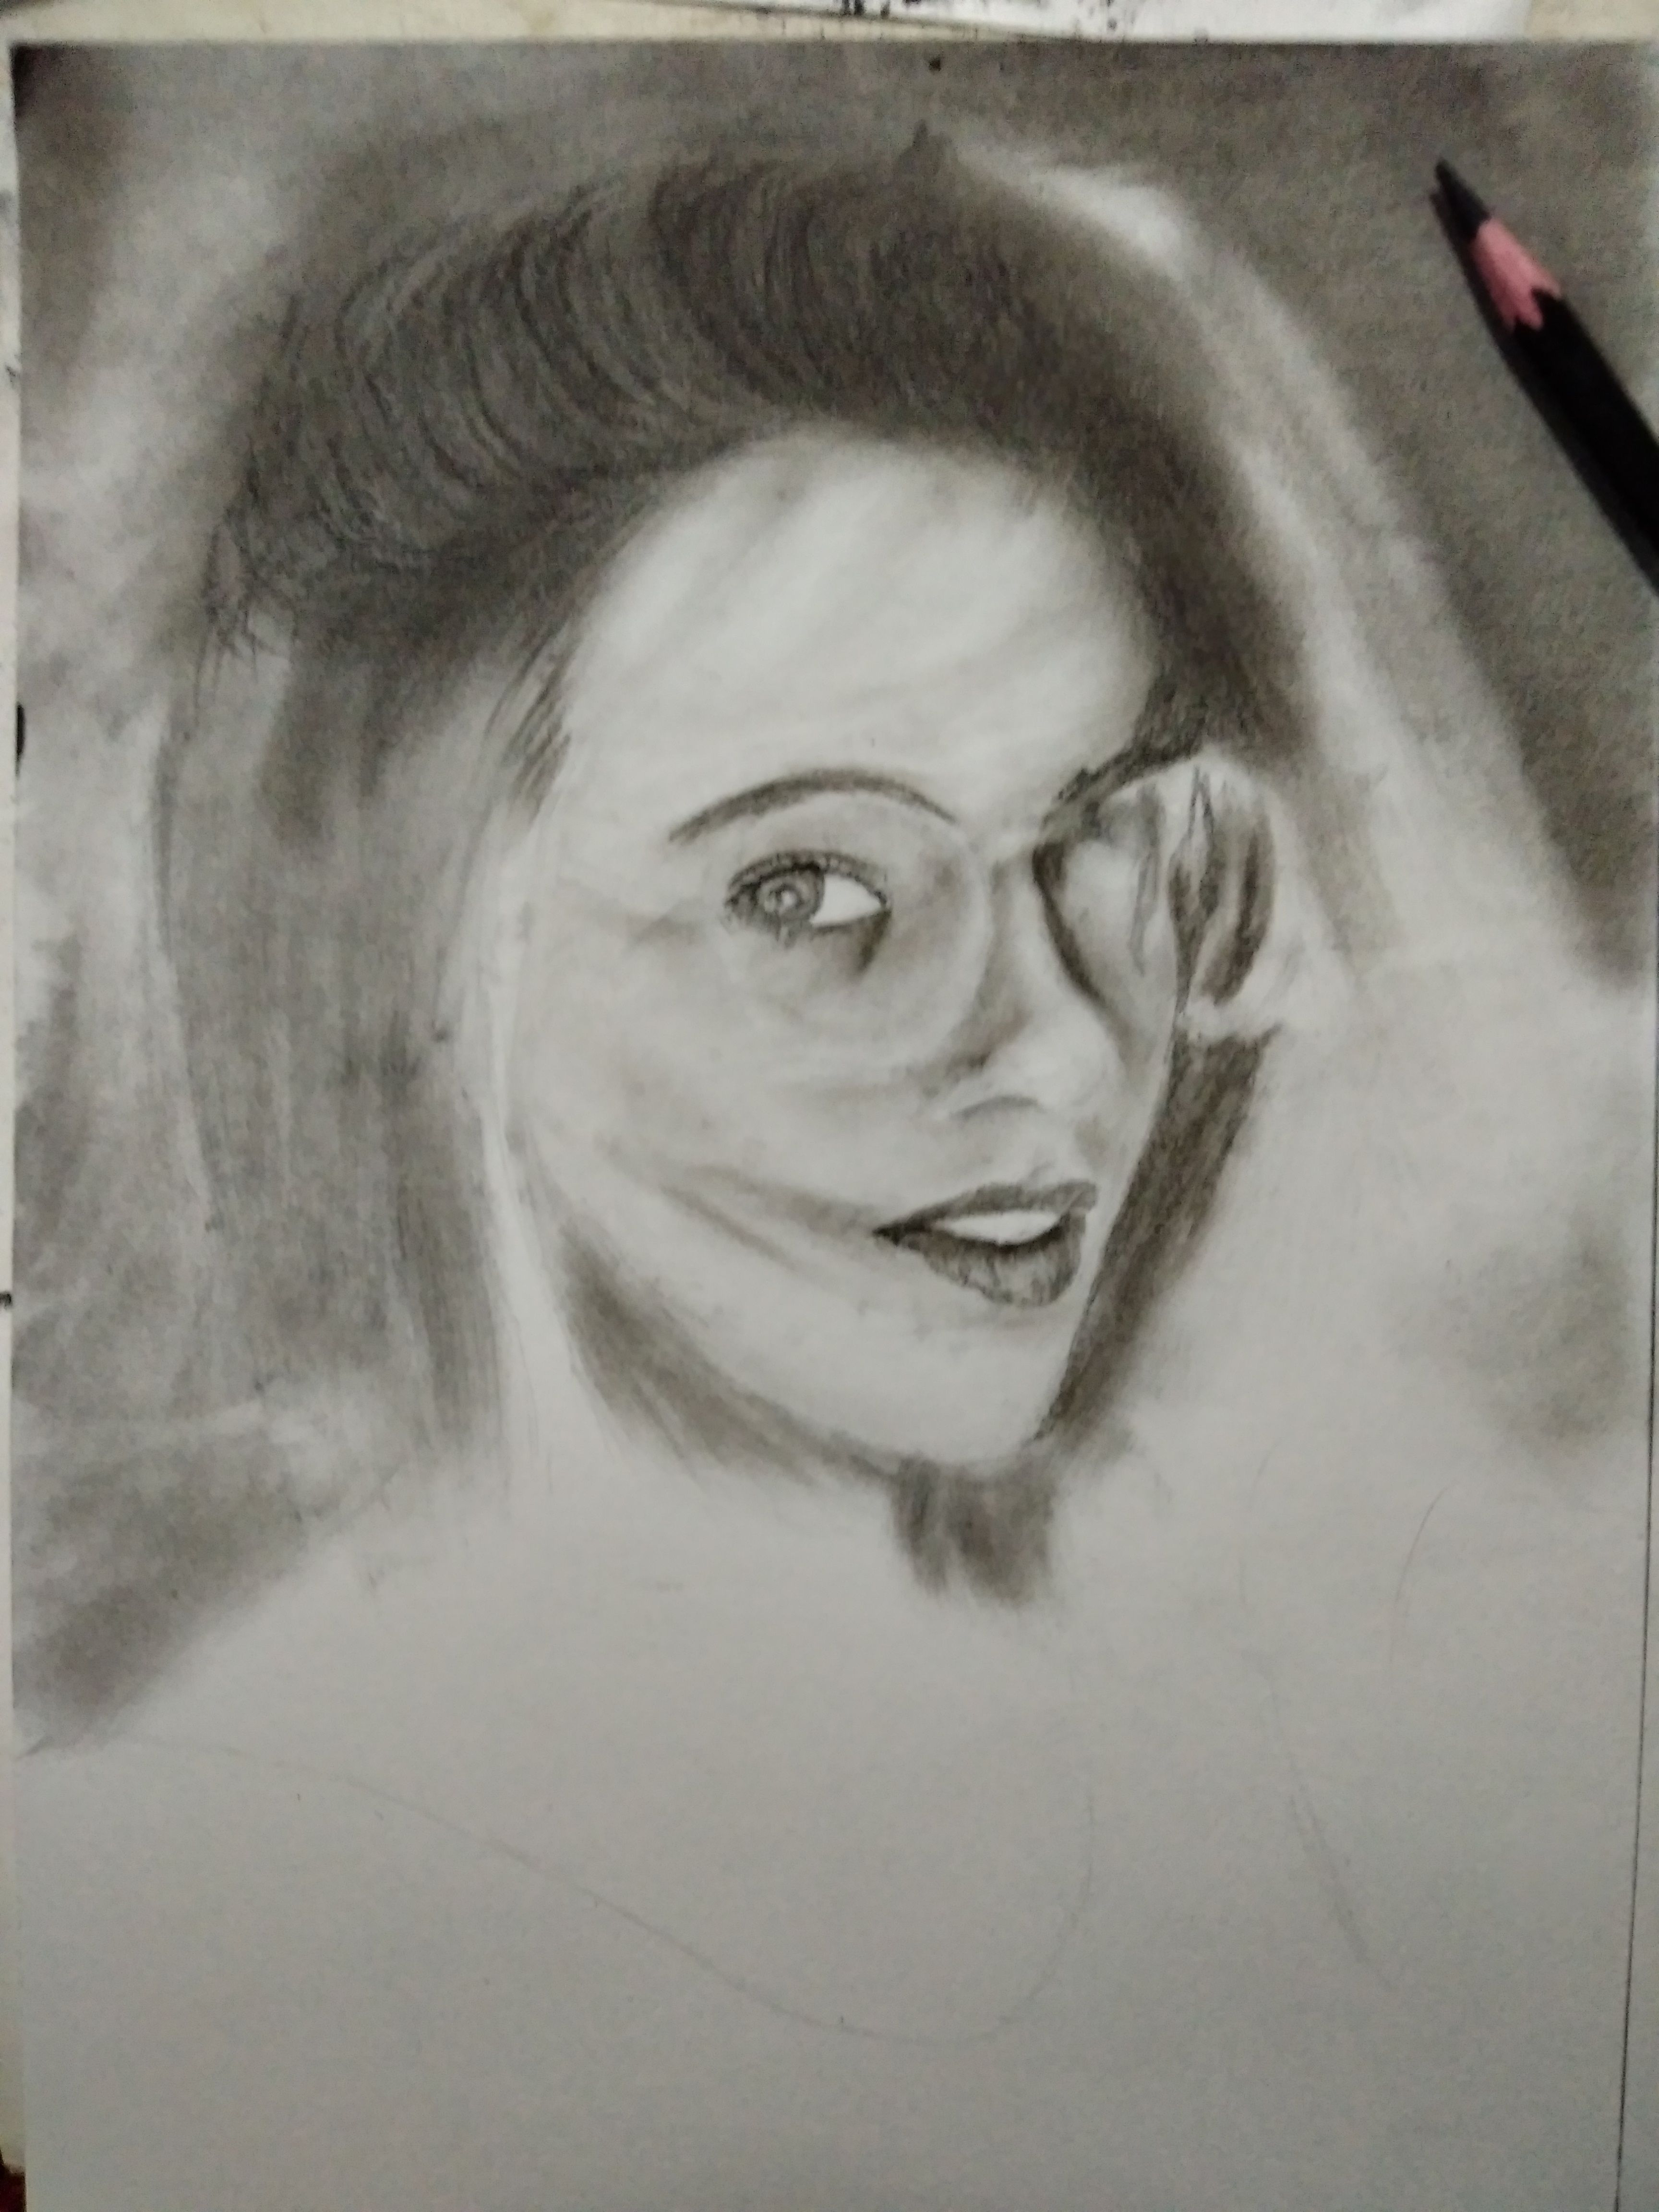
To make the light sections, here we can use mono-zero eraser or grid eraser to remove the bright parts like light on face, glasses and hair.
Untuk membuat cahaya atau bagian bagian yang terang, disini kita bisa menggunakan mono-zero eraser atau penghapus untuk menghapus bagian bagian yang terang seperti cahaya di wajah, kaca mata dan rambut.
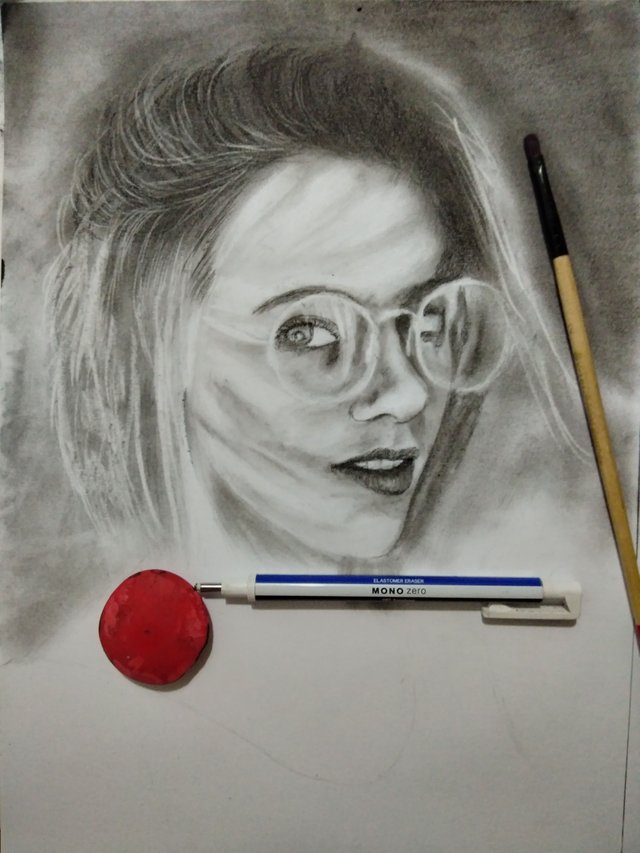
The last step is to draw the bottom part of the neck and shirt. In the reference image we can see that the neck is the darkest place. So we re-use cotton to block it to be darker than other parts. Therefore do it repeatedly.
Tahap terakhir ialah menggambar bagian bawah yaitu leher dan baju. Pada gambar referensinya kita bisa lihat bahwa dibagian leher ialah tempat yang paling gelap. oleh karena itu kita kembali menggunakan kapas untuk memblokingnya agar lebih gelap dari bagian lainnya. Oleh karena itu lakukan secara berulang ulang.
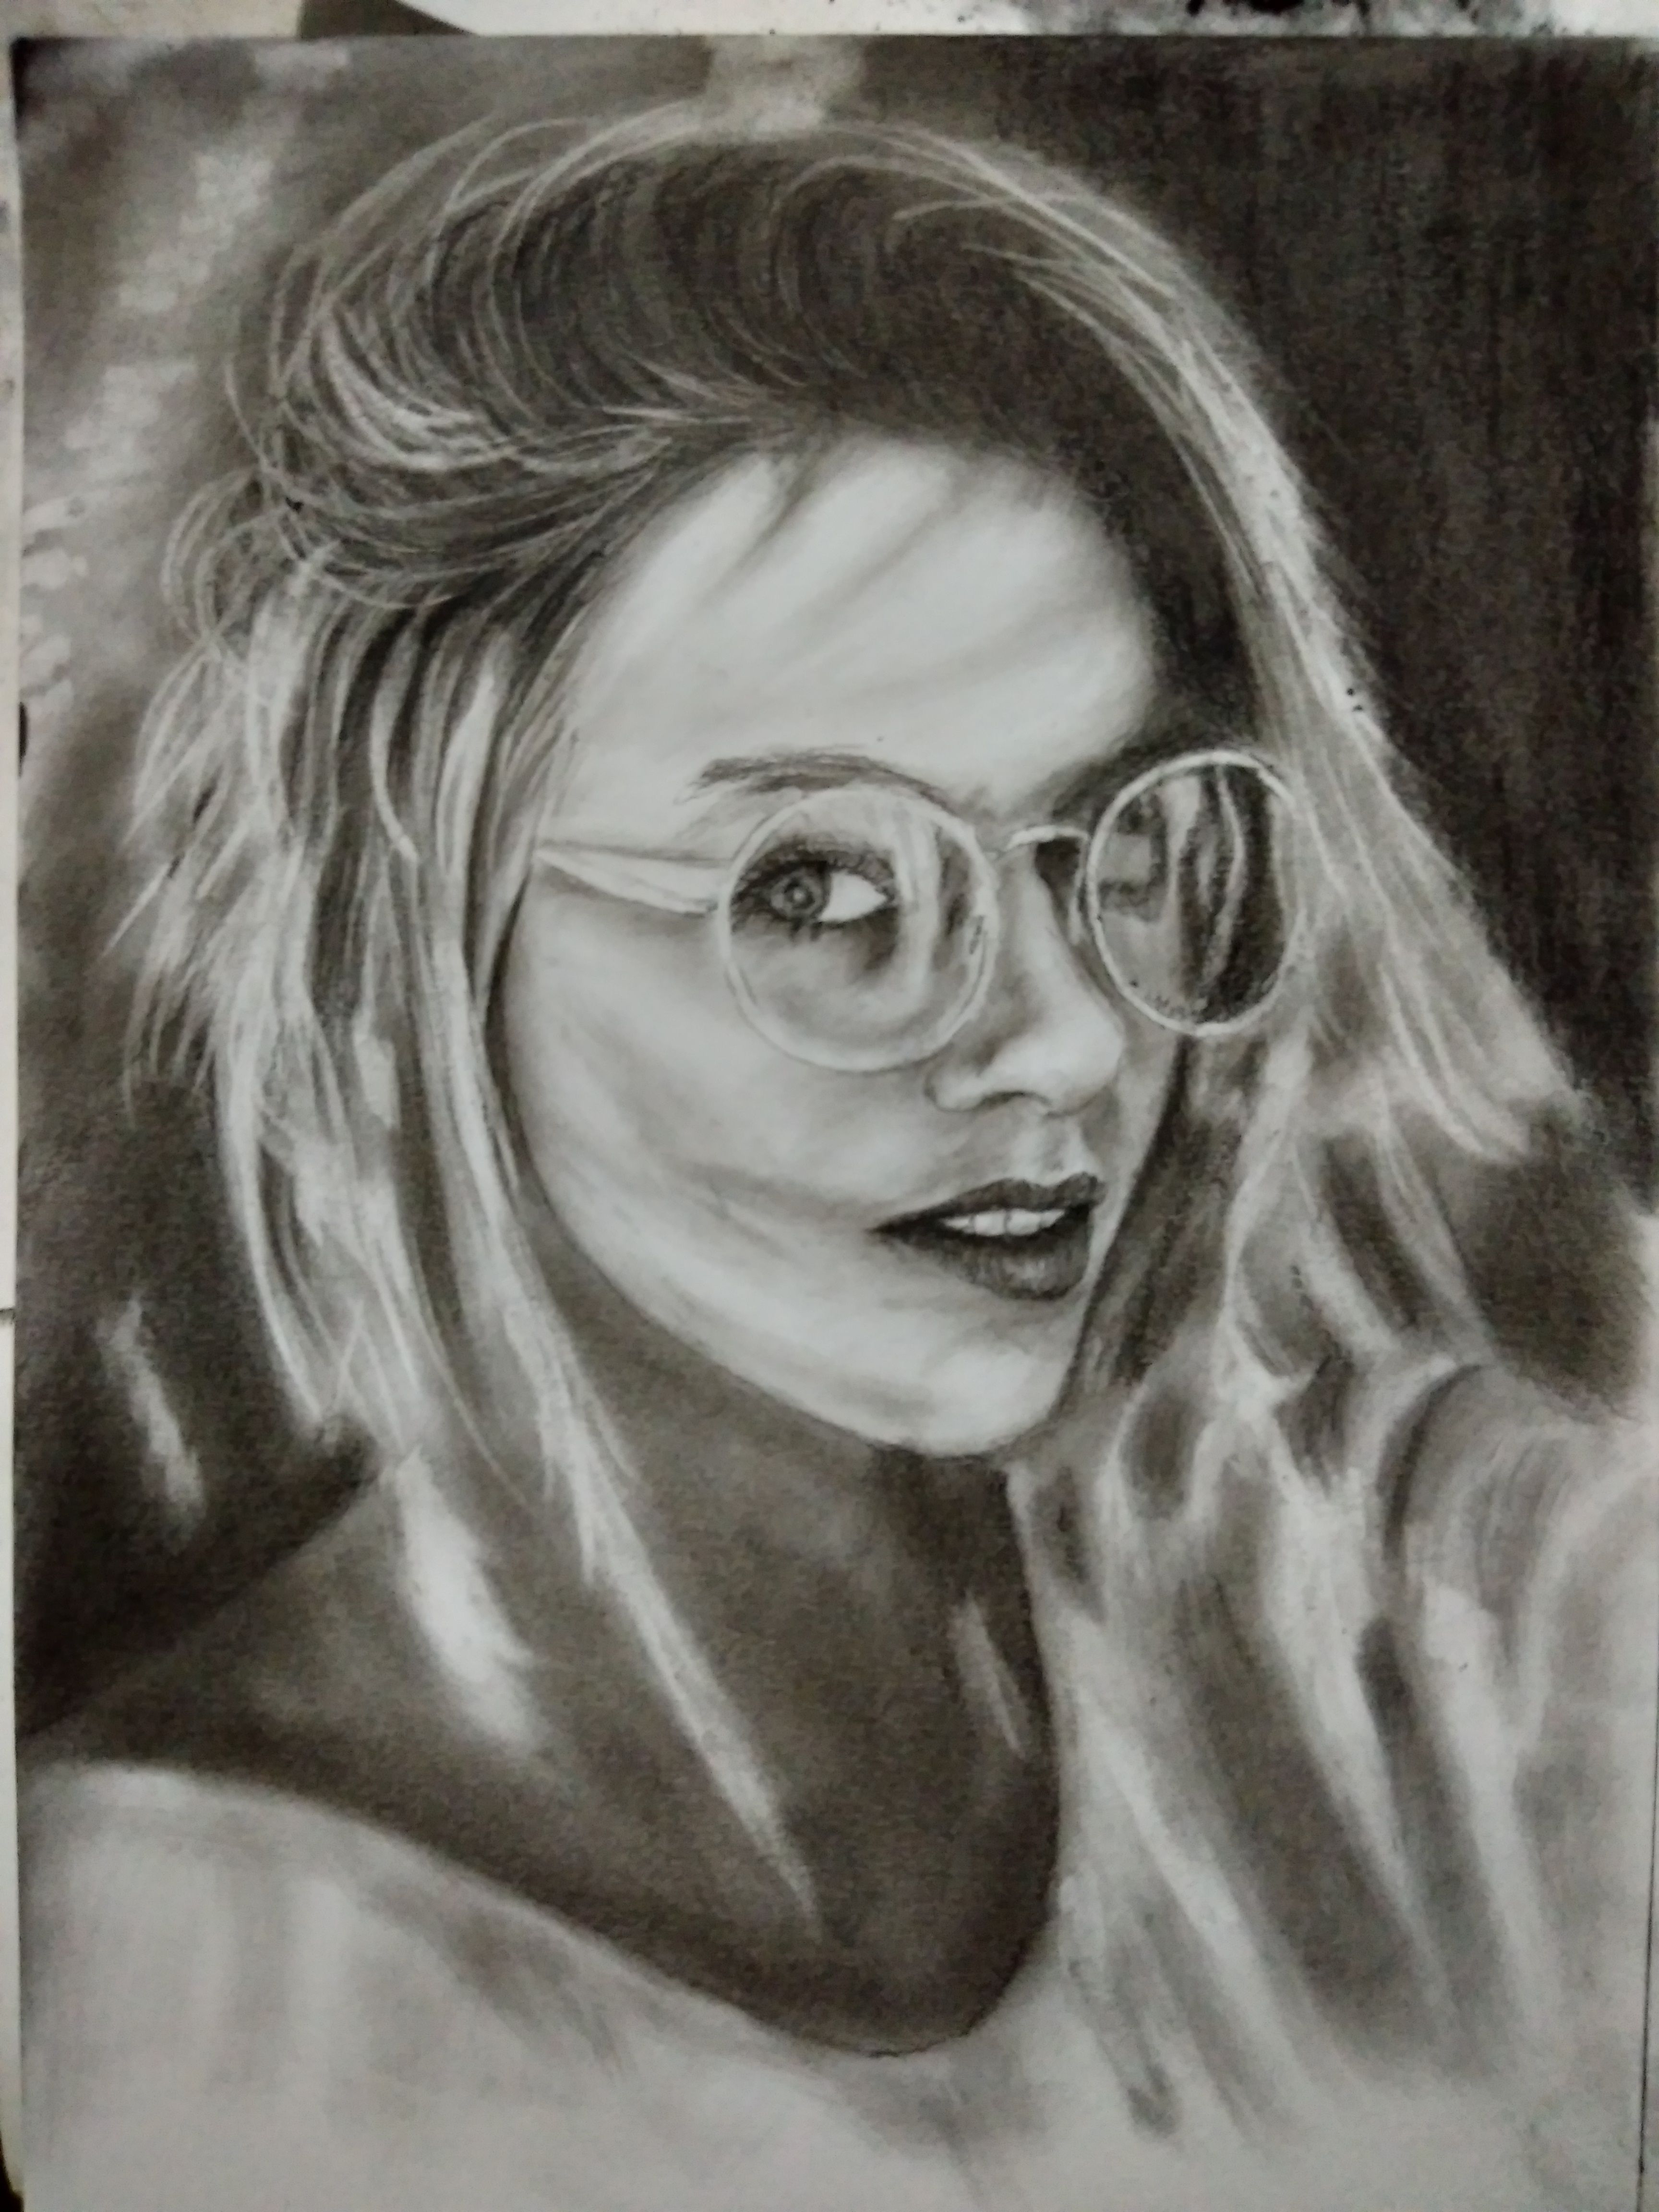
Finally, I can finish this drawing after spending 5 hours, while paper size was only 20x30 cm. I was very satisfied with the results and I really enjoyed during the making process although there are still many shortcomings.
Akhirnya, saya bisa menyelesaikan gambar ini setelah menghabiskam waktu selama 5 jam, padahal ukuran kertas hanya 20x30 cm. Saya sangat puas dengan hasilnya dan saya sangat menikmati selama proses pembuatan walaupun masih banyak terdapat kekurangan.
This work I created for the Steemit STARS Competition hosted by @dobartim and Thanks to @flysky, @aidasfg7 for being judges in this competition.
That's all my process of making it. Thanks for visiting my blog and hopefully you like my work and got inspired. I'm happy if you are interested to try drawing like I did.
Join Steemfollower to get upvote back for upvote. It's free, simple, and easy to find all contents that you may what to upvote and get your own content to be seen by other users and possibly upvote. But you must upvote at least 5 post that you like everyday, automatically our related post will be displayed.
Regard @huslein.slash
#thealliance

Emg lur biasa @huslein.slash tidak pernah mati ide untuk menghasilkan sebuah lukisan y luar biasa. Koleksi di studio nya makin bertambah pastinya. Salut. Sukses terus..
Kadang ide harus dipaksakan bg. Sesekali buntu juga. Itu dah pasti
Hi @huslein.slash, what an informative and wonderful artwork rolled into one post. I'd love to add you to the Steemtopia Network of Learning where we can share our knowledge and skills with other Steemians:
https://steemit.com/makesteemitgreat-again/@fibrefox/the-steemtopia-network-of-learning-update-more-fun-and-games
Thank you so much @plushzilla. Wow, it sound great I will check it out.
Your Post Has Been Featured on @Resteemable!
Feature any Steemit post using resteemit.com!
How It Works:
1. Take Any Steemit URL
2. Erase
https://3. Type
reGet Featured Instantly � Featured Posts are voted every 2.4hrs
Join the Curation Team Here | Vote Resteemable for Witness
You got a 100.00% upvote from @spotlight courtesy of @resteemable!
Very cool... i like this :)
Thanks you art too..
Kakaku mkin keren aja nih hehe
Dek juga bisa kok, ikuti aja tutorialnya
Wah asyik nanti kucoba deh hehe
Pertama belajar emng agak ribet sih pakek serbuk. Kalo ukuran gede kak abisin waktu sampe 1 bulan ada yg lebih juga. Tergantung kesulitan gambarnya sih, kak emng suka gambar yang sulit. Hehe
Tpi lebih mudah pkek alat make up dek pkek tangan aja bisa
Iya sih ka. Kalo alat makeuo biasanya pigmented jadingampang hehe
Hehehe itulah kak blg asik pkek make up
Wow! You really did a lovely sketch, great work my friend keep it up bro, the steps you show is really helpful, thanks for sharing @huslein.slash
Thank you so much. It's for everyone who want to draw. Many tutorial I've made here.
What a great work!! Amazing
Semoga menang 🙋
Thank you so much. I hope so. Hehe
It is composed of only black and white but it is a picture that can feel the diversity of light.
really cool bro ^-^b
Thank you, I think you can do it too friend.
Wow, It is so awesome.
Your drawing become better day by day
Honestly,I am a big fans of you. Haha
Thank you so much @warda. Where have yo been, long time no see you.