Turning Doodling Sketches or any photo into Cartoon Art with a couple simple techniques....Using a 20 year piece of software!

Had a lots of fun doing this last night I whipped out a 20 year old version of Paint Shop Pro v.5 went from the drawing to finished piece in about 30 minutes.
 Being the mentor I am, I thought:
"You know what I should show this process to my fellow Steemians, so anyone at any age can do it!"
People wonder why I am good at math, programming, building and fixing things, cooking and at art...(and before my health problems sports).

And my response is I should be they are all the same thing.....

And you should be too!!!!
What?!?
Yes you should!
Simply put for all theses fields, it's all about 3 components and simple and a guiding principle.
 The 3 components are
- Tools & Materials (sable paint brushes, demar varnish, , golf clubs, measuring cups, a hammer, a guitar, a laptop)
- technique - learn what someone else already thought out. In the past you needed to go to school, read a book, apprentice, watch someone else or have a coach show you. In todays society you can read a blog or watch a Youtube
- a little practice.
And the guiding principle comes from French Cooking a technique called "Mise en place" (pronounced: Meez en Plas) which means "To have everything in its place."
That means before doing what you want to accomplish, be organized! 
Specifically:
Review your plan
Get everything out (equipment, materials, clear area)
Stage, (Arrange, Setup for moving to stages or completion, Measure/Recheck)
review the schedule.
That applies to practice and doing it....
This way you can do it quicker, handle problems, make sure you have everything you need, do not waste time and can concentrate on what you want to accomplish successfully!
I could go into lots of details but I'll use those golden nuggets for a few future posts.
(follow me to read them then)

Alright on to the simple instructions:
I am using a 20 year old version of Paint Shop Pro 5.01

Note this version was Prior to JASC going out of business and Corel picking up the software and messing it up by turning it into bloatware with a tough to use interface. I have a legal license bought from back then. So, every time I wanted to move it from an old machine to new I had to go through a couple step process to move it because Corel doesn't support JASC's customers or have license info, and key generator from back then. BUT IT'S BEEN WELL WORTH IT....OVER THE YEARS....If your interested in it let me know in the replies.
The correct Quality tools are important and new isn't always better!
 It's like using a 30 yer old heavy duty Milwaukee Steel Case Corded Hammer Drill vs. a plastic light weight Ryobi 12 volt cordless Drill, to drill a 1 inch wide 6 inch deep hole in concrete. 1 will take you 2 minutes the other 3 days if ever lol.
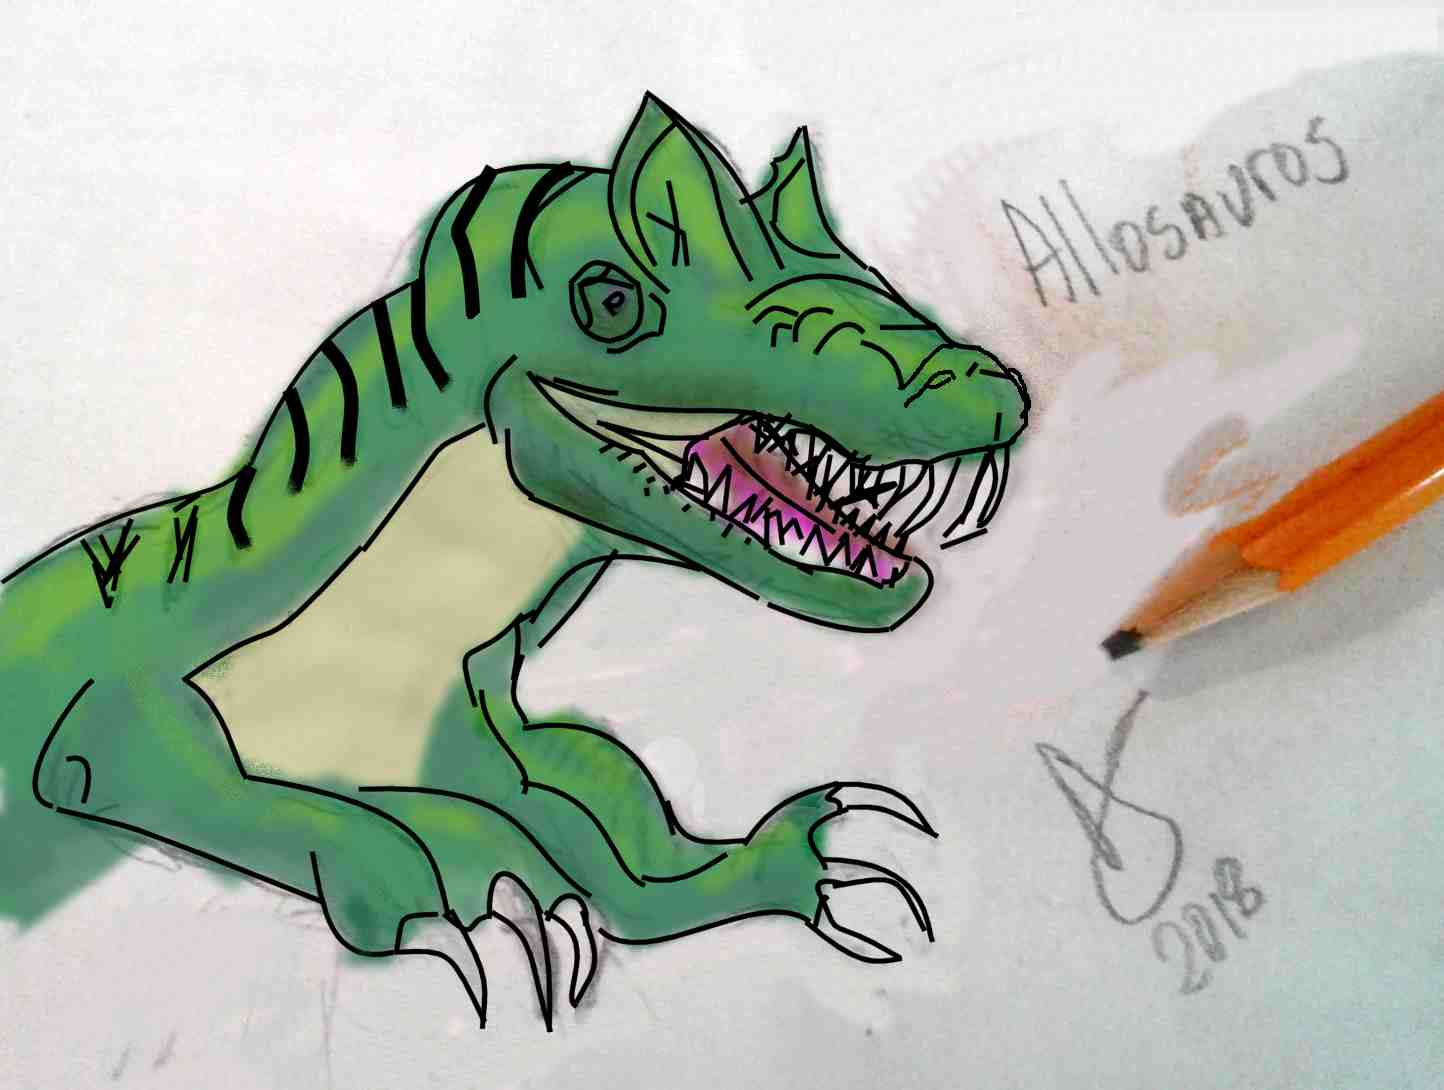
Step 1: Create a new page/canvas on a white background which is larger than the drawing or photo you will be cartooning!

Step 2: bring up the drawing or photo your going to turn into a cartoon in a separate window and crop it down tight to the area your interested.

Step 3: paste it to the large blank canvas as a new layer, duplicate layer, and add a blank layer between each and one on top.

Step 4: Choose the top layer and the line tool with bezier (bendy curve style) mode I like to use a 3 to 5 pt wide line and black.

If you have never used a simple bezier curve it's easy choose the first end hold the mouse down till you reach the second endpoint then choose which way you want it to bend by clicking and pulling and then choose the way you want it inflected pull and click.... Play with it a bit and you can see you can make little curvy points and balloons and subtle large curves

Step 5: Start tracing the edges of your drawing and lines of the item by incrementally doing curves. (THEY DO NOT NEED TO BE EXACT, THAT'S WHAT GIVES IT CHARM!)
The best part about this is you can do this incrementally and if you mistake a curve just undo the last 1 or couple of curves.

You can always hide the layer to see that your tracing ok!
step 6: When done tracing go around and close all areas.....
 | There are three in this example. This needed later for quick coloringinto areas |
Step 7:
Hide all the layers except the top and bottom,
Choose the Wand selection tool,
With the top layer as the active (the one you traced on)
Select the background.

if you have closed all edges no part of the inside of your drawing should be selected.
If it's not the case just go back and close the spots and do it again until its just the outside of your item.
Step 8: make a new selection of an inside area of your item that has a different base color then the other parts of your item. In this case the cards or the underbelly of the dinosaur

Make sure each selection does not bleed into another area and close them off. the same way you did for the outer edges.
Step 9:
Make top layer active.
On the top layer, Select the first inner area that will have it's own color, choose the base color you want to use in it.
Make all the layers visible except the 2nd from top original image layer.
Make the blank layer in between the 2 originals images the active layer.
As you pour the layer the image underneath will be covered , this is the guide you can check your work to make sure its filling correctly. Use the transparency slider next to hide/unhide button to see that it covers

Use the pour tool fill part in.
REPEAT THIS FOR ALL INNER AREAS OF YOUR DRAWING EXCEPT THE LARGEST! iN MY CASE THE HAND AND ARM!
Step 11:
Make the top layer active.
Use the selection tool on top layer to select the background, then invert it from the selection menu. Now the whole item is selected.
Make the layer between the original image layers as the active one again.
And pour the main color in the selection on an area that was not already poured on.

Step 12: Keep the selection in place use to control the areas that you are complementing with highlights, shadows, hues, tones, tints and textures.
Set the color to your complementary color.
Make visible your top image and set its transparency to 25%
Make sure the layer between the two images is active and selected.
Select first the spray can and set it lightly spray a mist in a medium size.
and spray some high lights, if you over spray just undo.

Step 13: Choose Retouch tool and you can really go to town
I start with lightning the card and the nails

Then darken the edges and saturate up some areas

You can zoom in and make some texture with dithering just by pushing with a similar color...

PLAY AROUND IT WORKS EASY!
step 14: Save the file without merging the layers so you can go back in later and change stuff around...
Now Save the file again as a different name.
step 15: final:
Hide the original image layers
Show the rest of the layers.
Merge all visible layers.
Copy to the clipboard and paste as new image.
Save the new image as either .jpg, .gif or .png

Step 15a....Paste a copy in the reply to this article and I will upvote you with 80% Steem Power!
Now that you know how to do it 1 and post for me in the responses, love to see your art.....

Great ..
Well done .. Thank you for this information
More work and creativity
glad you like it!

This seems interesting.....
I would like to show you what i will make using this old but fun software but it will take me time...
So just thanking you to show the way hiw to use this old paint shop 5.
Resteemed the post✌✌
thanks....
next week take a look at the SteemIt Decathlon and compete in on of the contests...
I have always said that for art there are no limits, with this post you showed that we do not need the best digital drawing program or a tablet, you just need the desire to learn, I really liked my friend
glad you it more to come, its about techniques and craftmanship....
something that is sorely lacking in today's society.
Thats what blog is saving...
so lets see you use the technique!
post it here
so much informative..@richatvns
The OG PSP pixel pushers. We salute you 🙌
LOL
O.G. or a dinosaur?
Either way I give you a thumbs up using some of the same techniques!

remember to follow me and resteem

Great! I love how there's always 1001 ways to gitirdun!
Wao Thant's amazing ideas thanks dude for share
make me one and post it... I'll give a 100% upvote!!!!
Congratulations @richatvns, this post is the sixth most rewarded post (based on pending payouts) in the last 12 hours written by a Superuser account holder (accounts that hold between 1 and 10 Mega Vests). The total number of posts by Superuser account holders during this period was 1294 and the total pending payments to posts in this category was $6405.63. To see the full list of highest paid posts across all accounts categories, click here.
If you do not wish to receive these messages in future, please reply stop to this comment.
This is an awesome photography. Its really amazing photo and also creative art. I really impressed your photography.
there is no photos here,
you meant drawings
lol
Hello Dear Steemian,
I am S.A.R.A.H. (Search Automatically High Reward Articles) Bot.
I'm an artificial intelligence that automatically looks for posts that expect high rewards. I recognize such posts, make my upvote on them and get a high Curation Reward. If you want to join in, you can hang on to my curation trail. You can follow me on Steemauto or on Streemian.
If it looks like this you are doing it right:
Let's maximize our curation rewards together!
Yours,
S.A.R.A.H.
FollowBack every day 100%