The Engineering World, The World of Testing

With increase in demand of more magnificent structures like the burj khalifa, international space station (ISIS), Monticello Dam and others alike, engineers are tasked with providing the right material for the construction of this structures. It is in this bid that they must come back to the basics of material and test for the best materials.
All the materials discovered through research need to go through mechanical testing to determine properties such as strength, hardness, ductility, malleability, elasticity, plasticity and so many more. The result of this test carried out helps the engineer to understand how the material will perform when used in the field and also help classify and categorize the material in case of possible use.
Such Mechanical tests carried out on a material to mention but a few include:
- Hardness test; to determine the hardness of a material to deformation
- Brinell hardness test
- Meyer hardness test
- Rockwell hardness test
- Tensile test; to get a graph known as the stress-strain curve which can be used to determine properties of a material such as upper and lower yield point, tensile strength, and the breaking point of a material.
- Impact test; to determine the toughness of a material to impact
- Izod test
- Charpy test
- Creep test; to determine how materials behave at high temperatures
The process of testing could take days, weeks and as long as possible to determine the required property. And in this post I will try to give us some insight on how tensile test and hardness test are carried out. So read on.
Tensile Test

Basically tensile test involves the placing of a sample material in between two grips also called fixtures. The sample material is usually a material with known length and cross-sectional area. Keeping one end stationary, we add weight to the other end and take note of the increase in length (extension). We keep adding weight (load) and keep taking note of the increase in length until the material breaks. In the laboratory, tensile strength is carried out using a Tensometer
The result of the experiment is usually a graph of Force (added weight) against Extension. But with this graph we only get an understanding of the effect of Force on materials with the same cross sectional area and length which is not enough. As with all experiments we need to compare our readings with those of another material to better understand our studies. If we had another material with a different length and cross sectional area, this comparison will be ineffective and to cancel out all errors that may arise from this the stress-strain graph was born.
With the stress strain graph we are able to eliminate this error because in calculating the stress of the material we divide the Force (added weight) by the original cross sectional area of the material and by so doing we eliminate any error that may occur as a result difference in cross sectional area. Also, in getting stress we divide the Extension by the original length of the sample material eliminating any error resulting from the difference in length. With all these resolved, what we now have is a graph possible of giving us accurate comparison between materials of different length and cross sectional area - A stress-strain curve. An example of a stress-strain graph from a tensile test is shown below

From the stress-strain curve above the part with purple colour is the elastic region - the region within which the material obeys Hooke's Law, that is, with every equal increase in weight there is an equal increase in extension and the material will return to its original size within this region. And the part shaded gold -"am not sure if the colour is actually gold, please verify, is it gold or gray" - is the plastic region, here the material doesn't obey Hooke's law and doesn't return to its original size.
So what can we actually determine from this curve? From the curve the point labelled A is the elastic limit, the point labelled B is the upper yield point, the part labelled C is the lower yield point, the part labelled D is the ultimate strength and the part labelled E is the breaking point. What does this all mean?" The elastic limit separates the elastic region from the plastic region and the yield point indicates the point the material yields to increase in weight, it also indicates the yield strength, while the ultimate strength tells us the maximum force( tensile strength) the material can take before necking. The breaking point shows the point when the material gives up and breaks.
A bit boring? Yes it is, but this is just one of the test the engineer must perform to determine the material which best fits and is capable of performing in the field. Another test I would like to discuss is the hardness test.
Hardness Test
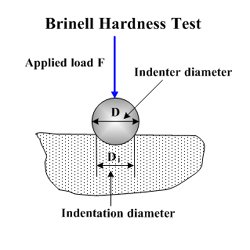
Hardness test as the name suggests is used to test the hardness of a material. But what is hardness? Hardness is simple terms is the ability of a material to resist indentation, scratching and penetration. And basically a hard material penetrates or indents a soft material , that is, a material that is not as hard as it .
We've all heard on different occasion that "diamond is the hardest material" and also "diamond cuts diamond". So how do we determine which material is hard and which is not? Thats what the hardness test is for and it basically just involves using an indenter, by adding weight, to penetrate a sample material and then determine the diameter of the indented hole.
The result from this experiment using different samples gives different diameter for the indented hole. The reading is highly dependent of the material the indenter is made from, as with the use of different indenter we get different readings. For this reason different table exists which we use to compare the hardness of the different material. This is because different people preformed the experiment and got different readings. An example is the Brinell Hardness Test and the Meyer Hardness Test.
The importance of testing in the engineering field cannot be over emphasized because the ability of an engineer to perform effectively and efficiently is highly dependent on testing. And the repercussion for not performing test is seen all around us in ineffective buildings and structures.
References:
All image credits are included under the images

This post has received a 0.05 % upvote from @drotto thanks to: @steemstem-bot.
Well done! This post has received a 10.00 % upvote from @litasio thanks to: @steemstem-bot. Whoop!
If you would like to delegate to the @LitasIO you can do so by clicking on the following link: 10SP