HOW TO BUILD A 1KVA INVERTER
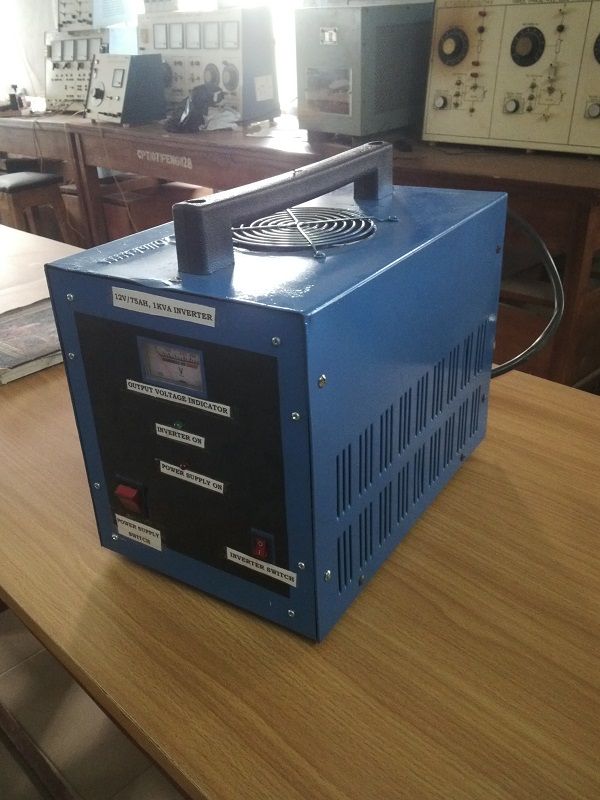
Finished Product
Hello steemians, it’s your boy @sistem and I am here today to take you on a very interesting topic ‘’How to build a 1KVA inverter’’.
Hey! Hold on please. I know this topic might seem boring to so many of you, especially those who are not science inclined but don’t worry, I will make it as interesting as possible and I will try as much as possible to break down every term used so that you can understand.
I hope to carry everyone along in this and not just those who are science inclined.
Are you an inquisitive being? Do you want to know how inverters operate? Do you want to know how they are made? Do you want to be able to make an inverter yourself? Then you are reading the right post and I want you to get a chilled bottle of coca cola as you do because you are about to learn something new today.
Now we all know that the demand for electric power in developing countries like Nigeria is on the rise and with this demand not being adequately satisfied, coupled with the high cost of power generation, the need for a renewable, cost-effective and alternative source of power supply arises and the best way to meet this dire need is through the utilization of solar energy from the sun using a device known as the Inverter.
Most inverters do their job by performing two main functions: first they convert the incoming DC (Direct Current) into AC(Alternating Current), and then they step up the resulting AC to mains voltage level using a transformer. And the goal of the designer is to have the inverter perform these functions as efficiently as possible so that, as much as possible, the energy drawn from the battery or solar panel is converted into mains voltage AC, and as little as possible is wasted as heat.
Ok ok, at this point I know that some people are confused as to what Alternating current is and what Direct current is. Now, Direct current is the current you get when you connect a battery to any device, in other words, direct current is the current from a battery.
Alternating current, is the current that gives you the power that comes into your house. It is the current drawn from the stand alone generators in your house and it is the same current utilized but most of the appliances in your home.
However, most of the appliances, like the television, light bulbs, refrigerators, electric irons etc can not work/operate on Direct current and that is where the inverter comes in, to convert that DC from the battery to AC so that those appliances would work.
Inverters actually work best when incorporated with a solar panel which utilizes solar energy to charge the batteries which are converted into Alternating currents to feed your homes nut we will not be delving into that today as we are just looking at the basic conversion of DC from batteries into usable AC.
Now, let’s take a look at the basic operation of an inverter and how it converts Direct current (DC) into Alternating current (AC).
Basic operation of an inverter…
The overall operation of this system comprises inter connections of many sub-circuits to give optimum performances. The sub circuit include; the oscillator circuit, PWM circuit, driver circuit, low battery/overload shutdown circuit, charging control/soft charging circuit, surge protection circuit, changeover/power supply circuit, and the output circuit (MOSFET and transformer section). DC from the battery is converted into AC very simply, by using a bank of parallel connected power MOSFETs (Metal Oxide Semiconductor Field Effect Transistors) acting as very efficient electronic switches. The positive 12V DC from the battery is connected to the centre-tap of the transformer primary, while each MOSFET is connected between one end of the primary and earth (battery negative). By switching the two MOSFETs on alternately, the current is made to flow first in one half of the primary and then in the other, producing an alternating magnetic flux in the transformer’s core. As a result, a corresponding AC voltage is induced in the transformer’s secondary winding, which is then transmitted into your hme distribution board to power your devices and appliances.
Heheheh owk, just so I don’t get you guys more confused, I have made a simple drawing of the circuit to help you understand the flow of events.
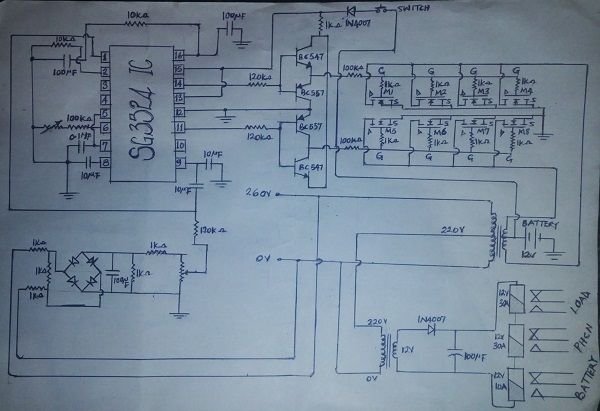
Circuit Diagram
In the diagram above, I have inputted the exact components and component values needed for the construction of this 1KVA inverter. Any change in any of these components might cause the inverter to behave differently so you have to stick with what I have given to you.
Components needed to build an inverter…
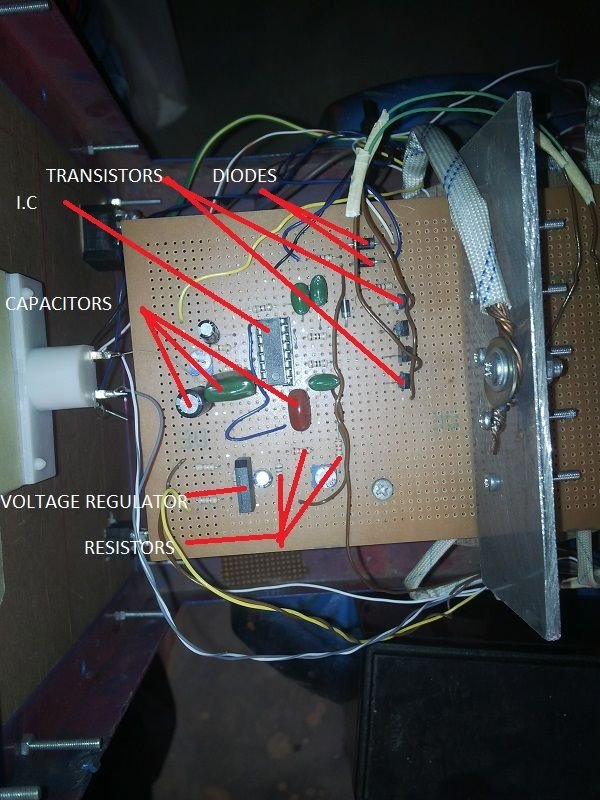
In the design and construction of this inverter, I made use of many components. Each component has a function different from the other, and highly dependent on the others for the desired result. No single component function is insignificant. The components employed or used include: Diodes, Resistors, Capacitors, Voltage regulators, Integrated circuit (ICs), Metal Oxides Semiconductor Field Effect Transistors (MOSFETs), Relays, Transistors, Bridge rectifier, Transformer, vero board, voltmeter, DC fan, Heat sink, inverter casing, wires of different sizes/gauges etc.
components explained in simple terms
• DIODES- Diodes are small electrical components which conducts current in one direction i.e it does not allow the flow of current in a reverse direction.
• RESISTORS- These are components which resists the flow of electrical current.
• CAPACITORS- These are electrical components which stores electrical energy.
• VOLTAGE REGULATOR- As the name implies, they are used to regulate voltage in the circuit.
• INTEGRATED CIRCUIT (IC)- This is known as the power house of the inverter. The integrated circuit controls virtually the major activities in the circuit.
• MOSFETS- They are known as the drivers in the circuit. They determine the amount of current that flows through the inverter circuit.
• RELAYS- As the name implies, they relay information to the circuit breakers telling them when to rip off on overload or short circuit. It is also used as a switching device.
• TRANSISTORS- They amplify the current that comes out of the integrated circuit.
• BRIDGE RECTIFIER- The bridge rectifier is found at the first stage of the inverter construction and it is made up of diodes arranged in a certain way (see the circuit diagram above) so as to convert Alternating current from the transformer to Direct current for the purpose of charging the batteries.
• TRANSFORMER- This is a component that transforms low voltage from the battery (12V) to medium voltage (220V) which is used by your appliances.
• VERO BOARD- The actual circuit building takes place on the vero board.
• VOLTMETER- It reads and displays the amount of voltage in the output circuit.
• DC FAN- It is incorporated in the inverter construction for the purpose of cooling the MOSFETs to prevent explosion or burning out.
• HEAT SINK- The heat sink is just a metallic plate which dissipates heat coming out from the MOSFETs.
• INVERTER CASING- This houses the inverter circuit.
Now, having understood the use of each of these components in the construction of the inverter, let us now go into the main construction of the inverter.
The construction of an inverter is divided into three(3) basic stages which are
- The Input stage
- The Driver stage
- The Output stage
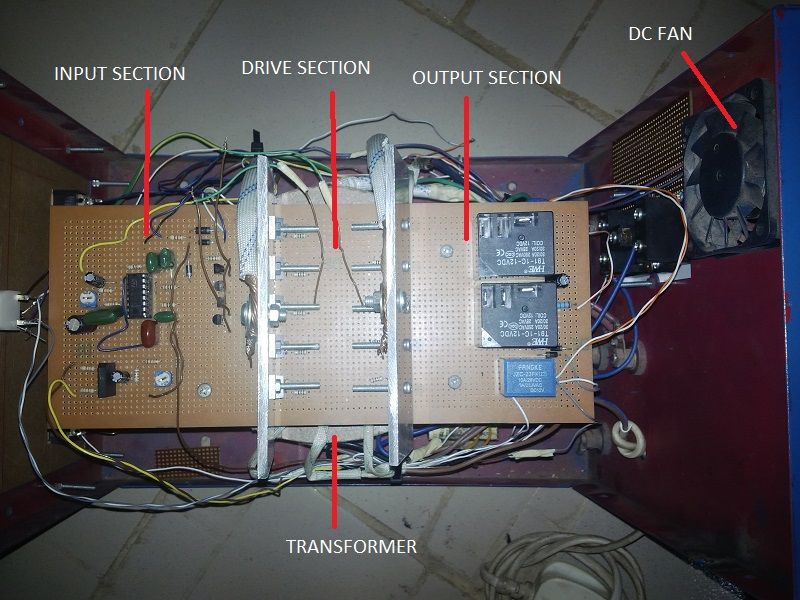
The Three stages of inverter consstruction
Input Stage
The first stage which is the input stage consists of the rectifier, the oscillator and transistor.
The rectifier converts the alternating current which comes from the output transformer into direct current for the purpose of charging the battery and this is done by the use of diodes. The oscillation transistor***r amplifies the output current from the IC to a current which can be carried or accommodated by the MOSFETs in the next stage (drive stage).
Input Stage
Drive Stage
The drive stage is made up of basically the MOSFETs. The MOSFETs helps amplify the current to a much higher level and the number of MOSFETs you use determines the mount of current that can be drawn from the inverter when charging the battery and when used to power appliances in your homes. It also determines the rating of the inverter, whether it will be a 1KVA inverter or a 5KVA inverter and so on.
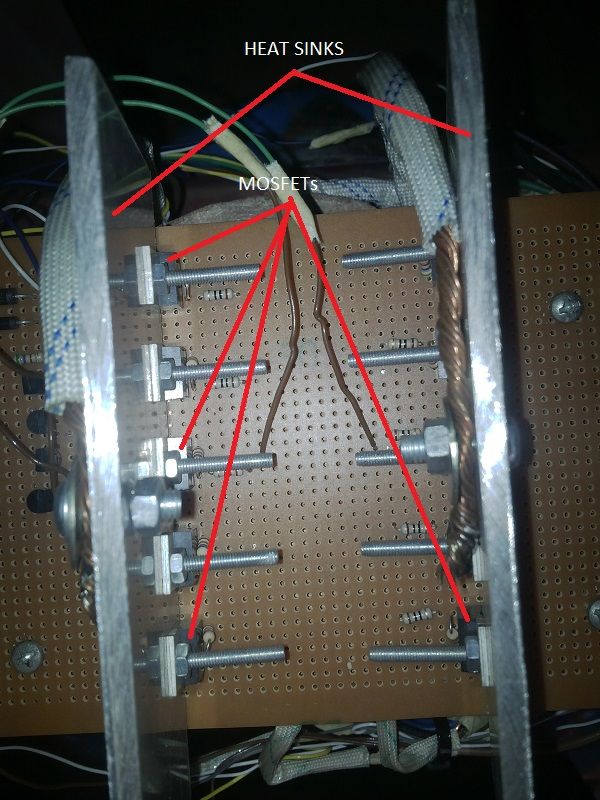
Drive Stage
Output Stage
The output stage is made up of the relays and transformer. The relays are basically incorporated here as a switching device which switches between power supply and inverter i.e, when there is power supply, the relays sense the power and switches off the inverter while switching to supply power from PHCN. It also does this when power supply goes off.
The transformer, as the name implies, transforms the 12V DC which comes from the battery into 220V. the transformer also, to a large extent, determines the rating of the inverter. A 1KVA transformer will be used to construct a 1KVA inverter. A 5KVA transformer will be used to construct a 5KVA inverter and so on. You don’t need to build these transformers yourself as they can easily be bought from the market or from dealers. You can also get it at a cheaper rate by giving it to an expert to construct for you. In this case, I had to tell an expert to design and construct it for me.
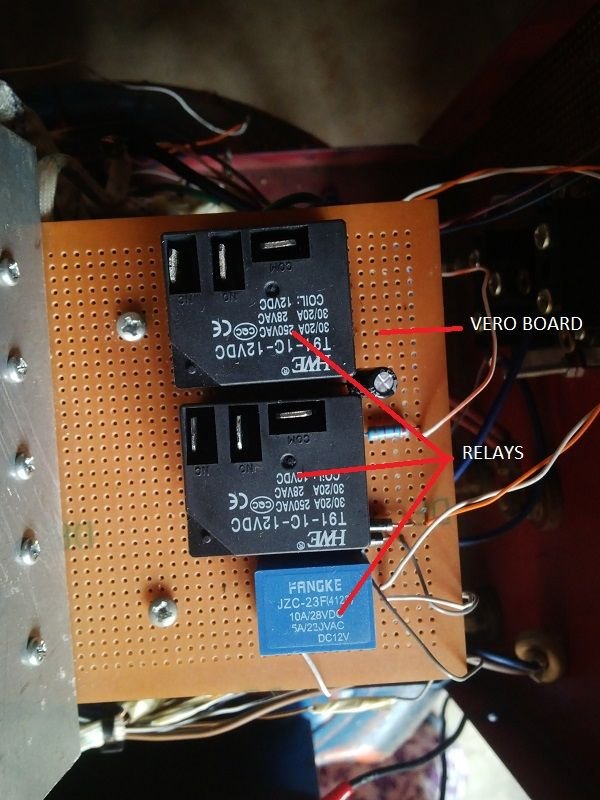
Output Stage
After doing all these, the next would be to package the inverter. The casing which houses the inverter could be locally sourced by you (constructed by you) or also bought from the market. In this case, I bought my casing from the market. Just go to the dealers and they will ask you to select the size you want. As simple as that.
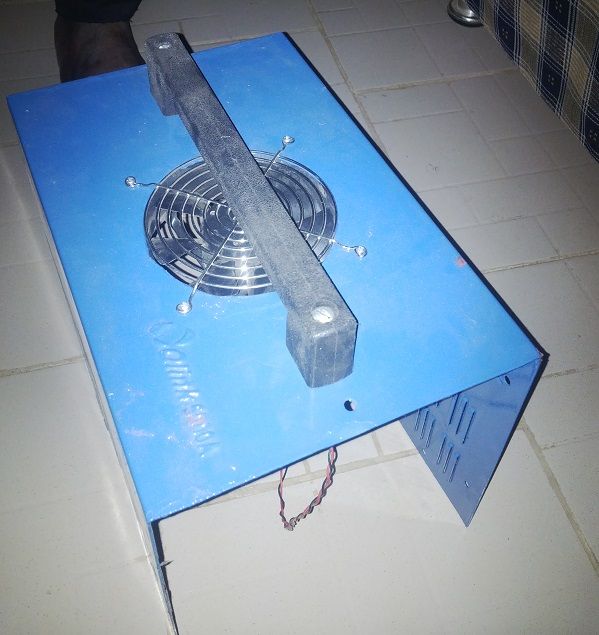
The Casing
After packaging, your inverter will be ready for use and this is what the final product would look like
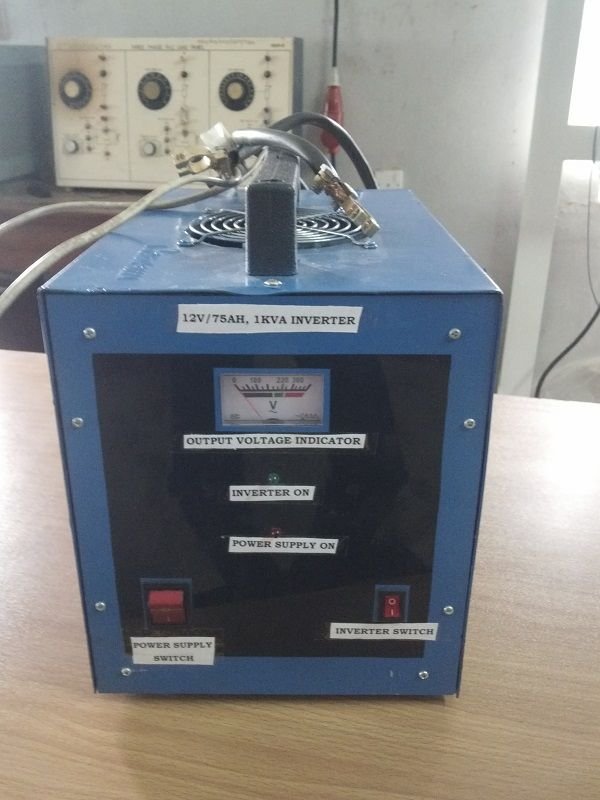
Front View of finished product
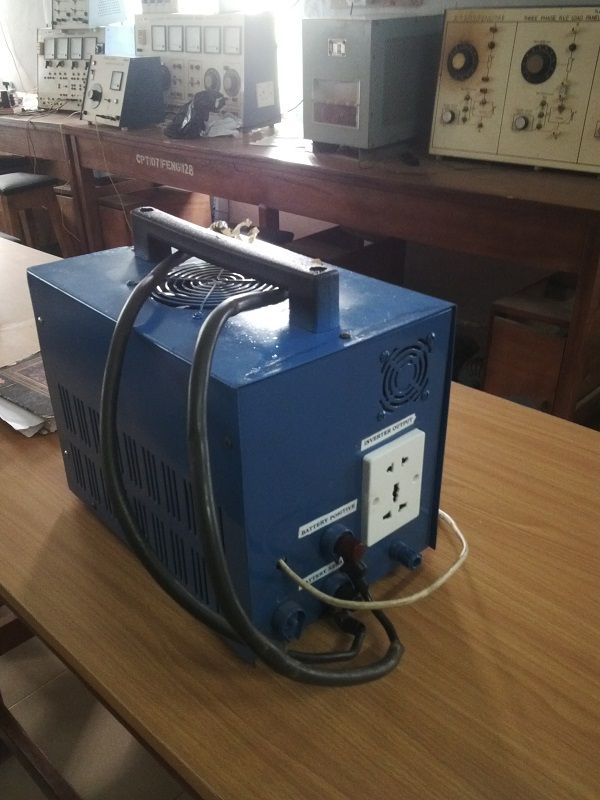
Back View of finished product
Owk folks, this is where we draw the curtain for today…I hope to meet you here again next time as I show you how to make other amazing electronics.
What a well detailed post you've got here. Inverters are almost the best things we need in this part of the world now..
You right bro...thanks
Do you also build on a printed circuit board (PCB)?
Still learning to build on that bro...I was thought with the Vero board so that's what I mastered for now.
This a great effort. We need more of this so that we could build our way out of recession and offer value instead of the continuous import damaging our country's economy.
What's the DC battery charge current like?
It can make use of any battery but the best and recommended battery for inverters is the deep cycle battery of about 200AH
The battery charge current for this particular inverter is 20A...if I understood you question correctly.
This is made in Nigeria, bro put in there. Seriously we have the brains to compete with all those Americans and Chinese with proper support. Bro you have done well
Congratulations @sistem, this post is the eighth most rewarded post (based on pending payouts) in the last 12 hours written by a User account holder (accounts that hold between 0.1 and 1.0 Mega Vests). The total number of posts by User account holders during this period was 3335 and the total pending payments to posts in this category was $10374.64. To see the full list of highest paid posts across all accounts categories, click here.
If you do not wish to receive these messages in future, please reply stop to this comment.
Excellent job! This looks like a really useful device, especially in power outages. I'll need to read through it in more detail later tonight when I have time. Even if someone isn't using this for solar power, everyone should have a 12v - 120/240vac inverter handy in case the power goes out as car batteries can be used to power it.
Keep up the good work!
Am so convinced, this is a well uplifitng invention, nice one bro.
Fine one brotherly... U av Finish work.. Hehehe
@sistem is a genius! Keep it up, it amazing breaking the inverter for novice like me to read and understand.
Wow Great work Sir, please how can I contact you personally relative to this, I so much love your work Sir and I'd love to be mentor by you Sir...I'm in Nigeria Edo state precisely 🙏🙏