How I turned my old broken laptop into the coolest STEAM MACHINE

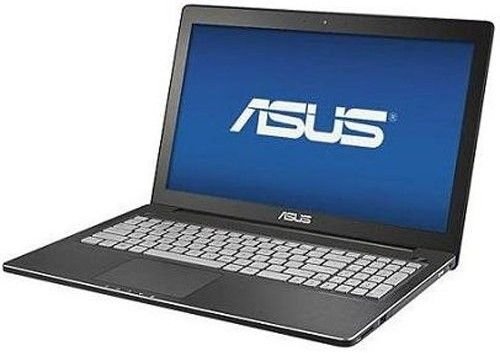
So last year, my old ASUS Q550LF laptop had its screen broken and it was too expensive to replace so I had to buy another one to work but the old hardware itself was in perfect shape so I thought: "why not make it into an awesome video game?".
This is what I'm talking about:
- 8 GB DDR3 RAM
- 1 TB Hard Disk
- CPU i7-4500U
- GPU GeForce GT 745M 2 GB
It's not a gaming monster but can run basically any game from PS3/Xbox 360 era on Steam as well as all the indie titles I have (Anybody else plays more indie games than AAA ones?).
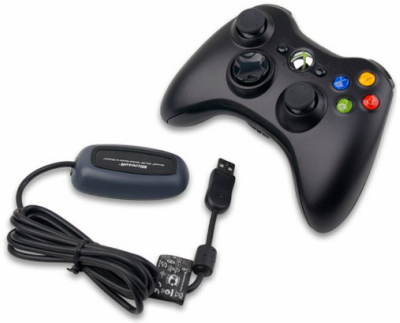
Aside from that, all I really needed was a receiver for my wireless Xbox 360 controllers which I already had to play games on PC and some software that you can find on the web (I'm going to leave links at the end) so, with that in mind, let's get started:
The basics
The first thing I had to do was removing the broken screen so it would fit into the TV stand. That part was pretty easy for this laptop. I just had to be careful with the antenna wire that sits inside the screen.
My next step was to get rid of my Linux partitions and make a brand new installation of Windows 10. One could argue that Steam OS would be more adequate to a Steam Machine but for now, nothing beats Windows when it comes to gaming compatibility.
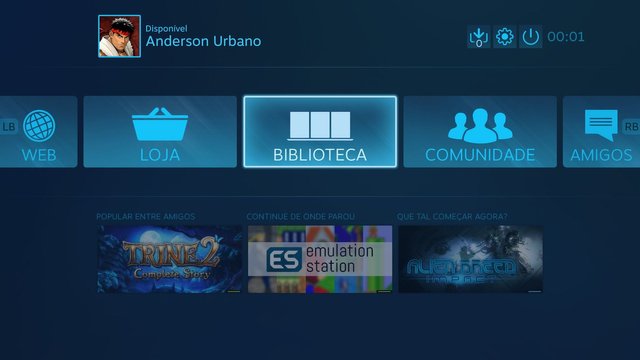
With OS installed as well as WiFi connection and some drivers for the GPU, it was time to install Steam. It has a mode called "Big Picture" which provides an awesome user interface that can be controlled by my Xbox 360 controllers so it looks just like a modern video game on the TV. On Steam settings you can configure it to initialize with Windows and to initialize directly on "Big Picture" mode and the interface has a shutdown button for the PC so you don't even need to touch Mouse and Keyboard at any moment.
The USB receiver for controllers is made by Microsoft and Windows can recognize it without me needing to install anything but unfortunately these controllers can't be turned off by the user so, when the computer shuts down they would be on for 10 minutes or so. The solution for that was a little program called "Turn Off Xbox Controller.exe" that I found online on SourceForge. It does pretty much what the name says, turning all controllers off. All I need to do was setup Windows in "gpedit.msc" to call this program on shutdown.
I then installed all the games in my library that had support for controllers, fixed a few issues some of them had with my PC so that they would be ready for when I wanted to play and removed/disabled unnecessary software that comes with Windows 10 such as Cortana, Office 360 and Skydrive. After that, it was only a matter of customization: change windows colors and wallpaper when initializing, hiding start menu, etc.
Adding Media Center Capabilities
For my initial purposes, the setup above worked just fine. But then I wanted a little more. Maybe watch some movies and listen to music would be nice so I decided to add these features in a way that it could be accessed by the controller.
I started by installing Netflix and Spotify from the Windows app store, logging into my accounts and setting up nice shortcuts on the taskbar.
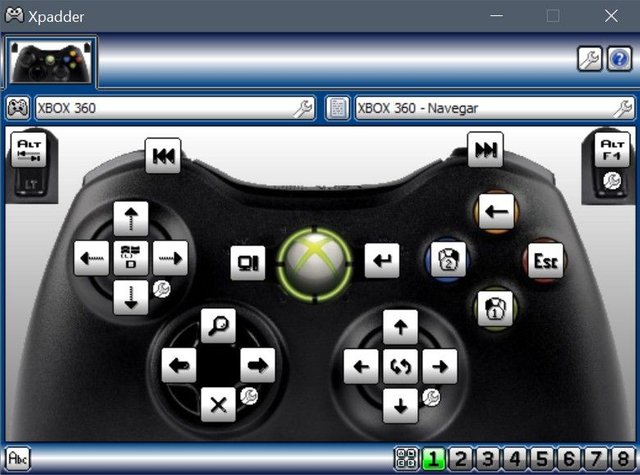
For controlling the desktop applications using the Xbox controller I used a small program called Xpadder. It allows mapping keyboard and mouse functions to a controller. I set up mouse movement to the left analog stick and right and left clicks to X and A buttons respectively as well as other useful commands such as ALT+TAB, WINDOWS+D, ALT+F4, etc.
To turn Xpadder on and off from within Steam Big Picture I created a small script in AutoHotKey. Is a software for creating custom hotkey shortcuts with a special language. The script bellow, saved as "xpadder.awk" and configured to initialize with Windows, is activated whenever the user hits LB+RB+START+SELECT on the controller (mapped to Joy5, 6, 7 and 8 on mine). It minimizes/maximizes Steam window and turns Xpadder on or off depending on whether it is already active. I also put a sound beep to better signalize when the script is triggered.
Joy5 & Joy6::
If  GetKeystate("Joy7") && GetKeystate("Joy8")
{
    SoundBeep, 600, 200

    Process, Exist, Xpadder.exe
    If ErrorLevel <> 0
    {
        Process, Close, Xpadder.exe
        Sleep, 500

        IfWinExist, Steam
            WinActivate
    }
    Else
    {
        Run, C:\Xpadder\Xpadder.exe
        Sleep, 500
        send #d
    }
}

The end result may not be the fastest way to navigate but works fine. I can now leave and come back to Steam at any moment to watch Netflix. Put songs on Spotify to play on the background of my games is pretty cool too.
Back in Time!
To make my gaming experience complete, there was one thing left: retro games! I wanted to setup an emulation interface with my most beloved old school games that could be accessed through Big Picture.
I LEAVE A DISCLAIMER HERE. IF YOU DOING SOMETHING LIKE THIS, BE AWARE THAT PUTTING ANY ROMS THAT YOU DON'T OWN A PHYSICAL COPY WILL BE CONSIDERED PIRACY IN MOST COUNTRIES.
For the emulator I used Retroarch. It is the coolest emulator ever made, it separates user interface (with settings for input, graphics, sound, etc) and platform specific aspects of emulation so developers can use its API to create a "core" file for the platform that can be say NES, SNES, GENESIS, N64 and so on. The user simply install desired cores made by developers and play games on a single emulator.

Next, I needed a nice interface to launch the games on Retroarch from Steam using command line. My first attempt was using scottrice's Ice software. Is a python program that add Steam shortcuts with nice thumbnail images for each game. It looked cool, here is an image of possible result from the website:

The problem I had with it was that retro games mix with regular Steam games and becomes a mess to find anything inside the interface so I used another software instead. It's called EmulationStation and it is used on a lot of Raspberry gaming arcades and retro consoles nowadays. It has a Windows port on the website and has themes, collection organizers and other cool customization features. Here is an interface snapshot from the official website:

There are plenty of guides on the web on how to set it up so I won't cover that but in my experience is just a matter of editing a few text files to tell EmulationStation what systems you intend to emulate, what commands to execute and where to find the ROMs. In addition, you can use the internal scrapper to find images and descriptions for each game in your collection (I love that kind of thing). All that was left was setting one Steam shortcut for EmulationStation and put a thumbnail to match Steam style. Gladly, I found one on the web so I didn't need to make my own.

After that it was working great. Steam launches EmulationStation that launches Retroarch loaded with the specific core and the selected ROM. Retroarch menu can be accessed using Xbox button in the middle of the controller so I can leave the game, save state and other features. EmulationStation has an exit option to go back to Steam so it's all pretty straightforward. The one thing that bugged me a little was that a black console window shows up for a bit whenever I am launching EmulationStation or Retroarch. I will try to fix that later on.
End Result
The final product was everything I had imagined. It's easy to use and an awesome way to recycle an old broken laptop that was just sitting gathering dust.
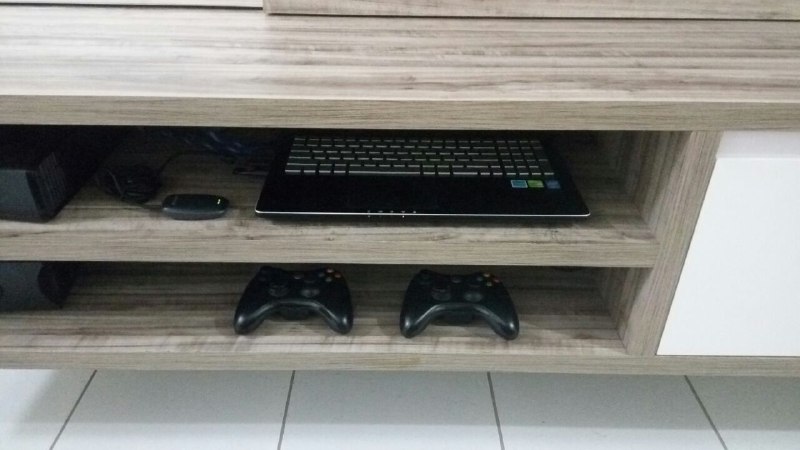
I must say it also looks very clean and organized next to the TV so no complaints about that. I am loving this setup, just turn on and play and is great to have the games always installed. I might actually add new features later on. Any ideas? :)