The Holy Trinity Of Photography - Using Aperture, Shutter Speed And ISO To Your Advantage
I'd like to thank @tropical-life for pointing out the fact I hadn't yet covered one of the most basic elements of photography. I think its important for everyone to know how to use the exposure triangle to their advantage.
One of the best things about a professional camera is the level of control you have over your photograph. This can also be one of the most confusing aspects if you're starting out with one. If you're coming off a point and shoot style camera or your phone camera, it can be tempting to just switch your DSLR or mirrorless into the Auto Mode. This basically hands over all the variable parameters to the camera to guesstimate what may be the ideal settings to get the best photo. Unfortunately, no software takes into account the photographer and their own vision. In this article, I hope to demystify some of the basic elements of professional cameras and teach you how to gain the most from them. To explain these features, I've drawn some diagrams on Adobe draw that I hope will better explain these concepts. Actually, I think I went a little overboard with Adobe draw, but I just bought myself a new Apple Pencil and it was just a lot of fun.
Exposure
There are a lot of definitions for exposure. To keep it simple, just think of it as the amount of light your photograph takes on. Now there's no finite definition of what an underexposed or overexposed shot is. If you feel the photo is too dark or lacking detail compared to what you had hoped to achieve, then you'd say that shot was underexposed. Conversely if you felt the shot was too bright or has a washed out look compared to what you had hoped to achieve, then you'd say it was overexposed. So as you can see, exposure is pretty subjective and really is dependent on what you hope to gain from the shot.
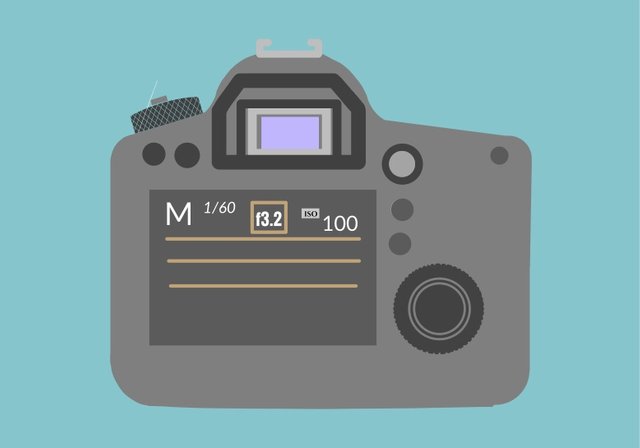
There are three basic variables you can control to achieve an adequate exposure. ISO, Shutter Speed and Aperture. You can increase and decrease these as you like. You'll notice that on you camera there are a number of modes. The full manual mode (usually indicated by the letter 'M') gives you control over all three of these variables. Now I'm going to say something I think a lot of photographers may disagree with. Don't worry too much about exposure. If your shot is a little over or underexposed, it can be corrected on most photo editing software. In general it is better to have an underexposed shot than one that's overexposed. You lose detail in an overexposed washed out image that may not be able to be brought back later. In an underexposed image, however, you can bring back some of the detail.
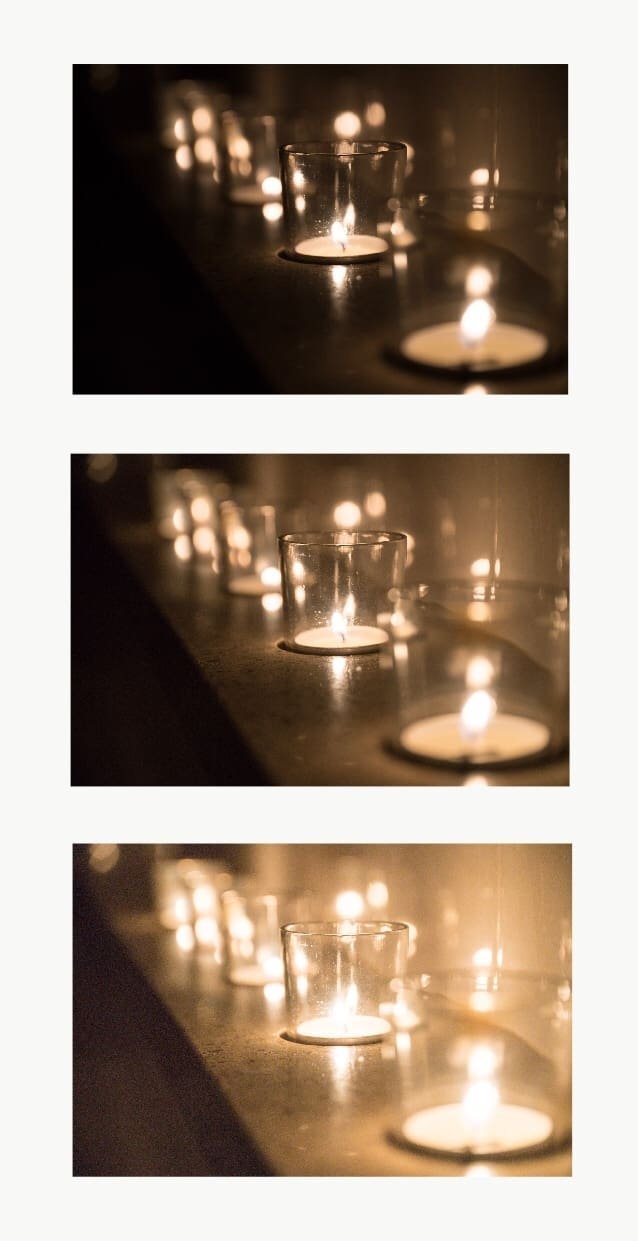
In the image below is a picture of the candles in my bathroom. I wanted to get some detail of the granite bench the candles were on, but still wanted to have a clean image of the candle flame. I'd consider the first image underexposed as the bench details are lacking and overall looks too dark. The last picture looks overexposed with a lot of the clarity of the flames washed out. The middle one looks like my ideal exposure retaining detail of both the bench and the flame.
Now that I've told you exposure isn't a big deal, I'm going to tell you what is. The three variables that control the amount of light that will hit your camera sensor also have other implications that you may want to consider in your photo. If photography were to be compared to painting, these would be your brushes.
Aperture
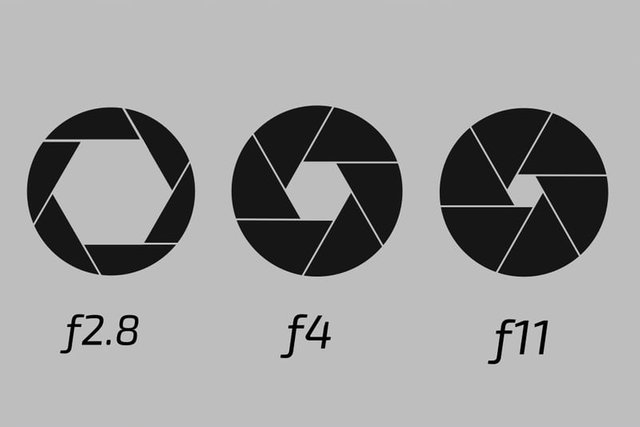
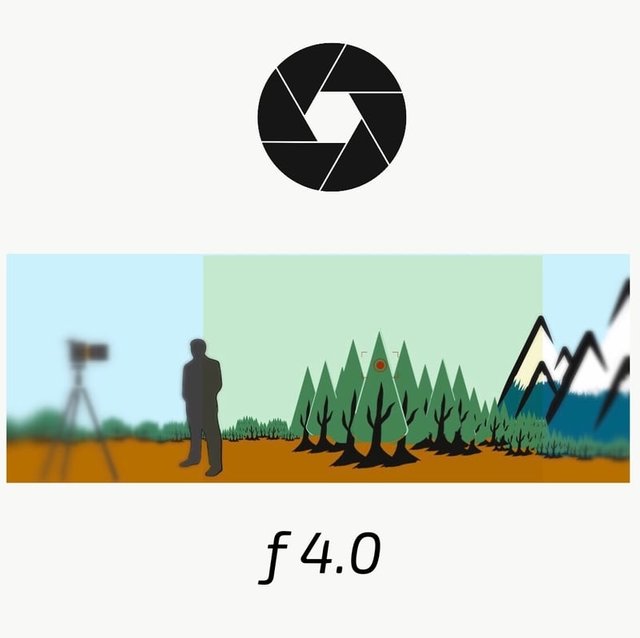
Your lens controls the amount of light that hits your camera sensor by increasing or decreasing the diameter of the hole the light passes through. The larger the hole, the more light that gets let in (the higher the exposure). This is denoted by the letter 'f' followed by a number. The smaller the number, the larger the diameter and the more light that is allowed to enter. Because this is lens dependent, a lot of lenses will have different ranges. When advertised, they often just state the maximum aperture (largest aperture) e.g. The Sigma f4.0 24-105mm lens has a variable zoom between focal lengths 24 and 105mm and a maximum aperture of 4.0.
Why do you want a lens with a larger maximum aperture? Out of the three variables, aperture is the only variable that can allow you to increase your exposure without too many unwanted side effects. Also with larger apertures you have an increase in the 'Bokeh' effect. This is a tool used in many photographs where you have your subject in focus but the foreground and background have a soft blur. It is often considered a desirable quality. This occurs because the larger your aperture, the narrower your focal window. In the photo below you can see that f2.8 you can only focus on the foreground, mid-ground or background, but you can't have all three in focus simultaneously.
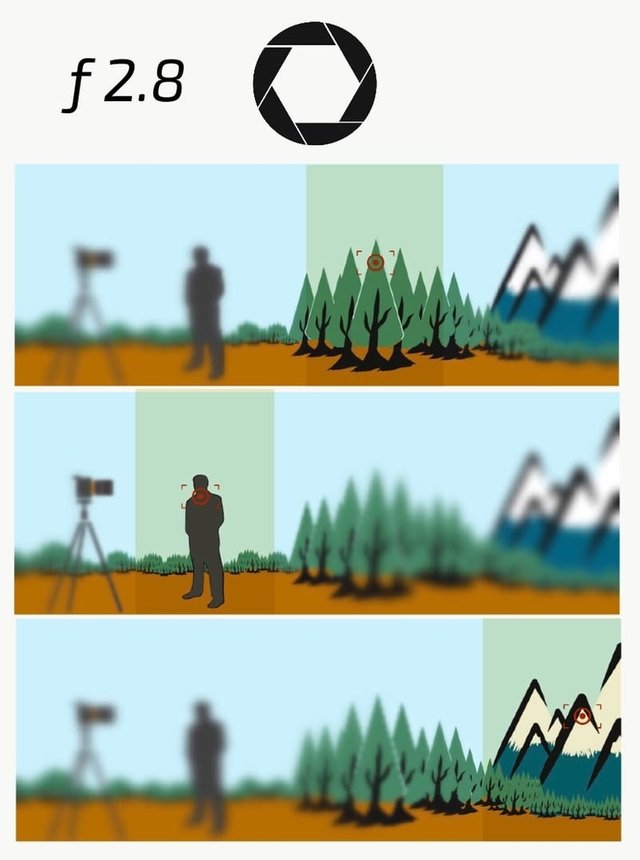
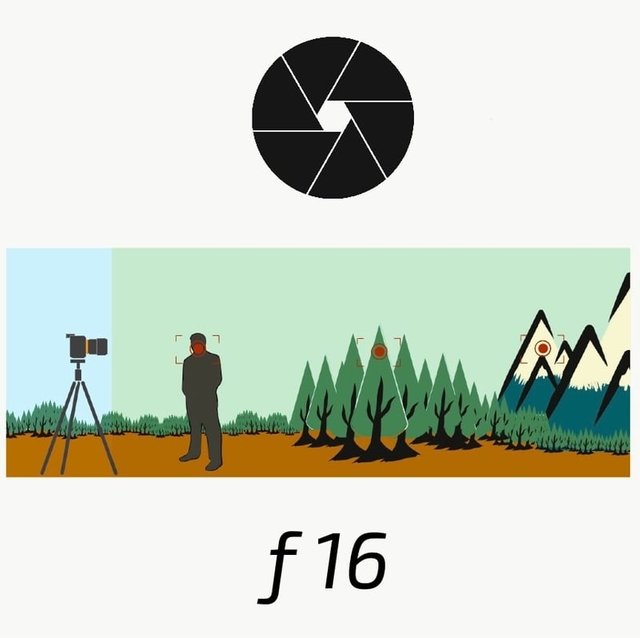
As your aperture decreases, your focal window increases, getting more of the shot in focus.
When you make your aperture very small and almost pin point, your focal window is so large that you'll have most of the shot in focus from foreground to background.
Shutter Speed
The shutter speed is the length of time your sensor is exposed to light. This is also commonly referred to as exposure time. A fast shutter speed will expose the sensor to light for a shorter duration than a slow shutter speed. The longer your sensor is open to light, the higher the exposure.
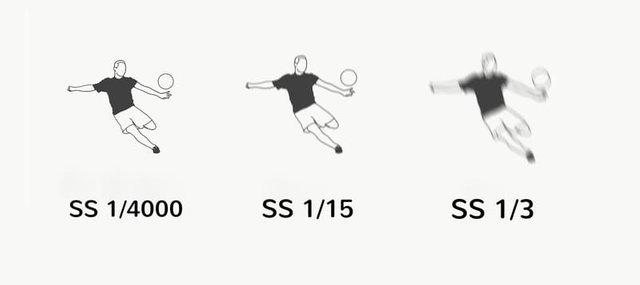
Having a slow shutter speed also results in motion blur. In some situations this can be desirable while in others it can completely ruin your shot. In landscape photography, most shots will be taken by a tripod at a mountain that hasn't moved in hundreds of thousands of years. For these shots, one might opt to use a longer shutter speed to increase the exposure of the photo (as most people will have a smaller aperture to keep everything in focus). If you had a flowing river in your shot, this will create motion blur in just the river, but keep the mountain sharp. This is a common technique used by a lot of landscape photographers. Sometimes if you want to leave your shutter open for a really long time in conditions where there is a lot of light, you can use a neutral density filter. This filter limits the amount of light that hits the lens and thereby limiting the amount of light that will eventually reach your sensor.
ISO
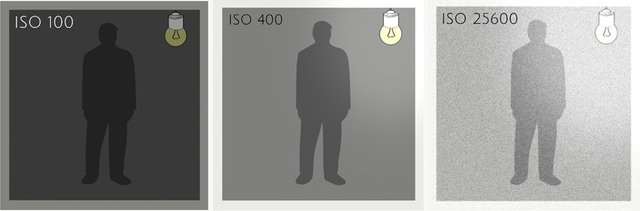
This is the sensitivity of your sensor to light. The higher the ISO the higher the exposure. Because this is sensor dependent, it'll vary on what type of camera you have. As you increase your ISO, you'll find you may get a speckled image or a noisy image. This is basically your sensor overreacting and thinking there is light where there isn't any. Think of it like a super twitchy crack addict. At really really high ISO's, a pixel will register light just by being triggered by the activation and heat of the adjacent pixel. You'll here the phrase useable ISO thrown around. I like to think of it like the maximum ISO your camera can go before you have noise to the point you have to edit it in post for you to be able to use that photo. You'll get to know what this is and it'll be a good idea to have that number in the back of your mind when adjusting your settings.
Keeping those three parameters in mind, I'll go through some common styles of photography and how to use the secondary benefits of those settings.
Landscape Photography
- Small Aperture
- Slow Shutter Speed
- Minimum ISO
The smaller aperture will keep things in focus from foreground to background, but will result in less light entering the sensor. Because you're dealing with largely motionless objects and because you'll be using a tripod, you can compensate for this by having a slower shutter speed to expose the sensor to more light. For the few things in your shot that are moving, such as clouds or bodies of water, this will result in some very smooth motion blur. You can keep ISO to a minimum here in as most landscapes will be done during the day in adequate lighting.
Portraits
- Large Aperture
- Fast Shutter Speed
- Minimum ISO
The use of a large aperture reduced your focal window and increases that very desirable bokeh effect that is almost hallmark of portrait photography. To compensate for the increased light entering the sensor, you can reduce the time your sensor is exposed to the light by increasing your shutter speed. Motion blur isn't ideal for portraits either. You can often use a lower ISO as this is usually conducted in good lighting conditions.
Sports/wildlife
- Large Aperture
- Very Fast Shutter Speed
- Variable ISO
Most people will use a very fast shutter speed to completely avoid motion blur. Because your lens is only exposed for a very short duration of time, you'll need to compensate by using a large aperture to increase the amount of light entering the lens. You may need to adjust your ISO to compensate for poorer lighting conditions. Take a look HERE at my previous article on action photography for a more details on what settings to use.
Astrophotography
- Large aperture
- Slow shutter speed
- Variable ISO
This is as low light as it comes, shooting in the dark. Large apertures to let the most amount of light into the camera. A slow shutter speed to also let as much light into the camera as possible. Remember the sky isn't stationary, the earths rotation will leave the stars looking blurry if you leave the shutter speed too slow. This will result in a star trail effect, but that might be the type of shot you're going for. You can vary the ISO as you need to but be careful and dont go too high or you'll end up with a lot of noise. Yes, I've done another article for you on this too. For more of information on astrophotography, have a look HERE.
Street Photography
- Variable aperture
- Variable shutter speed
- Variable ISO
Basically do whatever the hell you want for the desired effect. Want a lot of bokeh? No worries. Want some motion blur? Cool. This is dependent on the lighting conditions and your particular style of photography.
So if you had any questions or any additional tips you have come across, please feel free to comment below. I'm always looking for keen photographers to chat to!
If you enjoyed this post, be sure to UpVote, Resteem and Follow me @lenscape. Check out some of my other stuff - especially if you're into travel, photography and reading words online.
Good writeup. A fantastic resource I have been following for years has been Kenrockwell.com a treasure trove of info and written for most average photographers, i.e. he does not push you to the top of the line stuff, but the good enough stuff that covers 95% of your needs at 30% of the price...
Thanks for the tip, there's some really good info on this site. He's certainly one of the better known photographers for a good reason.
Good overview
Thanks @melek
Good long read and explanation of the basics. Regarding the exposure, this is very personal. I find the first picture of the candles the best because it has much more atmosphere then the others. I think the exposure is the personal touch of the photographer. Thanks for sharing :)
Thank you so much for Re-steeming. I hope you and your followers found the post helpful. I'm looking forward to seeing more of your photography!
That's worth every penny this post has earned. I really like your use of illustrations to visually explain the magic triangle & a very good addition to the #dailyphotoselection @photo-trail !
Thanks @outerground, I'm not sure I qualify for the photo trail, but thank you for the thought :)
whaddaya mean ? how do you think I found your post .. the link is top billing - DPS 11th July check it out yourself.. #dailphotoselection ! definitely deserves to be in there
Oh cool! Thanks for pointing that out! I literally had no idea :p that's awesome, really motivated to make more high quality content.
always pays to check ..if you resteem the post (which you should cos you're in it) you can always scroll down to it and click the tag dailyphotoselection which will take you to it and I'd recommend following @photo-trail who does a great job of curating excellent steemit photography and helping people get decent levels of exposure !
Yeah, I'm certainly following them now. So much great talent. I'm glad that people are finally diversifying into topics that are more than steemit and cryptocurrencies
photography is massive on steemit and rightly so !
It is indeed a big base. Loved the info. Awesome to see more and more photography related content in here ❤
It's refreshing to see something that isn't crypto currency related isn't it? :P
It is awesome. That is the way i hope it will go. For example you dont see youtubers only talking about youtube and so on. True there are a lot of good info about crypto here. But want to see more content.
It's the only way steemit can attract mass adoption
I know my content is not the best quality but still i am proud of it and I am trying to do my part when it comes to what I upload and the things i curate and resteem 😙
You sir.. are a true hero.. Paving the way for steemit :)
Ohhh I am just doing my part. There are awesome travel bloggers around here already. And photographers. We all have our place.
Well written! I have been trying to explain these elements for years to people. Now I can just forward them this link.
Thanks axon. Yeah I've been trying to explain to my friends too but I've definitely had better luck with these diagrams.
Congratulations! This post has been upvoted from the communal account, @minnowsupport, by rukiegamer from the Minnow Support Project. It's a witness project run by aggroed, ausbitbank, teamsteem, theprophet0, and someguy123. The goal is to help Steemit grow by supporting Minnows and creating a social network. Please find us in the Peace, Abundance, and Liberty Network (PALnet) Discord Channel. It's a completely public and open space to all members of the Steemit community who voluntarily choose to be there.
If you like what we're doing please upvote this comment so we can continue to build the community account that's supporting all members.
Very well summed up basic elements of exposure @lenscape. This has to be seen, and it should be in the DPS.
Thanks @lighteye hope you found it helpful. What's the DPS?
Great post and super helfpul! I've had my DSLR for years, and have learned all this stuff, but I haven't fully integrated it to a point where it's second nature. I still get confused by aperture - bigger means smaller focus area, and smaller number..I'm always confusing this! You explained it all really well, and I really appreciate it! Thank you!
Thanks, great shots of those flowers too. It can get a little fiddly to try to sort out all three at the same time... it can sometimes feel like trying to balance a monkey on a pole while riding a unicycle. In situations like sports and wildlife when you don't really have the time, the priority modes can give a good balance of control and convenience.
Cool, thanks! Yeah, that's refreshing to hear. :)
Excellent piece that I'm just now stumbling onto. Excellent explanation of all three. I remember taking the lessons on these to heart when I was going through my photo courses in college. Keep up the excellent work!
Thanks so much, I'm glad you found the article useful enough to re-steem! I've never had any formal training, most of my tips have come from experience. If you have any tips from your college days, feel free to share. I'm always looking to learn something new.