Learning Basics Of Git

Hi, today I am going to bring up very interesting tutorials for Utopians. In this tutorial I will teach you how to use git and if you are not familiar with git then no problem I will explain everything in this tutorial. I will try to explain everything as briefly as I can.
The git is very change than Github. Git is the piece of software used locally; Github is a popular remote to use with git. Some people like to use Git, some like to use Github and some like to use both but which one are you? Git != Github
Repository
What Will I Learn?
You will learn the following things in this tutorial.
- Installment Of Git
- Setting Up Username And Email
- Creating A Repository
Requirements
This tutorial doesn't actually have any requirements because I think every user will find something useful in it because knowing how to use git is really useful for Utopians. The only thing you will need is a username and email, we will need it because when you are working with a compnay then multiple people will be making changes to a single project, with usernames it becomes easier for use to see that which user is doing which task.
Tutorial
Installing Git

The first step will obviously be installing the git and without installing the git we can't do anything related to git. The most easiest way to install git is by terminal. You can easily install git by typing this command in the terminal
sudo apt-get install git. It will ask for your password and once you will give the password it will start installing the git.
Setting Up Username And Email

As I said in the require username and email so let's the first things, first and config our username. To do it we will type
git config --global user.name "USERNAME" in the terminal. Let me explain you the command. The first word "git" is just us calling the git and config is self explanatory but the main part that confuses lot of people is "--global". The global actually actually means the settings for this user and if you actually take a look at the name, it is kinda confusing name because many people sometime think of it as settings for the whole project but that's really not the case. Now we are specifying that which settings we want to change inside the "--global" and that is "user.name" and finally now we are specifying the username the username you will type your username inside the quotation marks. When you'll press enter the username will be changed.
After changing username, you will need to change email and now you will think this is very familiar. To change the email type
git config --global user.email "EMAIL". Now the most of the code is same but instead of changing user.name we are changing user.email. Press enter and it will be saved. You can also check all the settings by typing git config -- list and another handy command is clear typing this will clear the terminal not that your settings will be lost it will just clear all the settings. If you ever want to just look at one setting you can just do something like this "git config user.name" in this case it will return the name of the user. I am telling you this stuff because if you ever want to get this type of information then you'll probably know how to get it.
Creating A Repository

Now that we have our account ready we can actually start doing the good stuff like creating our first repository. Repository actually is like a project in git language. To create a repository you will first need to create a folder and you can name it same as the name of the project. I have created a folder on desktop inside a folder known as tutorials and the name of the the folder that I just made is "Git_Repository". Now we want our project to be managed by git, so now we will learn how I can tell the git to manage the project (the folder I just made). The first for us to do is to actually check where the git is looking at the moment. We can do it by typing "pwd" and if we do it the result will be something like
/home/anonfiles/, for you it will have your name after the slash after home. The project folder that I made was on desktop so how will I change directory in which git is looking. we can do it with a command known as cd (change directory). So we can use it to go to desktop like cd desktop and it will change directory to desktop. Now in the desktop my folder is in another known as Tutorials so we can cd Tutorials and then my project folder is Git_Repository so I will now type cd Git_Repository. Once you are in the folder type git init, first we are calling the git by typing git and then initializing it on the folder. If you want in simple terms then it means that we are turning this folder into repository. It won't have any noticeable but now git will keep track of each file in the folder or repository.
Adding First Files And Creating First Commit

Now that we have created a repository locally, let's actually create a file inside it. Let's say that we want to add a .txt file inside it. You can simply do it by going to the folder and creating a txt file and you can put any text inside it at the moment because this is just for explanation and how it works. Now we will need to let git know that we made some changes we can do this by typing
git add .. This will let git know that we made some changes. The dot at the end means folder directory.
Now we will need to create a commit. Commit is like a snapshot that git takes so if in future you get messed up at any part then you can just rewind back. You'll might be thinking a that haven't we made a commit by above code, the answer to that question is no. To make a git commit you will need to type the following code
git commit -m "First Commit. Again first word git is for calling git then commit means that we want to commit, -m acts like a parameter, "First Commit" acts like a message. The message is very important because if in the if you every want to come back to a specific commit then message will remind you what you did in specific commit otherwise you will be stuck finding the right commit.
Using Commit Log (Git Log)

Now that you have created a real commit you can also check the commits in the commit log or also known as git log. You can access commit log by just typing git log and it will show a list of all your commits.

You can also view commits by a specific person. This can be done by typing
git log --author="NAME" and then git will start to show the commits by a specific person.
Workflow Of Git
I showed you a way of adding the file which we did by typing something like git add . the dot in the code just means all but there's a better way to do it and that's specifying the file instead of all files we can specify a file by replacing the dot with file name. So most people think of adding file like making file ready for commit and then we can commit. So to better explain it I have found a chart.
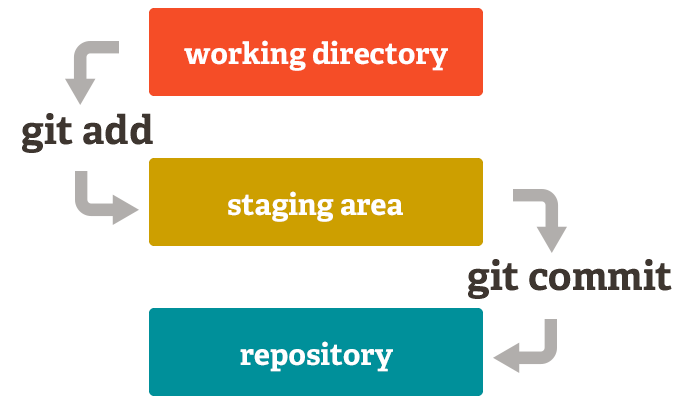
Now as you can see in the above chart when we add a file it goes in the staging area where it gets ready to be committed at when when commit the file goes to repository.
Edit Files In Repository
Now that we know how we can add the files, let's focus on how to edit them. Let's take a look at a example first, we had a one text file. I have now edited that file but now our file is different than our file on repository. So how will we tell git that "hey! we have updated our file, you should update it!". So let's type some commands to do it. First we will need to type git add Doc.txt. Doc is the name of my text file. It will add the file to staging area now we can commit it using git commit -m "Changing Doc.txt". You can also view the changes without committing from the staging area. You can do this by git diff so what will this do is show you differences between the repository and files. This is further shown in the image below.

Deleting A File From Repository (and locally)

Now that we have learned how to edit and add the the files, let's take a look at how we can delete from the repository. You can delete the file by typing
git rm filename, first call the git add rm means remove and then the filename, simple. It will not only delete the file on repository but it will also remove the file locally. There is one thing left to do which is to commit the change which you know by now that wen can do it by typing git commit -m "Removing A File".
Moving And Renaming The Files
Moving the files is really easy if you do it with git, it can become somewhat confusing because if you rename the file then git will thing that you have removed the previous file and created a new one. It isn't actually wrong git is just seeing the world different way. So if you add it to staging and then commit it then it will work like normal.
Pushing the Git to Github

Once you have completed a Git locally you can push it to Github so that all people around the world can contribute to your project. It also has some other features that you might not want to miss out. To push the Git to Github first we will need to create a remote. Remote is like a way to repository. We can create remote by typing
git remote add origin REMOTE_URL You need to add remote url at the end which can be found by making a repository on github. You can also verify the the remote by typing ``git remote -v. Now we can actually push it by typinggit push origin master```. Then it will start uploading the file to Github and once completed the files will be shown there.
End Of Tutorial
Ok, so this the end of the tutorial. Hopefully you learned alot in this tutorial and it didn't wasted your time. I just wanted to make this tutorial like journal so if you are working on project which is using git then you can check from this post how you can do certain things and this can save you alot of time because you won't have to google it or neither find a good resource for it. All the things are in one place. This tutorial is also just a standalone tutorial so I won't be making any newer tutorial on this topic and I also don't have any related tutorial or article to this tutorial so I won't add curriculum either. Anyway, thanks for reading and I'll see you in the next tutorial!
perfect ,,, i like with successful people like you. !! thanks.
Yes perfect timing! I'm actually working on a n00b tutorial on building a simple app and uploading it to the blockchain.
I was thinking that I don't know anything about Git, but that I should include it in the tutorial. So thank you for this, you saved me from fumbling around in the dark
Kira
Thank you for your contribution.
Please try a tutorial that doesn't have much information on the subject on the internet and that helps the open source community.
Need help? Write a ticket on https://support.utopian.io/.
Chat with us on Discord.
[utopian-moderator]
Congratulations @anonfiles! You received a personal award!
You can view your badges on your Steem Board and compare to others on the Steem Ranking
Vote for @Steemitboard as a witness to get one more award and increased upvotes!