Steem & HTML [Part I]- Begin
Repository
What Will I Learn?
You'll learn:
- How to use the steem api with HTML.
- Aesthetically improve the environment of a website with CSS.
Requirements
- Visual Studio Core.
- Live Server Extension.
- basic knowledge of Javascript.
Difficulty
- Basic
Steem and HTML
A month ago, I published about the usefulness of the steem api with the discord platform, which those tutorials helped many colleagues who did not know how to implement those functions on that platform. A few days ago, a person asked me: could you develop tutorials of the steem API with HTML? And see me here, talking about the first of several tutorials about HTML and steem, which will are increase the difficulty as the tutorials develop.
This tutorial is divided into three parts:
- Design the form to obtain the data.
- Aesthetically improve the website.
- Create the steem vote function.
Design The Form To Obtain The Data
Long before you start programming, you must download the only two requirements that are needed for the tutoring to take place; considering this, you can start quietly.
We will create a folder, which will contain the script index.html, this one is the main script of the tutorial.
Once the folder is created, we open visual studio core> file> open folder ...
We will create inside this folder an .html file, called index.
Like you are learning html, we will create the main structure that forever has an .html file, which is the one that appears next:
A small shortcut for not writing all structure is to write the exclamation mark "!", As the image shows
Then, once the structure is created, we will create a form, which will collect the necessary data to make the much appreciated vote. For this we will write in the body of the html script for create a form function.
!DOCTYPE html>
<html lang="es"> (html comment removed: Language)
<head>
    <meta charset="UTF-8">
    <meta name="viewport" content="width=device-width, initial-scale=1.0">
    <meta http-equiv="X-UA-Compatible" content="ie=edge">
    <title>Steemit Simple Web Voter</title> (html comment removed: This the Tittle of your Web Page)
    <link rel="shortcut icon" type="image/x-icon" href="Css/Steemit.png">(html comment removed: Web Logo)

</head>
<body>
    <form action="">
        <fieldset>
            <legend>Place Your Steemit Post</legend>  (html comment removed: Tittle of Your Form)
                        (html comment removed:  Collect The Data)
            <input id="link" name="link" placeholder="Permlink" type="text" required>
            <input type="text" name="author" id="author" placeholder="Author" required>
            <input id="voter" name="voter" placeholder="Steemit voter" type="text" required>
            <input id="Privatekey" name="Privatekey" placeholder="Privatekey" type="password" required>
            <button type="button" onclick="">vote</button>
        </fieldset>
    </form>
</body>
</html>
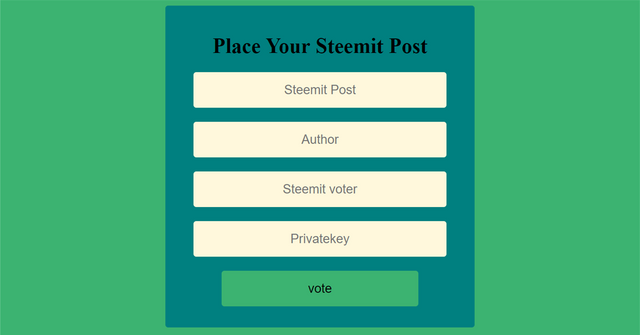
As you can see in the script, we created 4 input fields, where each one has a different id and name, this specifically for when you want to know about it, it will be through the id or name.
To test the code, we use the extension that is requested to download in the requirements, once added to Visual Studio Core, we can activate it here:
When activated, we can try our work, we will have this:
From my point of view, a programmer ,you must create a pleasant interface, so that the user who uses it feels comfortable, what I try to achieve with this is , we must add the artistic touch that every web page has, for this we will use Css.
Aesthetically improve the website
CSS
Stands for "Cascading Style Sheet." Cascading style sheets are used to format the layout of Web pages. They can be used to define text styles, table sizes, and other aspects of Web pages that previously could only be defined in a page's HTML. Source
Inside the folder that was created, we will create a new folder, called "Css" where we will create a .css script called "Styles.css".
Keeping this in mind, we need to inform the Html script that we are going to edit it visually, for this we must paste in the head of the following line of code <link rel="stylesheet" href="Css/Styles.css" type="text/css">, which will solve said problem. Once everything is configured, we will proceed to the encoding of the script.
To design a specific part of the web page, in css we have several options, we can edit it using the tags that contain it (such as <body> </body>, where everything inside the body is going to be affected ), by id or name; in this particular case, we will use the tags that contain it.
Then to make the design, what will be done in placing the name of the tag (without the <> </>) followed by two keys "{}" which will open and close the character of the said tag
will be like that
body{
    font-family: Arial, Helvetica, sans-serif;
    background-color: mediumseagreen;
    text-align: center;
}
fieldset{
    width: 420px;
    border: none;
    margin: 0 auto;
    padding: 0 0 10px 0;
    background-color: teal;
}

form{
    background-color: teal;
    width: 420px;
    padding: 40px 10px  0 10px;
    margin: 0 auto;
    border-radius: 4px;
}

input{
    display: block;
    border: none;
    margin: 20px auto;
    width: 360px;
    padding: 15px 0;
    text-align: center;
    background-color: cornsilk;
    font-size: 18px;
    border-radius: 4px;
}

legend{
    width: 100%;
    text-align: center;
    font-size: 30px;
    font-family: 'Times New Roman', Times, serif;
    font-weight: bold;
    color: black;
}

button{
    display: block;
    border: none;
    margin: 20px auto;
    width: 280px;
    padding: 15px 0;
    text-align: center;
    background-color: mediumseagreen;
    font-size: 18px;
    border-radius: 4px;
    cursor: pointer;
}
Each one is a feature that the css can have, if I explain all of them, the tutorial would be very, very long, so I leave you to homework for what each of the characteristics that i put, and if not you can understand, write to the discord, and I will gladly explain.
Now, once we have saved everything, we will try it to see how our website is.
But wait a moment, we have all the HTML part ready, but we need the most important of this tutorial: execute the function of the vote.
Create the steem vote function
For this, we use the same function of votes that we have learned in previous tutorials of JS and Discord, we will create a <script> </ script> tag inside the Body of our HTML script, where we will introduce all the JS writing with steem.
keeping this in mind, our script will be like this
<script src="//cdn.steemjs.com/lib/latest/steem.min.js"></script>
    <script>
    function sub(){
   var permlink = document.getElementsByName('link')[0].value;
    var wif = document.getElementsByName('Privatekey')[0].value;
    var voter = document.getElementsByName('voter')[0].value;
    var author = document.getElementsByName('author')[0].value;
    console.log(permlink + ' ' + wif + ' '+ voter +' '+ author);
    var power = 10000;
    steem.broadcast.vote(wif, voter, author, permlink, power, function(err, result) {
    if(err){
        document.getElementById("Result").innerHTML = "It was already voted";
        }
    if(result) {
        document.getElementById("Result").innerHTML = "voted";
        }
});
}
</script>
Important, so that when stepping on the voting button that function is executed, we must indicate it in the form, in this way <button type="button" onclick="sub()">vote</button>
Also, in the body we will create an H1 (it is a title, but in this case we will use it as the text to show when the vote is executed) with the id = "Result" and when the function is executed with JS, a text will be shown saying if it worked or it did not work.
We save everything and we try it.
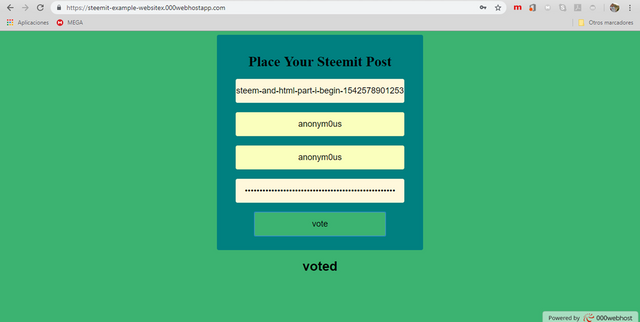
Note: the permlink is what follows the username in the steemit link, you must separate it and paste only that part, for the next tutorial, it will be arranged so that you can place the entire link, and in turn, we will work with steemconnect
Curriculum
It is my first tutorial of the HTML and Steem series, but you can go through my steemit profile to know my other tutorials that I have published in utopian.
Thank you for your contribution @anonym0us.
After analyzing your tutorial we suggest the following points:
The content of your tutorial is very basic. We suggest you take a more innovative tutorial on steem.
There are already several tutorials on this subject. We suggest that before developing a tutorial check if there already exists tutorials similar to what you are thinking of developing.
Always post comments in your code. Comments are very important for the reader to better understand what he is developing.
Your tutorial is quite short for a good tutorial. We recommend you aim for capturing at least 2-3 concepts.
Thanks for your tutorial. We hope that in the next tutorial follow our suggestions.
Your contribution has been evaluated according to Utopian policies and guidelines, as well as a predefined set of questions pertaining to the category.
To view those questions and the relevant answers related to your post, click here.
Need help? Write a ticket on https://support.utopian.io/.
Chat with us on Discord.
[utopian-moderator]
Thank you for your review, @portugalcoin! Keep up the good work!
Buena idea, sigue asi...
Hi @anonym0us!
Your post was upvoted by @steem-ua, new Steem dApp, using UserAuthority for algorithmic post curation!
Your post is eligible for our upvote, thanks to our collaboration with @utopian-io!
Feel free to join our @steem-ua Discord server
Hey, @anonym0us!
Thanks for contributing on Utopian.
We’re already looking forward to your next contribution!
Get higher incentives and support Utopian.io!
Simply set @utopian.pay as a 5% (or higher) payout beneficiary on your contribution post (via SteemPlus or Steeditor).
Want to chat? Join us on Discord https://discord.gg/h52nFrV.
Vote for Utopian Witness!
Congratulations @anonym0us! You have completed the following achievement on the Steem blockchain and have been rewarded with new badge(s) :
Click here to view your Board of Honor
If you no longer want to receive notifications, reply to this comment with the word
STOPDo not miss the last post from @steemitboard: