Learning 3D Graphics With Three.js | Advanced Materials and Custom Shaders
What Will I Learn?
- You will learn what a
Materialis in three.js - What they are used for
- The various types and when you might want to use each
- How to put together a custom shader using bits and pieces from threejs's
ShaderChunklibrary
Requirements
- Basic familiarity with three.js
- Basic programming knowledge
- Any machine with a webgl compatible web browser
- Knowledge on how to run javascript code (either locally or using something like a jsfiddle)
Difficulty
- Basic
Tutorial Contents
When I first began using three.js I didn't understand the differences between the materials or why they were significant. I especially didn't understand the purpose behind the ShaderMaterial let alone how to use it. I hope to shed some light on these topics and teach you how to go from very little knowledge about materials to writing your own custom ShaderMaterial in three.js.
Materials are a very important part of any 3D scene. They define how to draw the objects that you submit to the renderer to draw. They take information such as color and reflectivity of a surface and define how it should look in a scene given other properties such as lighting or fog.
Materials are an extension of vertex and fragment shaders. If you don't know what those are don't worry, they are something that you use in lower level frameworks to tell the computer how to draw objects. A Material encapsulates information about what to do with a) geometry data (how it is to be placed in the final screen) and b) how the surface interacts with lights and other objects in the scene. In three.js this information is represented by things like color, reflectivity, roughness, transparency, etc. depending on the specific Material used.
Materials are made up of two main components; the vertex shader and the fragment shader. In three.js we use Materials as a way of abstracting away from these low level concepts. Shaders are essentially miniature programs which are meant to be executed on the GPU. Vertex shaders take per-vertex information and return where on the screen a given vertex should be placed given model and camera information. A fragment shader determines what color each final pixel of an image should be. It uses information passed in by the vertex shader and information passed in uniformly to both shaders. Since we are using three.js you do not need to worry about either of these concepts, three.js hides them nicely for you so you can focus on what you want your objects to look like, not on learning a whole new language.
For this tutorial we will be focussing on comparing the various types of Materials that three.js has to offer. To begin we will set up the basic structure of our program. If this looks unfamiliar to you or you don't understand where this is supposed to go I recommend you familiarize yourself with the basic structure of three.js. You can see an example of how a scene works here.
var scene = new THREE.Scene();
var camera = new THREE.PerspectiveCamera( 75, 1, 1, 4 );
scene.background = new THREE.Color(0x77aadd);

var renderer = new THREE.WebGLRenderer({antialias: true, preserveDrawingBuffer: true});
renderer.setSize( 512, 512 );
document.body.appendChild( renderer.domElement );

var light = new THREE.PointLight( );
light.position.set( 5, 5, 5 );
scene.add( light );

camera.position.z = 2;
renderer.render(scene, camera);
Starting from this as a base we will be adding a mesh to the scene like so:
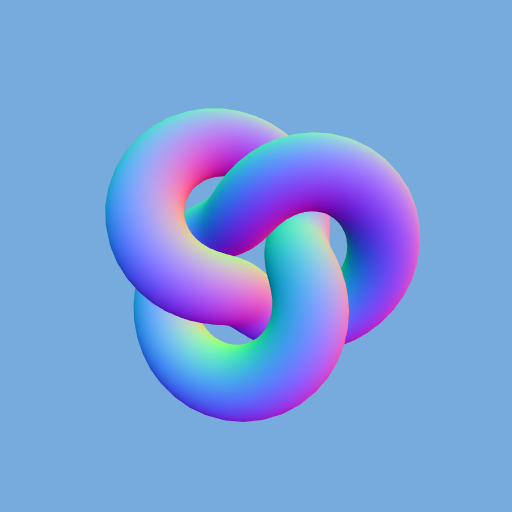
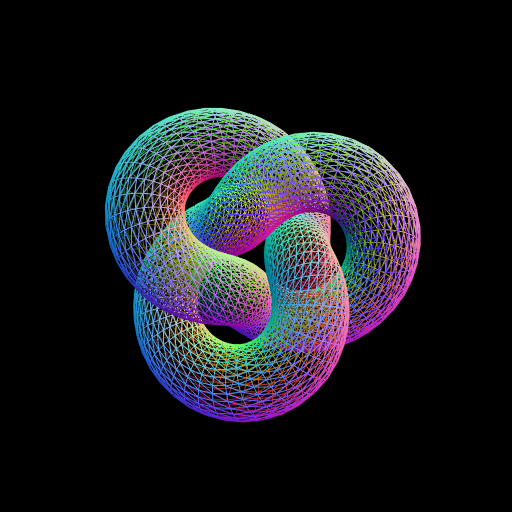
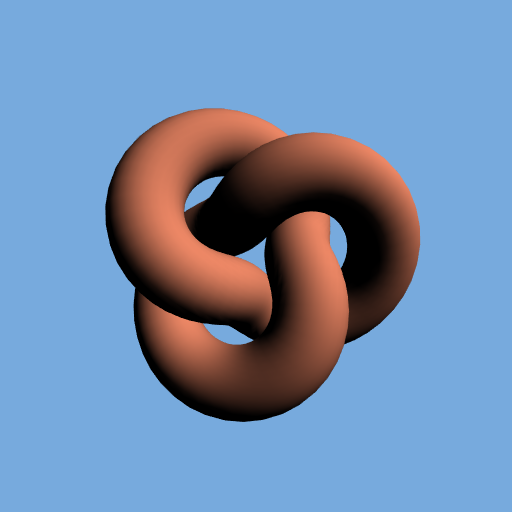
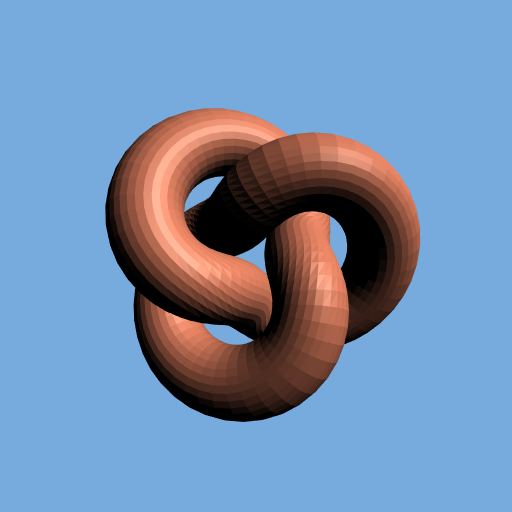
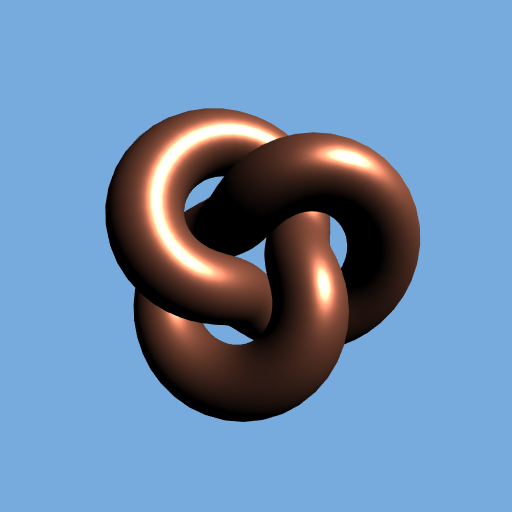
var geometry = new THREE.TorusKnotGeometry(0.5, 0.2, 128, 32);
//add a material here
var mesh = new THREE.Mesh(geometry, material);
scene.add(mesh);
For each material simply replace the middle line with the material definition to see what it will look like.
Abstract Material
The abstract Material class is the parent to the other material classes in three.js. It contains properties and methods that are accessible by all other material classes. The basic form of instantiating a Material derived class is
var material = new THREE.MeshTypeMaterial({/*property: value*/});
As you can see it is very simple, it gets complicated once you start passing in many different properties as you will often do for some of the other types of materials.
Common Materials
MeshBasicMaterial
The MeshBasicMaterial essentially assigns the object a single color and ignores all other aspects of coloring and shading. Although it still inherits all the properties from Material including rendering in wireframe etc. The MeshBasicMaterial true to its name is the most basic of the materials in three.js. It is best for when you want a lot of speed and you are okay with not having complex shading or other effects. An example instantiation would look like:
var basic_material = new THREE.MeshBasicMaterial({color: 0xee8866});

MeshDepthMaterial
The MeshDepthMaterial is used to display the distance between the camera and the point of the object that is being shaded. MeshDepthMaterial typically uses no parameters to instantiate so it looks like this:
var depth_material = new THREE.MeshDepthMaterial();
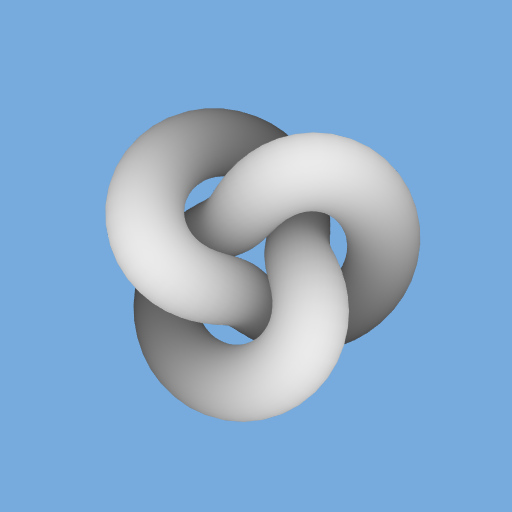
MeshNormalMaterial
The MeshNormalMaterial is used to display the normals of the object you are rendering. It is very useful for debugging an object's normals directly. As with MeshDepthMaterial, MeshNormalMaterial typically does not take arguments unless you want to use one of the standard ones built into Material such as wiredframe. Let's look at how that would work.
First a regular Mesh with standard parameters:
var normal_material = new THREE.MeshNormalMaterial();
Now with the wireframe property set to true:
var normal_material = new THREE.MeshNormalMaterial({wireframe: true});
MeshLambertMaterial
The MeshLambertMaterial is the most basic of the materials that take into account lighting. The MeshLambertMaterial uses the lambertian shading model to determine how to shade the object. Which means you will get ambient and diffuse shading but no specular highlights. Additionally it uses Gouraud shading which means that the lighting calculation is computed for each vertex and then interpolated across the triangle. It is fairly similar to MeshPhongMaterial but since the calculation is performed once per vertex instead of once per pixel and it doesn't compute a specular highlight it is significantly faster at a reduced visual quality.
var lambert_material = new THREE.MeshLambertMaterial({color: 0xee8866});
MeshLambertMaterial doesn't have very many parameters either. It is a fairly basic material. Try turning off the property depthTest by setting it to false. This is something that can be done with any Material derived materials in threejs.
var lambert_material = new THREE.MeshLambertMaterial({color: 0xee8866, depthTest: false});
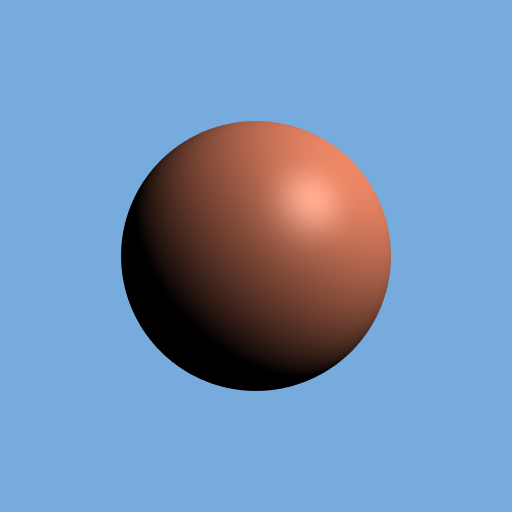
MeshPhongMaterial
The MeshPhongMaterial using the Phong shading model and is calculated per-pixel. It used to be the standard formula for shading algorithms until Physically Based Materials took over. It is significantly cheaper than the MeshStandardMaterial but uses a lot of approximations as a result. That being said it is very powerful especially when attention is paid to its various parameters and/or when combined with textures.
var phong_material = new THREE.MeshPhongMaterial({color: 0xee8866});

Here is the same object with the flatShading parameter set to true
var phong_material = new THREE.MeshPhongMaterial({color: 0xee8866, flatShading: true});
Try playing with the shininess parameter to see how it affects the material. Notice how at 0 it looks like the MeshLambertionMaterial and at 100 it looks like shiny plastic.
MeshToonMaterial
The MeshToonMaterial is built on a very similar model to the MeshPhongMaterial except it uses a more restricted color palette. Therefore you get bands of solid color rather than the continuous shading you see in the MeshPhongMaterial. It is used for more stylized graphics.
var toon_material = new THREE.MeshToonMaterial({color: 0xee8866});

MeshStandardMaterial
The MeshStandardMaterial implements Physically Based Rendering (PBR) techniques to shade an object in a more physically correct way. If you are looking to create realistic graphics this is the material for you. You have fine tuned control over many properties that will allow you to closely match real materials. The two most prominent parameters are roughness and metalness they each vary from 0-1 and affect the look of the object greatly.
var standard_material = new THREE.MeshStandardMaterial({color:0xee8866})
Object rendered with standard parameters roughness = 0.5 and metalness = 0.5
metalness increases from 0-1 from left to right and roughness increases from 0-1 from top to bottom
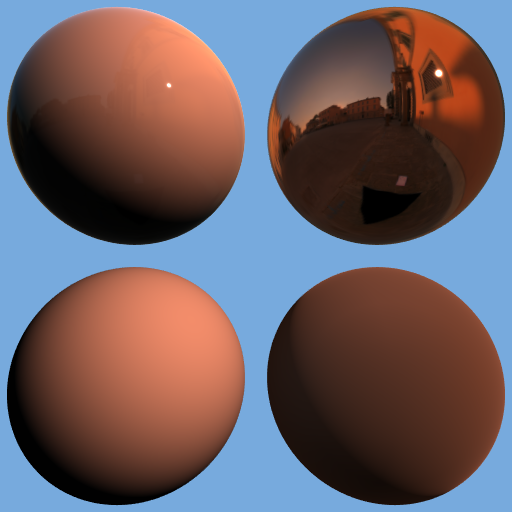
Notice that with high roughness and low metalness you are back to the basic Phong/Lambertion style shading.
To get the most out of the MeshStandardMaterial you will want to set an environment map. You do so by setting the envMap property to a CubeTexture.
Note: The MeshPhysicalMaterial is an extension of the MeshStandardMaterial that has more fine tuned reflectivity properties.
Advanced Materials
ShaderMaterial
The ShaderMaterial allows you to write your own shaders
ShaderMaterials have a bit more complicated usage than the other materials
var material = new THREE.ShaderMaterial({
    uniforms: {
    time: {value: 0},
        color: { value: new THREE.Color( 0xffffff) }
    },
    vertexShader: vertexShaderSource, //string containing vertex shader code
    fragmentShader: fragmentShaderSource //string containing fragment shader code
});
Using the ShaderMaterial you can come up with all kinds of custom effects that are not possible with standard materials. For example below is a picture of a little white planet with a blue atmosphere. This picture was drawn using a single sphere. The picture below it is using the same geometry but has the MeshPhongMaterial applied.
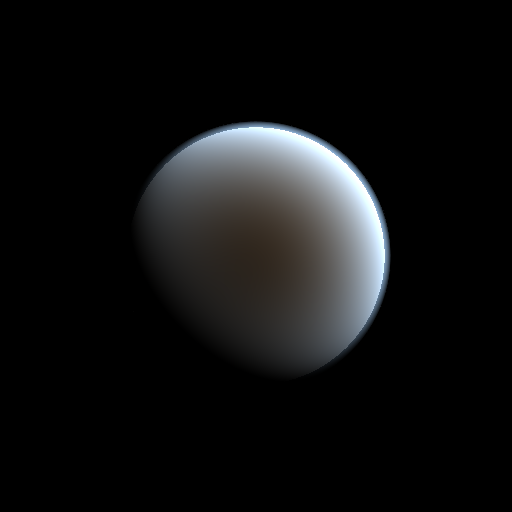
As you can see the ability to write your own shaders gives you a lot of flexibility to do special effects that would otherwise be unavailable to you. You can also use them to make cheap animations. The following gif uses the same material above, but is drawn in a scene with no lights. Everything is faked within the shader.
Making Your Own ShaderMaterial
The easiest way to make your own ShaderMaterial is by using three.js's built in ShaderChunk. The ShaderChunk class is essentially a library of common shader code that can be mixed and matched to create your own shaders, or that can be added to your shader to avoid writing common shader stuff such as lighting calculations. To access it you just use:
THREE.ShaderChunk["name_of_ShaderChunk"]
or you can use dot notation
THREE.ShaderChunk.name_of_ShaderChunk
Let's do an example, suppose you wanted to add fog to a custom shader you might instantiate your material like so:
var material = new THREE.ShaderMaterial({
    uniforms: {
    time: {value: 0},
        color: { value: new THREE.Color( 0xffffff) }
    },
    vertexShader: THREE.ShaderChunk.common + THREE.ShaderChunk.fog_pars_vertex + vertexShaderSource,
    fragmentShader: THREE.ShaderChunk.common + THREE.ShaderChunk.fog_pars_vertex + fragmentShaderSource
});
This will allow you to access any of the fog parameters and functions within your own shader. Unfortunately, this is not everything you need to do. In order to render with Fog we need to access certain uniform variables and we need to calculate the fog within the shader. The first is much easier to do, let's look at how to do that.
In order to access the fog uniform variables we just have to combine them with our own custom variables, we do this with the THREE.UniformsUtils function merge and the UniformsLib which functions very similarly to ShaderChunks. With this added bit our example now looks like:
var material = new THREE.ShaderMaterial({
   uniforms: THREE.UniformsUtils.merge( [
   THREE.UniformsLib[ "fog" ],
       {
       time: {value: 0},
           color: { value: new THREE.Color( 0xffffff) }
       }
   ]),
   vertexShader: THREE.ShaderChunk.common + THREE.ShaderChunk.fog_pars_vertex + vertexShaderSource,
   fragmentShader: THREE.ShaderChunk.common + THREE.ShaderChunk.fog_pars_vertex + fragmentShaderSource
});
This will add the fog uniforms to our own so that we can access them in our shaders. All that remains to be done now is to actually utilize the fog parameters and uniforms in our shaders. They will be just as accessible as variables and functions you define yourself. There is a ShaderChunk that will perform the calculations for you as well. But it must be embedded when you create the shader. Let's look at a minimal example of how that would look:
var fragmentShader = [
  "uniform vec3 color;",

  THREE.ShaderChunk[ "common" ],
  THREE.ShaderChunk[ "fog_pars_fragment" ],

  "void main() {",
    "gl_FragColor = vec4(color, 1.0);",
    THREE.ShaderChunk[ "fog_fragment" ],
  "}"

].join("\n"),

var vertexShader = [
    THREE.ShaderChunk[ "fog_pars_vertex" ],
  THREE.ShaderChunk[ "common" ],

  "void main() {",
    "vec4 mvPosition = modelViewMatrix * vec4( position.xyz, 1.0 );",
    "gl_Position = projectionMatrix * mvPosition;",
    THREE.ShaderChunk[ "fog_vertex" ],
  "}"

].join("\n")
Don't worry if you don't understand everything that is going on here. The important things to note are how the shader code is written line by line as individual comma-separated strings, and how the ShaderChunks are embedded directly into shader code.
Putting it all together we end up with a ShaderMaterial definition exactly like the first one. You can see that the calls to THREE.ShaderChunk are hidden away.
And with that, you should have everything you need to start writing your own custom shaders for three.js.
RawShaderMaterial
The RawShaderMaterial is really where the rubber meets the road. With a ShaderMaterial you can still access all the default information that three.js makes available. With the RawShaderMaterial you have to do everything yourself. This makes it significantly more lightweight but also requires that you do a lot more work yourself.
Summary
That's it! There are a few other types of materials that are available in three.js but these are the common ones you will likely want to use.
Hopefully you have learned:
- The basic material types in three.js and how they are used
- how to set up your own custom material using
ShaderMaterialandShaderChunk
Further Reading
If you are interested more in learning about shaders I suggest you work your way through The Book of Shaders and check out Shadertoy.
Posted on Utopian.io - Rewarding Open Source Contributors
Thank you for the contribution. It has been approved.
PS:
I really like your sentence
I hope to shed some light on these topics, considering it's all about shading! ;-)You can contact us on Discord.
[utopian-moderator]
Thank you @scipio! I'm glad you caught that.
Hey @clayjohn I am @utopian-io. I have just upvoted you!
Achievements
Community-Driven Witness!
I am the first and only Steem Community-Driven Witness. Participate on Discord. Lets GROW TOGETHER!
Up-vote this comment to grow my power and help Open Source contributions like this one. Want to chat? Join me on Discord https://discord.gg/Pc8HG9x
Congratulations @clayjohn! You have completed some achievement on Steemit and have been rewarded with new badge(s) :
Click on any badge to view your own Board of Honor on SteemitBoard.
For more information about SteemitBoard, click here
If you no longer want to receive notifications, reply to this comment with the word
STOPNice tutorial! Thanks, will give this a play with shortly.
Congratulations @clayjohn! You have completed some achievement on Steemit and have been rewarded with new badge(s) :
Click on any badge to view your own Board of Honor on SteemitBoard.
For more information about SteemitBoard, click here
If you no longer want to receive notifications, reply to this comment with the word
STOP