Part 1: Create a Secure Steemconnect-Powered STEEM/SBD Payment Portal with React and AdonisJS
Repository
What Will I Learn?
This is a two part series in which we build a payment portal that uses the Steemconnect API to accept STEEM/SBD payments directly. As we progress while building this portal, we will learn about and use the techniques below to achieve our goal.
- Test Driven Development approach to building scalable applications
- Dynamically generating payment endpoints using URL encoding.
- Setting up the server-side API payment to process payment requests.
- Securing payments from fraud by leveraging custom generated security tokens.
Requirements
- Node.js 8.0 or greater.
- NPM 3.0 or greater.
- Yarn package manager
- Git
- Adonis Fullstack Boilerplate
- An understanding of Object Oriented Programming with ES6 and unit testing.
- An advanced level of AdonisJS knowledge.
- Keen interest and patience.
Difficulty
- Advanced
Tutorial Repository
Tutorial Contents
- Introduction.
- Setting up AdonisJS Installation
- Writing Feature Tests for Wallets
- Setting up user authentication.
In this installment, we will be strictly working with AdonisJs and the server . We will setup wallets for our users to record their transactions. We will also create user authentication systems with Adonis Persona. We will then visit security token management. We will also be writing our code in a test driven development fashion as we'd like to assure ourselves that we are not recording any false positives.
Introduction.
Disclaimer:
This tutorial is not the ideal introduction to AdonisJS or React for beginners. I'd strongly advise you have a grasp of object oriented programming and you are fairly comfortable with asynchronous programming.
Also, if you are not familiar with functional testing in AdonisJS, I wrote a very helpful article to get you started.
I'd be overjoyed if you took a trip to see these resources before we proceed:
Finally, every line of code in this tutorial is available on Github
Briefing.
We covered our scope above. So let's get to it. We'll be calling our app Paysy.
Setting Up the AdonisJS Installation
I'm assuming your development machine runs the Linux operating system. Windows users will be right at home too. I'm also assuming you have the Node.js runtime and NPM installed.
To install AdonisJS on your machine, we first have to get the global command line interface (CLI). We can install that by running:
npm i -g @adonisjs/cli
Once the installation completes, make sure that you can run adonis from your command line.
adonis --help
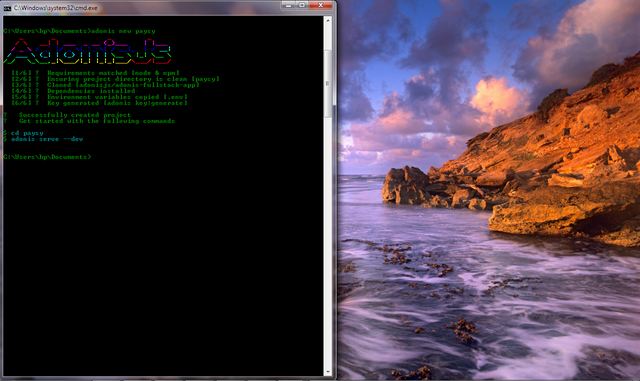
Next, we need to create an app called paysy from the CLI. We're interested in the API and web functionalities so we pass the --fullstack additional flag.
adonis new paysy --fullstack
You should see an output similar to the one below.
Also, let's add the sqlite3 and mysql dependencies. We'll have sqlite3 for our testing database and MySQL for the production database.
npm install mysql sqlite3 --save-dev
Let's change directories to the paysy directory and start the development server.
cd paysy && adonis serve --dev
We receive a tidy little JSON response if we head over to http://127.0.0.1:3333
{"greeting":"Hello world in JSON"}
Setting Up Application Config
We need to configure environmental variables. Let's update the contents of our .env file to the content below. Leave the rest of the parameters untouched.
HOST=127.0.0.1
PORT=3333
APP_URL=http://${HOST}:${PORT}
DB_CONNECTION=mysql
DB_HOST=127.0.0.1
DB_PORT=3306
DB_USER=root
DB_PASSWORD=
DB_DATABASE=paysy
We'll also set our authentication method to jwt since we'll be using that method. Edit config/auth.js and set authenticator to jwt
  /*
  |--------------------------------------------------------------------------
  | Authenticator
  |--------------------------------------------------------------------------
  |
  | Authentication is a combination of serializer and scheme with extra
  | config to define on how to authenticate a user.
  |
  | Available Schemes - basic, session, jwt, api
  | Available Serializers - lucid, database
  |
  */
  authenticator: "jwt",
Setting Up Testing Environment
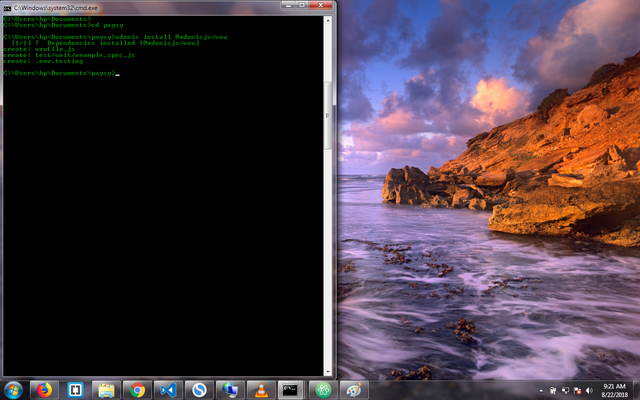
AdonisJS relies on the @adonisjs/vow package as its core testing framework. We may install it by running
adonis install @adonisjs/vow
We should get a screen like below
We now need to register its service provider in the aceProviders array available at start/app.js .
    const aceProviders = [
      '@adonisjs/vow/providers/VowProvider'
    ]
We must also define a couple of behaviors for our tests. We can define these behaviours in a vowfile.js script available at the project root. We'd like Adonis to spin up a server and run migrations before any tests are run. Then, we'd like Adonis to destroy the server and reset the migrations after we are done testing.
'use strict'

/*
!|--------------------------------------------------------------------------
| Vow file
|--------------------------------------------------------------------------
|
| The vow file is loaded before running your tests. This is the best place
| to hook operations `before` and `after` running the tests.
|
*/

const ace = require('@adonisjs/ace')

module.exports = (cli, runner) => {
  runner.before(async () => {
    /*
    |--------------------------------------------------------------------------
    | Start the server
    |--------------------------------------------------------------------------
    |
    | Starts the http server before running the tests. You can comment this
    | line, if http server is not required
    |
    */
    use('Adonis/Src/Server').listen(process.env.HOST, process.env.PORT)

    /*
    |--------------------------------------------------------------------------
    | Run migrations
    |--------------------------------------------------------------------------
    |
    | Migrate the database before starting the tests.
    |
    */
    await ace.call('migration:run')
  })

  runner.after(async () => {
    /*
    |--------------------------------------------------------------------------
    | Shutdown server
    |--------------------------------------------------------------------------
    |
    | Shutdown the HTTP server when all tests have been executed.
    |
    */
    use('Adonis/Src/Server').getInstance().close()

    /*
    |--------------------------------------------------------------------------
    | Rollback migrations
    |--------------------------------------------------------------------------
    |
    | Once all tests have been completed, we should reset the database to it's
    | original state
    |
    */
    await ace.call('migration:reset')
  })
}
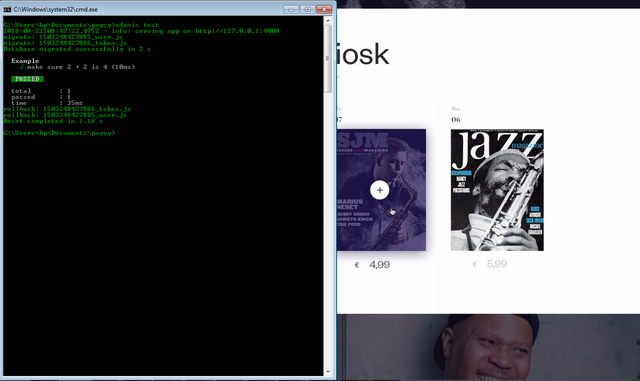
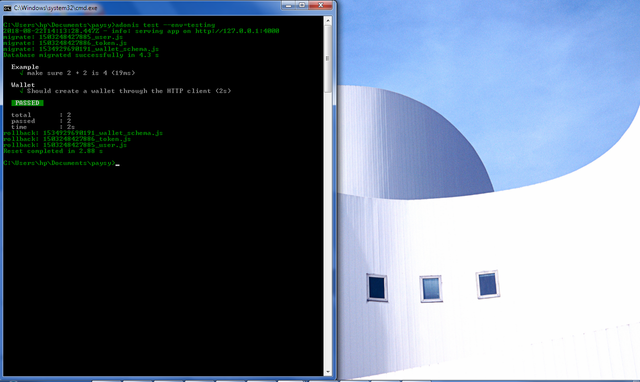
Run adonis test in your terminal now and you'll hopefully get the below result.
Building the Application
We've successfully setup our installation and we must proceed with building our application now. We'll be following a series of steps to help us achieve our purpose.
Obtaining Requirements
Our app must do the following:
- Successfully register and authenticate new users.
- Quickly generate security token nonces we'll use in verifying transaction legitimacy.
- Promptly update the appropriate user wallets with the new balances whenever funding is successful.
Setting Up Our Database Tables
Based on the requirements we have above, we would need a wallets table to contain all the STEEM and SBD data we'll be storing. AdonisJS can help us create the required table(s) via migrations.
We'll be generating the wallet migrations through the CLI.
adonis make:migration wallet
A little dialog should come up on the CLI asking if we'd like to create or select a table. We'll go with the create table option. Open up the newly generated migration available at database/migrations and let's add some code. We'll be checking to see if this table is yet to be created before proceeding. We'll also need the name, balance and user_id fields to store important information.
'use strict'

const Schema = use('Schema')

class WalletSchema extends Schema {
  up () {
    if (await this.hasTable('wallets')) return;

    this.create('wallets', (table) => {
      table.increments()
      table.integer("user_id");
      table.string("name");
      table.float("balance", 8, 3);
      table.timestamps()
    })
  }

  down () {
    this.drop('wallets')
  }
}

module.exports = WalletSchema
We'll run our migration now. This will generate the wallets table.
adonis migration:run
We've successfully set up our database. Let's create a quick AdonisJS Lucid ORM model for our wallets table. Create Wallet.js in app/Models and add some code
'use strict'

const Model = use('Model')

class Wallet extends Model {
    user () {
        return this.belongsTo('App/Models/User')
    }
}

module.exports = Wallet
Writing Feature Tests for Wallets
For our wallets, we'd like to be able to do the following:
We'd like to be able to add a new wallet entry through the HTTP client.
We'd like to be able to retrieve wallet information through the HTTP client.
We'd also like to be able to update wallet information. This way, we'd be able to update the balance whenever a user funds STEEM or SBD.
We also would like to be able to list and filter homes according to criteria.
We'd also like to extract the logic into lots of separate classes that can be reused in other parts of our app.
Creating Our Wallet Test Suite
AdonisJS comes fully equipped with test capabilities. We can generate a test through the CLI for our Wallet suite of tests. Make sure you choose to generate a functional test as we'll be attempting to test HTTP routes.
adonis make:test Wallet
wallet.spec.js should be available at the test/functional directory now.
_Writing Our First Wallet Test
Open up test/functional/wallet.spec.js and we are greeted with a default test that looks like this:
    'use strict'

    const { test } = use('Test/Suite')('Home')

    test('make sure 2 + 2 is 4', async ({ assert }) => {
      assert.equal(2 + 2, 4)
    })
Not bad, but we'd love to have a real functional test. Let's replace the content with some new content. We'll import the test and trait methods as we'll need them. The Test/ApiClient trait allows us to make HTTP calls to the backend.
'use strict'

const { test, trait } = use('Test/Suite')('Wallet')

trait('Test/ApiClient')
Next, we add our first test. We attempt to create a wallet by posting data to the /api/v1/wallets route. We then proceed to make sure the wallet was really created by querying the wallets endpoint with the wallet's id as the parameter. We then get assertions by measuring JSON responses from both operations.
test('Should create a wallet through the HTTP client', async ({ client }) => {
  let data = {
    name: 'STEEM',
    user_id: 1,
    balance: 0.000
  }

  const wallet = await client
                      .post(`/api/v1/wallets`)
                      .send(data)
                      .end()

  const response = await client.get(`/api/v1/wallets/${wallet.body.id}`).end()

  response.assertStatus(200)

  response.assertJSONSubset(data);

}).timeout(0)
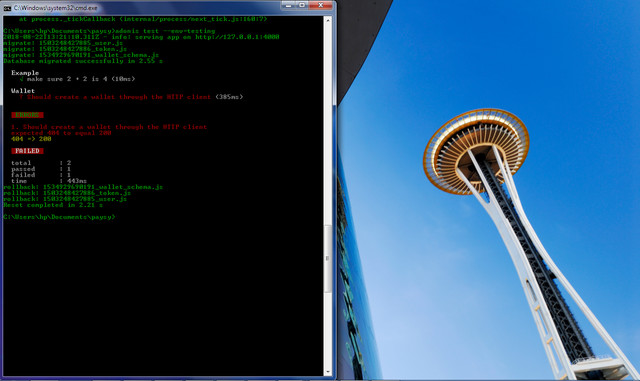
We run the test and sure enough we get a red failing test. Let's write the implementation to get our tests passing.
Passing Our Wallet Tests_
We'll hop into the terminal and run a command to generate our Wallets controller
adonis make:controller Wallets
Let's write code that passes our test. We'll edit the first route in the start/routes.js and write some code. We'll create a whole lot of routes easily by using the route.factory.
Route.resource("/api/v1/wallets", "WalletsController");
Let's add some code to the Wallet class. We'll import the Wallet model.
const Wallet = use("App/Models/Wallet");

class WalletsController {}
We'll create the store method now. Within it, we'll be creating the wallet. We'll be using the ES6 Object Spread proposal to set some block scoped variables. We're retrieving values from request.all()
  async store({ request }) {
    let { name, user_id, balance } = request.all();
  }
We now need to create a new Wallet (if none matching the provided data exists) using the data received. We then return the created Wallet instance in JSON format.
  let wallet = await Wallet.findOrCreate({
    name,
    user_id
    balance
  })

  return wallet.toJSON()
We also would like to show the created wallet on its own special endpoint. For this, we will add the show method and we'll just grab the id of the wallet needed from the URL using the destructured params object. We'll then fetch it and return it in JSON format.
  async show({ request, params }) {
    let { id } = params;

    let wallet = await Wallet.find(id);

    return wallet.toJSON();
  }
Last of all we need to make sure our wallet can be updated through the HTTP client. We'll add another test that should update the wallet with an id of 1. We'll simply fire a PUT request to our endpoint and run assertions on the JSON returned and the status code of the response.
test("Should update the wallet with the id #1 through the HTTP client", async ({
  client
}) => {
  let walletID = 1;

  let data = {
    balance: 5.0
  };

  const wallet = await client
    .put(`/api/v1/wallets/${walletID}`)
    .send(data)
    .end();

  const response = await client.get(`/api/v1/wallets/${walletID}`).end();

  response.assertStatus(200);

  response.assertJSONSubset(data);
}).timeout(0);
We run adonis test and sure enough our test fails. Let's get it passing. We'll add the update method to our wallet controller. Within this method we will simply find and update the wallet with new data.
  async update({ request, params }) {
    let { id } = params;
    let { balance } = request.all();
    let data = {
        balance
    }

    let wallet = await Wallet.query()
      .where("id", id)
      .update(data);

    return wallet.toJSON();
  }
Let's save, jump back into the terminal and run our test
adonis test
Congratulations, our tests turn green! We have completed the first phase of TDD for our wallet.
Refactoring for Cleaner, Reusable Code.
We'll get our code cleaner and better reusable by extracting functionality into a WalletManager.js class. Create App/Managers/WalletManager.js and we'll move some content from our WalletController.js class to our new one. We're not adding new code here, simply reusing the code we already have. We extract core functionality into three methods:
findOrCreateWalletupdateWalletByIDfindWalletByID
"use strict";

const Wallet = use("App/Models/Wallet");

class WalletManager {
  static async findOrCreateWallet(payload) {
    let wallet = await Wallet.findOrCreate(payload.data);

    return wallet.toJSON();
  }

  static async updateWalletByID(payload) {
    let wallet = await Wallet.query()
      .where("id", payload.id)
      .update(payload.data);

    return wallet.toJSON();
  }

  static async findWalletByID(payload) {
    let wallet = await Wallet.find(payload.id);
    return wallet.toJSON();
  }
}

module.exports = WalletManager;
Our WalletController should look like the below now. It's much more skinnier now that we have moved the core functionality to a reusable class.
"use strict";

const WalletManager = use("App/Managers/WalletManager");

class WalletsController {
  async store({ request }) {
    let { name, user_id, balance } = request.all();

    return WalletManager.findOrCreateWallet({
      data: {
        name,
        user_id,
        balance
      }
    });
  }

  async show({ request, params }) {
    let { id } = params;

    return WalletManager.findWalletByID({ id });
  }

  async update({ request, params }) {
    let { id } = params;
    let data = request.all();

    return WalletManager.updateWalletByID({ id, data });
  }
}

module.exports = WalletsController;
We run our tests again and nothing breaks so we can move on.
Adding Users to our App.
A payment server is no good without any actual users. We'll add users to our application and we'll use adonis-persona to speed up this process. Run this to install
adonis install @adonisjs/persona
Follow up by registering the provider inside the providers array in start/app.js:
const providers = [
  '@adonisjs/persona/providers/PersonaProvider'
]
Since Persona does not come with any implementations, we must create one. We'll generate a UserController class.
adonis make:controller User
Next we update our start/routes.js class and add a route factory for our UserController
Route.resource("/api/v1/users", "UserController");
We'll write a test in advance (cause that's the cool thing to do). First of all, we'll generate a functional test suite for the user class.
adonis make:test user
We'll then add the below test to it.
test("Should create a user through the HTTP client", async ({ client }) => {
  let data = {
    email: "[email protected]",
    password: "secret",
    password_confirmation: "secret"
  };

  const user = await client
    .post(`/api/v1/users`)
    .send(data)
    .end();

  const response = await client.get(`/api/v1/users/${user.body.id}`).end();

  response.assertStatus(200);

  response.assertJSONSubset(data);
}).timeout(0);
We get our expected failing test. Now, let's get it green. We'll add the index, store and show methods to the UserController class. Our index method shows us all our available users. We'll keep our core functionality in the UserManager class we'll soon create.
"use strict";

const UserManager = use("App/Managers/UserManager");

class UserController {
  async index() {
    return await UserManager.all();
  }

  async store({ request, auth }) {
    const data = request.only(["email", "password", "password_confirmation"]);

    try {
      const user = await UserManager.createUserFromData({ data });

      await auth.login(user);

      return user;
    } catch (e) {
      return e;
    }
  }

  async show({ params }) {
    const { id } = params;

    return UserManager.findUserByID({ id });
  }
}

module.exports = UserController;
Lets create App/Managers/UserManager.js and then we'll define the methods required on it.
Firstly, the all method returns all our users. We use the Persona package to register users in the createUserFromData method. We use the findUserByID to simply return any user matching the id provided.
"use strict";

const User = use("App/Models/User");
const Persona = use("Persona");

class UserManager {
  static async all(payload) {
    return await User.all();
  }

  static async createUserFromData(payload) {
    let user = await Persona.register(payload.data);
    return user.toJSON();
  }

  static async findUserByID(payload) {
    let user = await User.find(payload.id);
    return user.toJSON();
  }

  static async findUserByAttributes(payload) {
    let user = await User.query()
      .where(payload.attributes)
      .fetch();
    return user;
  }
}

module.exports = UserManager;
Save and return to the terminal. Running adonis test gives us glorious green results.
Setting up JWT authentication for our App.
We are able to register new users now. We also need to be able to authenticate them. We can pull this off by using Persona. First of all, let's generate the AuthController class.
adonis make:controller Auth
Next, we need to add a route factory for the AuthController in start/routes.js.
js Route.resource("/api/v1/auth", "AuthController");
We'll write a test for our authentication. We'll expect to get an object like the one below as the response.
{
    type: 'bearer',
    token: 'some-long-random-secure-string-24dfe4244'
}
We then proceed to add our test case code to tests/functional/user.spec.js.
"use strict";

const { test, trait } = use("Test/Suite")("Auth");

trait("Test/ApiClient");

test("Should generate a token based on credentials passed through the HTTP client", async ({ client }) => {
  let data = {
    uid: "[email protected]",
    password: "secret"
  };

  const return = await client
    .post(`/api/v1/auth`)
    .send(data)
    .end();

  response.assertStatus(200);

  response.assertJSONSubset({
    type: 'bearer'
  });
}).timeout(0);
Running this we get a failing test. Let's fix that. We'll add the store method to the AuthController class within which we will attempt to get a JWT token that we'll use to confirm our users identity. We first verify our user details using Persona.
"use strict";

const Persona = use("Persona");

class AuthController {
  async store({ request, auth }) {
    const payload = request.only(["uid", "password"]);
    const user = await Persona.verify(payload);
    const authScheme = `jwt`;

    return await auth
      .authenticator(authScheme)
      .withRefreshToken()
      .attempt(payload.uid, payload.password);
  }
}

module.exports = AuthController;
Running adonis test now we get a passing green test. This leads us to the last part of this tutorial.
Generating Secure Payment Tokens.
Before we proceed, we need to figure out a way to make sure requests are actually valid and not spoofs from intruders. We can do this by generating a custom token before a user attempts to make payments. We'll add a test case to the user.spec.js. We only want it to generate a token if we have an authenticated user making this request.
test("Should generate a transaction token for payments only if we are authenticated", async ({
  client
}) => {}).timeout(0)
Our test is simple. We'll simply pass user credentials to the /api/v1/auth endpoint over post and then we'll be rewarded with an authentication token. We then pass that token through the Authorization header to the api/v1/payments endpoint and hopefully we get rewarded with the needed payment token that we'll use to verify our transaction.
  const authResponse = await client
    .post(`/api/v1/auth`)
    .send({
      uid: userData["email"],
      password: userData["password"]
    })
    .end();

  const token = authResponse.body.token;

  const paymentTokenResponse = await client
    .post(`/api/v1/payments`)
    .header("Authorization", `Bearer ${token}`)
    .send()
    .end();

  paymentTokenResponse.assertStatus(200);
We run this test and it fails. We'll generate a PaymentController and get to work.
adonis make:controller PaymentController
Let's add a route factory for this controller in start/index.js
Route.resource("/api/v1/payment", "PaymentController");
We'll add the store method. The store method is where we'll write the code that helps us generate the payment token. Within this method, we'll first make sure the person making this request is authenticated by using auth.check() and if the token supplied is invalid, we return an error. Next, we'll use a method we're yet to create. We'll call this method generateTransactionToken and it will live in the PaymentManager class so remember to create app/Managers/PaymentManager.js class. We'll supply two arguments to this method and they are the User model object and the transaction token type. We'll supply auth.user and payment as the required arguments.
  const PaymentManager = use("App/Managers/PaymentManager");

  class PaymentController {
    async store({ request, response, auth }) {
      try {
        await auth.check();
        return new PaymentManager().generateTransactionToken(
          auth.user,
          "payment"
        );
      } catch (e) {
        return response.status(401).send("Missing or invalid api token");
      }
    }
  }
}
Let's add the generateTransactionToken method to the PaymentManager class. We'll be using the rand-token package for generating our custom token. We'll use the moment package to help us calculate if the token was generated within the last 12 hours.
Within the generateTransactionToken method, we make sure a user object was passed in. We then get all tokens associated with our user. We then make sure only tokens that are of the type payment and were generated within the last 12 hours with is_revoked set to 0 are returned. If we have any such tokens, we simply return it. If we don't have such, we generate a 16 character long random string and insert it into the database as our token.
const randtoken = require("rand-token");
const moment = require("moment");

const TokenManager = use("App/Models/Token");
const Encrypter = use("Encryption");

class PaymentManager {
  async generateTransactionToken(user, type = "payment") {
    if (!user) return;
    let query = user.tokens();
    query = await this._addTokenConstraints(query, type);

    if (query.length) {
      return query[0].token;
    }

    const token = Encrypter.encrypt(randtoken.generate(16));
    await user.tokens().create({ type, token });

    return token;
  }

  /**
   * Adds query constraints to pull the right token
   *
   * @method _addTokenConstraints
   *
   * @param  {Object}            query
   * @param  {String}            type
   *
   * @private
   */
  async _addTokenConstraints(query, type) {
    return await query
      .where("type", type)
      .where("is_revoked", false)
      .where(
        "updated_at",
        ">=",
        moment()
          .subtract(12, "hours")
          .format(this.dateFormat)
      );
  }
}

module.exports = PaymentManager;
We run our test again and we are in the green again. Yay!
Securely Processing SteemConnect Redirects.
Since we'll be using SteemConnect to securely access payments, we need to ensure there are no vulnerabilities for intruders to exploit. We must first anticipate our redirect url query structure. We need to have a query structure like this.
http://localhost:3333/api/v1/payment?uid=1&amt=0.001&wlt=SBD&tkn=cecc65002391685dc0052d3b7c057e96hppl8qzD
Let's go through each query property:
uid: This is the user id of the user making the payment. We'll use this data to track our users.
amt: This is the amount our user is paying. In this case its 0.001 SBD.
wlt: This is the wallet our user is making an update to. We use this to differentiate between STEEM and SBD payments.
tkn: This is the token security nonce that is required. This acts as a means of trust since potentially anyone can manipulate the query string to perform dangerous operations like increasing the amount of SBD or even diverting payments to other users.
With this structure in mind, we will write some code in the index method of the PaymentController to process such a payment request. We first get all the data we passed through the query string. We then use the UserManager.findUserByID method we wrote previously to get the user processing the payment. We also search for the provided token through the list of tokens our user has. If we find a match, we know the token is valid and we proceed. We then update the token setting the is_revoked flag to true and we update the corresponding wallet that matches the wlt key on the query string. Last of all, we render a simple view that does a javascript powered countdown that seamlessly closes the window after 12 seconds.
  async index({ request, response, view }) {
    const data = request.only(["uid", "amt", "tkn", "wlt"]);

    const userID = parseInt(data.uid, 10);
    const amount = parseFloat(data.amt, 10);
    const walletName = data.wlt;

    const user = await UserManager.findUserByID({
      id: userID
    });

    let validTransactionToken = await TokenManager.findTokenByParams({
      data: {
        user_id: user.id,
        is_revoked: 0,
        type: "payment"
      }
    });

    if (!validTransactionToken) {
      return response.status(401).send({
        error: {
          message: "Invalid token supplied."
        }
      });
    }

    await TokenManager.updateTokenByID({
      id: validTransactionToken.id,
      data: {
        is_revoked: 1
      }
    });

    let wallet = await WalletManager.findWalletByParams({
      data: {
        user_id: userID,
        name: walletName
      }
    });

    let balance = Number(wallet.balance, 10) + amount;

    let userWallet = await WalletManager.updateWalletByID({
      id: wallet.id,
      data: { balance }
    });

    return view.render("payment.process");
  }
That's all for this installment friend. Let's do a brief recap of what we've achieved so far and why we are awesome.
Conclusion
Building a STEEM/SBD payment portal is easily achievable thanks to all the help from Adonis. We've tackled each required part of the payment portal so far using Test Driven Development and we've been successful.
In our final installment, we will be tackling the frontend and building out a simple React app to serve as the user interface for all transactions.
Proof of Work Done
You can clone the repository containing code to this tutorial from https://github.com/creatrixity/paysy.
Thank you for your contribution.
As always good tutorial, I wait for the next one.
Your contribution has been evaluated according to Utopian policies and guidelines, as well as a predefined set of questions pertaining to the category.
To view those questions and the relevant answers related to your post, click here.
Need help? Write a ticket on https://support.utopian.io/.
Chat with us on Discord.
[utopian-moderator]
Thanks. I'll add comments on my next one
Thank you for your review, @portugalcoin!
So far this week you've reviewed 3 contributions. Keep up the good work!
Hey @creatrixity
Thanks for contributing on Utopian.
We’re already looking forward to your next contribution!
Want to chat? Join us on Discord https://discord.gg/h52nFrV.
Vote for Utopian Witness!
Congratulations @creatrixity! You have completed the following achievement on Steemit and have been rewarded with new badge(s) :
Click on the badge to view your Board of Honor.
If you no longer want to receive notifications, reply to this comment with the word
STOPTo support your work, I also upvoted your post!
Do not miss the last post from @steemitboard:
SteemitBoard and the Veterans on Steemit - The First Community Badge.
Hi @creatrixity! We are @steem-ua, a new Steem dApp, computing UserAuthority for all accounts on Steem. We are currently in test modus upvoting quality Utopian-io contributions! Nice work!