Part 3: Build a CSS-in-JS React App with Styled Components and Priceline Design System
Repository
Previously on this series, we learned about lazy loading and its multiple performance benefits for our application. We then proceeded to implement lazy loading within our application using the react-loadable NPM package. We also created some custom styled components for our application.
Today, we'll do just a little bit more. We'll setup a state management system for our application. We'll also setup route transition animations for smoother switches from one route to another.
Difficulty
- Advanced
What Will I Learn?
We expect to have gained a superior understanding of state management upon arriving at the end of this tutorial. We should also understand how to setup both state management for our applications and route based transitions for our applications. We'll be covering the following:
- Implementing state management in React with Redux-saga.
- Keeping our state immutable with
Immutable.js - Making reducers and sagas play nice.
- Setting up route based transitions within our React application.
Requirements
- Node.js 8.0 or greater.
- NPM 3.0 or greater.
- Yarn package manager
- Git
- Previous code on this series
- An intermediate level of ReactJS knowledge.
- Keen interest and patience.
Introduction
Welcome back to the series! It's great for us to know we've been making progress and to stay in sync with the last known state of our application let's remember our current application structure:
fire-liners/
- config/...
- node_modules/...
- public/...
- scripts/...
- src/
components/
- Header/
- index.js
- logo.svg
- Header/
containers/
- App/
- App.test.js
- index.js
- App/
screens/
- Home /
- index.js
- Loading /
- index.js
- Home /
registerServiceWorker.js
- package.json
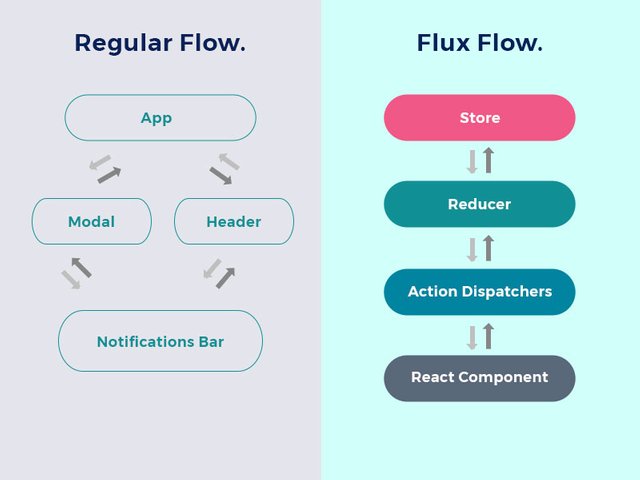
Previously, we gained an understanding lazy loading as a tool to optimize load times. Today, we'll be looking at the mysterious, often dreaded world of state management. "What is state management and why do we need it anyway?", you may ask yourself. Well, here's a little story involving the primary actor—you as a React developer. You're engineering your latest marvel with React and everything is going swell, until you face an important problem; you need to have two React components communicate with each other without one component getting in the way of the other component.
In this case, you're building a shopping app and you'd love to be able to update the cart counter at the top right hand corner with the total number of items a user added to their cart. This is usually troublesome as you have to device a solution for this problem. However, with state management you can simply send information to a central store and every component can access it and get whatever information they are interested in.
Let's break down some important terms before proceeding further:
What is State?
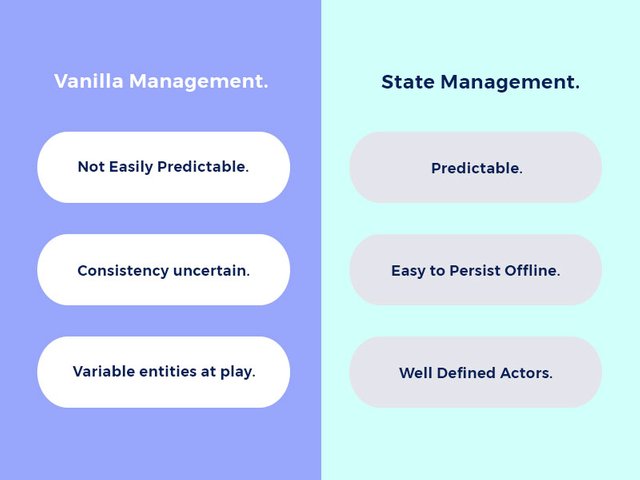
State simply means all data present in the application at a particular point in time. These datum could either be user generated or of third party origin. A good example of data within an application that can be considered as state is the simple boolean switch within a user's settings panel that allows the user choose to either receive notifications or go without.
What is State Management?
State management simply refers to an architecture devised to ensure state is easily accessible and modifiable. You may write a custom state management mechanism or you may just piggyback on the excellent open source solutions accessible to all of us. Several excellent state management solutions such as Redux and MobX are freely available. For the remainder of our tutorial, we'll be narrowing our focus to the Redux state management solution.
What is Redux?
Redux is a contraction of the terms Red__ucers and Fl__ux. Redux is a state management solution that marries the popular use of reducers in Javascript with the Flux ideology that was inspired by Facebook. This begs the questions posed below.
What are Reducers?
Reducers are functions that try to collapse multiple values to a single value. For instance, using reducers, we may attempt to obtain the maximum value from a range of values. Take the following example in which we find the largest id in the items array. We do that by passing a method and an integer to the reduce method. This method will return the maximum value between the current item under consideration and the maximum previous value. The integer provided is the "initialization value" which basically begins maxId at -1. This reducer can be used when you need to add a new entry to the items array.
var items = [
    { id: 1, title: 'Rush of Blood to the Head' },
    { id: 12, title: 'Viva la Vida or Death and all His Friends' },
    { id: 14, title: 'Parachutes' }
]

const largestId = items.reduce((maxId, item) => Math.max(item.id, maxId), -1) // returns 14
What is Flux?
Flux is an application architecture philosophy from Facebook that tries to make applications easier to build and maintain by enforcing a singular direction for data flow. This is also called the unidirectional data flow model. Flux strips out unnecessary complexity so we can write our code with less headaches.
![Image of Flux unidirectional data flow compared with multidirectional data flow.()
What is State Immutability and Why Should I Care About It ?
State immutability is a concept that describes state that is prone to change, as conversely being prone to errors.
Basically, state immutability simply means, "Dude, never change or mutate the state in an application". I know you've got your eyebrows up and about to go into an uproar. "But how do we get anything done without changing the state?", you exclaim. Well, the solution to that is that we should never change state, we should only change a copy of the state object and enforce it as the current representation of the state. This is helpful in more ways than one. Implementing brain-wracking techniques like undo actions (Ctrl + Z) becomes a piece of cake and we can easily revert to a previous state image if we make an error. Also, when we hot reload our code, we don't have our state thrown out the window, but still readily available and useful.
We can implement state immutability in our application by leveraging the ImmutableJS package (also by Facebook).
...Lastly, What Are Sagas and How Are They Related to Redux?
A Saga is like a separate part of your application that's solely responsible for side effects. When you're building apps, any actions that are carried out may come with their own side effects. For example, when making an asynchronous request, a common side effect encountered is the inability of the client to cancel the request in the case of inadvertent triggers. A Saga can help us handle such side effects.
According to its official Github page, Redux Saga is a library that aims to make application side effects (i.e. asynchronous things like data fetching and impure things like accessing the browser cache) easier to manage, more efficient to execute, simple to test, and better at handling failures.
Sagas use an interesting new concept in ECMAScript 6 called generators. You can learn all about generators in ES6 here
A Gentle Introduction To Redux
Redux works with a set of separate but related entities. We'll be looking at these entities and their roles within a Redux application
- Reducers: Reducers are 'pure' JavaScript functions that accept a state object along with an action object and returns a new state object. As an example, this is a typical Redux reducer. Here, it accepts an
initialStateobject as an argument and it also accepts an action object. Notice how our reducer doesn't attempt to mutate the state, rather it returns a new state object based on the action object it was passed.
const initialState = {
    title: "The Shawshank Redemption"
}

const AppReducer = (state = initialState, action) => {
    switch (action.type) {
        case SET_TITLE:
            return {
                ...state,
                title: action.data.title
            }

        default:
            return state
    }
}
Action Dispatchers: These are the little guys that tell the Redux store something has happened. They simply call the
dispatchmethod with an action object as the argument.Action Objects: These are simple objects with the required property of a
typeand an optional argument. If action dispatchers are messengers, then action objects are the messages they transport.
A Gentle Introduction To Sagas
Sagas are kinda like reducers and actions rolled in one. They are capable of dispatching action objects that can be acted upon by reducers and they are also capable of listening for action objects to act upon in they own right.
A typical saga looks like the one below. Here, we have the generator method setAppTitle that uses the yield statement to obtain the title value from getAppTitle. Upon obtaining the title, it then uses the put method from redux-saga to try and set the title of the app.
export function* setAppTitle (payload) {
    const title = yield call(getAppTitle);
    return yield put({
        type: SET_APP_TITLE,
        payload: {
            title
        }
    })
}

export default function* root() {
  yield all([
    takeLatest(SET_APP_TITLE_REQUEST, setAppTitle),
  ]);
}
Getting Started with State Management in Redux.
We'll be writing code that allows our app add new quotes that can be displayed on the index page. We'll do that by sending our data to the Redux store upon submission and that'll allow us to access it from any part of our application.
We'll install the following packages:
reduxreact-router-redux: This helps ourreact-routerstay in sync with our redux store.redux-sagaredux-localstorageimmutable
We'll be using the Redux Local Storage middleware to persist our state to the browser's storage for ease of accessibility.
npm i --save immutable redux react-router-redux redux-saga redux-localstorage
We'll be changing our application structure a little bit. Our new application structure will resemble the one below. The changes have been highlighted.
fire-liners/
- config/...
- node_modules/...
- public/...
- scripts/...
- src/
components/
- Header/
- index.js
- logo.svg
- Header/
containers/
- App/
- reducer.js
- constants.js
- actions.js
- index.js
- App/
screens/...
redux/
- store.js
- reducers.js
registerServiceWorker.js
- package.json
We'll be setting up our feed of liners to source data from the Redux store instead of from an array, but first of all, let's setup the Redux application structure. We'll modify src/index.js and have our app access the soon to be created Redux store. We'll first list out our dependencies. We'll need the Provider component that will allow our app access the Redux store. We'll also need the browserHistory method that allows us get the browsers history object. We also use the syncHistoryWithStore method to keep the history up to date with the store. Finally, we'll be using the store object which we're yet to create.
import React from 'react';
import ReactDOM from 'react-dom';
import { Provider } from 'react-redux';
import { browserHistory } from 'react-router';
import { BrowserRouter as Router } from 'react-router-dom';
import { syncHistoryWithStore } from 'react-router-redux';
import store from './redux/store'
import App from './containers/App';
Next, setup the application to use the above mentioned dependencies.
const history = syncHistoryWithStore(browserHistory, store)

ReactDOM.render((
    <Provider store={store}>
        <Router history={history}>
            <App />
        </Router>
    </Provider>
),
document.getElementById('root'));
We'll create the store.js module at src/redux. We'll be using the createStore and applyMiddleware methods from redux to help us create a redux store and then apply some middleware that allows us extend the store's capabilities. We'll also use a so-called 'rootReducer' that actually just combines separate reducers into one giant object. In our configure method, we check if the browser window has the Redux DevTools extension installed. If it does, we create the store with Dev Tools support. We then apply middleware that helps us carry out various tasks. For now we'll be using none. We then create the store supplying it all the reducers along with any possible initial state data we may have available which at the moment is an empty object.
Last of all, we check if we're using hot module reloading. If we are using HMR, we keep the reducer updated with every hot reload by replacing the current reducer with itself.
import { createStore, applyMiddleware } from 'redux'

import rootReducer from './reducers'

export default function configure(initialState = {}) {
  const create = window.devToolsExtension
    ? window.devToolsExtension()(createStore)
    : createStore

  const createStoreWithMiddleware = applyMiddleware()(create)

  const store = createStoreWithMiddleware(rootReducer, initialState)

  if (module.hot) {
    module.hot.accept('./reducers', () => {
      const nextReducer = require('./reducers')
      store.replaceReducer(nextReducer)
    })
  }

  return store
}
Let's create src/redux/reducers and get to work. We'll be importing a single reducer (the app reducer) from src/containers/App/reducer. We'll also be importing the combineReducers method from redux.
import { combineReducers } from 'redux';
import AppReducer from '../containers/App/reducer';

export default combineReducers({
    app: AppReducer
})
We now have to create the AppReducer which we'll make available at src/containers/App/reducer.js. We'll be importing the fromJS method from the
ImmutableJS library. This fromJS method allows us to turn a regular JavaScript object to an Immutable object that can only be manipulated through an API that is exposed by the Immutable library. Also, we'll be defining a set of constants in the src/containers/App/constants.js as a good programming practice. We then define the
initial state for our app as an ImmutableJS object with the liners property set to an empty array.
Finally, we define the AppReducer function that accepts the state (we set it to the initial state by default) and the action object. We use the switch statement on the action.type to get the action.type value that corresponds to SET_LINERS_DATA. If we get a match, we set the liners property of the Immutable initialState to the value contained in the action.data.
import { fromJS } from 'Immutable';
import { SET_LINERS_DATA } from './constants';

const initialState = fromJS({
    liners: []
})

export default const AppReducer = (state = initialState, action) => {
    switch (action.type) {
        case SET_LINERS_DATA:
            return state.set('liners', action.data)
        default:
            return state
    }
}
So as an example, our action object may look like this:
{
    type: 'SET_LINERS_DATA',
    data: [
        {
            id: 3,
            body: "It's a new world",
            author: "Bryan Adams"
        },
        ....
    ]
}
We've successfully setup our initial Redux application structure. Let's do something with it. First of all, real web apps typically make requests to an external API for data. Let's mimic the real thing by moving our liners data from an array to a JSON file. Create assets/liners.json and add some JSON data.
[{
    "id": 1,
    "author": "Immortal Technique",
    "government_name": "Felipe Andres Coronel",
    "body": "The purpose of life is a life with a purpose. Rather die for what I believe in than live a life that is worthless.",
    "photo": "immortal-technique.jpg"
},
{
    "id": 2,
    "author": "Eminem",
    "government_name": "Marshall Mathers",
    "body": "I don't rap for dead presidents. I'd rather see the president dead.",
    "photo": "eminem.jpg"
},
{
    "id": 3,
    "author": "Andre 3000",
    "body": "Hell just fell 3000 more degrees cooler but y'all can't measure my worth; and before you do, you'll need a ruler made by all the Greek gods.",
    "photo": "andre-3k.jpg"
}]
``
Then we'll update the code at ``src/screens/home/index.js
 to reflect the change. Remove this line.
T```js
const liners =[...]
... And instead, run this import at the top.
import liners from '../data/liners.json'
We'll update the code at src/screens/home/index.js to reflect the change. Remove this line.
const liners =[...]
... And instead, run this import at the top.
import liners from '../data/liners.json'
The switch in architecture here helps us move our data from non-flexible format to a more convenient one.
However, looking deeper, we've got some optimizations we could add to help our app more production-ready. We'll be leveraging the power of sagas to help make our application run with better separation of concerns. In a typical production app, we'd probably be making a HTTP request for the data instead of just importing it from a local source. Let's attempt to replicate this behavior using Redux saga
Setting Up Our Sagas.
We'd like to request for our liners data when we start our application by visiting the homepage. Let's work on src/screens/Home/index.js and make some changes. Add this lifecycle event handler method to the Home class. We want our app to fetch the liners when our component mounts. Here, we are taking advantage of the this.props global object which is freely accessible from any class extending React.Component.
    componentDidMount() {
        this.props.fetchLiners()
    }
Next, we'd like a way to be able to access state from our component. We can have this done by defining a function called mapStateToProps that accepts the state and returns an object accessible through this.props. Within the returned object, we expose the liners object we'll be creating soon.
We'll like to be able to run or 'dispatch' actions from our component. That's a breeze with the mapDispatchToProps function. As you can see, it's really similar to the mapStateToProps method with the only difference being that mapStateToProps returns objects while mapDispatchToProps returns methods. In this function, we get to dispatch the fetchLiners method we'll soon be creating.
Finally, we change our default export from simply exporting the Home class to exporting the connect method from react-redux. Of course, we pass mapStateToProps and mapDispatchToProps as our arguments as well as the Home class as the self invoking method parameter.
import { connect } from 'react-redux';
import { fetchLinersRequest } from './actions';

const mapStateToProps = (state) => {
    return {
        liners: state.app.get('liners')
    }
}

const mapDispatchToProps = (dispatch) => {
    return {
        fetchLiners: data => dispatch(fetchLinersRequest(data))
    }
}

export default connect(mapStateToProps, mapDispatchToProps)(Home);
Let's create the fetchLinersRequest action at src/screens/Home/actions.js. It's a simple method that returns an action object. We're using a yet to be created constant so create src/screens/Home/constants.js and add a single line
export const ADD_LINERS_REQUEST = "app/ADD_LINERS_REQUEST";
Then we use our newly created constant in our action.
import { ADD_LINERS_REQUEST } from './constants';

export const fetchLinersRequest = data => {
    return {
        type: ADD_LINERS_REQUEST,
        data
    }
}
We're doing great. We are now letting our app now we'd like to request for our data when we start our app, but our app unfortunately, doesn't know about our request. Let's fix that by creating our first saga. We'll create src/screens/Home/saga.js and get to work asap. First of all, we'll import our dependencies, We'll be using the all, call, put and takeLatest methods from redux-saga/effects to carry out some tasks. We'll be creating a data service that we'll assign the responsibility of fetching our data. We'll also import a couple of constants.
import { all, call, put, takeLatest } from 'redux-saga/effects';
import { getLinersData } from '../../services/DataService';
import { ADD_LINERS_REQUEST } from './constants';
import { SET_LINERS_DATA } from '../../containers/App/constants';
Next, we define a generator function called fetchLiners that'll help us make a call to the data service for data. We use the yield statement in combination with the call method to get our data. We then use redux-sagas put method to dispatch SET_LINERS_DATA to our reducer. We'll be passing the response obtained from our request as the payload.
export function* fetchLiners () {
    const response = yield call(getLinersData);
    return yield put({
        type: SET_LINERS_DATA,
        payload: {
            data: response
        }
    })
}
Finally, we have to setup our default export, which will be a generator function. We'll be supplying the all method with an array of saga listeners. For now, we'll add one that executes once for every time a saga action object is released. We do this by using the takeLatest method and supplying it the label constant and the method that should be executed.
/**
 * We process only the latest action
 */
export default function* root() {
  yield all([
    takeLatest(ADD_LINERS_REQUEST, fetchLiners),
  ]);
}
We'll now create the getLinersData method at src/services/DataService/index.js. The Data Service will fetch the data from the JSON file and then return the data in form of a promise that we can use redux-saga's call method to resolve.
import linersData from "../../data/liners.json";

export const getLinersData = (id = null) => {
    if (id) {
        let liner = linersData.filter(liner => liner.id === id);
        return new Promise(resolve => resolve(liner));
    }

    return new Promise(resolve => resolve(linersData));
};
Now that we have our saga setup, we need to register it in the store. We can do this by updating src/redux/store.js. We'll import the createSagaMiddleware from redux-saga that we'll be using to (surprise) create the saga middleware. We'll also import the rootSaga which we're yet to create from src/redux/sagas.js.
import createSagaMiddleware from 'redux-saga';
import rootSaga from './sagas';
Next, we add some code to the configure method. We'll assign the createSagaMiddleware call to the sagaMiddleware constant. We'll also setup a middlewares array to keep all our middlewares. We then use the ES6 object destructuring proposal to extract our middlewares into the applyMiddleware call. Finally, we run the rootSaga using the sagaMiddleware.
const sagaMiddleware = createSagaMiddleware();
const middlewares = [
    sagaMiddleware
]

const createStoreWithMiddleware = applyMiddleware(
  ...middlewares
)(create)

sagaMiddleware.run(rootSaga);
Let's add some code to src/redux/sagas.js. We'll be using the all and fork methods from redux-saga as well as the HomeScreenSaga from the saga at the Home screen directory. We then define our default export which uses the all method to combine multiple sagas. We then 'fork' the Home screen saga into our root saga.
import { all, fork } from 'redux-saga/effects';

import HomeScreenSaga from '../screens/Home/saga';

/**
 * rootSaga
 */
export default function* root() {
  yield all([
    fork(HomeScreenSaga)
  ]);
}
That's awesome, if we head back to the browser you should see that our data loads when we visit the home view within the app.
It's easy to get petulant and just moan, "We went through all this hard work just to display the same JSON data as we did before?". Well, we just setup the foundations for a very solid application going forward.
Setting up Route Based Transitions
Transitions are cool. Yes, very cool. We'd like our application to be able to use transitions to keep switching routes from becoming boring. We can do this by using the transition group properties present within React Router. We'll be adding a fade transition for our app. Let's head over to src/containers/App/index.js and get to work. For starters, we'll import the TransitionGroup component from react-transition-group.
We also need to import the yet to be created FadeTransition component from src/components/Transitions/fade.js.
import { TransitionGroup } from "react-transition-group";
import FadeTransition from "../../components/Transitions/fade";
Next, we'll update the render method of the App class to use our imports. We wrap everything in our TransitionGroup and we also use our to be created FadeTransition component.
        <TransitionGroup>
            <FadeTransition key={location.key}>
                <ThemeProvider>
                    <Flex flexDirection="column" className="App" style={{ minHeight: '100vh' }}>
                        <Header/>
                        <Route exact path="/" component={LoadableHomeScreen} />
                        <Route path="/add" component={LoadableAddLineScreen} />
                    </Flex>
                </ThemeProvider>
            </FadeTransition>
Next, let's create src/components/Transitions/fade.js and add some code. We'll be basically wrapping the children components of this class within react-transition-group's CSSTransition method. We also specify a timeout and a CSS class for it.
import React from "react";
import { CSSTransition } from "react-transition-group";

export const FadeTransition = ({ children, ...props }) => {
  return (
    <CSSTransition {...props} timeout={200} classNames="fade">
      {children}
    </CSSTransition>
  );
};

export default FadeTransition;
Finally, we'll add a little CSS to src/index.js just for effect.
    <style type="text/css">
        .fade-enter {
            opacity: 0;
            z-index: 1;
        }

        .fade-enter.fade-enter-active {
            opacity: 1;
            transition: opacity 250ms ease-in;
        }
    </style>
Amazing! Switching routes come with some cool fade transitions. We've had an amazing day today working with React.
Conclusion
In this tutorial, we covered multiple concepts. We learned more about state management in large applications (like Utopian.io for example) and the benefits we can gain by adopting an architecture like Flux. We also setup a Redux application complete with actions and Sagas.
In our next tutorial, explore more capabilities of our state management system and we'll actually setup dynamic data for feed population. Finally, we'll add functionality that allows us to persist our state to lacal storage. Our next tutorial will be awesome!
Resources
- An Introduction to Redux Saga
- An awesome introduction to ImmutableJS by Facebook
+Using Saga Helpers - React Router Transition
- FireLiners Github Code
Thank you for your contribution.
While I liked the content of your contribution, I would still like to extend few advices for your upcoming contributions:
Looking forward to your upcoming tutorials.
Your contribution has been evaluated according to Utopian policies and guidelines, as well as a predefined set of questions pertaining to the category.
To view those questions and the relevant answers related to your post, click here.
Need help? Write a ticket on https://support.utopian.io/.
Chat with us on Discord.
[utopian-moderator]
Hey @portugalcoin
Here's a tip for your valuable feedback! @Utopian-io loves and incentivises informative comments.
Contributing on Utopian
Learn how to contribute on our website.
Want to chat? Join us on Discord https://discord.gg/h52nFrV.
Vote for Utopian Witness!
Cool codes @creatrixity. I wasn't following the series what do I do to catch up?
It's really easy. You can start at the first post and you'll be here in no time. The code is also available on Github for your convenience.. Cheers and I want to hear from you!
Thanks for the useful links. Got to try them out.
And besides I'm a newbie enthusiast in programming world. I'm not familiar with git hub
Nice to see a newbie here. Github is the center for code collaboration and open source contribution. It's not as difficult to use as many think. It's worth an exploration. Do that sometime, you'd be glad you did.
Thanks @creatrixity. I'm going to do that. It's of great pleasure to find open people like you!
Always a pleasure to help. Just drop a line if you need something.
Sure!
Hey @creatrixity
Thanks for contributing on Utopian.
We’re already looking forward to your next contribution!
Contributing on Utopian
Learn how to contribute on our website or by watching this tutorial on Youtube.
Want to chat? Join us on Discord https://discord.gg/h52nFrV.
Vote for Utopian Witness!