Part 4: Build a CSS-in-JS React App with Styled Components and Priceline Design System
Repository
Previously on this series, we learned more about state management in large applications and the benefits we could gain by adopting an architecture like Flux. We also add Redux application functionality to our FireLiners app complete with actions and Sagas.
Today, we'll do just a little bit more. We'll be going in-depth into more state management practices and we'll setup dynamic data that we'll be using to populate our feed. Finally, we'll add functionality that allows us to persist our state to local storage.
Difficulty
- Advanced
What Will I Learn?
By the time we get to the end of this tutorial, you should have understood the following concepts:
- Working with forms in a Redux-Saga application.
- Updating immutable records with sagas.
- Keeping client data easily accessible by persisting to LocalStorage with
redux-localstorage-middleware. - Dynamically transitioning to any view within our React application.
Requirements
- Node.js 8.0 or greater.
- NPM 3.0 or greater.
- Yarn package manager
- Git
- Previous code on this series
- An intermediate level of ReactJS knowledge.
- Keen interest and patience.
Introduction
Welcome back, friend! Last time around, we did a lot of awesome stuff. This time around, we'll be up to even much more. Before we proceed any further, let's remember our current project structure.
fire-liners/
- config/...
- node_modules/...
- public/...
- scripts/...
- src/
- components/
- Header/
- index.js
- logo.svg
- Header/
- containers/
- App/
- App.test.js
- index.js
- constants.js
- reducer.js
- App/
- screens/
- Home /
- index.js
- constants.js
- actions.js
- Loading /
- index.js
- Home /
- services/
- DataService/
- index.js
+index.js
- index.js
- DataService/
- registerServiceWorker.js
- components/
- package.json
Last time around we explored many new ideas about state management. We talked about actions, action dispatchers, sagas and a whole lot of new ideas. We also setup our app to start using those concepts. Today, we'll continue applying our knowledge to our application. We'll be adding functionality that allows the creation of new quotes. We'll be visually highlighting the latest quote and we'll also explore local storage as a viable store for our application (for now).
Adding New Liner Entries Efficiently.
Let's get straight to it. We'll be adding functionality to the form available at /add. We'll also be working on multiple form inputs. Let's create src/screens/AddLine/index.js (if you are yet to do so) and get to work. We'll be importing our dependencies for this module. We'll start off by importing React and it's Component subclass. We'll also be using the connect method from react-redux to add our store state and dispatch methods to the this.props property. We'll also use the Box, Flex, Label, Select, RedButton and Text Priceline components to construct our UI. We'll import the addLiner method from src/containers/Home/actions.js (which we'll soon create) as it will help us add a new "liner" (or quote, if you prefer) to the store. Finally, we also import the getAppState method from the reducer.js file at src/containers/App to help us retrieve the current application state and make it available to this module.
import React, { Component } from 'react';
import { connect } from 'react-redux';
import { Box, Flex, Label, Select, RedButton, Text } from 'pcln-design-system';
import Textarea from '../../components/Form/Textarea';
import { addLiner } from '../Home/actions';
import { getAppState } from '../../containers/App/reducer';
Next, we'll be adding some code to our AddLiner class. We'll add a constructor to the class. Within our constructor, we'll first follow a common React practice and inherit from React's Component constructor by calling the super method with any provided props as the argument. We'll also be making the this.handleSubmit method accessible throughout our class. We then set a default state for our AddLine component. You may ask, "I thought we were supposed to use Redux for state? Why are we then setting state in this component?" Well, simply because we use Redux doesn't mean we can't use regular state management. We use regular state management for state that is supposed to remain private. For instance, we have two fields:
- A Select field with a list of authors we can use for any given quote.
- A Textbox where we can add the quote.
We'll save them into the component's state and later, we'll send them to the store. We are setting a default quote just to keep things from getting boring.
class AddLine extends Component {
    constructor (props) {
        super(props);
        this.handleSubmit = this.handleSubmit.bind(this);
        this.state = {
            author: 'Immortal Technique',
            body: 'This is the point from which, I die or succeed; Living the struggle, I know I'm alive when I bleed.'
        }
    }
}
Next, in our class, we'll add a render method. We'd like to render a select box pre-filled with a list of authors within our form. To do this, we must first go through an array of authors and we'll create an <option></option> element for each author. We can do this by calling the map method on this.props.author (undefined at the moment).
render () {
    let authors = this.props.authors.map((author, index) => (
        <option value={author.name} key={index}>{ author.name }</option>
    ));
}
Next, we construct a little UI with the Priceline Design System Components. We create a form and we assign the this.handleSubmit method as its submit event handler. We also assign an inline handler method to the onChange method of the <Select/> component that simply sets the author state value to the selected author. We also make sure the select box selects an author by default. We do this by mapping the value attribute to the this.state.value option. We also set the state.body property to a new value anytime the value of the Text box changes. Finally, we show a pretty red button that triggers the submit action.
        return (
            <Flex mt={4} justify="center" alignItems="center">
                <Flex flexDirection="column" width={[ 0.8, 0.8, 0.5 ]}>
                    <Text bold mb={3} fontSize={3}>Add. The Dopest Lines. Ever.</Text>
                    <Box mb={3}>
                        <form onSubmit={this.handleSubmit}>
                            <Flex flexDirection="column" mb={3}>
                                <Label mb={2}>Author</Label>
                                <Select onChange={e => this.setState({
                                    author: e.target.value
                                })} placeholder="Which cat dropped this line?" value={this.state.author}>
                                {authors}
                                </Select>
                            </Flex>

                            <Flex flexDirection="column" mb={3}>
                                <Label mb={2}>Lyrics</Label>
                                <Textarea rows={7} value={this.state.body} onChange={e => this.setState({
                                    body: e.target.value
                                })} placeholder="Spit that line here, dawg..."></Textarea>
                            </Flex>

                            <RedButton type="submit">Save and go back</RedButton>
                        </form>
                    </Box>
                </Flex>
            </Flex>
        )
With our render method done, we simply need to create the submit event handler. We use e.preventDefault to prevent our form from actually trying to send information to a server as that's not the behaviour we'd like. We also use the Array.prototype.reduce method to calculate the largest numeric id within our liners collection and we then simply add 1 to the id obtained to get our new id. We then call the addLiner method which is available on the this.props. We supply the new id, author and body to this method for processing. Finally, we go back to the index by calling this.props.history.push('/') which will take us to the root.
    handleSubmit (e) {
        e.preventDefault();
        let newID = this.props.liners.reduce((maxId, liner) => Math.max(maxId, liner.id), 0) + 1;
        this.props.addLiner({
            id: newID,
            author: this.state.author,
            body: this.state.body
        })
        this.props.history.push('/')

    }
We then need to create our mapStateToProps and mapDispatchToProps functions that we get to pass to Redux's connect method. We get to add the liners and authors props to the component.
const mapStateToProps = (state) => {
    return {
        liners: getAppState(state).get('liners'),
        authors: getAppState(state).get('authors')
    }
}

const mapDispatchToProps = (dispatch) => {
    return {
        addLiner: data => dispatch(addLiner(data))
    }
}

export default connect(mapStateToProps, mapDispatchToProps)(AddLine);
It's now time to create the addLiner method in src/containers/Home/actions.js. We'll create the actions.js file at src/containers/Home. We'll import our constants and we'll use them in the action object.
import { ADD_LINER_REQUEST, ADD_LINERS_REQUEST, ADD_AUTHORS_REQUEST } from './constants';

export const fetchLinersRequest = data => {
    return {
        type: ADD_LINERS_REQUEST,
        data
    }
}

export const addLiner = data => {
    return {
        type: ADD_LINER_REQUEST,
        data
    }
}
We then need to update our saga at the Home screen. We'll edit src/screens/Home/saga.js. We'll setup the dependencies. We get to import the all method that combines multiple saga functions. We also import the call method that helps us resolve any promises. We use the put method to send an action to the Redux store. We also use the takeLatest method to take the latest available saga action.
Next, we import the getLinersData method and a couple of constants.
import { all, call, put, takeLatest } from 'redux-saga/effects';
import { getLinersData } from '../../services/DataService';
import { ADD_LINERS_REQUEST, ADD_LINER_REQUEST } from './constants';
import { SET_LINERS_DATA, ADD_LINER } from '../../containers/App/constants';
We get to our addLiner method now. We simply use this as a wrapper that calls our put method with a type and some data.
export function* addLiner (data) {
    return yield put({
        type: ADD_LINER,
        payload: data
    })
}
...Then in the root method, we simply take the latest ADD_LINER_REQUEST and call the addLiner method above.
export default function* root() {
  yield all([
    takeLatest(ADD_LINERS_REQUEST, fetchLiners),
    takeLatest(ADD_LINER_REQUEST, addLiner)
  ]);
}
We then need to update our reducer at src/containers/App/reducer.js and add some code. We'll be using the fromJS method from ImmutableJS to turn Javascript objects or arrays to immutable ones. In our AppReducer function, we set the liners state property to an array that comprises of the initial liners data along with the new data.
import { fromJS } from 'immutable';
import {ADD_LINER } from './constants';
const initialState = fromJS({
    liners: [],
})
We then add our reducer code.
const AppReducer = (state = initialState, action) => {
    switch (action.type) {
        case ADD_LINER:
            return state.set("liners", fromJS([state.get('liners').push(action.payload.data)]));

        default:
            return state
    }
}
We've just completed functionality that enables us to add some new quotes easily. But, it's not enough, as we'll also need a way to keep our authors dynamic. Let's tackle that.
Dynamically Fetching Authors.
We'd like to add a means of keeping our authors list dynamic. This is important, because along in this series, we'll be adding functionality that allows us to create authors dynamically.
The Game Plan
We need to fetch our authors immediately our app starts. This means using a lifecycle event method to run the action that fetches our authors. That means we'll be modifying the App root component a little to allow us add new behavior.
Let's edit src/containers/App/index.js and get to work. We'll be adding some new dependencies. We'll be using the withRouter method from react-router as we'd like to be able to access some router based properties within our component. We'll also be importing the fetchAuthorsRequest from the Home screen actions.
import { withRouter } from 'react-router';
import { connect } from 'react-redux';

import { fetchAuthorsRequest } from '../../screens/Home/actions';
We'll need to add the componentDidMount lifecycle method. We'll be calling this.props.fetchAuthors in this method. We'll define this method below.
class App extends React.Component {
    componentDidMount() {
        this.props.fetchAuthors()
    }
Next, we'll run the usual mapStateToProps and mapDispatchToProps where we get to define the fetchAuthors method that will make the request to our saga telling it, "Hey, we want all the authors you've got".
const mapStateToProps = (state) => {
    return {}
}

const mapDispatchToProps = (dispatch) => {
    return {
        fetchAuthors: data => dispatch(fetchAuthorsRequest(data))
    }
}

export default withRouter(connect(mapStateToProps, mapDispatchToProps)(App));
Next, we must define the recently used fetchAuthorsRequest action dispatcher. We'll add the fetchAuthorsRequest method to the actions.js file at src/screens/Home. We're simply importing a couple of constants and we then define our action object. This will dispatch the ADD_AUTHORS_REQUEST action to our saga.
import { ADD_LINER_REQUEST, ADD_LINERS_REQUEST, ADD_AUTHORS_REQUEST } from './constants';

export const fetchAuthorsRequest = () => {
    return {
        type: ADD_AUTHORS_REQUEST
    }
}
Next, we'll add a saga for this request. We'll define the fetchAuthors generator function at src/screens/Home/saga.js. We'll start off by importing the getAuthorsData method from the Data Service we created previously. We also import a couple of constants we'll be using. We then use the special call method provided by Redux-Saga to resolve the promise returned by the getAuthorsData method. We then call the put method providing it with some required parameters (type and payload).
import { getAuthorsData } from '../../services/DataService';
import { ADD_AUTHORS_REQUEST } from './constants';
import { SET_AUTHORS_DATA } from '../../containers/App/constants';

export function* fetchAuthors (payload) {
    const response = yield call(getAuthorsData);
    return yield put({
        type: SET_AUTHORS_DATA,
        payload: {
            data: response
        }
    })
}
We'll quickly define the imported constants. Editing src/containers/App/constants.js.
export const SET_AUTHORS_DATA = 'app/SET_AUTHORS_DATA';
Also editing src/screens/Home/constants.js.
``js
export const ADD_AUTHORS_REQUEST = 'app/ADD_AUTHORS_REQUEST';
We'll be defining the `getAuthorsData` method at the Data Service. Let's edit `src/services/DataService/index.js`. We'll be creating the `authors.json` file at `src/assets/data` shortly. In the meantime, we import the JSON data from it, and we resolve that data in a promise that we return.

```js
import authorsData from "../../assets/data/authors.json";

export const getAuthorsData = (id = null) => {
    if (id) {
        let author = authorsData.filter(author => author.id === id);
        return new Promise(resolve => resolve(author));
    }

    return new Promise(resolve => resolve(authorsData));
};
It's now time to create our authors.json along with the information. Let's use this file as a base to build on. Create src/assets/data/authors.json and add test data.
[{
    "name": "Immortal Technique",
    "government_name": "Felipe Andres Coronel",
    "photo": "immortal-technique.jpg"
},
{
    "name": "Eminem",
    "government_name": "Marshall Mathers",
    "photo": "eminem.jpg"
},

{
    "name": "Andre 3000",
    "photo": "andre-3000.jpg"
}]
Great! All we need to do now is add a reducer for this action. We'll start by importing the SET_AUTHORS_DATA constant. We then have the authors property of the initial state as being an empty object. We check for our SET_AUTHORS_DATA action and if our action was called we simply set the erstwhile empty authors property in the initialState array to the action's payload data.
import { SET_AUTHORS_DATA } from './constants';

const initialState = fromJS({
    // ...Previous code here.
    authors: []
})

const AppReducer = (state = initialState, action) => {
    switch (action.type) {
        case SET_AUTHORS_DATA:
            return state.set('authors', action.payload.data)
        // ...Previous code goes here.
        default:
            return state
    }
}
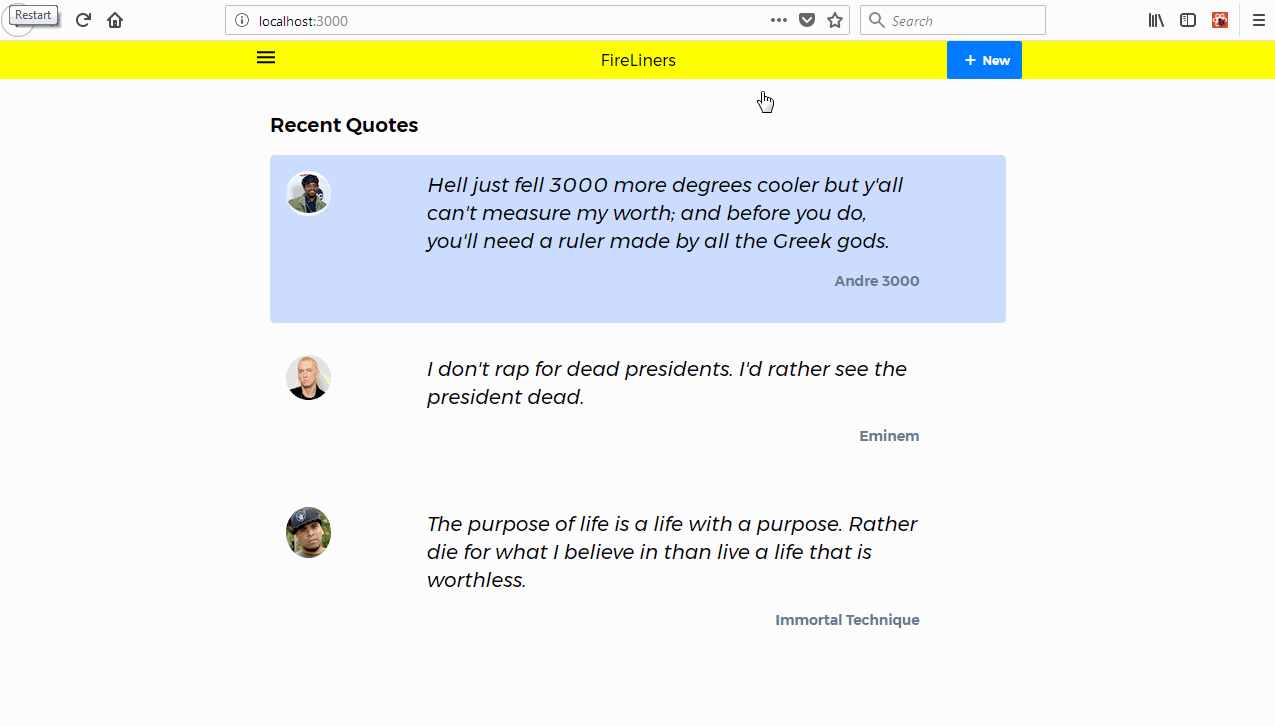
Heading back to our browser tab at http://localhost:3000, we see our list of authors show up in the select box. That's awesome! If we hit the submit button, we get to see our new entry with the selected author. Isn't that great?
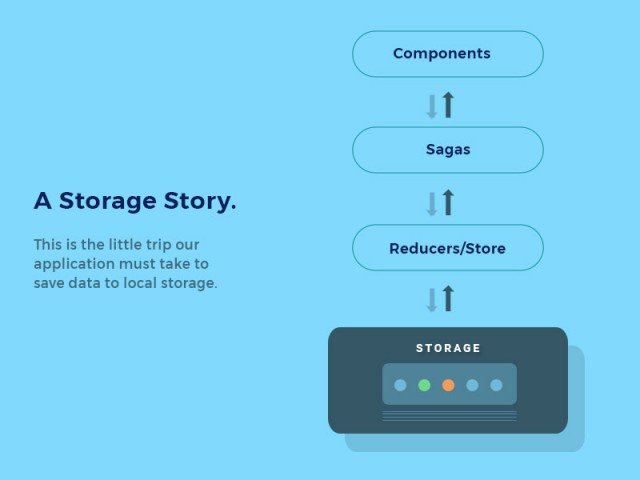
Persisting Data To LocalStorage.
Earlier, we installed redux-localstorage. We need it for persisting data to the local storage. We can apply the middleware by updating some code at our Redux store. We first start by importing the compose Redux method we also import the redux-localstorage middleware. In our createStoreWithMiddleware method call, we use the compose method to compose our persistState function. We provide undefined as the first argument. This makes sure we sync all of our Redux store to local storage. We also define the slicer, serialize, deserialize and merge methods.
We'll go through the functionality of these methods:
The
slicermethod: returns a portion of the state.The
serializemethod: can be used to perform an action before the data is saved or serialized to local storage.The
deserializemethod: is used to perform an action before data is retrieved or deserialized from local storage.The
mergemethod: is used to merge the initial state and the persisted state. Since we're using immutable, we're merging the persisted data along with the initial state data through Immutable'smergeDeepmethod.
import { compose } from 'redux';
import persistState from 'redux-localstorage'

const store = createStoreWithMiddleware(
    rootReducer,
    initialState,
    compose(
        persistState(undefined, {
            slicer: (paths) => (state) => state,
            serialize: (subset) => JSON.stringify(subset),
            deserialize: (serializedData) => fromJS(JSON.parse(serializedData)),
            merge: (initialState, persistedState) => initialState.mergeDeep(persistedState)
        })
    )
)
We'll stop at this juncture now. We've done a lot of work and we deserve some ice cream now.
Conclusion
In this tutorial, we covered multiple concepts. We learned more about state management in large applications. We also wrote some more code to add more functionality. We then added the ability to persist our redux store to local storage.
In our next tutorial, we'll explore route based filtering from our store.
Thanks for the contribution!
Your contribution has been evaluated according to Utopian policies and guidelines, as well as a predefined set of questions pertaining to the category.
To view those questions and the relevant answers related to your post, click here.
Need help? Write a ticket on https://support.utopian.io/.
Chat with us on Discord.
[utopian-moderator]
Hey @creatrixity
Thanks for contributing on Utopian.
We’re already looking forward to your next contribution!
Contributing on Utopian
Learn how to contribute on our website or by watching this tutorial on Youtube.
Want to chat? Join us on Discord https://discord.gg/h52nFrV.
Vote for Utopian Witness!
That's really good contribution. I want to give you some advices to make better contributions:
I hope these advices will help you for your next contributions.
Congratulations @creatrixity! You have completed some achievement on Steemit and have been rewarded with new badge(s) :
Click on the badge to view your Board of Honor.
If you no longer want to receive notifications, reply to this comment with the word
STOP