How to create a Sound Recording Application using ObjectBox as DB in android studio (PART 2)
![]()
Repository
https://github.com/objectbox/objectbox-java
What Will I Learn?
- How to create a Sound Recording application using ObjectBox DB.
- How to use ObjectBoxLiveData.
- How to query ObjectBox boxes.
- How to access an ObjectBox box from a fragment.
- How to use ObjectBox with Android Architecture Components (ViewModel)
Resources
- ObjectBox Website https://objectbox.io/
- ObjectBox Github - https://github.com/objectbox/objectbox-java
Difficulty
- Intermediate
Tutorial Duration - 40 - 45Mins
Tutorial Content
This happens to be the part two of this tutorial series and the part one can be found here.
In today's series, we are going to be displaying all our previous made recordings and make it possible that users will be able to listen to their recordings.
To achieve this we are going to be reading all our recordings previously saved in our ObjectBox database and then we are going to be using android architecture components to listen for when new recordings are added.
Next, we would setup our adapter and a dialog fragment that would enable the user to play each recording.
Outline
- Added Dependencies.
- Changes made to the
Recordingsmodel class. - Setup Our Custom Adapter (SavedRecordingsAdapter).
- Setup SavedRecordingsFragment (Both XML and Java class files)
- Setup our SavedRecordingsViewModel class.
- Setup our PlayRecordingFragment.
Added Dependencies
In order for us to be able to extend the ViewModel class, we are going to edit our Application level gradle file. So head to your build.gradle application level file and add the following lines just below the existing lines.
- implementation "android.arch.lifecycle:extensions:1.1.0"
annotationProcessor "android.arch.lifecycle:compiler:1.1.0"
after adding the above lines of code, then you click the sync now to the topmost right of your IDE.
Changes made to the Recordings model class
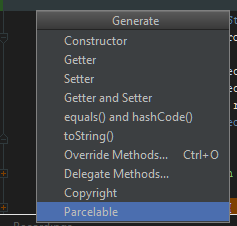
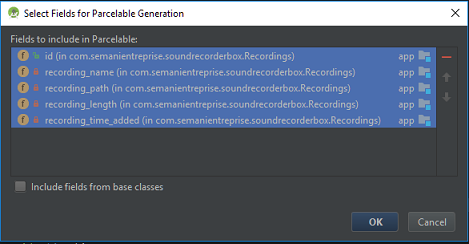
In order for us to pass an object from our adapter to the fragment responsible for displaying it, we need to make our Recordings.class Parcelable.
To do that, we need to click alt + ins while in our class file and then click on the Parcelable option and then select all the fields as shown in the images below.
Setup Our Custom Adapter (SavedRecordingsAdapter)
The SavedRecordingsAdapter class will be responsible for setting up the details of each of our recording item.
Create a new java class file by right-clicking on the java folder => New => java class and call the name of the file - SavedRecordingsAdapter and extend the RecyclerView.Adapter class.
SavedRecordingsAdapter
First, we need to create three private variables in which two are going to be initialized in the constructor of this class.
private List<Recordings> recordings;
private Recordings recording;
private Context mContext;

public SavedRecordingsAdapter(Context context, List<Recordings> recordings) {
    super();
    mContext = context;
    this.recordings = recordings;
}
When the Adapter class is being created, we are going to initialize the recordings/list of recordings and save it into the recordings variable which happens to be a List of recordings and then the mContext variable will hold the context.
Next, we need a setRecordings() method that will be called when we register an observer on our Recordings class Box which will set the list of the recordings to the new list.
public void setRecordings(List<Recordings> recordings){
    this.recordings = recordings;
    notifyDataSetChanged();
}
Then in the onCreateViewHolder() method, we are going to be inflating a layout file that will serve as a template for each of our recordings.
@Override
public RecordingsViewHolder onCreateViewHolder(ViewGroup parent, int viewType) {
    View itemView = LayoutInflater.from(parent.getContext()).inflate(R.layout.recordings_list_item, parent, false);
    mContext = parent.getContext();
    return new RecordingsViewHolder(itemView);
}
NB: The recordings_list_item layout file will be created in our next section.
The bulk of the Adapter class file is done in the onBindViewHolder() method and maximum explanation will be done here to ensure that we all understand what is happening.
Below is the code for the onBindViewHolder() method and as usual explanations are done below.
@Override
public void onBindViewHolder(final RecordingsViewHolder holder, int position) {

    recording = getItem(position);
    long itemDuration = recording.getRecording_length();

    long minutes = TimeUnit.MILLISECONDS.toMinutes(itemDuration);
    long seconds = TimeUnit.MILLISECONDS.toSeconds(itemDuration) - TimeUnit.MINUTES.toSeconds(minutes);

    holder.vName.setText(recording.getRecording_name());
    holder.vLength.setText(String.format("%02d:%02d", minutes, seconds));
    holder.vDateAdded.setText(
        DateUtils.formatDateTime(
            mContext,
            recording.getRecording_time_added(),
            DateUtils.FORMAT_SHOW_DATE | DateUtils.FORMAT_NUMERIC_DATE | DateUtils.FORMAT_SHOW_TIME | DateUtils.FORMAT_SHOW_YEAR
        )
    );

    // define an on click listener to open PlaybackFragment
    holder.cardView.setOnClickListener(new View.OnClickListener() {
        @Override
        public void onClick(View view) {
            try {
                PlayRecordingFragment playbackFragment = new PlayRecordingFragment().newInstance(getItem(holder.getAdapterPosition()));

                FragmentTransaction transaction = ((FragmentActivity) mContext)
                        .getSupportFragmentManager()
                        .beginTransaction();

                playbackFragment.show(transaction, "dialog_playback");

            } catch (Exception e) {
                Log.e(LOG_TAG, "exception", e);
            }
        }
    });
}
Code Explanation
- Firstly, we get the current recording object and initialize it to the
recordingobject previously declared as a private object. - We then get the length of the recording and save it in the
itemDurationlong variable and then get the minutes and seconds of the recording and store it inminutesandsecondswhich happen to be two local variables. - We set the name of the recording, the length by calling the
String.format("%02d:%02d", minutes, seconds)which formats the display of the length of the recording to two decimal places and specifying the minutes and seconds as the arguments, Next we set the date added of the recordings by using the DateUtils.formatDateTime() method. - Finally, we set an
onClickListener()on our cardview object in which we start thePlayRecordingFragmentand send the recording being clicked as the argument to the Fragment. (NB - The PlayRecordingFragment will be created in a later session).For us to be able to pass the Object from our Adapter to the Fragment we needed to make the Recordings class Parcelable.
Lastly, for our Adapter class, we need to create a ViewModel class. To do this just below the existing codes in our Adapter class, we add the following codes.
public static class RecordingsViewHolder extends RecyclerView.ViewHolder {
    @BindView(R.id.file_name_text) TextView vName;
    @BindView(R.id.file_length_text) TextView vLength;
    @BindView(R.id.file_date_added_text) TextView vDateAdded;
    @BindView(R.id.card_view) View cardView;

    private RecordingsViewHolder(View v) {
        super(v);
        ButterKnife.bind(this, itemView);
    }
}

@Override
public int getItemCount() {
    return recordings.size();
}

private Recordings getItem(int position) {
    return recordings.get(position);
}
Code Explanation
In this class we only initialize all the views in our recordings_list_item.xml layout file and then return the count of the recordings in the getItemCount() method and also return a specific Recordings item when the getItem() method is called.
Setup SavedRecordingsFragment.
Next, we need to edit our already existing fragment_saved_recordings.xml file where we will be displaying all the recordings in a vertical list. All we need to do in the layout file is to add a RecyclerView widget to it.
fragment_saved_recordings.xml
<?xml version="1.0" encoding="utf-8"?>
<RelativeLayout
    xmlns:android="http://schemas.android.com/apk/res/android"
    xmlns:tools="http://schemas.android.com/tools"
    android:layout_width="match_parent"
    android:layout_height="match_parent"
    tools:context=".SavedRecordingsFragment">

<android.support.v7.widget.RecyclerView
    android:id="@+id/recyclerView"
    android:layout_width="match_parent"
    android:layout_height="match_parent" />

</RelativeLayout>
Next, we need to create a new layout file that will act as the template for each recording item that will be displayed in our RecyclerView. Create a new layout file you need to right-click on the layout folder (under the res folder) => New => layout resource file and name the file - recordings_list_item.xml.
The below layout will show the name of the recording, a microphone image, the length of the recording, and the date created.
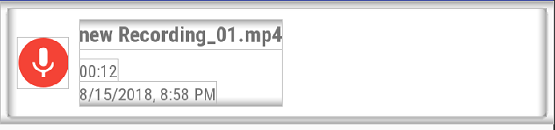
We intend to create a layout file as the image above. To achieve that we need to edit our layout file as below.
<?xml version="1.0" encoding="utf-8"?>
<LinearLayout
    xmlns:android="http://schemas.android.com/apk/res/android"
    android:orientation="vertical"
    android:layout_width="match_parent"
    android:layout_height="wrap_content">

    <android.support.v7.widget.CardView
        xmlns:card_view="http://schemas.android.com/apk/res-auto"
        android:id="@+id/card_view"
        android:layout_width="match_parent"
        android:layout_height="75dp"
        android:layout_gravity="center"
        android:layout_margin="5dp"
        android:foreground="?android:attr/selectableItemBackground"
        android:transitionName="open_mediaplayer"
        card_view:cardCornerRadius="4dp"
        card_view:cardElevation="3dp">

        <LinearLayout
            android:layout_width="match_parent"
            android:layout_height="match_parent"
            android:orientation="horizontal">

            <ImageView
                android:id="@+id/imageView"
                android:layout_width="wrap_content"
                android:layout_height="wrap_content"
                android:src="@drawable/ic_fileviewer"
                android:layout_gravity="center_vertical"
                android:layout_marginLeft="7dp"
                android:layout_marginRight="7dp"/>

            <LinearLayout
                android:layout_width="wrap_content"
                android:layout_height="wrap_content"
                android:orientation="vertical"
                android:layout_gravity="center_vertical">

                <TextView
                    android:id="@+id/file_name_text"
                    android:layout_width="wrap_content"
                    android:layout_height="wrap_content"
                    android:text="file_name"
                    android:textSize="15sp"
                    android:fontFamily="sans-serif-condensed"
                    android:textStyle="bold"/>

                <TextView
                    android:id="@+id/file_length_text"
                    android:layout_width="wrap_content"
                    android:layout_height="wrap_content"
                    android:text="00:00"
                    android:textSize="12sp"
                    android:fontFamily="sans-serif-condensed"
                    android:layout_marginTop="7dp"/>

                <TextView
                    android:id="@+id/file_date_added_text"
                    android:layout_width="wrap_content"
                    android:layout_height="wrap_content"
                    android:text="mmm dd yyyy - hh:mm a"
                    android:textSize="12sp"
                    android:fontFamily="sans-serif-condensed"/>
            </LinearLayout>

        </LinearLayout>

    </android.support.v7.widget.CardView>
</LinearLayout>
We then need to head to our SavedRecordingsFragment.java class file and then setup our RecyclerView and also create an adapter for the RecyclerView also, we then want to get all our recordings from the ObjectBox database and then pass it as the List of recordings needed in our custom Adapter.
Firstly, we need to inject our RecyclerView using butterknife, as already explained in the Part 1 of this tutorial, we need to place our cursor on the fragments layout file and click alt + ins on a Windows PC and then click on the Generate Butterknife Injection option and then select the RecyclerView widget to have it injected into our fragment.
Next, we need to create some variables that will be needed in this fragment, add the following block of code just before the newInstance() method
private SavedRecordingsAdapter savedRecordingsAdapter;
private View view;
private Box<Recordings> myRecordings;
List<Recordings> recordings;
Next, we edit our onCreateView() method to the following -
onCreateView()
@Override
public View onCreateView(LayoutInflater inflater, ViewGroup container, Bundle savedInstanceState) {
    // Inflate the layout for this fragment
    view = inflater.inflate(R.layout.fragment_saved_recordings, container, false);
    unbinder = ButterKnife.bind(this, view);


    //initialize the myRecordings Box object and then set it to the Recording.class box by getting a Box object from our
    //MyApplicationClass getBoxStore method.
    myRecordings = ((MyApplicationClass) getActivity().getApplication()).getBoxStore().boxFor(Recordings.class);

    //Setting the Adapter and also the layoutManager of the Adapter
    recordings = myRecordings.getAll();
    savedRecordingsAdapter = new SavedRecordingsAdapter(getActivity(), recordings);

    recyclerView.setHasFixedSize(true);
    LinearLayoutManager linearLayoutManager = new LinearLayoutManager(getActivity());
    linearLayoutManager.setOrientation(LinearLayoutManager.VERTICAL);

    //newest to oldest order (database stores from oldest to newest)
    linearLayoutManager.setReverseLayout(true);
    linearLayoutManager.setStackFromEnd(true);

    recyclerView.setLayoutManager(linearLayoutManager);
    recyclerView.setItemAnimator(new DefaultItemAnimator());

    recyclerView.setAdapter(savedRecordingsAdapter);

    return view;
}
Code Explanation
- We get a reference to a Box object from our
MyApplicationClassand then save it in the myRecordings variable which will hold a reference to a Box of theRecordingsclass -myRecordings = ((MyApplicationClass) getActivity().getApplication()).getBoxStore().boxFor(Recordings.class); - We then get all the objects in the
myRecordingsvariable and store it in a variable -recordingswhich happens to be a list of Recordings. - We then initialize our custom adapter object - == savedRecordingsAdapter == passing a context and then the list of all recordings which is saved in the
recordingsvariable as explained above. - The Next few lines creates a
LinearLayoutManagerwhich is set to be == Vertical == and then we set some of its properties such as *setReverseLayout()` which ensures that the layout displays the newset entries first and sets the RecyclerViews layoutManager to the newly created layoutManager and set the setItemAnimator() property to the default Animator and lastly we set the adapter of the RecylerView.
Setup our SavedRecordingsViewModel class
To introduce the concept of the ObjectBoxLiveData object, we will be creating a ViewModel class for our SavedRecordingsFragment that will listen if there is any newly added input into our database and hence update the Adapter about the changes and the View will be updated also.
To create a ViewModel class, just create a new java class file and name it - SavedRecordingsViewModel and extend the ViewModel class.
public class SavedRecordingsViewModel extends ViewModel {

    private ObjectBoxLiveData<Recordings> recordingsLiveData;

    public ObjectBoxLiveData<Recordings> getRecordingsLiveData(Box<Recordings> recordingsBox) {
        if (recordingsLiveData == null) {
            recordingsLiveData = new ObjectBoxLiveData<>(recordingsBox.query().build());
        }
        return recordingsLiveData;
    }
}
Code Explanation
- Firstly, we create an
ObjectBoxLiveDataobject of theRecordingsclass called - recordingsLiveData this object can be therefore observed by an observer. - We then create a method -
getRecordingsLiveData()that takes a Box of Recordings class and then returns therecordingsLiveDataobject saved in it the latest list of all the recordings in our ObjectBox database.
To use this ViewModel in our fragment, we need to create an observer than will observe this ObjectBoxLiveData method and then call the appropriate method in our adapter class and set the new List of recordings to the most current list in the adapter.
So head to the SavedRecordingsFragment class and just below the existing codes, add the following -
//Setup the ViewModel to listen for new input into the database and then calling the appropriate adapter method
        //to handle it
SavedRecordingsViewModel model = ViewModelProviders.of(this).get(SavedRecordingsViewModel.class);

model.getRecordingsLiveData(myRecordings).observe(this, new Observer<List<Recordings>>() {
    @Override
    public void onChanged(@Nullable List<Recordings> recordings) {
        savedRecordingsAdapter.setRecordings(recordings);
    }
});
Code Explanation
- We create a ViewModel of using the
ViewModelProviders.of()method and specify the class of the ViewModel and then we register an observer on that method which whenever there is a change, be it a new recording or a deletion, we call thesetRecordings()method of the adapter passing the new list of Recordings as the argument which then updates the adapter will the most current list.
Setup our PlayRecordingFragment
The PlayRecordingFragment is a DialogFragment that enables users to be able to listen to a previously recorded recording made using the application.
Previously in our SavedRecordingsAdapter we set up an onClickListener() for the cardView that passes the clicked recording to the PlayRecordinFragment so that the user can listen to the recordings by clicking the play button.
Firstly, create a blank Fragment by right clicking on the java folder => New => Fragment => Fragment (Blank) and name the fragment - PlayRecordingFragment
Next, we need to edit the layout file and make it as the below -
<?xml version="1.0" encoding="utf-8"?>
<RelativeLayout xmlns:android="http://schemas.android.com/apk/res/android"
    xmlns:app="http://schemas.android.com/apk/res-auto"
    android:orientation="vertical"
    android:layout_gravity="center_vertical"
    android:layout_width="fill_parent"
    android:layout_height="wrap_content">

    <android.support.v7.widget.CardView
        xmlns:card_view="http://schemas.android.com/apk/res-auto"
        android:id="@+id/mediaplayer_view"
        android:layout_width="match_parent"
        android:layout_height="wrap_content"
        android:layout_gravity="center"
        card_view:cardElevation="3dp"
        android:transitionName="open_mediaplayer"
        android:layout_alignParentTop="true"
        android:layout_centerHorizontal="true">

        <LinearLayout
            android:layout_width="match_parent"
            android:layout_height="wrap_content"
            android:layout_margin="7dp"
            android:orientation="vertical">

            <TextView
                android:id="@+id/file_name_text_view"
                android:layout_width="match_parent"
                android:layout_height="wrap_content"
                android:layout_marginLeft="10dp"
                android:layout_marginTop="7dp"
                android:layout_marginBottom="7dp"
                android:text="name_of_file.mp4"
                android:textSize="18sp"
                android:fontFamily="sans-serif-condensed"/>

            <SeekBar
                android:id="@+id/seekbar"
                android:layout_width="match_parent"
                android:layout_height="wrap_content"/>

            <RelativeLayout
                android:layout_width="match_parent"
                android:layout_height="wrap_content">

                <TextView
                    android:id="@+id/current_progress_text_view"
                    android:text="00:00"
                    android:layout_width="wrap_content"
                    android:layout_height="wrap_content"
                    android:layout_marginLeft="10dp"
                    android:layout_alignParentTop="true"
                    android:layout_alignParentLeft="true"
                    android:layout_alignParentStart="true" />

                <android.support.design.widget.FloatingActionButton
                    android:id="@+id/fab_play"
                    android:layout_width="wrap_content"
                    android:layout_height="wrap_content"
                    android:src="@drawable/ic_media_play"
                    android:layout_centerHorizontal="true"
                    android:layout_marginBottom="10dp"
                    android:layout_marginTop="10dp"
                    app:fab_colorNormal="@color/colorPrimary"
                    app:fab_colorPressed="@color/colorPrimary"
                    app:fab_shadow="false"/>


                <TextView
                    android:id="@+id/file_length_text_view"
                    android:text="00:00"
                    android:layout_width="wrap_content"
                    android:layout_height="wrap_content"
                    android:layout_marginRight="10dp"
                    android:layout_alignParentTop="true"
                    android:layout_alignParentRight="true"
                    android:layout_alignParentEnd="true" />

            </RelativeLayout>

        </LinearLayout>

    </android.support.v7.widget.CardView>

</RelativeLayout>
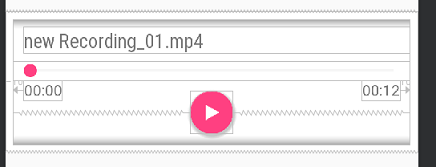
The above layout looks as the below image -
Code Explanation
In the layout above, there exist three TextViews with the id's - file_name_text_view, current_progress_text_view and file_length_text_view, the first TextView will be used to display the name of the recording while the remaining two will hold the progress of the recording being played and the length of the recording respectively. Next, a seekbar with the id - seekbar and a FAB button with id - fab_play. Once the FAB button is clicked, the recording begins to play.
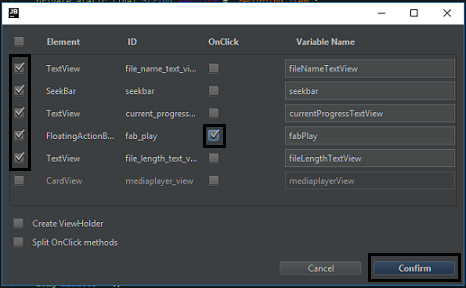
Next, we need to head to our PlayRecordingFragment class file and inject our views using ButterKnife and set up the logic of playing each recording.
PlayRecordingFragment
To inject our views, place your cursor on the layout file name and then hit - alt + ins on a Windows PC and then click the Generate Butterknife Injection and select the options as indicated in the image below:
Next, we need to create a few variables that we will be using in this Fragment.
//used to receive the Recordings Object sent from the Adapter
private Recordings recording;
private Handler mHandler = new Handler();
private MediaPlayer mMediaPlayer = null;

//stores whether or not the mediaplayer is currently playing audio
private boolean isMediaPlaying = false;

//stores minutes and seconds of the length of the file.
long minutes = 0;
long seconds = 0;

public PlayRecordingFragment newInstance(Recordings item) {
    PlayRecordingFragment f = new PlayRecordingFragment();
    Bundle b = new Bundle();
    b.putParcelable(ARG_ITEM, item);
    f.setArguments(b);

    return f;
}

@Override
public void onCreate(Bundle savedInstanceState) {
    super.onCreate(savedInstanceState);
    recording = getArguments().getParcelable(ARG_ITEM);

    long itemDuration = recording.getRecording_length();
    minutes = TimeUnit.MILLISECONDS.toMinutes(itemDuration);
    seconds = TimeUnit.MILLISECONDS.toSeconds(itemDuration) - TimeUnit.MINUTES.toSeconds(minutes);
}
Code Explanation
- In the
newInstance()method, we put the received Recordings item and pass to the fragment in a bundle as a parcelable and then set it as the arguement for the Fragment, next in theonCreate()method of the fragment, we receive the recording item set it to the value of ourrecordingvariable. - We get the Duration of the recording and then save it in the
itemDurationvariable and get the minutes and seconds saving them in the minutes and seconds variable respectively.
Next, in the onCreateDialog() code, we edit is as follows -
@NonNull
@Override
public Dialog onCreateDialog(Bundle savedInstanceState) {

    Dialog dialog = super.onCreateDialog(savedInstanceState);

    AlertDialog.Builder builder = new AlertDialog.Builder(getActivity());
    View view = getActivity().getLayoutInflater().inflate(R.layout.fragment_play_recording, null);

    mSeekBar.setOnSeekBarChangeListener(new SeekBar.OnSeekBarChangeListener() {
        @Override
        public void onProgressChanged(SeekBar seekBar, int progress, boolean fromUser) {
            if (mMediaPlayer != null && fromUser) {
                mMediaPlayer.seekTo(progress);
                mHandler.removeCallbacks(mRunnable);

                long minutes = TimeUnit.MILLISECONDS.toMinutes(mMediaPlayer.getCurrentPosition());
                long seconds = TimeUnit.MILLISECONDS.toSeconds(mMediaPlayer.getCurrentPosition()) - TimeUnit.MINUTES.toSeconds(minutes);
                mCurrentProgressTextView.setText(String.format("%02d:%02d", minutes, seconds));

                updateSeekBar();

            } else if (mMediaPlayer == null && fromUser) {
                prepareMediaPlayerFromPoint(progress);
                updateSeekBar();
            }
        }

        @Override
        public void onStartTrackingTouch(SeekBar seekBar) {
            if (mMediaPlayer != null) {
                // remove message Handler from updating progress bar
                mHandler.removeCallbacks(mRunnable);
            }
        }

        @Override
        public void onStopTrackingTouch(SeekBar seekBar) {
            if (mMediaPlayer != null) {
                mHandler.removeCallbacks(mRunnable);
                mMediaPlayer.seekTo(seekBar.getProgress());

                long minutes = TimeUnit.MILLISECONDS.toMinutes(mMediaPlayer.getCurrentPosition());
                long seconds = TimeUnit.MILLISECONDS.toSeconds(mMediaPlayer.getCurrentPosition())
                        - TimeUnit.MINUTES.toSeconds(minutes);
                mCurrentProgressTextView.setText(String.format("%02d:%02d", minutes, seconds));
                updateSeekBar();
            }
        }
    });

    mFileNameTextView.setText(recording.getRecording_name());
    mFileLengthTextView.setText(String.format("%02d:%02d", minutes, seconds));

    builder.setView(view);

    // request a window without the title
    dialog.getWindow().requestFeature(Window.FEATURE_NO_TITLE);

    return builder.create();
}
Code Explanation
NB: I will only be explaining the logics in this session and not trivia or easily understood codes.
- Firstly, we set an
setOnSeekBarChangeListener()method on our inject seekbar widget and then on theonProgressChnaged()method:- We check if the == mMediaPlayer == is not null and if the boolean == fromUser == is true.
- We then set the progress of the mediaPlayer to the progress of the seekbar by calling the
seekTo()method and passing the == progress == as the argument. - We then get the minutes and seconds of the mMediaPlayer and set it as the text for the
mCurrentProgrssTextViewwidget formatting it with theString.format()method. - We then call the method -
updateSeekBar()which calls a method - * mRunnable every 1 second (1000 milliseconds) *-
private void updateSeekBar() { mHandler.postDelayed(mRunnable, 1000); } - if the == mMediaPlayer == is null and the == fromUser == argument is true, we call the
prepareMediaPlayerFromPoint()passing in the == progress == variable and then we call theupdateSeekBar()method also.
NB: This has to be done incase the user clicks on a recording and then moves the seekbar to a certain progress, we then need to get that progress and start playing the recording from that length. - Next we override the
onStartTrackingTouch()method which removes the callbackmRunnablefrom themHandlerobject. - Next, we override the
onStopTrackingTouch()where we remove hemRunnableas a callback from themHandlerobject and then set the mediaPlayer progress to the == seekBar.getProgress() == value. We then get the minutes and seconds as explained earlier and also set themCurrentProgressTextViewtext to the minutes and seconds variable and lastly we call theupdateSeekBar()method - We set the
mFileNameTextViewtext to the name of the recording by callingrecording.getRecording_name()and then the length of the recording is set in themFileLengthTextViewand formatted using theString.format()method as explained eariler.
Next, in the onClick() method injected for us by Butterknife for our FAB button, we add call the onPlay() method passing the isMediaPlayin boolean variable and also set the variable to its opposite.
@OnClick(R.id.fab_play)
public void onViewClicked() {
    onPlay(isMediaPlaying);
    isMediaPlaying = !isMediaPlaying;
}
onPlay() method
// Play start/stop
private void onPlay(boolean isPlaying) {
    if (!isPlaying) {
        //currently MediaPlayer is not playing audio
        if (mMediaPlayer == null) {
            startPlaying(); //start from beginning
        } else {
            resumePlaying(); //resume the currently paused MediaPlayer
        }

    } else {
        //pause the MediaPlayer
        pausePlaying();
    }
}
NB: The comments in the above code explains it all.
startPlaying() method
private void startPlaying() {
    mPlayButton.setImageResource(R.drawable.ic_pause);
    mMediaPlayer = new MediaPlayer();

    try {
        mMediaPlayer.setDataSource(recording.getRecording_path());
        mMediaPlayer.prepare();
        mSeekBar.setMax(mMediaPlayer.getDuration());

        mMediaPlayer.setOnPreparedListener(new MediaPlayer.OnPreparedListener() {
            @Override
            public void onPrepared(MediaPlayer mp) {
                mMediaPlayer.start();
            }
        });
    } catch (IOException e) {
        Log.e(LOG_TAG, "prepare() failed");
    }

    mMediaPlayer.setOnCompletionListener(new MediaPlayer.OnCompletionListener() {
        @Override
        public void onCompletion(MediaPlayer mp) {
            stopPlaying();
        }
    });

    updateSeekBar();

    //keep screen on while playing audio
    getActivity().getWindow().addFlags(WindowManager.LayoutParams.FLAG_KEEP_SCREEN_ON);
    }
Code Explanation
- Once the method is called, we get the imageResource of our
mPlayButtonto a pause drawable with the name -ic_pause, next we initialize a new == MediaPlayer == object. - Next, we get the datasource of the media player to the path of the current recording passed to this fragment which is gotten by calling the
recording.getRecording_path()) we then prepare the media player and set the max (setMax()) of themSeekBarto the media player's getDuration() method. Once the mediaPlayer is prepared, we start the mediaPlayer -mMediaPlayer.start()and once the mediaPlayer is done playing our recording, we call thestopPlaying()` method.
stopPlaying() method
private void stopPlaying() {
    mPlayButton.setImageResource(R.drawable.ic_media_play);
    mHandler.removeCallbacks(mRunnable);
    mMediaPlayer.stop();
    mMediaPlayer.reset();
    mMediaPlayer.release();
    mMediaPlayer = null;

    mSeekBar.setProgress(mSeekBar.getMax());
    isMediaPlaying = !isMediaPlaying;

    mCurrentProgressTextView.setText(mFileLengthTextView.getText());
    mSeekBar.setProgress(mSeekBar.getMax());

    //allow the screen to turn off again once audio is finished playing
    getActivity().getWindow().clearFlags(WindowManager.LayoutParams.FLAG_KEEP_SCREEN_ON);
}
Code Explanation
- We set the imageResource of the
mPlayButtonwidget to a play button since the recording has finished playing and then we remove the callback -mRunnablefrom themHandlerobject, we then stop ,reset, release set the mediaPlayer to null. - Next, we set the
mSeekBarprogress to the max of the seeekbar and set the text of themCurrentProgressTextViewwidget to the text of themFileLengthTextView.
prepareMediaPlayerFromPoint()
private void prepareMediaPlayerFromPoint(int progress) {
    //set mediaPlayer to start from somewhere in the middle of the audio file

    mMediaPlayer = new MediaPlayer();

    try {
        mMediaPlayer.setDataSource(recording.getRecording_path());
        mMediaPlayer.prepare();
        mSeekBar.setMax(mMediaPlayer.getDuration());
        mMediaPlayer.seekTo(progress);

        mMediaPlayer.setOnCompletionListener(new MediaPlayer.OnCompletionListener() {
            @Override
            public void onCompletion(MediaPlayer mp) {
                stopPlaying();
            }
        });

    } catch (IOException e) {
        Log.e(LOG_TAG, "prepare() failed");
    }

    //keep screen on while playing audio
    getActivity().getWindow().addFlags(WindowManager.LayoutParams.FLAG_KEEP_SCREEN_ON);
}
Code Explanation
The prepareMediaPlayerFromPoint() is similiar to the startPlaying() method so no explanation would be made on this method as the `startPlaying() method was explained extensively.
pausePlaying() and resumePlaying() methods
private void pausePlaying() {
    mPlayButton.setImageResource(R.drawable.ic_media_play);
    mHandler.removeCallbacks(mRunnable);
    mMediaPlayer.pause();
}

private void resumePlaying() {
    mPlayButton.setImageResource(R.drawable.ic_pause);
    mHandler.removeCallbacks(mRunnable);
    mMediaPlayer.start();
    updateSeekBar();
}
Code Explanation
- In the
pausePlaying()method, we set the image Resource to the drawable with the name == ic_media_play == and then we pause the media player -mMediaPlayer.pause(); - In the
resumePlaying()method, we set themPlayButtonimage resource to the drawable with the name == ic_pause == and then we start the media player -mMediaPlayer.start()and then call theupdateSeekBar()method.
mRunnable callback
//updating mSeekBar
private Runnable mRunnable = new Runnable() {
    @Override
    public void run() {
        if (mMediaPlayer != null) {

            int mCurrentPosition = mMediaPlayer.getCurrentPosition();
            mSeekBar.setProgress(mCurrentPosition);

            long minutes = TimeUnit.MILLISECONDS.toMinutes(mCurrentPosition);
            long seconds = TimeUnit.MILLISECONDS.toSeconds(mCurrentPosition) - TimeUnit.MINUTES.toSeconds(minutes);
            mCurrentProgressTextView.setText(String.format("%02d:%02d", minutes, seconds));

            updateSeekBar();
        }
    }
};
Code Explanation
The concept used inn this method has already been touched in other methods so no explanations will be done here.
APPLICATION EXECUTION
Thank you for your contribution.
Looking forward to your upcoming tutorials.
Your contribution has been evaluated according to Utopian policies and guidelines, as well as a predefined set of questions pertaining to the category.
To view those questions and the relevant answers related to your post, click here.
Need help? Write a ticket on https://support.utopian.io/.
Chat with us on Discord.
[utopian-moderator]
Thanks for taking time out to moderate my contribution @portugalcoin.
Thank you for your review, @portugalcoin!
So far this week you've reviewed 20 contributions. Keep up the good work!
Great tut! Love Java, love Android, and love your work! Will be keeping an eye out for more!
Thanks @ceruleanblue am glad you like it. Stay locked in for more.
Hey @edetebenezer
Thanks for contributing on Utopian.
We’re already looking forward to your next contribution!
Want to chat? Join us on Discord https://discord.gg/h52nFrV.
Vote for Utopian Witness!